Overview
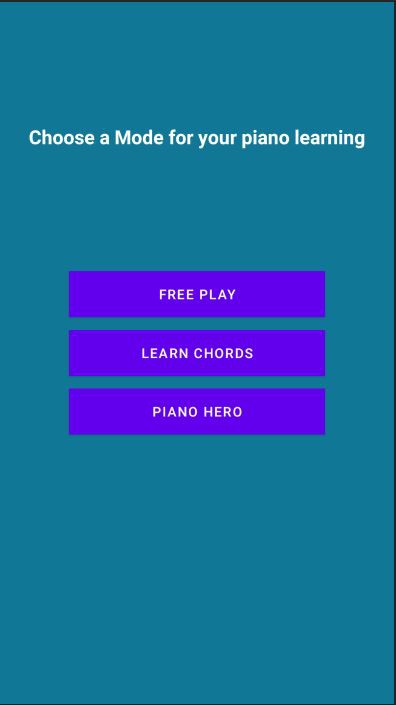
This project is to be a 3-part setup for teaching piano for beginners. It is intended to be a way to ease in people who have a desire to learn music, but are unsure if they are willing to fully invest. The original teaching modes are as follows:
- Piano Hero Mode
- Notes fall down in real time towards the keys
- In this proof of concept, the LED matrix doesn't span the width of the keys, but ideally that would be the case
- Chord Learning Mode
- The app would send a MIDI message that would end up being displayed on the LED Matrix
- Free Play Mode
- A piano connected to an RPI would be able to send the MIDI messages to the LED Matrix for display (similar to the Piano LED visualizers seen on YouTube)
The Free Play Modes and Chord Learning Modes are still in progress.
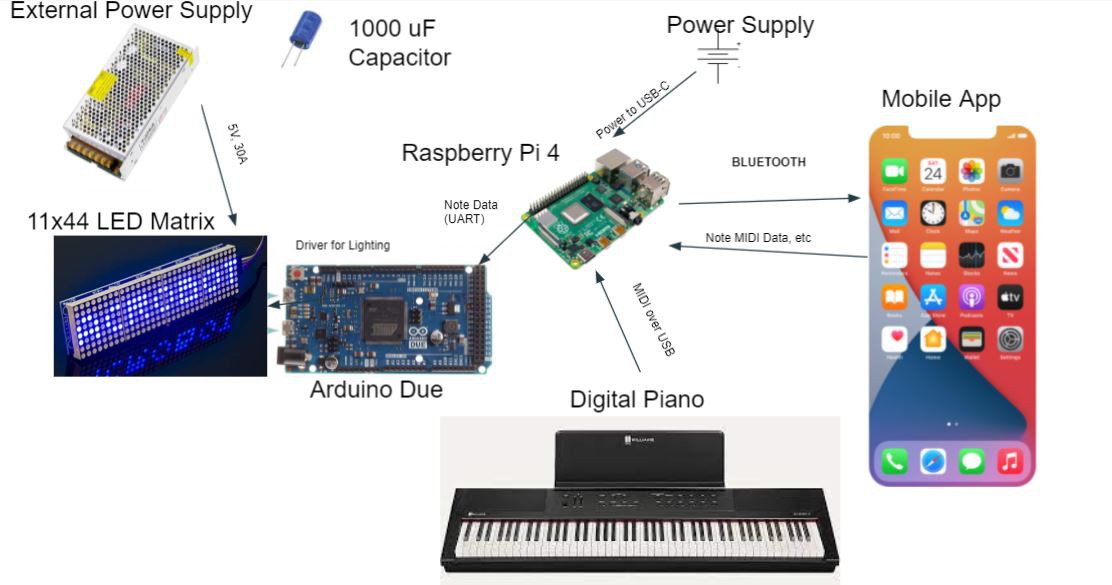
Currently, there is an Android App that sends MIDI files over Bluetooth to a Raspberry Pi. The Raspberry Pi then creates MIDI messages from the File to send as a set of 3 bytes to the Arduino for driving the LED matrix using the FastLED Library.
Components
- External Power Supply (For the LED Matrix)
- WS2812B Individually Addressable LEDs
- 1000 uF Bypass Capacitor
- Arduino Due
- Raspberry Pi 4
- Proper Cables (USB-C, USB-A, etc)
The components are quite expensive, but there are many clear places to reduce the overall cost. The Arduino Due can be changed to a much smaller board since its only job is to animate the LED matrix. The External Power Supply can reasonably be just 10A and 5V since the LEDs can be dimmed (they are annoyingly bright...). Finally, the LED Matrix just happened to be 44 keys which was why I purchased it (piano has 88 keys). It is much cheaper to create a custom LED matrix, though it may require much more engineering.
The Raspberry Pi seems quite useful for implementing all three functionalities at the end. All of these components are surely replaceable, but convenience should be a factor as well.
Process
Android Studio
Let's first discuss about the Android application. It was possible first to crudely design the application on an emulator, but Bluetooth required a physical device to even run.
**A workaround could be to use a VirtualBox or a VMPlayer to fully emulate the system and utilize your computer's Bluetooth.
This application consisted of several buttons and a navigation to another page (fragment). The second fragment consists of some default songs and a simple Bluetooth implementation.
One very important thing to do would be to move this socket connection and data transfer to another thread. A socket's "connect" method is blocking, and this would disrupt the QoL of the user.
private fun sendDataToDevice(msg: InputStream, device: BluetoothDevice){
        try {
            val byteMsg = msg.readBytes()
            bSocket = device.createInsecureRfcommSocketToServiceRecord(appUID)

            bSocket.connect()
            var outStream = bSocket.outputStream
            outStream.write(byteMsg)
            Log.d("BT_SEND_SUCCESS", "Message was sent")
            outStream.close()
        } catch (e: IOException){
            Log.e("BT_SEND_FAILURE", "Exception during write", e)
        } catch (e: NullPointerException){
            Log.e("BT_SEND_FAILURE", "Null outputStream", e)
        }
    }
Nonetheless, the code suffices to transfer a default song to the Raspberry Pi.
Raspberry Pi
Configuring the Raspberry Pi for Bluetooth was quite a hassle. After installing pybluez (Python bluetooth library), the two most important insights to getting the Bluetooth working was the following:
- sudo hciconfig hci0 piscan
- This enables Bluetooth discoverability. Consider having this on startup.
- stack overflow
After retrieving the MIDI File, I modified the script to use the mido library from Python to construct a series of messages to send over UART to the Arduino using a baud rate of 9600. A bit of research was done at this point to play notes on the connected digital piano. In doing this research, I discovered that Linux has some interesting command line interfaces to work with the digital piano connected via USB. My piano had no drivers for Linux, but using the Linux commands, I was able to get data from the piano.
- amidi -p $PORT -d
- Got MIDI messages printed on terminal when key pressed on piano
- aconnect -i -o -l
- Connected ports with recognized MIDI
- arecord
- soundfile recorder for the ALSA soundcard driver.
Unfortunately, I was unable to discover any way to send MIDI messages to the piano so that sound would play while Piano Hero was being sent over UART.
Arduino
Before going into the lighting, I had to parse the MIDI data that was being sent over UART. The Raspberry Pi sleeps for the appropriate amount of time between each note message. This meant the code must analyze MIDI messages as they come in. These messages came in 3 bytes.
The three biggest pieces of information would be the channel, pitch, and velocity. The bitmasks for them are as follows:
#define CHANNEL_BITMASK 0x0F
#define PITCH_BITMASK 0x7F
#define VELOCITY_BITMASK 0x7F
When the 3 byte buffer was filled, we can then parse the message to drive the lighting. These messages show that a note is turned on when the velocity value is not 0. When the velocity is 0, the note defined by "pitch" is turned off.
The libraries used in this section are <Arduino.h> and <FastLED.h>. Attempts were made to use MIDI, MIDIUSB, USBHost for the Arduino, but to no avail.
This section involved the most debugging to make sure everything was rendering properly. The work done was roughly as follows:
- Construct a method to get the linear value of a serpentine layout (modified from XYMatrix example)
- Read bytes into buffer and extract the data when buffer was filled
- Depending on the velocity, set the first row to be a color or empty
- Propagate every value in the matrix down a layer, if the TICKTIME was reached
Many other methods were attempted to provide a slower rate of falling of the notes, but this method performed the best.
Future Goals
Now that the Piano Hero mode of this project functions (and very well for that matter!), I would like to add sound to the piano hero, and to implement the free play mode. The chord mode at this point seems trivial to add. If I make any large headways, this project might be updated.
I am not quite looking forward to developing the Android app, so that'll be left to later.
Final Thoughts
Throughout this project, there were very cumbersome details that were honestly quite irritating to face. One example would be not being able to send data at 31250 baud rate (MIDI baud). It is inconvenient for these OSes, but it would have made for much more exciting possibilities. Perhaps after more research, I'd be able to find more clever ways to tackle certain parts of the project.
I will be working on this project periodically in the future. It was exhilarating to see the Piano Hero work so well at the end.
Thank you for your time. Happy Hacking!