Close
0%
0%

LoRaLamp AIRQuality

A Desklamp for your "Work from Home" Desk with Air Quality Sensor, LoRa, WiFi, MQTT that reminds you to open your windows for Fresh Air

Public Chat
Similar projects worth following
During Covid-19 Pandemic I was working a lot from home. In that time I was often sitting in my little room in Zoom/WeBex calls for hours. After several working hours I often had headaches or felt tired. One reason for that was the bad Air Quality. I simply often forgot to open the windows on a regular basis.
So I decided to built a Device that fits well on my Desk and does not make my tiny desk even smaller.

Main Features of this Device should be
- A Desklamp where I can control Light intensity/color
- Measure the Air Quality and indicate it with a visual effect if the Air Quality turns bad
- Log the Air Quality values
- Detect a bad lighting situation if working late in a dark surrounding
- Communicate all measured values via WiFI/MQTT
- If Wifi is not availible(e.G. workplace/office locations) communicate the measured values via LoRa TheThingsNetwork or Helium LoRa Network

To achieve this I decided to rebuilt my own Desktop lamp with my own PCB and my own Firmware.

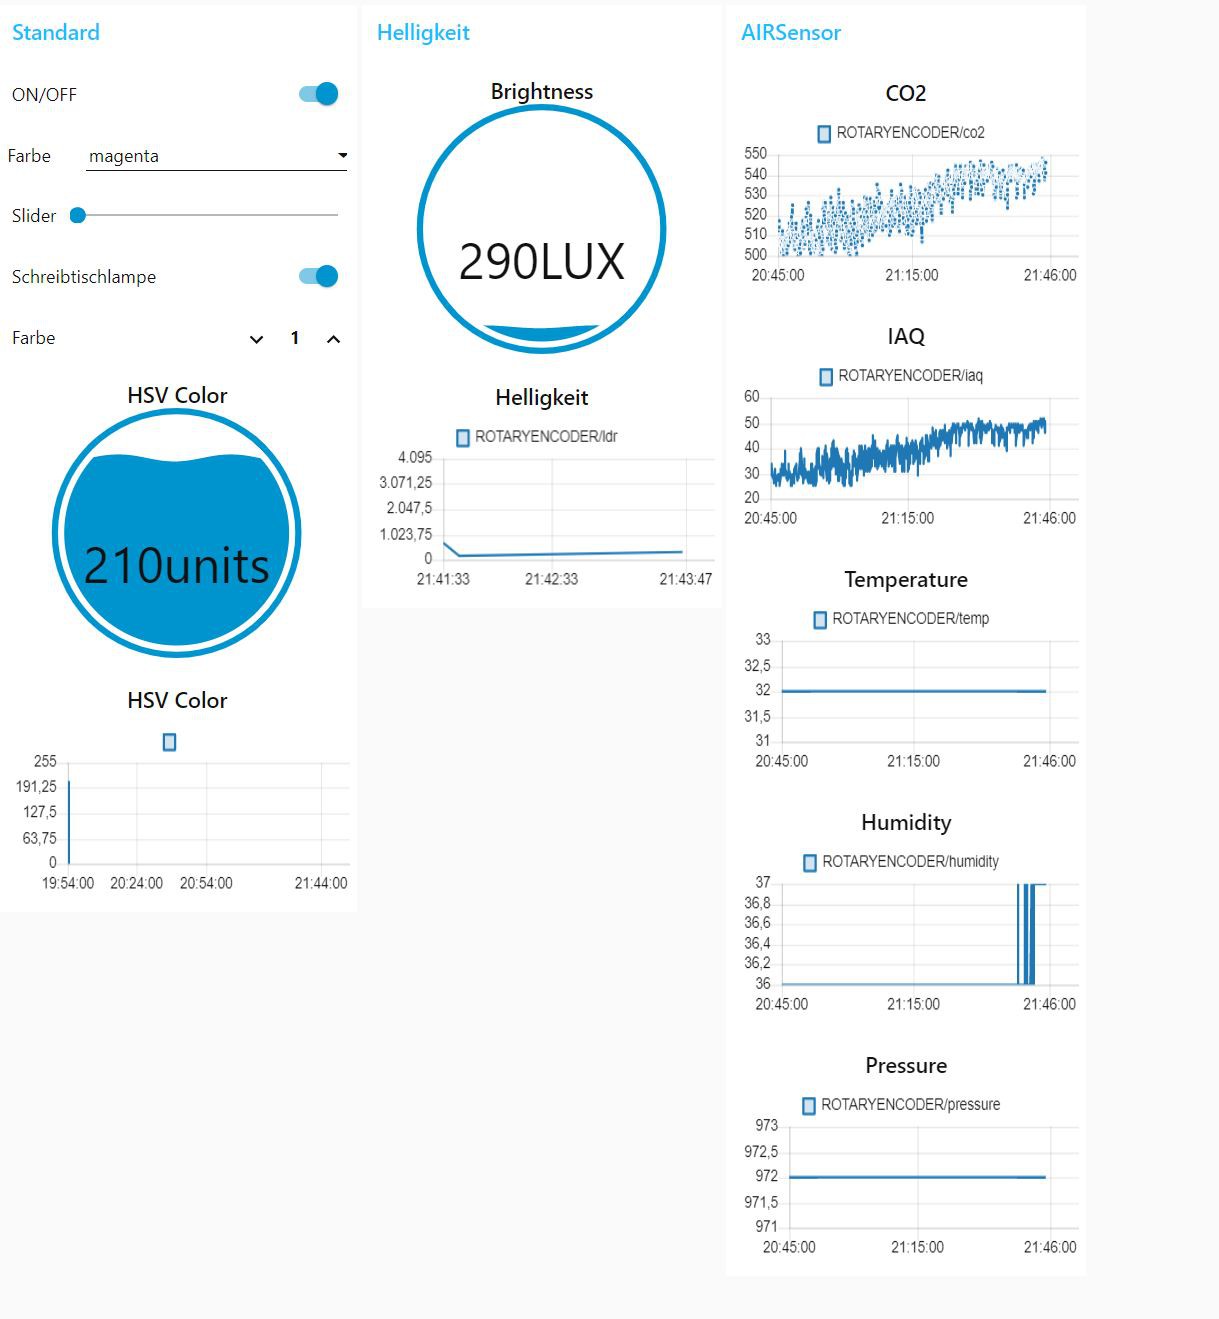
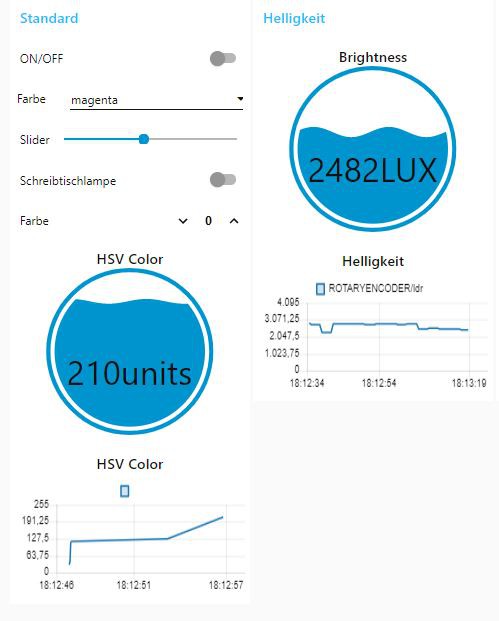
On long office hours I was staring in boring conference Calls a lot on this stupid Desk Lamp.

I bought this Desk Lamp a couple of years ago cheap on Ebay:

https://www.ebay.de/itm/372597969794

or a German Discount Shopper Aldi

https://www.aldi-sued.de/de/p.-casalux-led--schreibtischleuchte.490000000000710065.html

Honestly I can't really remember.

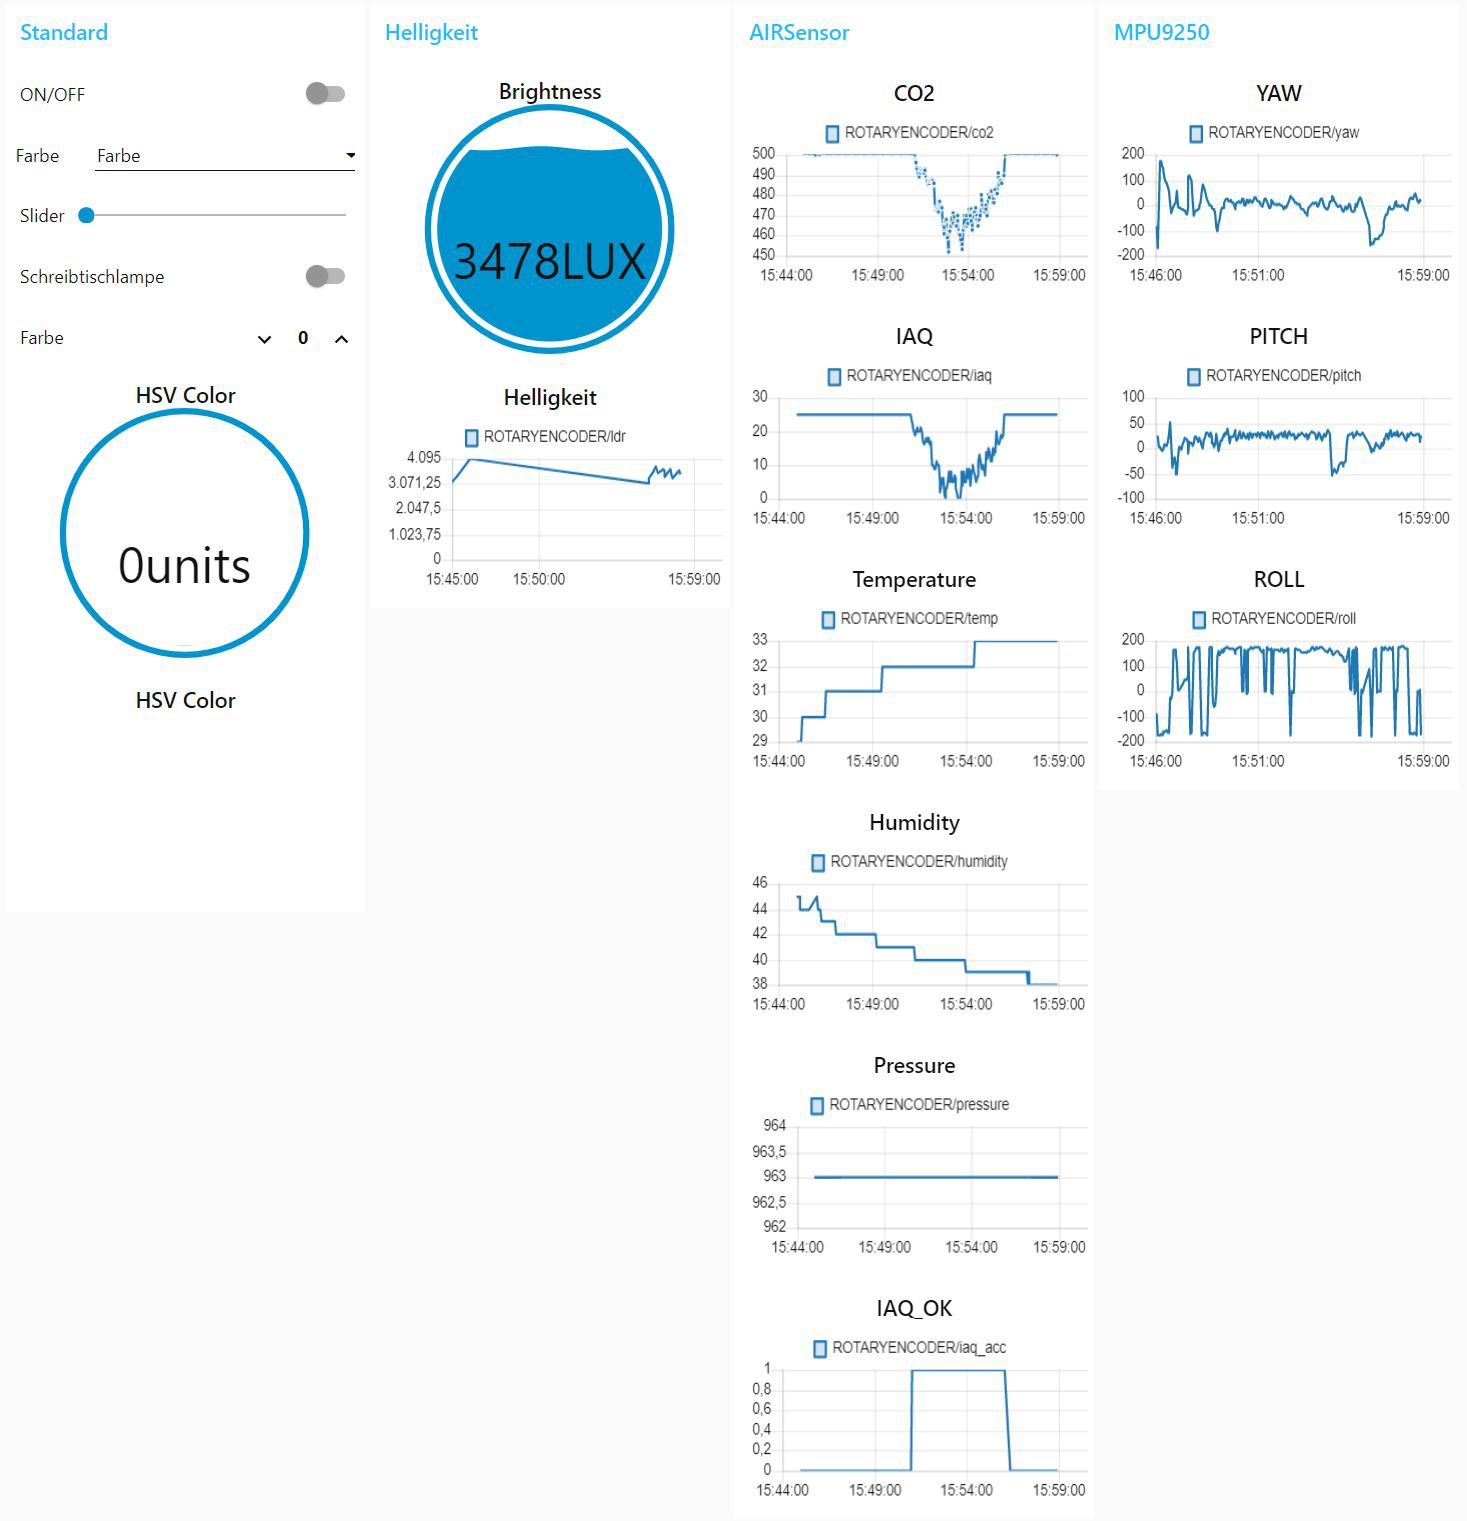
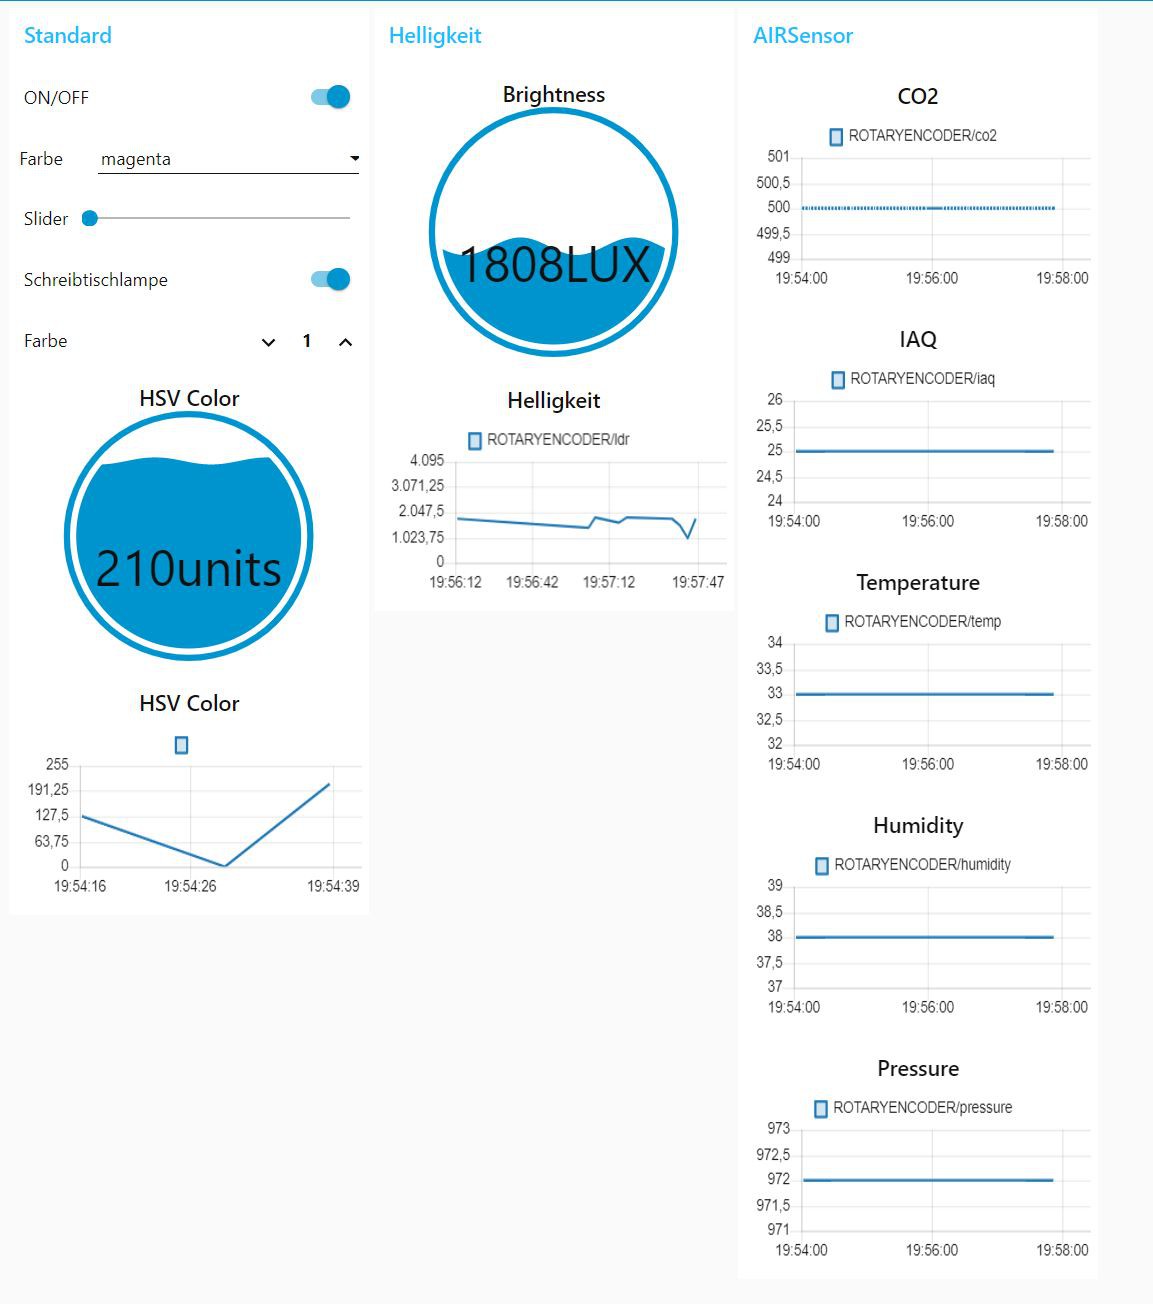
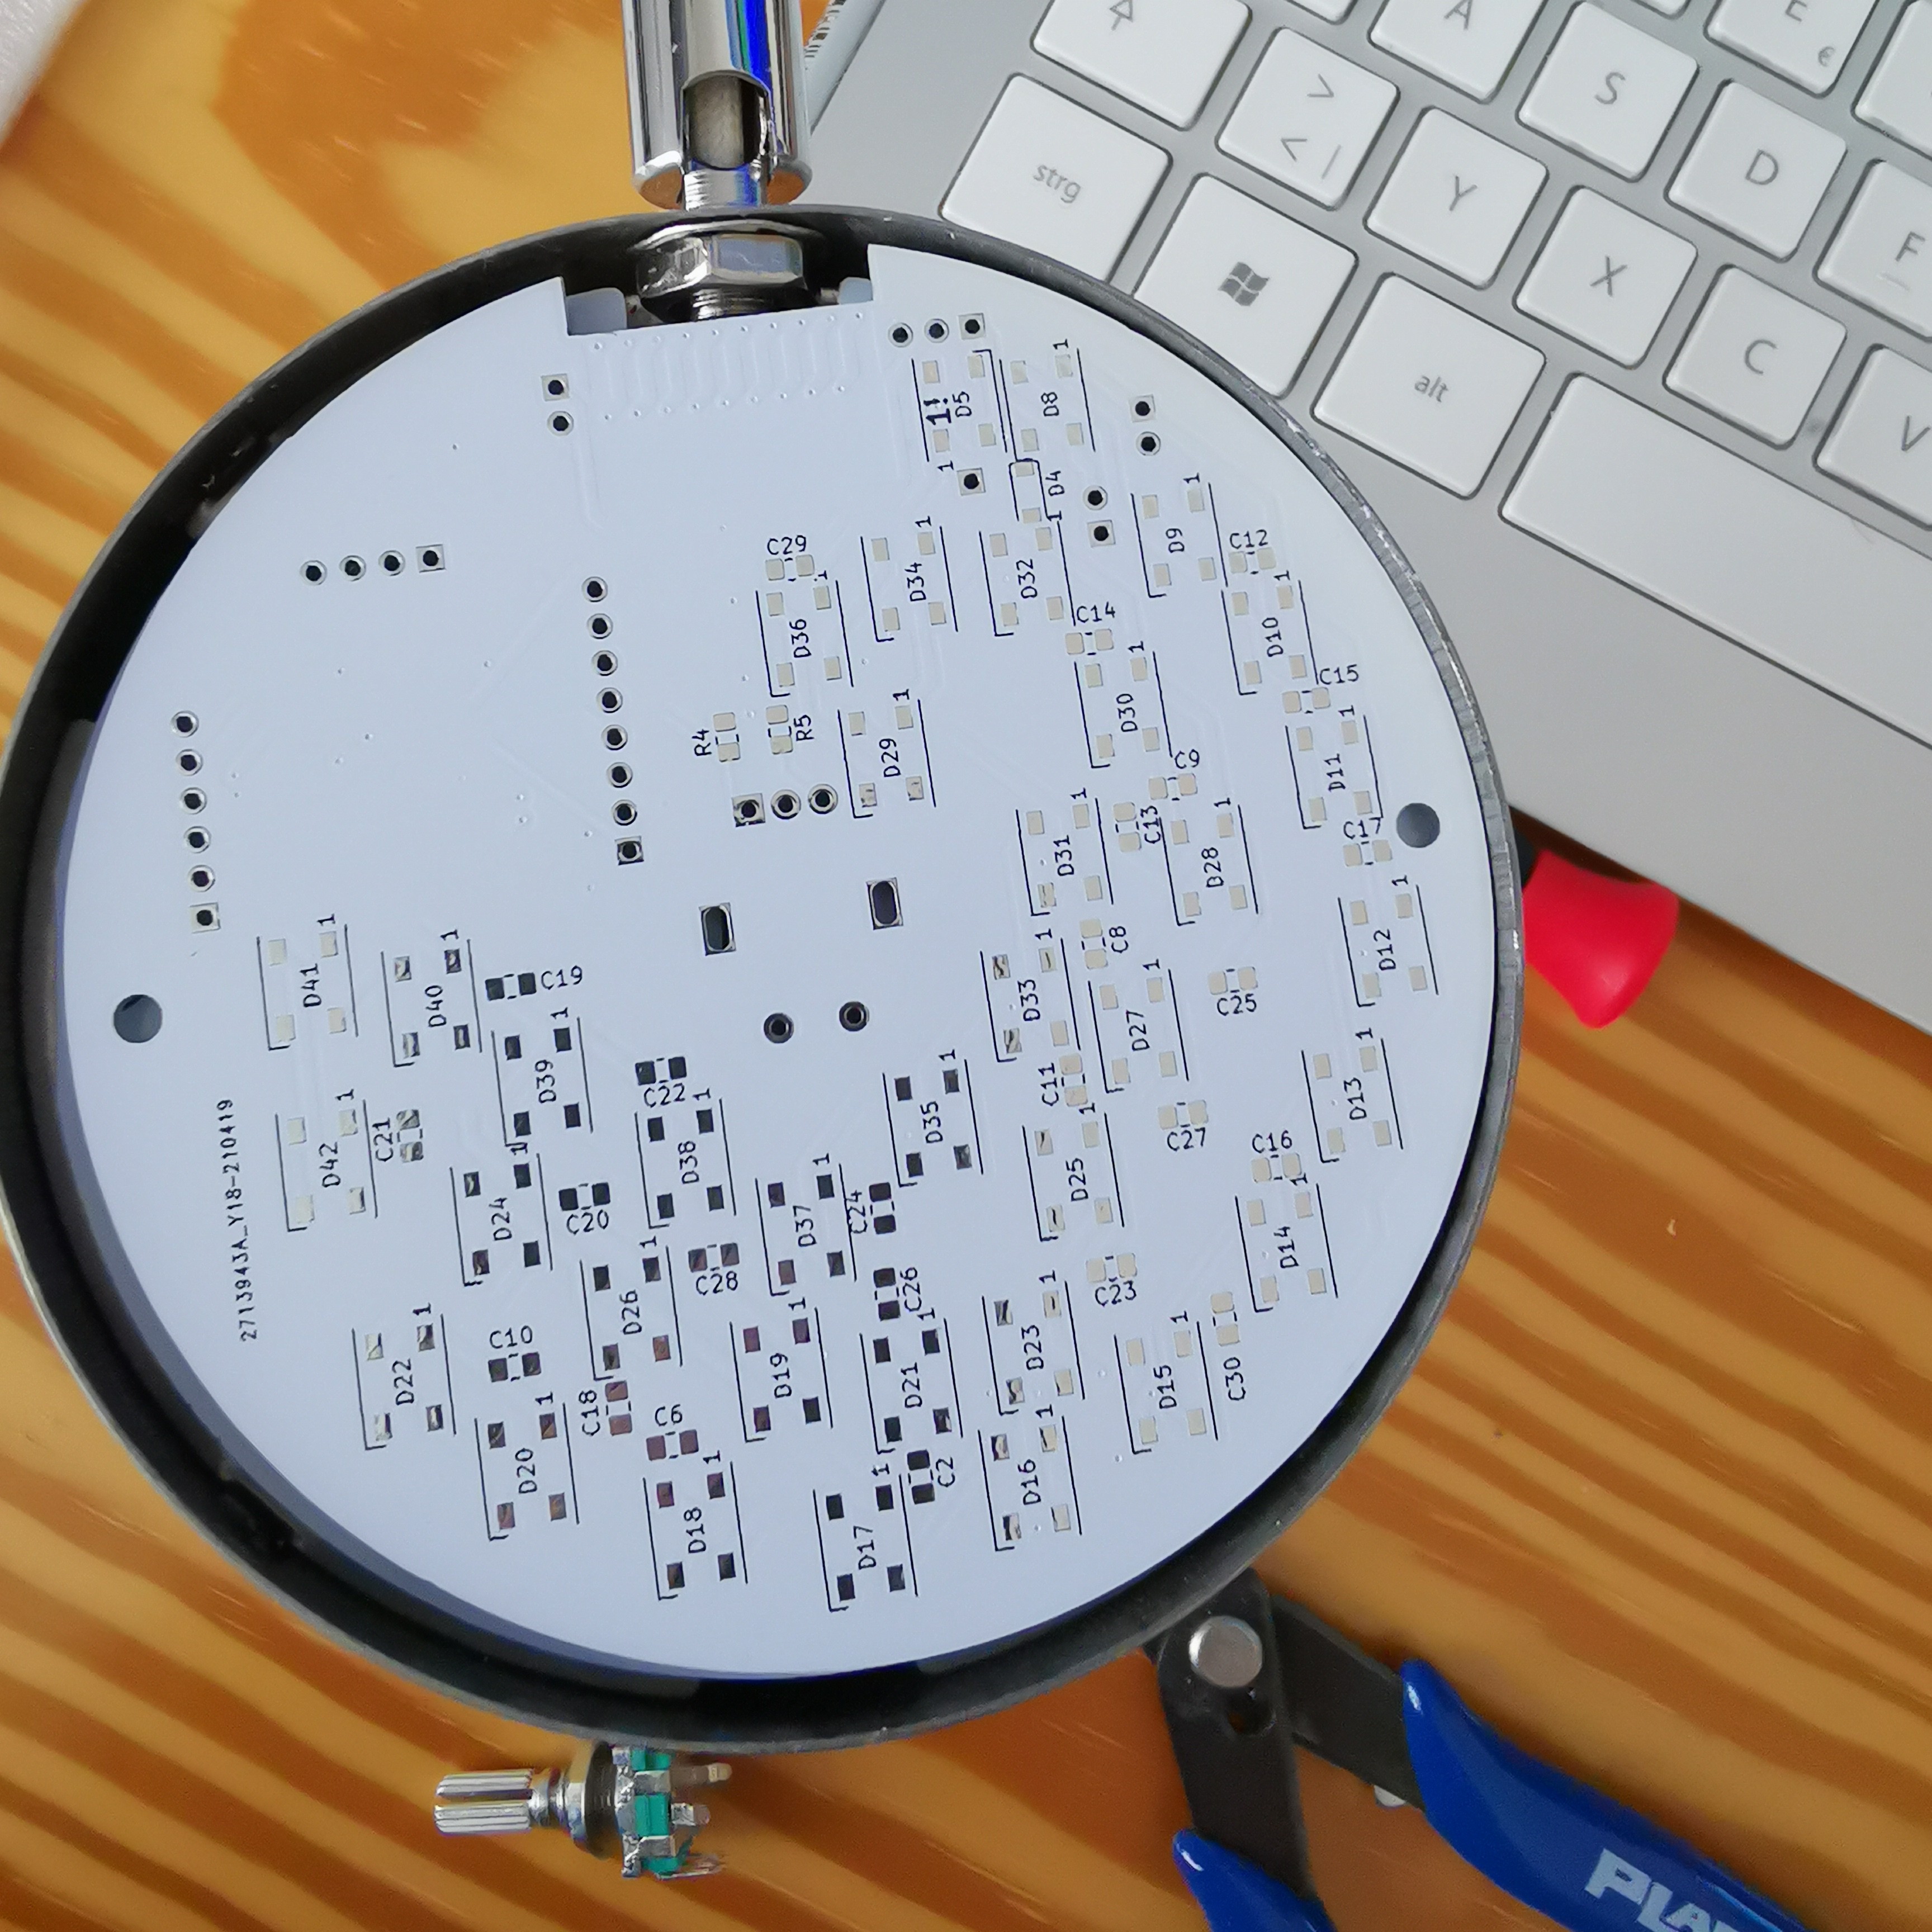
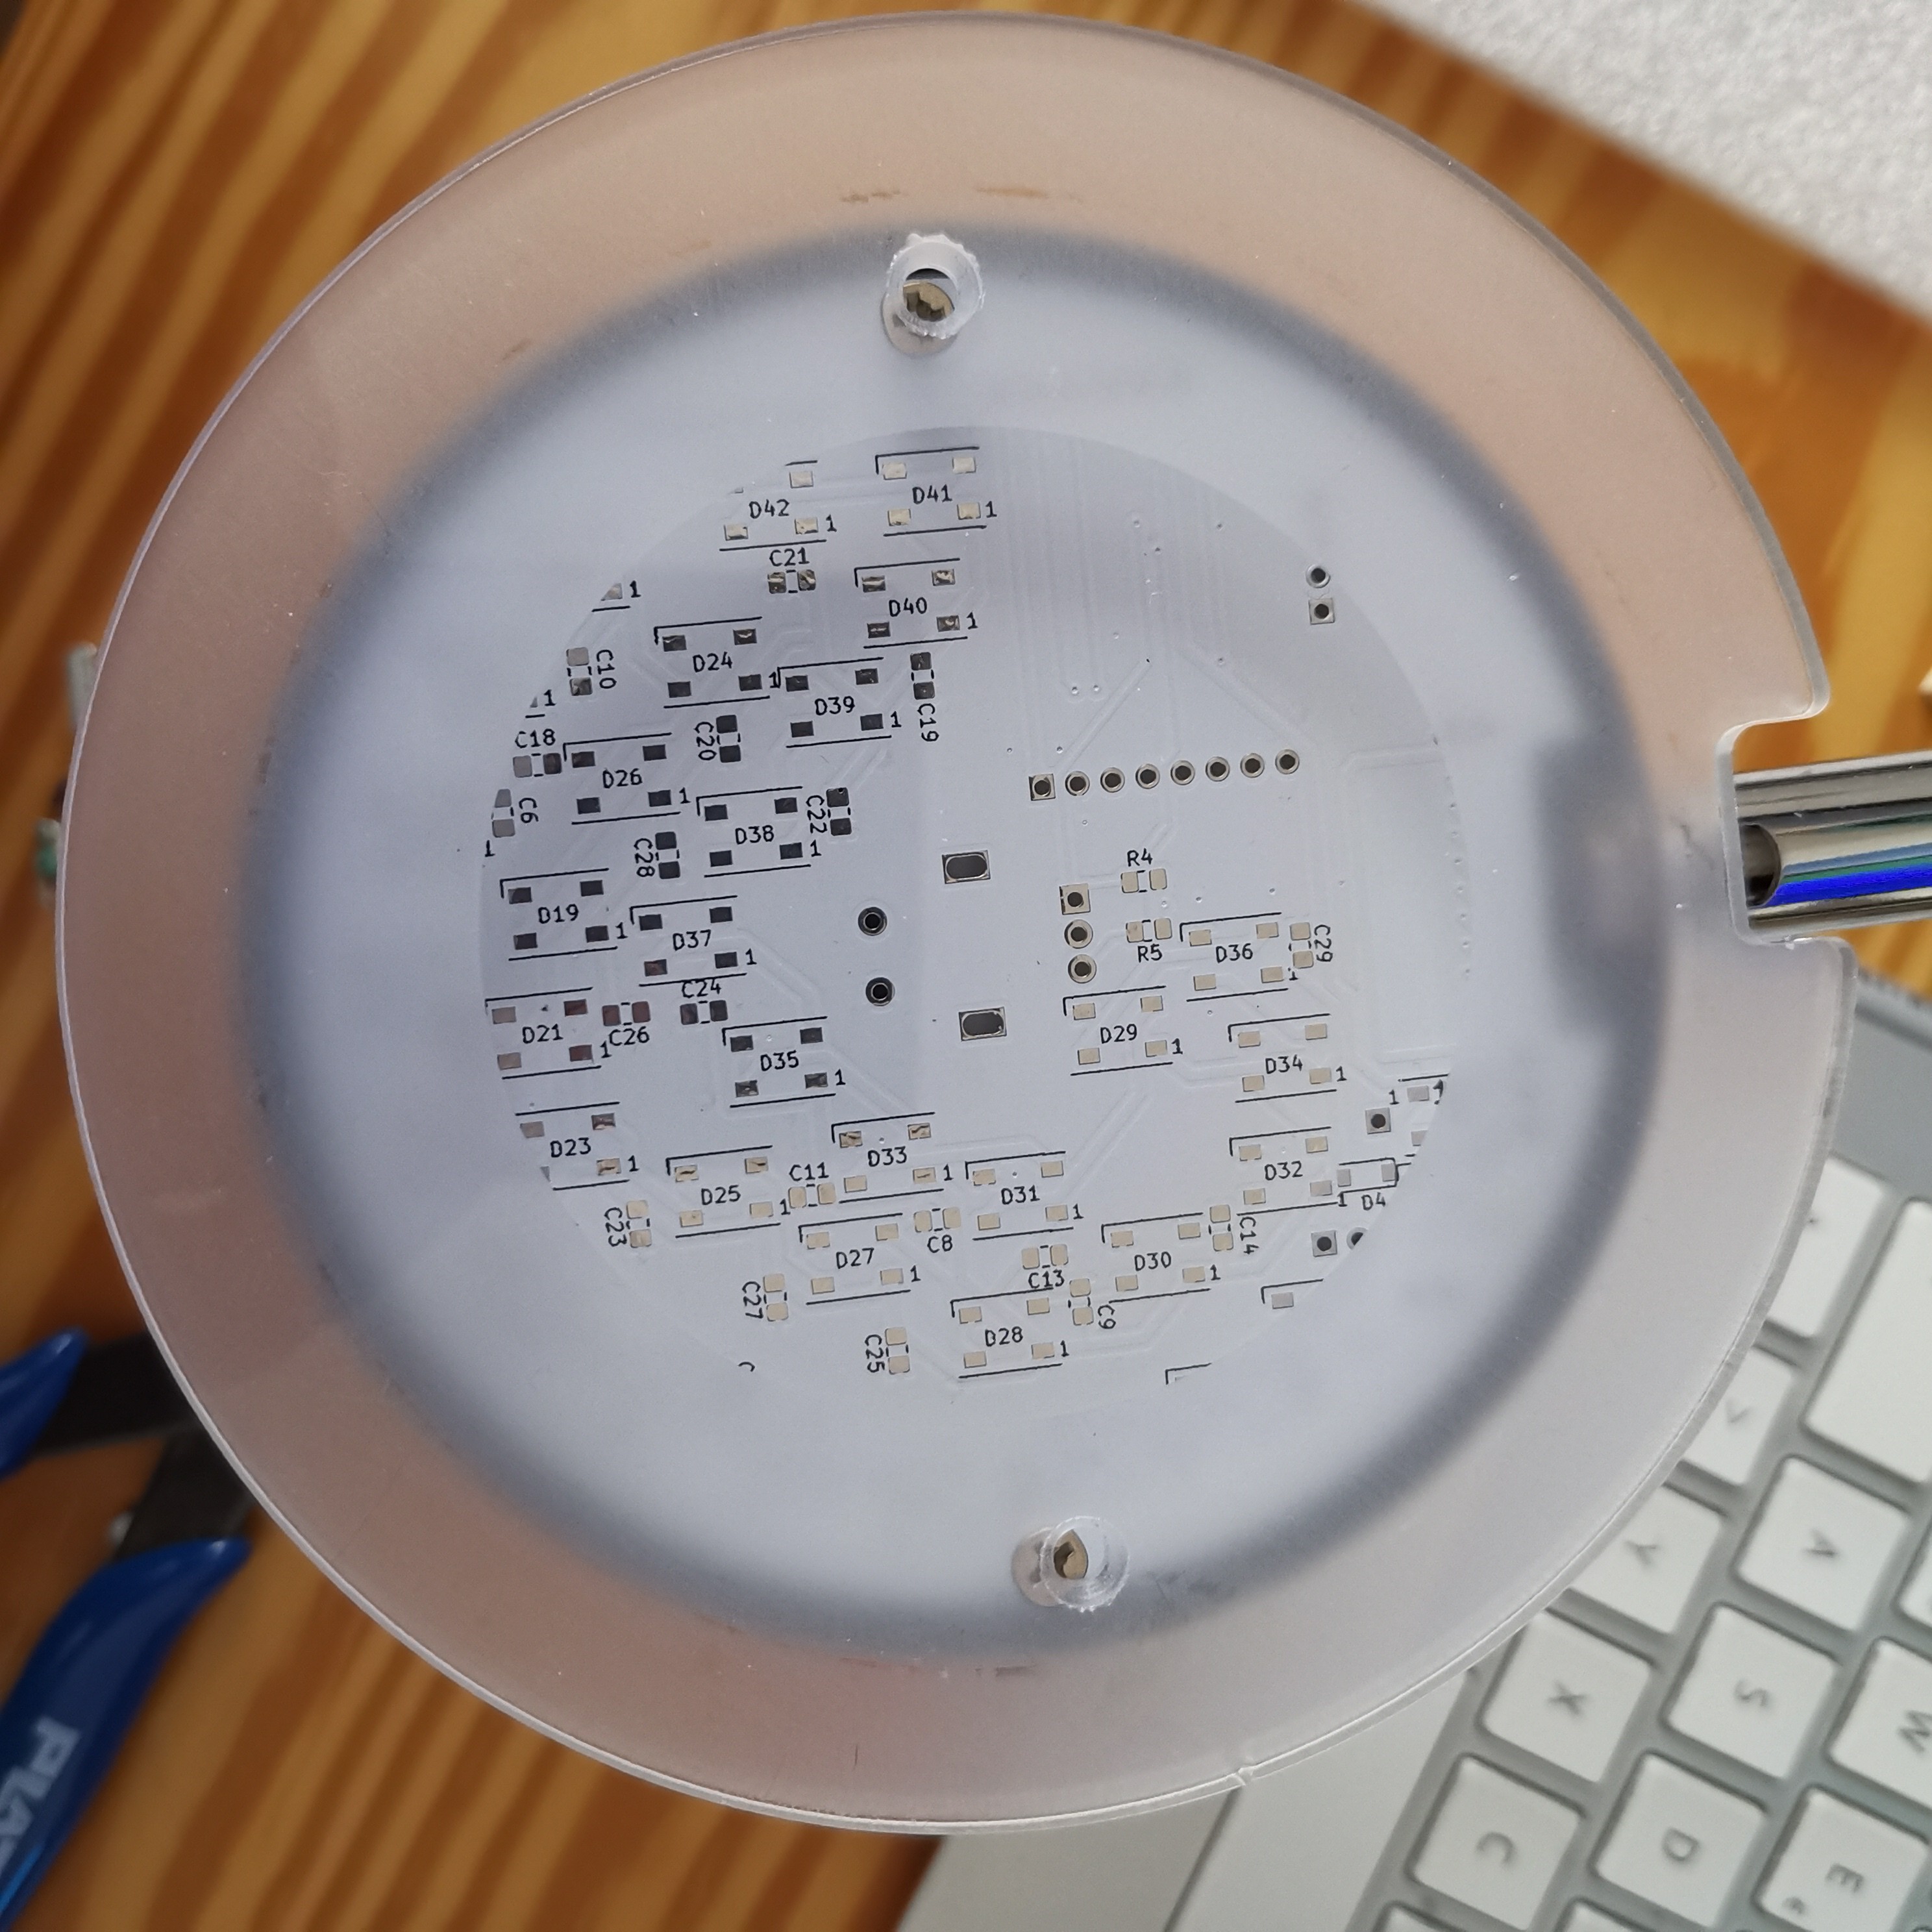
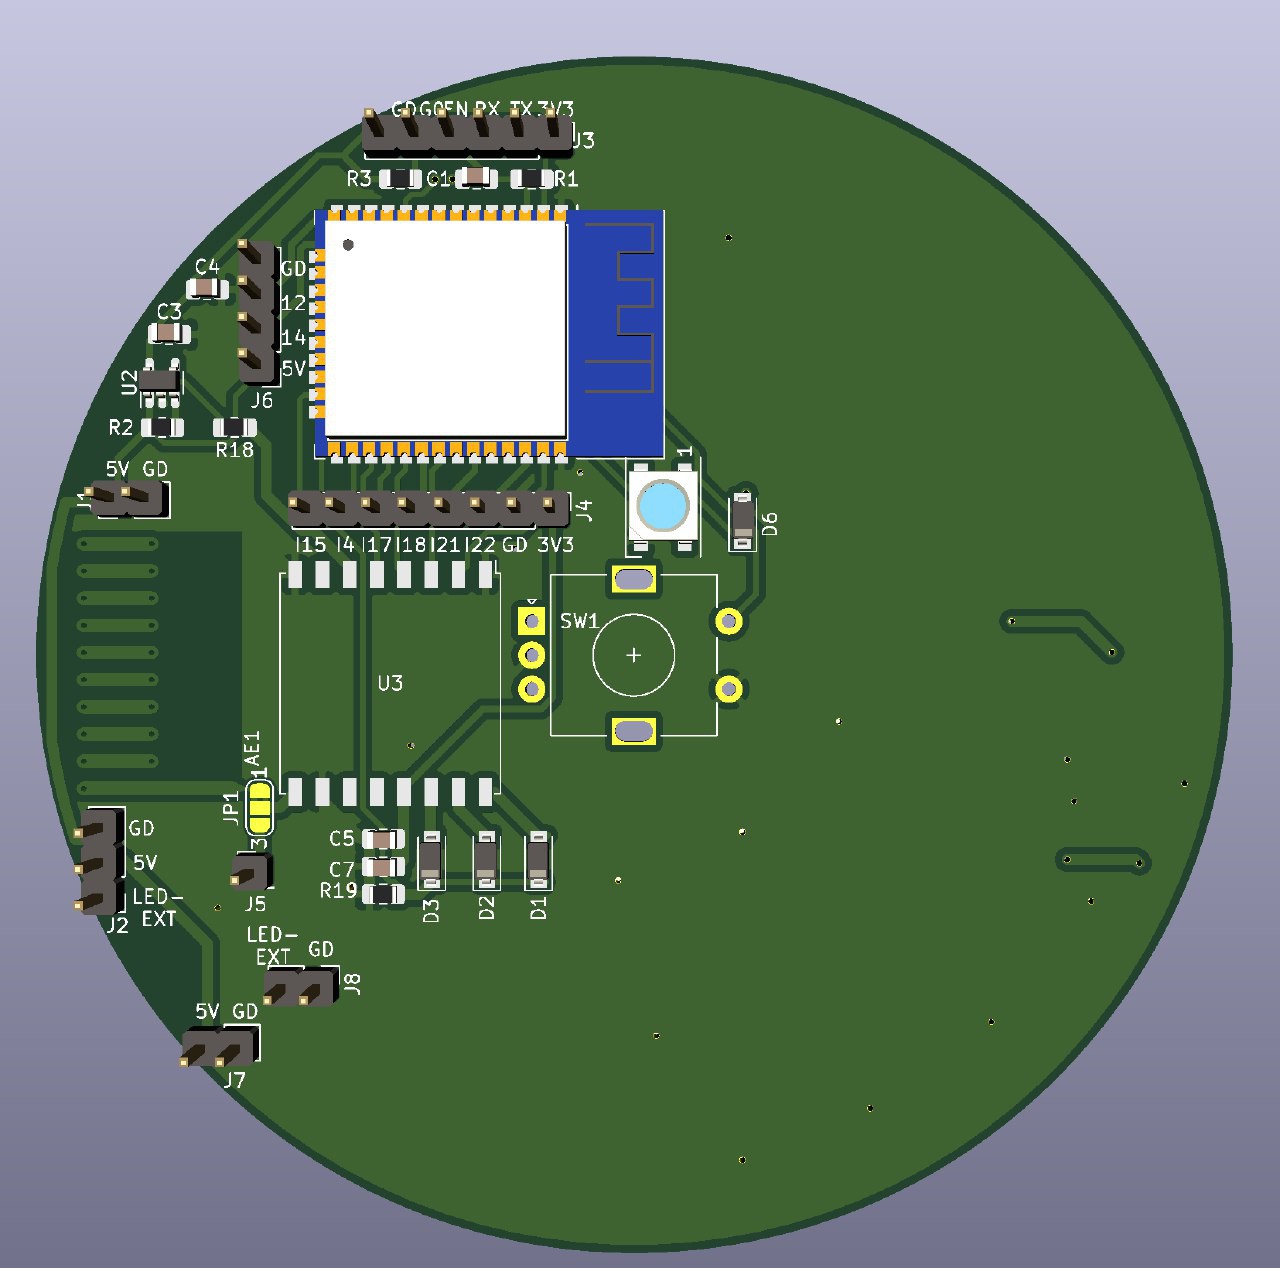
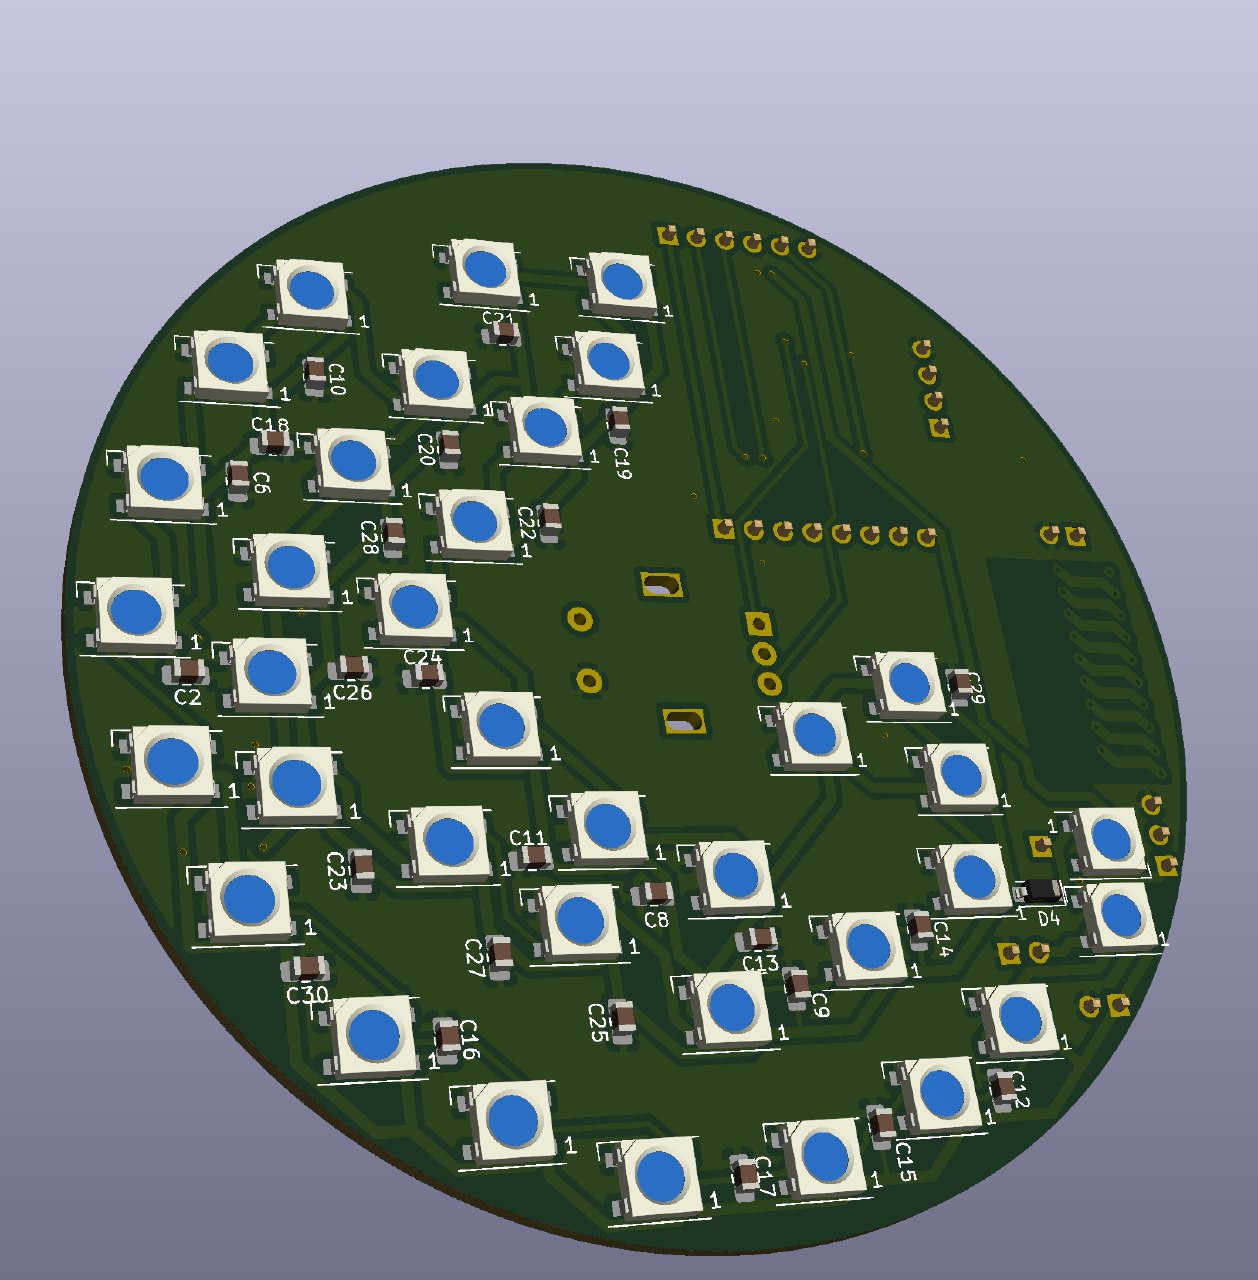
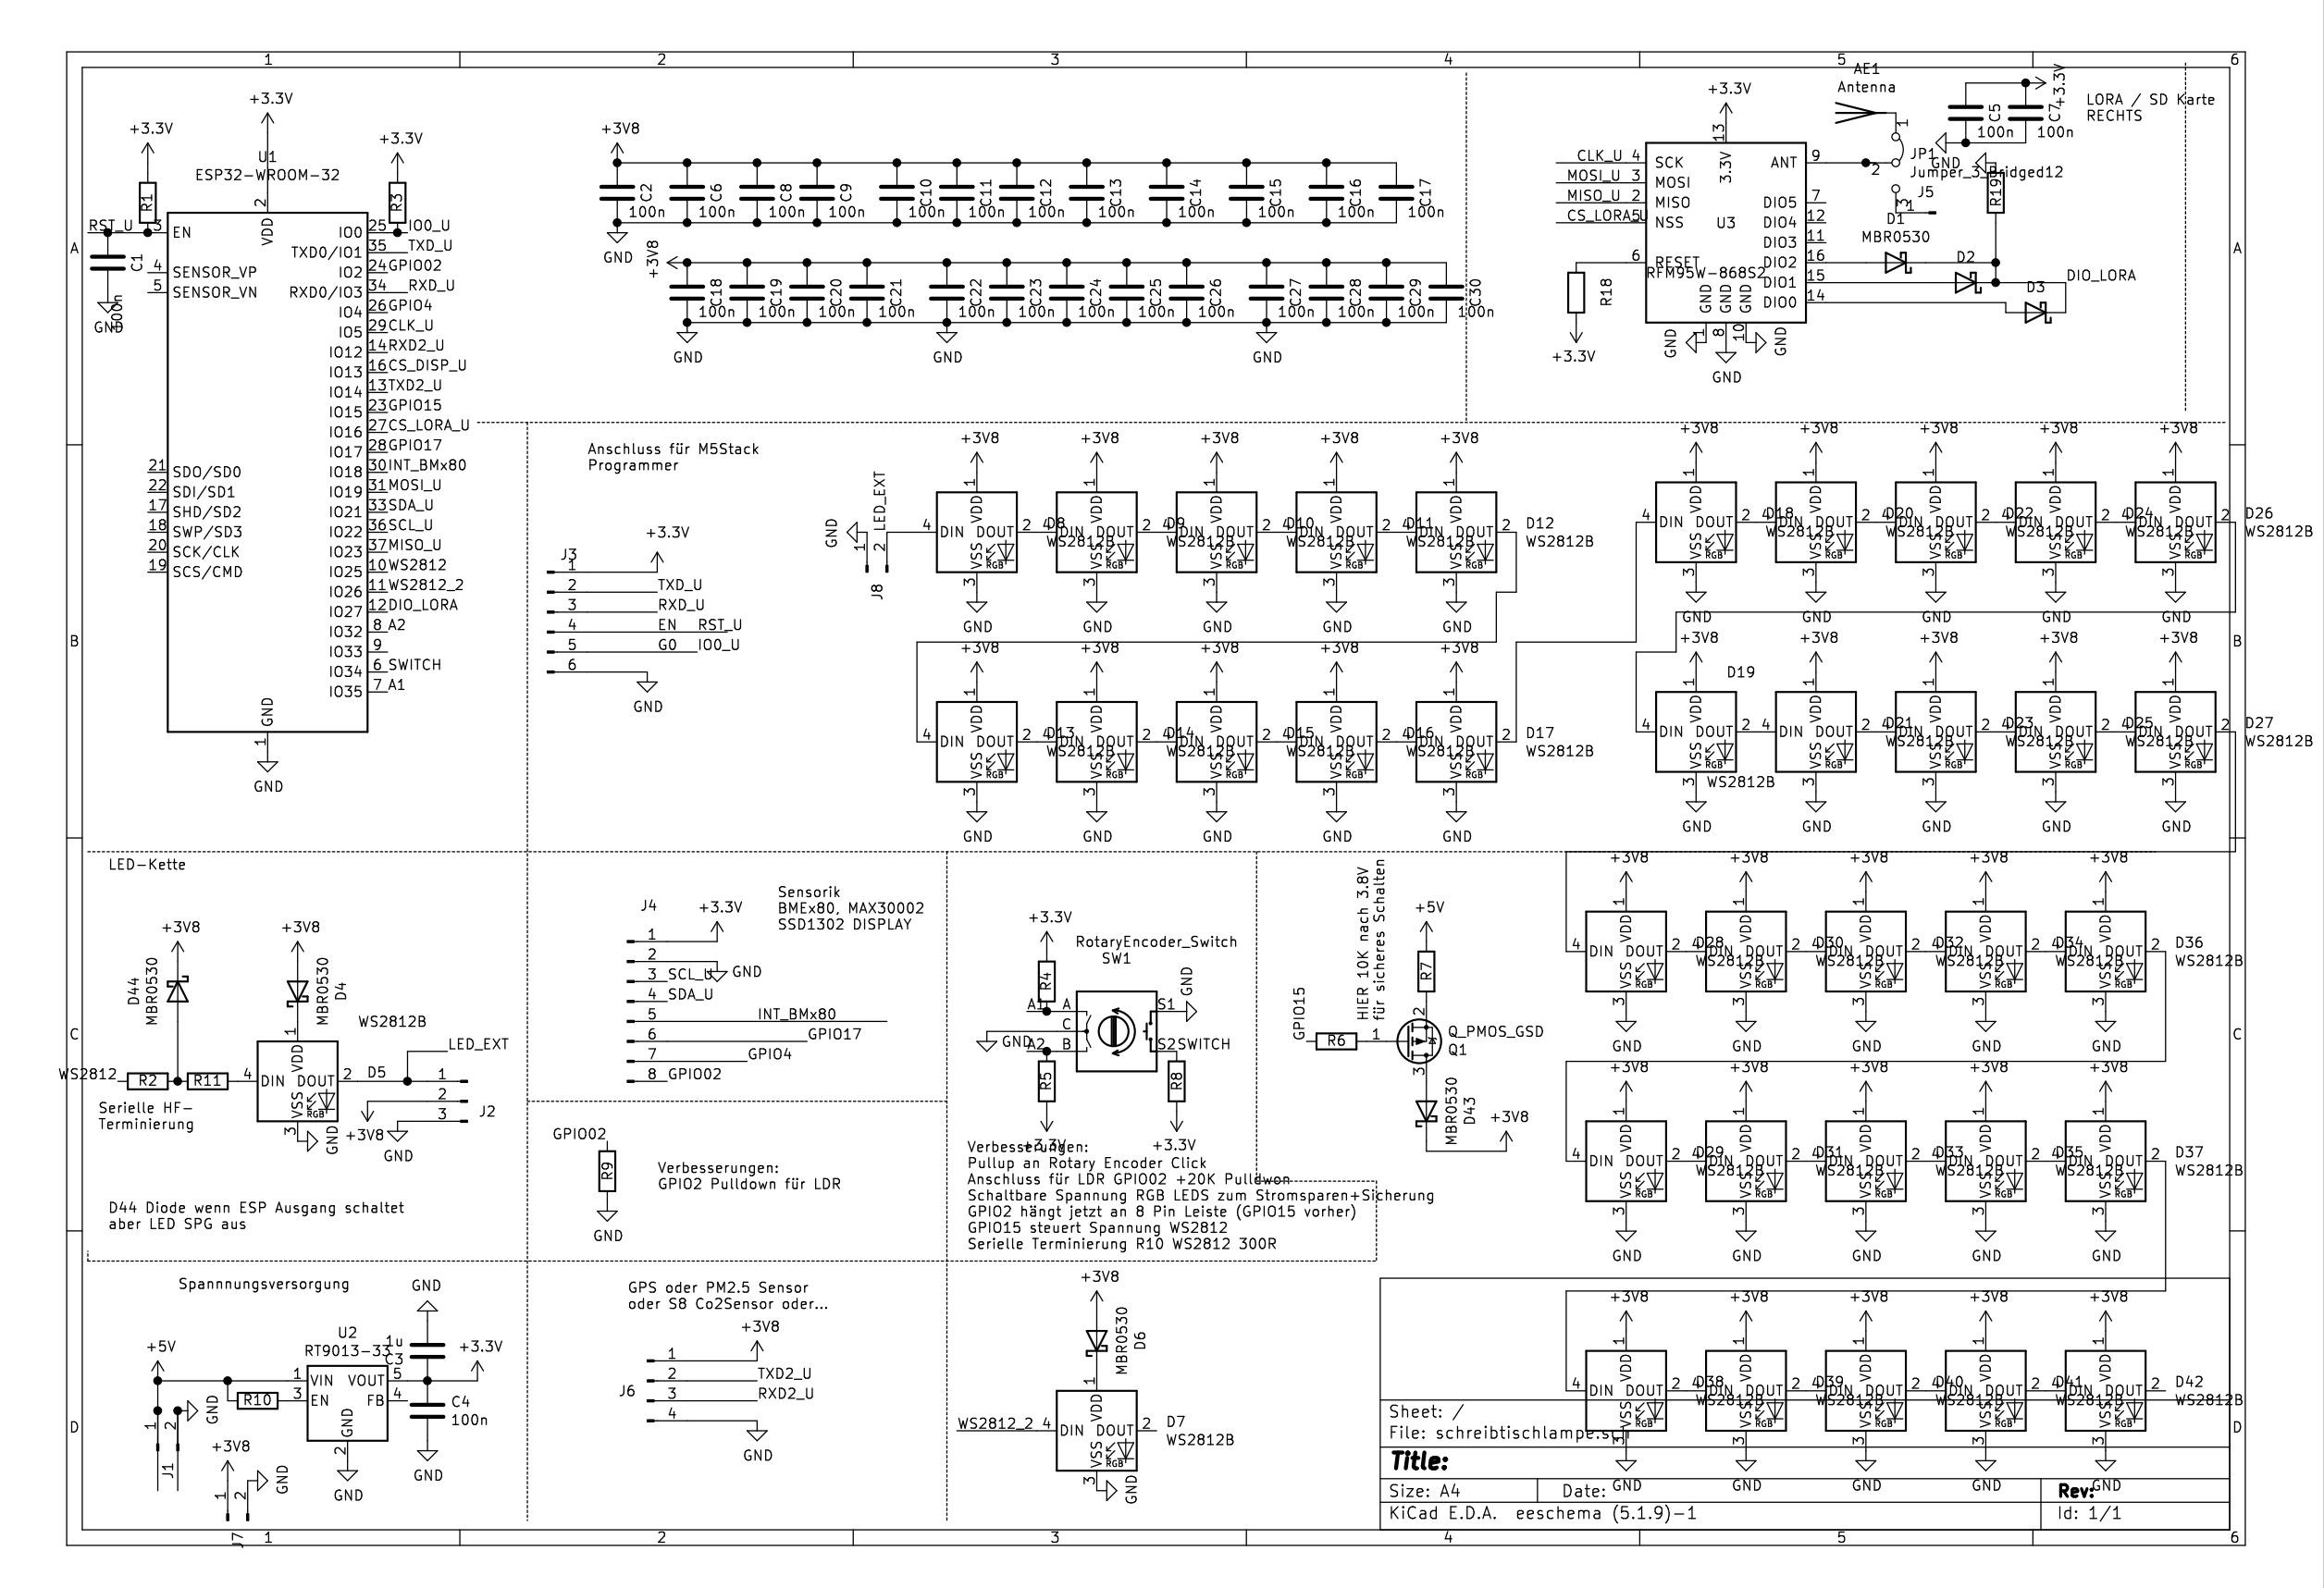
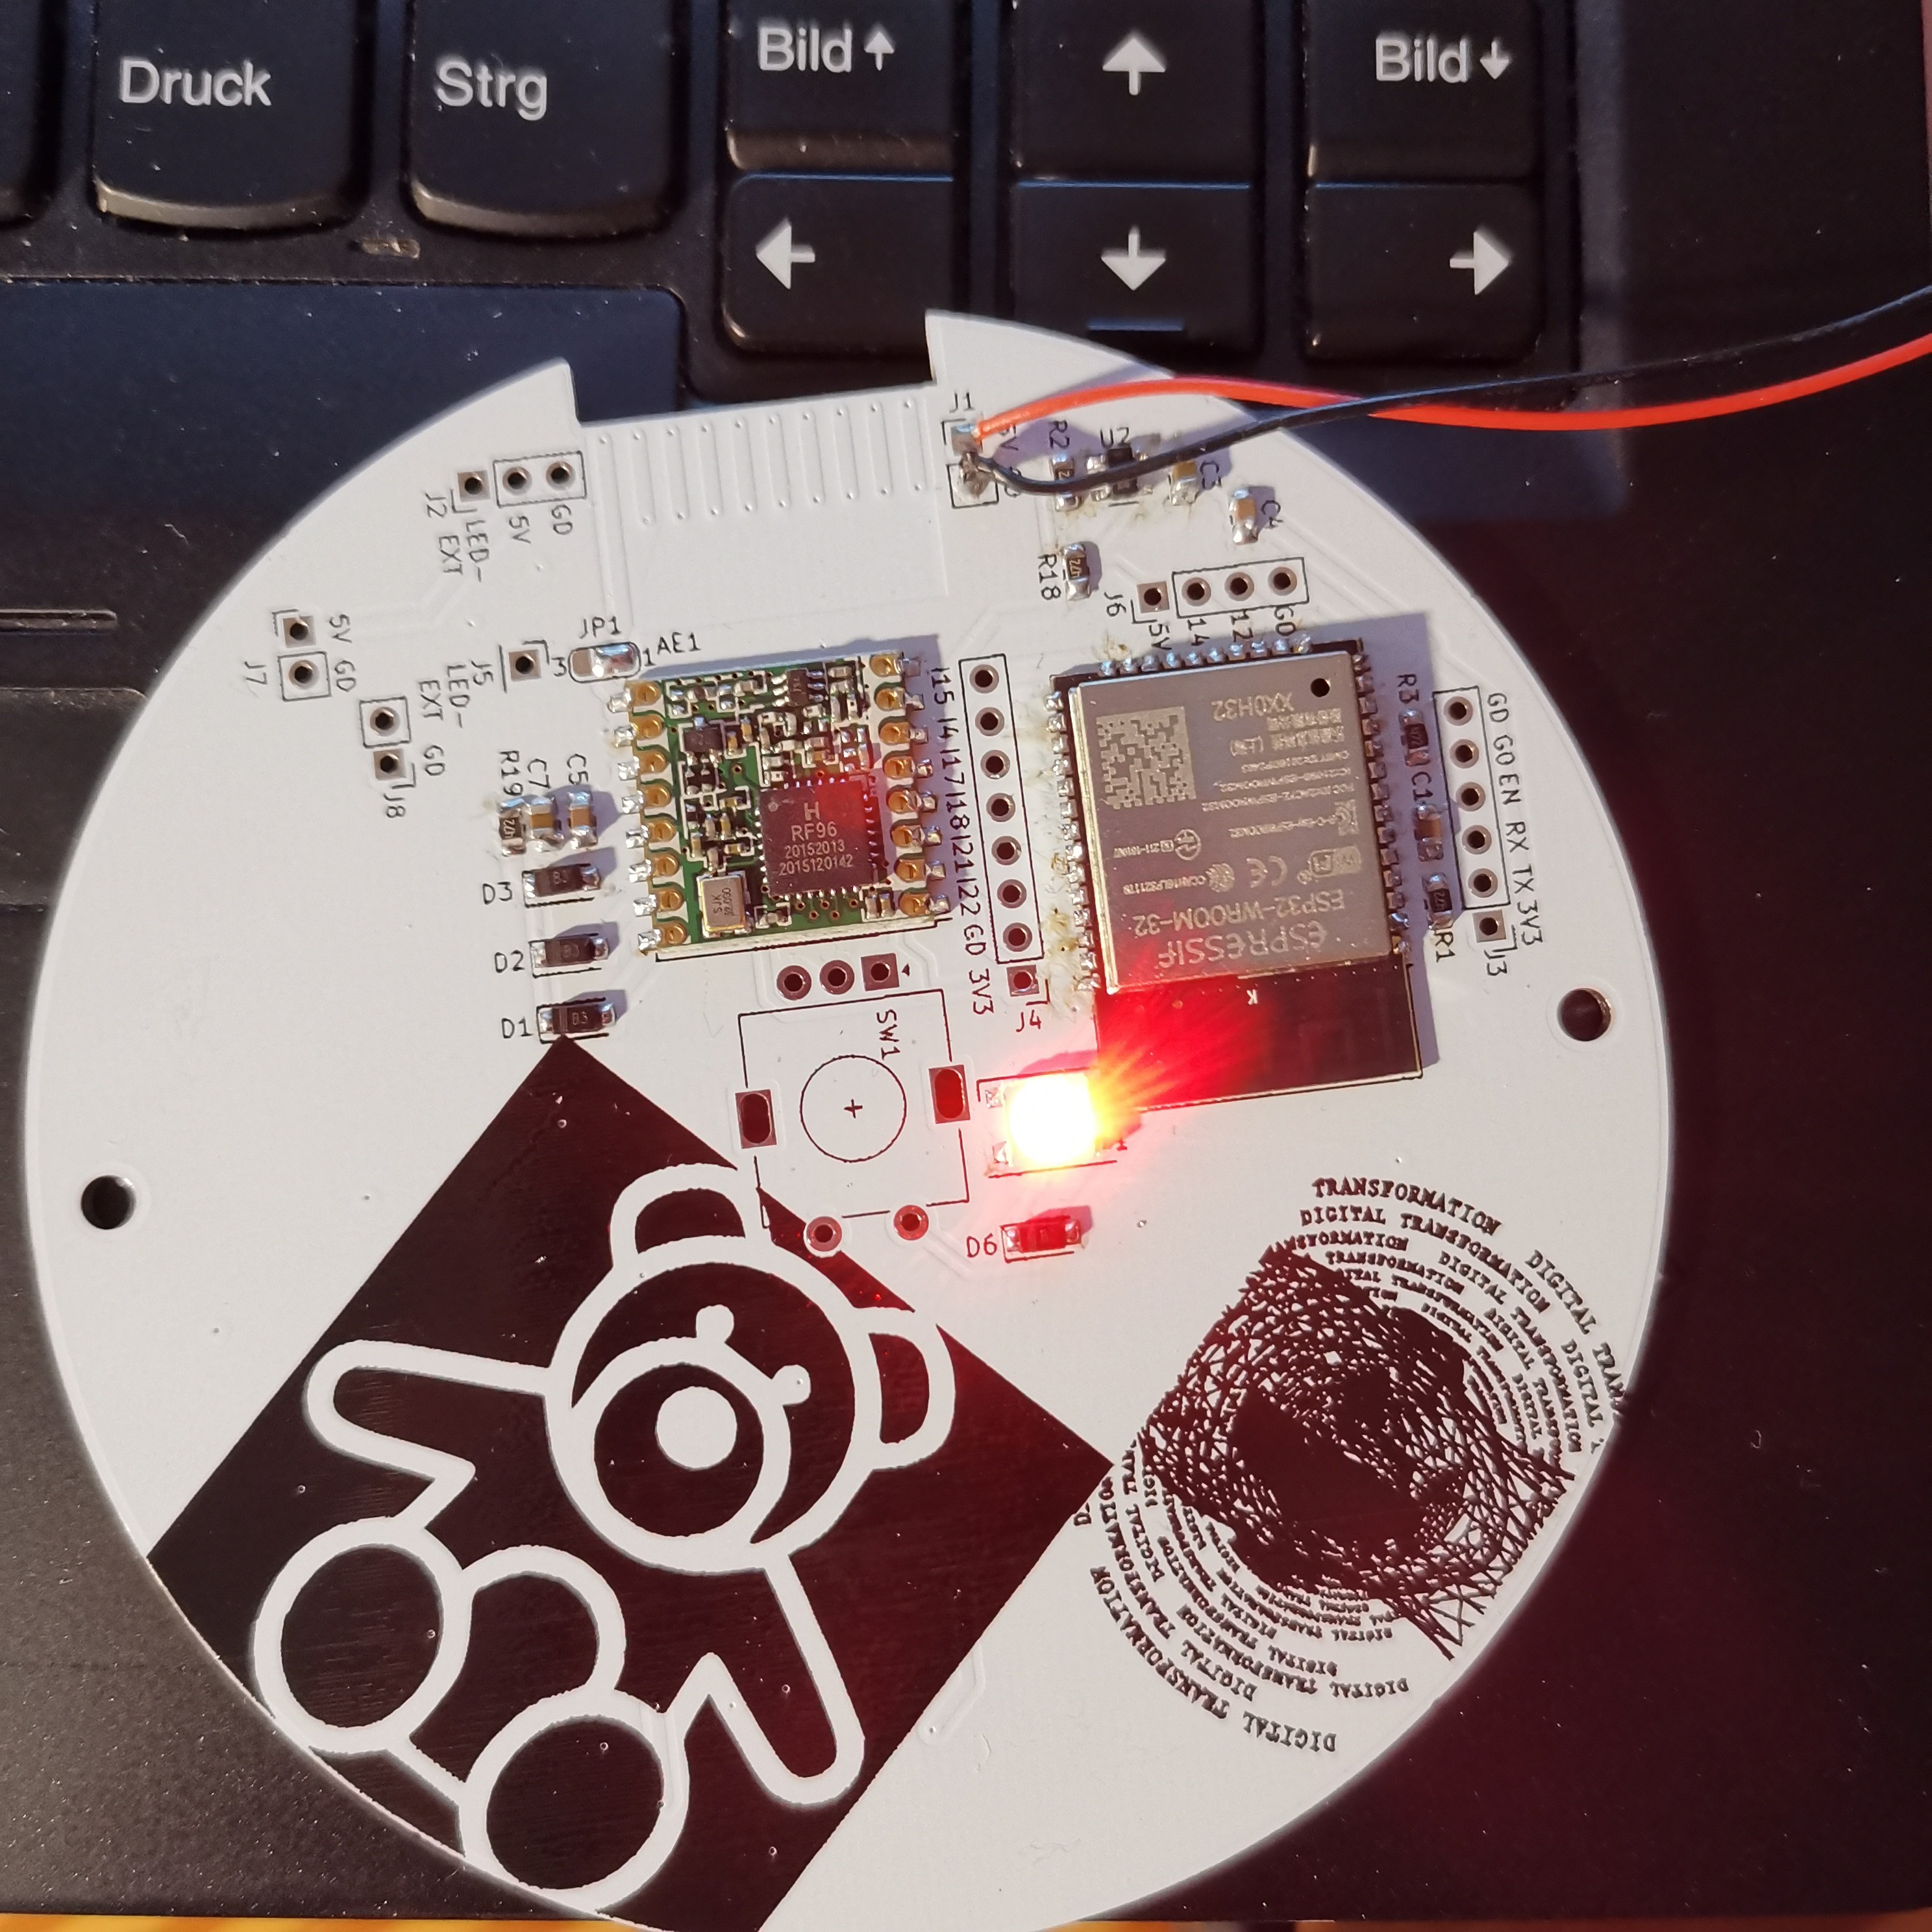
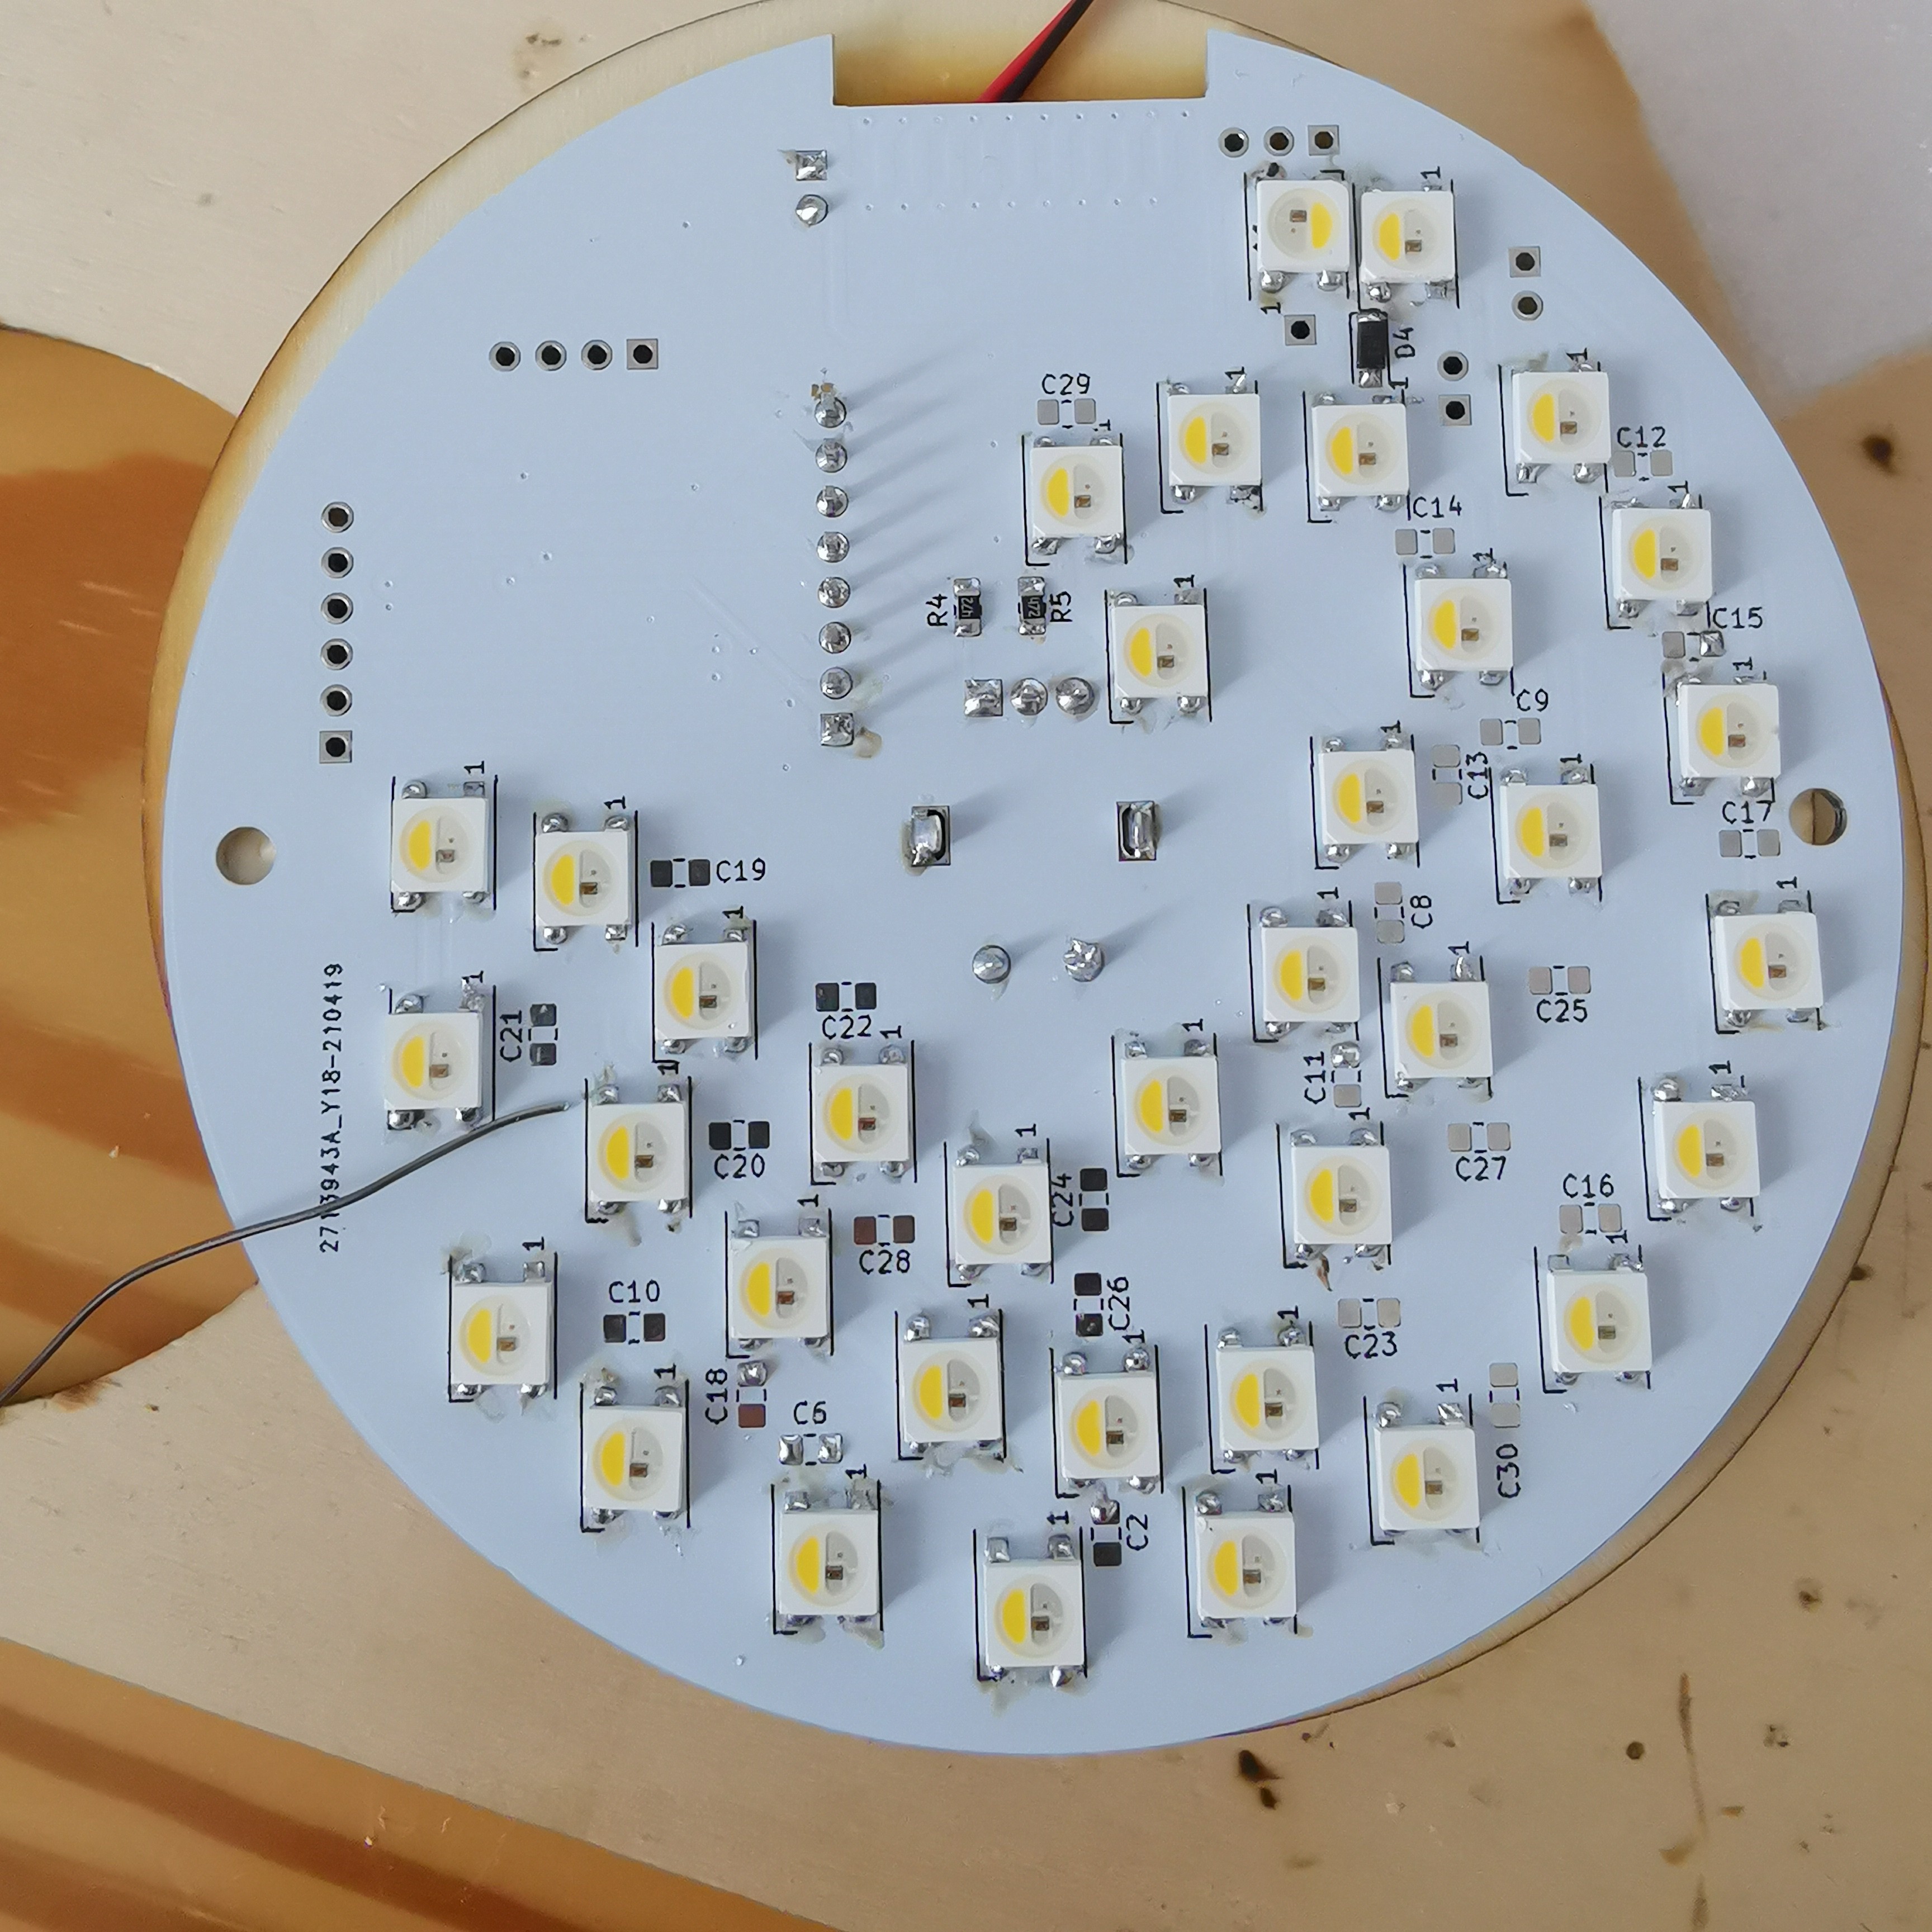
Many times I tought: "Can't we make this Device more Smart. Something more than just producing light in a color and brightness that I can decide"

schematic-v2.pdf

Schematic

Adobe Portable Document Format - 306.35 kB - 07/16/2021 at 19:26

Preview
Download

View all 19 components

  • Gyro Support (Roll, Pitch, Yaw) MPU 9250

    Ulrich07/24/2021 at 14:06 0 comments

    Added Gyro Movement detection today: I added the support of the MPU-9250 breakout board today.

    To ilustrate I added an export to MQTT/Mosquito as well.

    Now the Lamp can detect Movements and interact with the user automatically.

    This is quite useful on a bedside lamp. Especially it might be useful during nighttime.

    Possibilities you might think of:

    • Simple touch the lamp to enable it. No more need to search for the switch. Enable it with a low brightness if only touched anywhere
      (full brightness only on the knob)
    • Earthquake detection
    • turn it to a specific orientation to turn it on
    • rotate the head it to a specific orientation to turn it off

    Right now I am struggling with filters to keep the curves smooth on one side and be responsive on the other side.

    The Roll Sensor is flickering a lot.

  • First Ping on the LORA TheThingsnetwork

    Ulrich07/18/2021 at 20:26 0 comments

    I just sent out the first PING over the LORA WAN CHIP RFM95 to a local TheThingsNetwork Gateway that is more than 2km away!

    This is a transmission on 868MHz. Impressive that this even works with the PCB Antenna that is covered insde the metal Lamp Head :-)

    More Messages:

  • Air Quality Sensor sends Data to MQTT/Mosquitto

    Ulrich07/18/2021 at 17:59 0 comments

    Integrated more Sensor Values today:

    This time i added the Air Quality Sensor.

    Now the Bosch BME680 is publishing Data to MQTT.

    Longer Monitoring Period: Reason for low CO2 Values: Nearby Window is open

  • NodeRed/Mosquitto Integration

    Ulrich07/17/2021 at 16:26 0 comments

    Just finished Node Red/Mosquitto Integration/Implementation

    Now You can 

    - set Brightness and color via Node Red in convenient HSV format

    - Read back Brightness Level that the light detects with its LDR Sensor

    Next step: Temperature and eCO2 Air values. Stay tuned :-)

  • HW Bring UP

    Ulrich07/17/2021 at 08:56 0 comments

    Let's start soldering and check if it is working:

    To start soldering I first started to populate the small resistors and Diodes on the Top Layer. You might notice: I tried out some PCB art on the silk screen of the PCB.

    After that I started to solder the Mikrocontroller:

    And finally lets add The Lora Module and a Diode:

    We can start programming the microcontroller now:-) I use this M5Stack Programmer and designed to PCB that you can plug and play on the pins on the far right side of the board (lapbeled with GD, G0, EN, RX,TX3V3)

    et. Voila! : We got some light: 

  • PCB Hardware has arrived

    Ulrich07/16/2021 at 19:46 0 comments

    The first PCB have arrived. 

    I Ordered my PCB at JLC PCB. You may compare differnt PCB suppliers here in this overview from Hackaday.

    Please choose wisely you PCB material. Some PCB manufacturers still offer lead PCBs. They are easier to solder but bad for our environment.

    I choose to solder my components on my own. If your Layout turns out wrong it is easier because you are not waisting so much money

    Time for fitting it into the case.

    YES: IT fits perfectly fine on the first Try!

    No lets try to assemble the mounting holes to see how it looks with the PMMA Cover

    Outcome: Fits perfectly, even if it doesn't look like here :-)

  • Layout of the PCB Board

    Ulrich07/16/2021 at 19:35 0 comments

    After the Schematic has been finalized it is time for designing a PCB.

    This part is in my opinion pure ART:

    After some Hours I was quite happy with the Design:

    Outer diameter of the board needs to be 94mm to fit nicely in the Housing of the Deklamp

    An the Mounting boards have a distance of 85mm

    Top View: (hidden inside the lamp head) Version 1:

    Bottom View: Partly visible. (PCB Version 1)

    I tried to lactae the LEDs equaly along the board. You might notice some space. This is due to Antenna Deisgns

  • Time for Schematic Design

    Ulrich07/16/2021 at 19:24 0 comments

    So fiannaly after all the component choosing it is the time for a schematic. 

    In the past I used KiCad in several other designs. Ist is easy to use and why not use it as well on this design?

    In the past I was often searching on my schematics for connections. Thats why I choosed this time to draw logical blocks.

    In total we got 

    - 36 RGB+White LEDs SK6812 or WS2812B (choose which is nicer for you)

    - I²C Connector Interface for all kind of Air Quality Sensors

    - a LoRa Communication Chip RFM95

    - an ESP32 Wroom

    - an EC11 Rotary Encoder with built in Switch

    - 1 LED RGB for Illumination of the Rotary knob

    - a low Dropout Voltage Regulator

    - an programming interface

    - one more interface for debugging or control even more Air Quality sensors e.g. Sensair S8 or  an PM2.5 Sensor.

    - Space for an Light Sensor


    Schematic V2 with some minor improvements:

  • Knock Knock - User interface part two

    Ulrich07/16/2021 at 19:11 0 comments

    I wa searching the other day for a different AIR Quality Sensor on Aliexpress. And Lucky me: I came across a different Sensor for the User Interface. Thsi should be an addtional sensor to the rotary knob

    I was thinking if I could extend my user experience a little bit. I came across this MPU9250+BMP280 Breakout Board.

    This enables the following features:

    - Knocking Detection (User Action if you knock on the Lamp)

    - Activate Lamp by rotation

    - Deactivate Lamp be turning the head in any direction 

    And the good news again: Same pinout as my Air Quality Sensors that I choosed so far. So easy for stacking the sensors and quick tryouts during development.

  • UI Interface, User Controls

    Ulrich07/16/2021 at 19:08 0 comments

    The original Desk lamp that I bought only had a little Push Button.

    This was too less to operate on/off, brightness, color and certain other features.

    So I was thinking can we use something else simple and elegant:

    In my mind came the rotary Knob from my stereo. What a Nice and elegent Aluminium knob that perfectly fits to the design of the lamp.

    On Aliexpress I found a perfect one for my design: This Knob perfectly matches perfectly and is not too expensive

View all 15 project logs

  • 1
    Ordering PCB and Parts

    You may want to built this beautiful Desklamp by yourself:

    What do you need: Lamp it self: 

    Ebay Link

    PCBs: You may find the Gerber Files here: Gerber

    Download the GerberZipFiles (V1 or V2) from Github

    Upload these Files to JLCPCB, -> Instructions how to to this can be found e.g.: Here

    Choose the color of the PCB and the Material: You may try out new Aluminium PCB for better heat dissipation

    I choosed white PCB to have a good reflection of the light and for design reasons.

    Sent your Order to process and do the payment.

    Order your parts for this Project:

    You may order your parts at LCSC, Aliexpress or your local electronic parts distributor.

  • 2
    Soldering the PCB

    You may want to start soldering on the TOP Layer of the PCB.

    Reason for this: It is easier to fix the PCB on you desk if the LEDs on the bottom side are not soldered yet. 

    Start with the smallest parts first. Resistors, Capaitors, LDO and Diodes should be soldered first.

    Watch for polarity of the Diodes!

    You Board should look after the first steps like this:

    Solder the Main Processor: ESP32:

    You may notice: There is a little solder bridge at AE1, next to the lora Chip. You need to solder this to enable the LORA Antenna

    Now lets solder the LORA Module and the TOP LED:

    Now we can start to program the Board with a small Demo Arduino Sketch to see if everything is working.

  • 3
    Solder the bottom side of the PCB Board

    Now it is time to flip the board to the other side.

    Lets populate all the LEDS on the bottom:

    Watch for Polarity carefully. You may notice: The orientation of the board is the same for all LEDs.. EXCEPT for ONE! The one on the far North D5(next to D4 in the below picture). Thats why I wrote a "!" in the Silk Screen under this LED to remind me of this :-)

    Finally lets add some capacitors. You may need some but not all of them.

View all 9 instructions

Enjoy this project?

Share

Discussions

Similar Projects

Does this project spark your interest?

Become a member to follow this project and never miss any updates