Close
0%
0%

IKEA Bekant Desk Automater

Who has time to wait for minutes per day to push a button? Let's automate the motion of an electric IKEA desk with an Arduino Nano!

Similar projects worth following
189 views
0 followers
I have an electric IKEA Bekant sit/stand desk. It's designed so that you need to hold down the up and down buttons for the desk to move. The desk takes about twelve seconds to move from a comfortable sitting position to a standing position, and vice versa, for me. I certainly don't have time to wait for minutes... MINUTES I TELL YOU... per day to push a button.

I made a simple automater using an Arduino Nano, some N-channel mosfets, several momentary switches, and the original desk control PCB cannibalized from a spare control panel.

Now I can conveniently switch between sitting and standing positions and back again more often, promoting good health. While other automatic desks exist, I already had my IKEA desk and I wanted to keep the larger work surface (and breath some new life into the desk while I was at it). Mission accomplished.

(Re-upload for the Hackaday Prize 2021: Refresh Work-From-Home Life challenge)


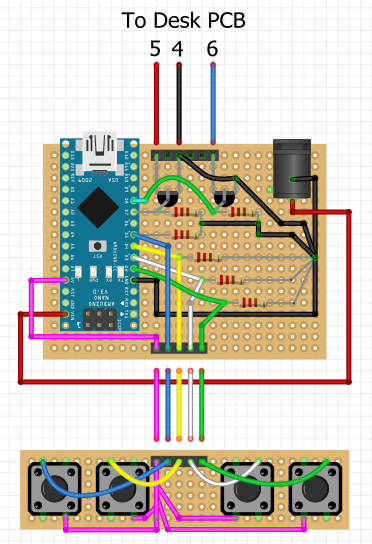
While I could have used an actual schematic, I'm hoping the included Fritzing diagram will help ease the circuit layout process for anyone re-creating this project.

--- Parts I used ---

As an Amazon Associate I earn from qualifying purchases through links in my descriptions and comments. This helps me finance future videos at no additional cost to you. If you choose to support me in this way, thank you.

***All screws, washers, nuts, and standoffs are M2***

***All wire is 22awg solid-core***

1x IKEA BEKANT desk

1x Arduino Nano clones

1x Power jacks

2x MOSFETs

4x Buttons

4x Button caps

Protoboards

1x Female headers

Screws

4x Standoffs

Wire

6x 220 Ohm resistors

1x Power supply with a 5.5mm x 2.1mm jack (Any 7-12V wall wart should do since Nanos can tolerate that range. You don't need much current as the circuit is only running logic. I used a 9V, 1A supply... way overkill on the amps, but it's what I had on hand.)

desk_automater.ino

Source code

ino - 1.95 kB - 07/18/2021 at 04:12

Download

Body.stl

Enclosure main body

Standard Tesselated Geometry - 435.73 kB - 07/18/2021 at 04:11

Download

Cover.stl

Enclosure cover

Standard Tesselated Geometry - 129.77 kB - 07/18/2021 at 04:11

Download

Holddown.stl

Original PCB holddown

Standard Tesselated Geometry - 1.45 kB - 07/18/2021 at 04:11

Download

  • 1
    Print the enclosure.

    Print the enclosure parts (see Files section), cleaning up the holes on the bottom surface of the body so that a washer and screw head sit below flush from the surface (the flat side will be placed flat against the underside of the desk).

  • 2
    Remove and open the control panel.

    Unscrew the control panel from your desk.

    Open up the control panel case using a dremel, pliers, cutters, and/or a screwdriver as needed and remove the flexible button PCB. BE CAREFUL NOT TO DAMAGE THE PCB! It is only slightly below the control panel case you'll be cutting. IKEA sent me a spare, but shipping takes a while.

  • 3
    Solder the boards.

    Solder the two boards shown below (What I call the "main PCB" in the video is on top, and the "button PCB" is on the bottom; I realize they aren't technically PCBs, I just want to remain consistent with the video's phrasing). Be sure to add headers underneath the pins of the Nano; don't solder the Nano directly to the board (it makes replacement easier later, if necessary).

    The main PCB has 24 columns, 18 rows. The button PCB has 28 columns, 6 rows. All resistors are 220 Ohm. You will have to drill out one of the holes to fit the negative lead of the power jack. After drilling, bend it over and solder it to a nearby hole for structural support.

View all 17 instructions

Enjoy this project?

Share

Discussions

Similar Projects

Does this project spark your interest?

Become a member to follow this project and never miss any updates