 Dominik Meffert
Like a hole puncher, but for metals. For your shelf or desktop.
Already have an account? Log in.
To make the experience fit your profile, pick a username and tell us what interests you.
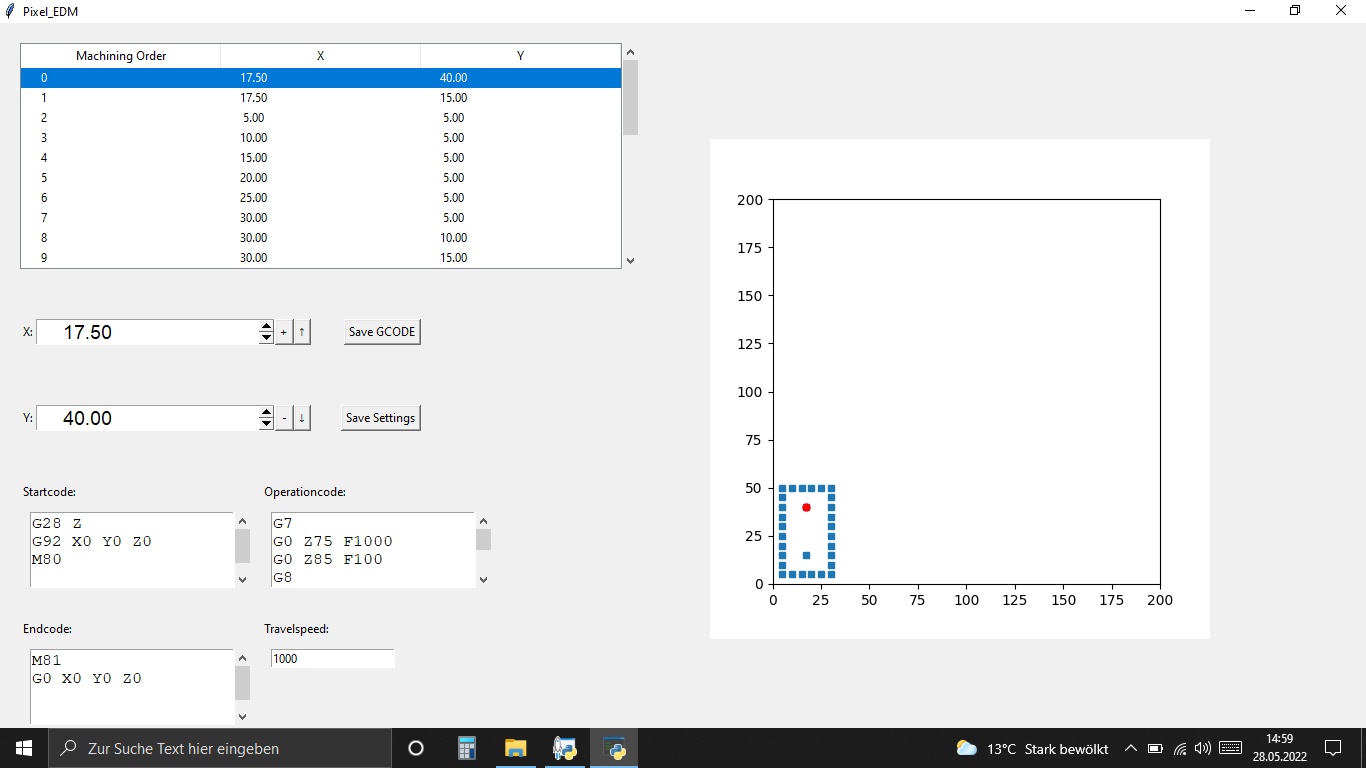
Over the last few days I wrote some code for makeing it easier to place multiple drilling locations next to each other (easier than writing the whole gcode per hand).
And with the GCODE created by the tool I did another test:
This time I cut out a small bracket. The cut took around an hour with no need for observation or intervention while machining. I think workpieces like this can be cut to do actually useful things with the machine. So the good things are that the machine is now working reliable and also quite precise. The problems remaining are that the machining takes quite long and the DI filter and electrode need to be replaced after some time. The machining time can be reduced by using a more powerfull PSU, but the need for replacement of the DI filter + electrode will remain.
So for now I think this is the best result that I can get with my EDM machine.
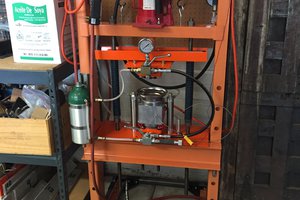
I spent the week building an EDM machine that looked like a 3D printer where the filament got replaced by copper wire so that I don't have to worry about running out of electrodes.
Machining with the wire worked without problems, but because the wire was slightly bent the resulting holes were not round and it also took quite long to cut pieces with a ∅1.38mm electrode diameter.
And so, after all the testing I've done so far, I would say that the 5x5 brass electrode can produce the most useful parts.
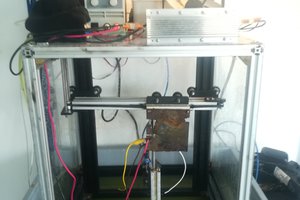
For further testing, I changed the machine to a vertical setup again and added a 2020 profile frame to the water tray for mounting the workpieces.
For doing useful work with the 5x5mm electrode I want to write a tool in which you can select "pixels" for machining so that you can create your workpiece like painting the squares on the pages of a college block (which are also 5x5mm).
In the last few days, I did a lot of testing and also a few changes to my setup.
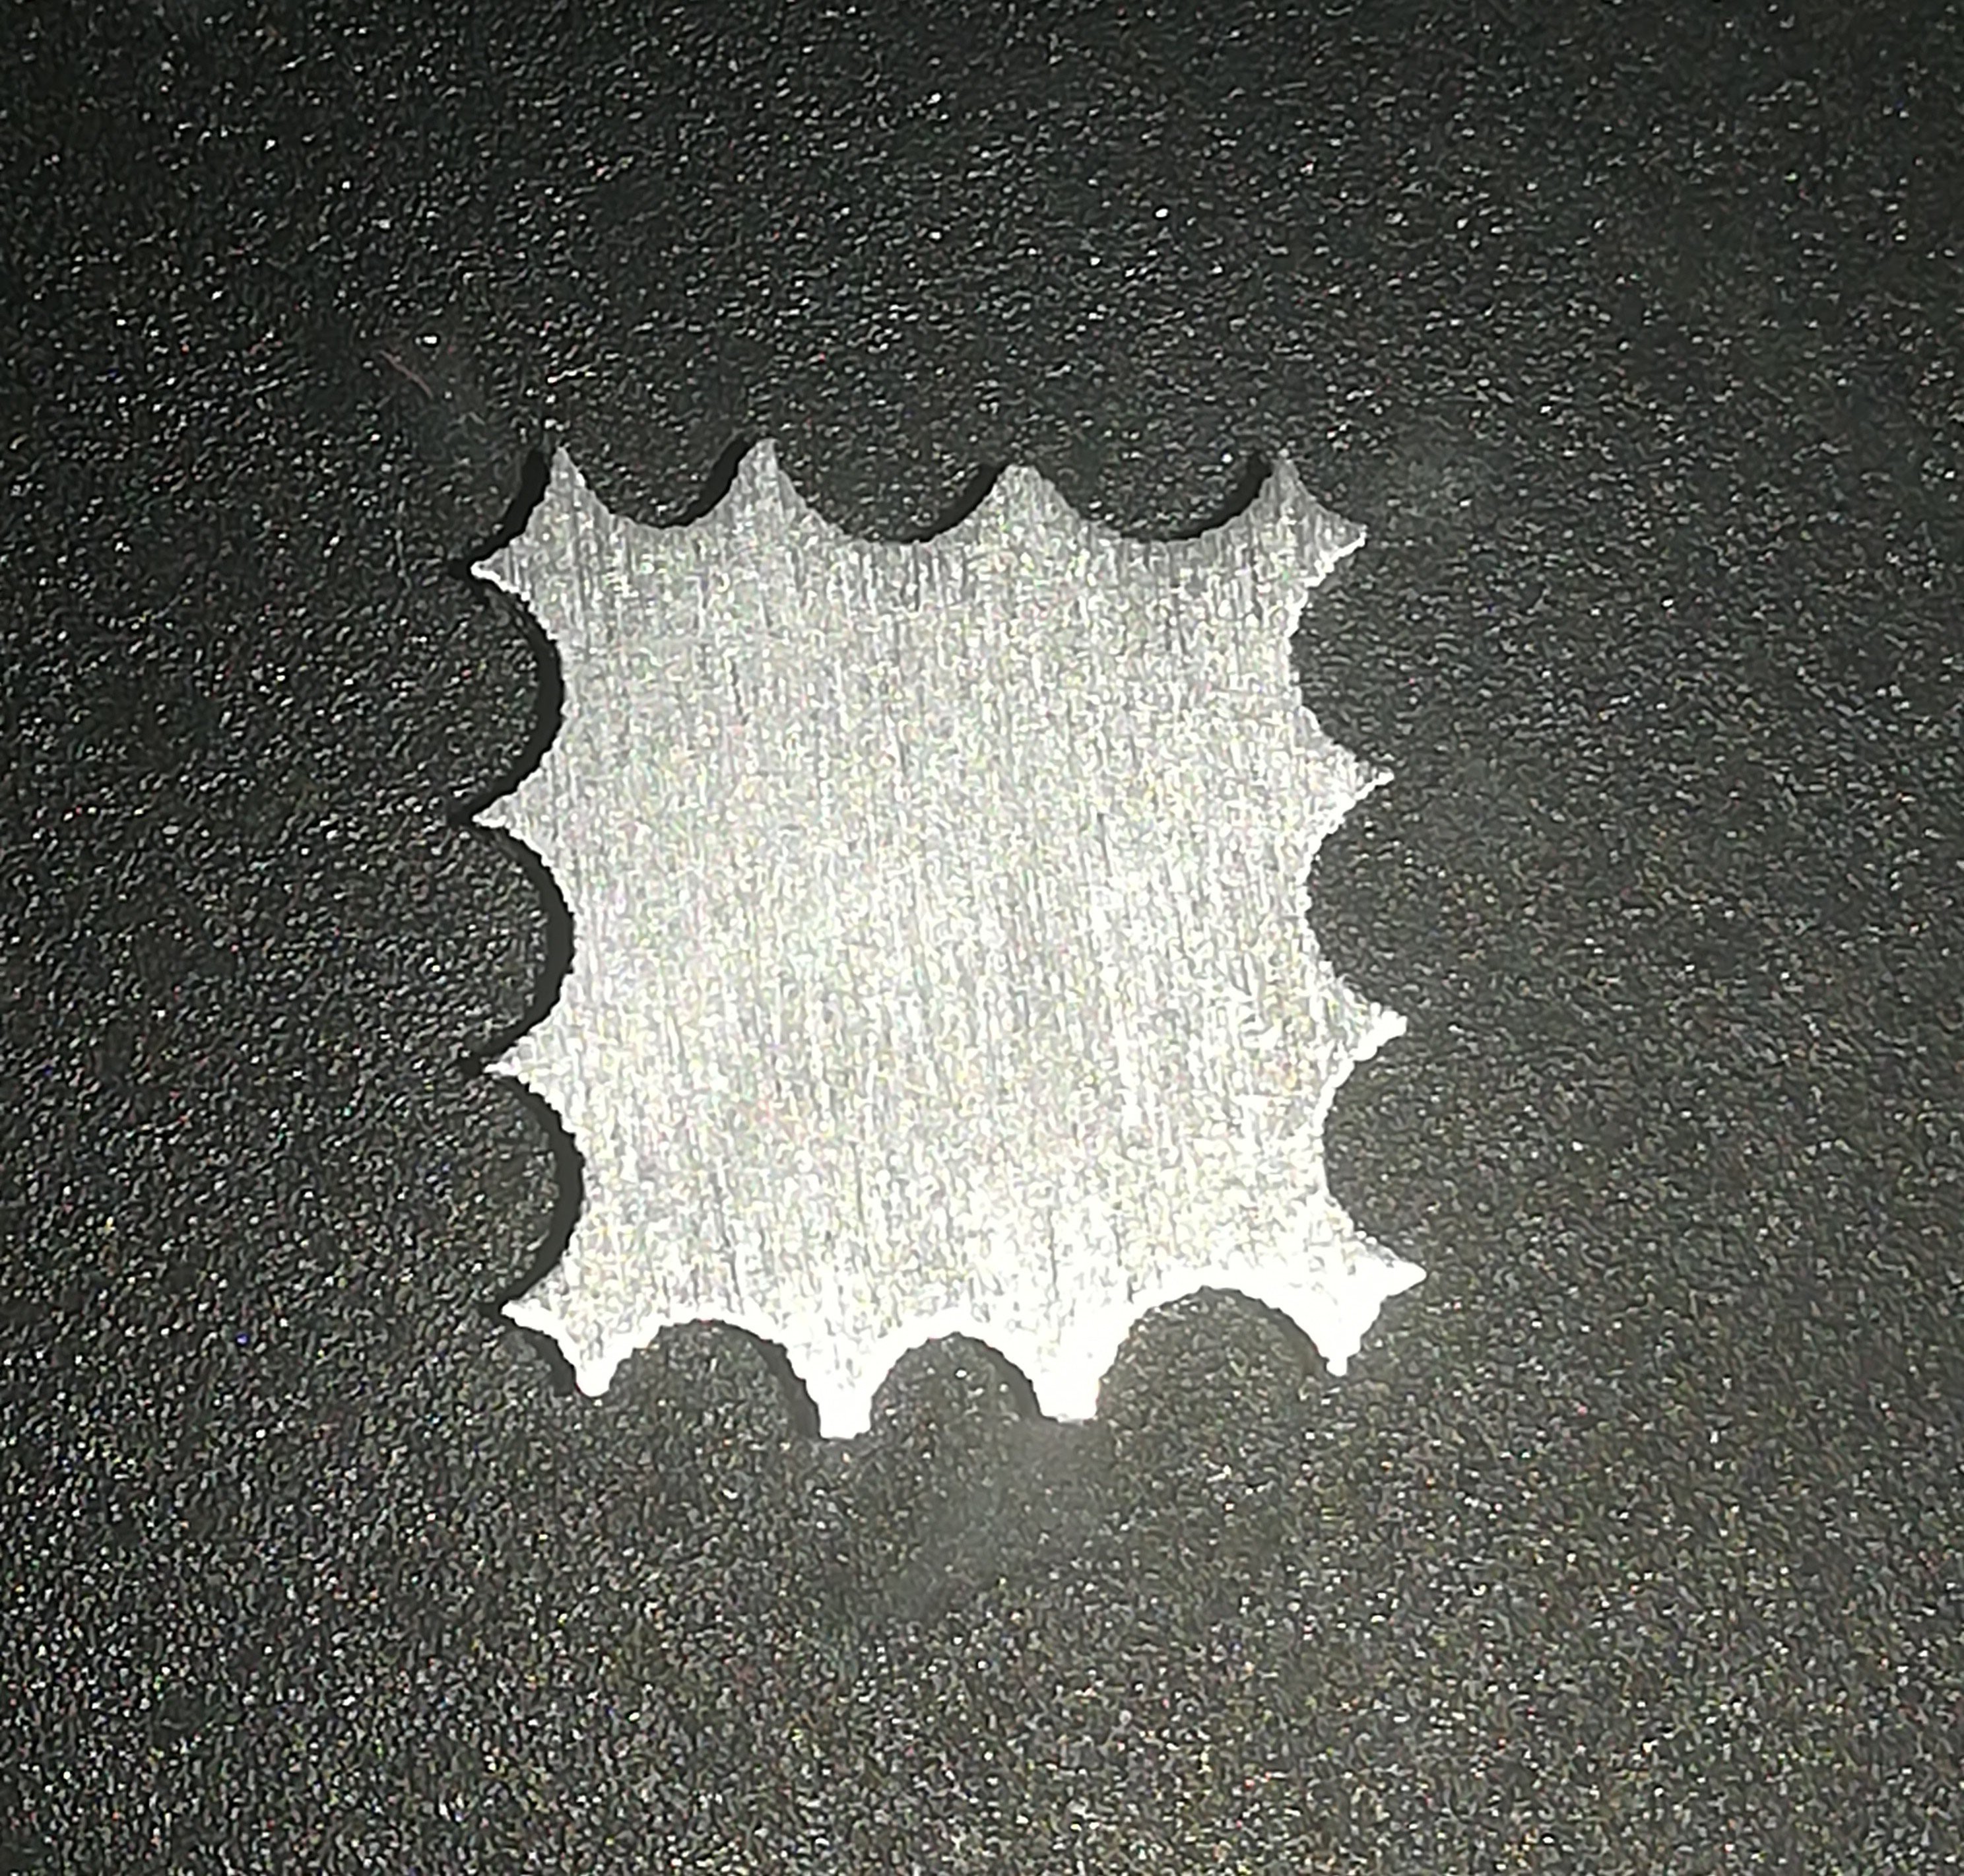
First I did a test with a round 4mm brass electrode where you can see the wave pattern on the edge.
Then I did a test with a square-shaped 5*5mm brass electrode where you can see that the edge got cut with almost no wave pattern.
After that, I did a test with a smaller square-shaped 2x2mm copper electrode and also got a good edge cut.
While using the smaller electrode I noticed that the cutting speed increased, but also the wear of the electrode. The electrode that I used was 333mm long and for my plan to do workpieces with hundred of holes or for cutting thicker material it will likely be too short.
So I tried out to use 0.8mm welding wire, but because steel wire is not a good electrode material it did not work.
But after doing the test with the copper electrode I knew that copper is a good electrode material.
And so I got the idea to use just the copper wire from normal 1,5mm² power cables.
I also got a good edge cut with it.
With such a small 1.5mm² electrode the amount of removed material is much lower than with a 5*5mm electrode and so it's no longer a problem for the filter and that makes it possible again to do the cutting underwater.
With that I could get rid of the fumes and splashing and also the cutting quality got a bit better and less sooty.
At the moment I'm thinking about changing the design of the machine so that it will become closer to a normal 3D printer again where the 1.5mm² (∅1.38mm) replaces the filament.
So, maybe that could be the next step.
Yesterday, I tried cutting out a square with the new machine setup.
I wrote some GCODE per hand and let the machine run.
G28 Z
G92 X0 Y0 Z0
M80

;####################
G0 X0 Y0 Z75 F1000
G7
G0 X0 Y0 Z90 F100
G8
G28 Z
;####################
G0 X4 Y0 Z75 F1000
G7
G0 X4 Y0 Z90 F100
G8
G28 Z
;####################
G0 X8 Y0 Z75 F1000
G7
G0 X8 Y0 Z90 F100
G8
G28 Z
;####################
G0 X12 Y0 Z75 F1000
G7
G0 X12 Y0 Z90 F100
G8
G28 Z
;####################
G0 X16 Y0 Z75 F1000
G7
G0 X16 Y0 Z90 F100
G8
G28 Z
;####################
G0 X16 Y4 Z75 F1000
G7
G0 X16 Y4 Z90 F100
G8
G28 Z
;####################
G0 X16 Y8 Z75 F1000
G7
G0 X16 Y8 Z90 F100
G8
G28 Z
;####################
G0 X16 Y12 Z75 F1000
G7
G0 X16 Y12 Z90 F100
G8
G28 Z
;####################
G0 X16 Y16 Z75 F1000
G7
G0 X16 Y16 Z90 F100
G8
G28 Z
;####################
G0 X12 Y16 Z75 F1000
G7
G0 X12 Y16 Z90 F100
G8
G28 Z
;####################
G0 X8 Y16 Z75 F1000
G7
G0 X8 Y16 Z90 F100
G8
G28 Z
;####################
G0 X4 Y16 Z75 F1000
G7
G0 X4 Y16 Z90 F100
G8
G28 Z
;####################
G0 X0 Y16 Z75 F1000
G7
G0 X0 Y16 Z90 F100
G8
G28 Z
;####################
G0 X0 Y12 Z75 F1000
G7
G0 X0 Y12 Z90 F100
G8
G28 Z
;####################
G0 X0 Y8 Z75 F1000
G7
G0 X0 Y8 Z90 F100
G8
G28 Z
;####################
G0 X0 Y4 Z75 F1000
G7
G0 X0 Y4 Z90 F100
G8
G28 Z
M81
G0 X0 Y0 Z0
The behavior of the new machine is very different from the EDM machines that I build before.
- First of all, there is (almost) no condition that can lead to a failed machining job. In theory, the electrode could get stuck in the workpiece, but that has not happened, yet and I think that it is really unlikely because the gap between electrode and workpiece is large enough to prevent this. Otherwise, there is not much that can go wrong.
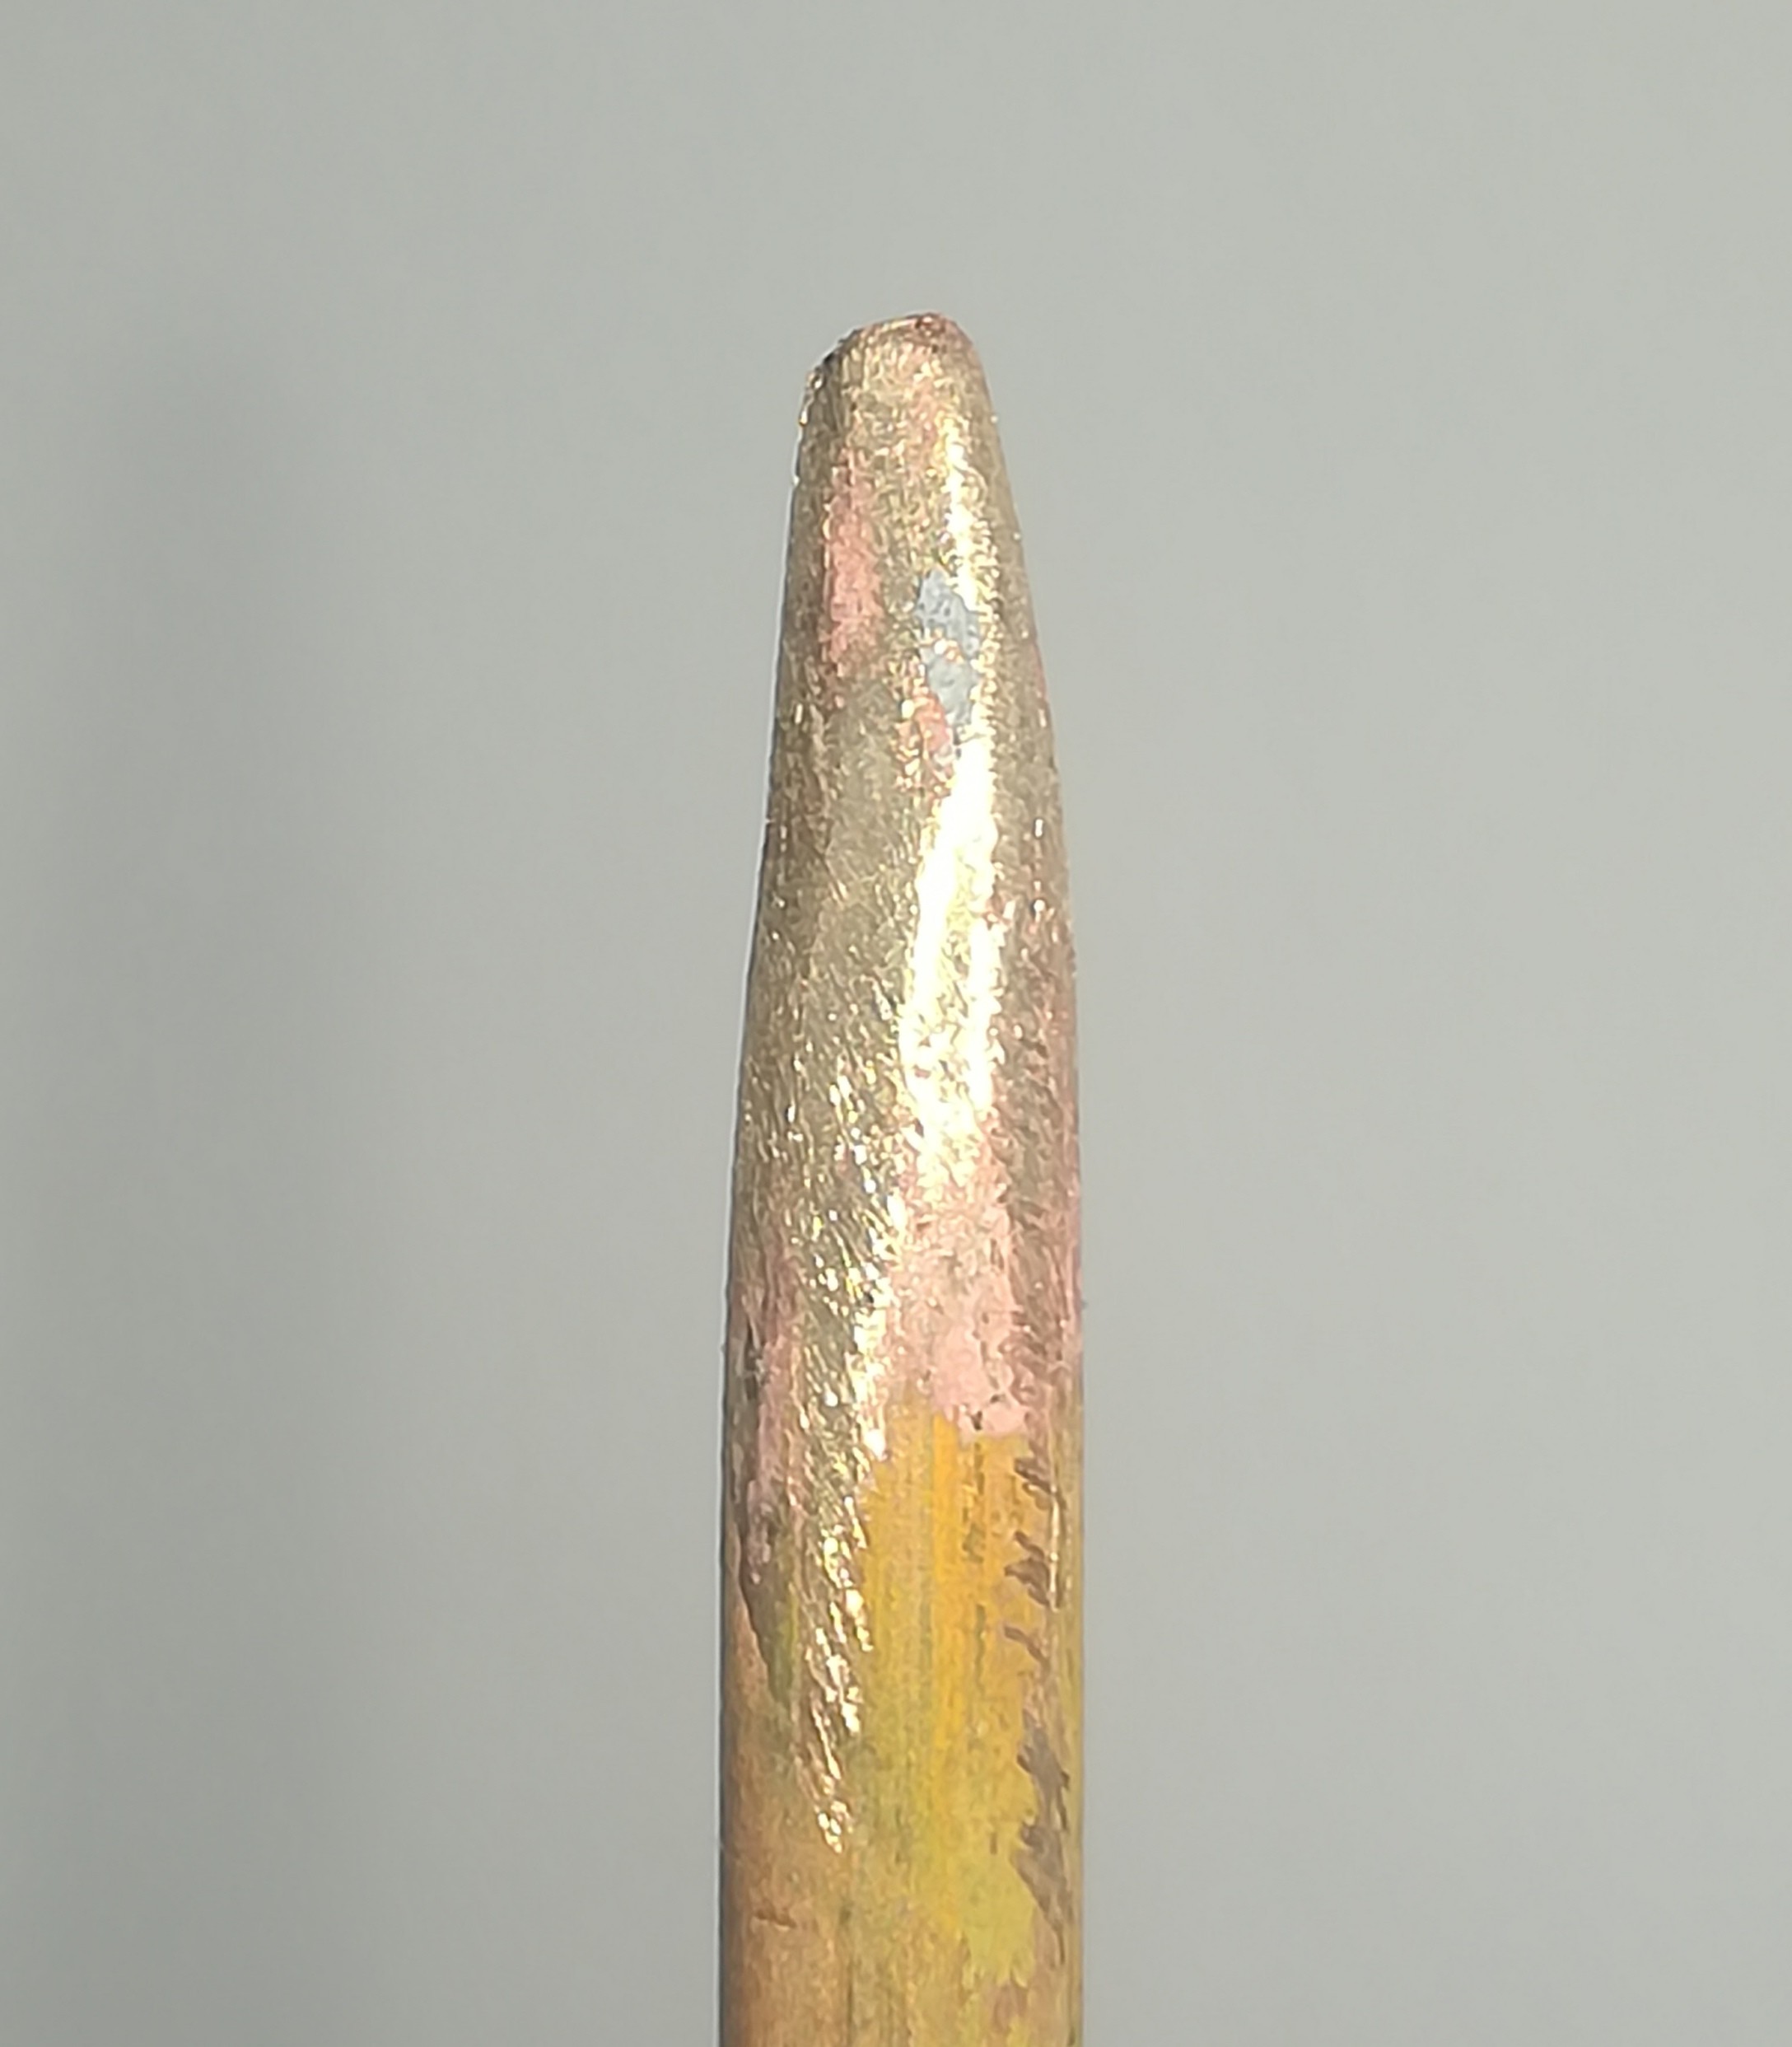
- During machining the electrode got more pointy, like if you would sharpen a pencil:
That led to a smaller exit hole at the backside of the workpiece and so a tapered hole.
It also led to strange behavior in which the electrode moved back and forth in an endless loop. I think this happened because the shape of the electrode prevented the machine from starting an arc.
I hope I can avoid this in the future by writing GCODE which leads to more constant electrode wear.
- I had to machine the holes where the strange behavior happened again per hand, but I'm hoping that I can fix that at some point.
- Besides that, the machining job was finished with no errors.
Here you can see the finished workpiece:
- With the new machine I was able to run a program for the first time without having to keep an eye on it all the time.
I started the machining job and watched TV, fixed the endless loop error, and just waited for the job to finish.
Besides the error (that I hope to find a permanent solution for in the future) it's the way of stable operation that I was looking for.
In terms of the shape of the workpiece's edge - I'm thinking about writing a tool path generation tool to generate code for overlapping holes to reduce the waviness of the edge and also keep the electrode wear low and evenly.
Another thing to notice is that because of the high amount of machined material by using sinker EDM, the deionization filter can no longer keep the conductivity of the water low. Therefore, I can no longer machine the parts submerged in water because the current would just be conducted by the water and no arc would ignite. So, at the moment I'm machining the workpieces in the air and using the water just for cooling and flushing. This way the machining does work even without deionized water, which is likely not the best thing, but as long as it works it's OK. I will keep an eye on the performance and if it will cause problems in the future I will try to find a solution for it. If it turns out that it doesn't lead to problems, it would be a good thing, because that would reduce the cost of the machine by making a deionization filter, separate pump, and ppm sensor unnecessary....
Read more »My next idea for reaching the goal of this project is to build a machine that is as fail-safe as possible. So, no wire EDM machine where every wire break would require user interaction.
Instead of that, I will build a horizontal Sinker EDM machine with the workpiece mounted on the X-axis and easy access for replacing the electrode.
The later machine should then be able to cut out workpieces by drilling multiple holes next to each other. It will likely not be the cleanest cutting solution but will also be very unique. The cool thing about Sinker EDM is that the tool is not rotating and so it will not slip into already drilled holes which makes overlapping holes possible.
The machine will also get a proximity sensor which will serve two purposes. It will check the length of the electrode after every drilled hole because while drilling the electrode gets shorter. It will also reset the position of the electrode if the machine fails to keep its distance from the workpiece and crashes into it. As a result of that, even a crash will not lead to a failed machining job.
After the job has finished, you can start the job again to only drill the skipped hole.
In the future, I will look into using an endstop switch and changing the code, so that the machine can detect a crash as a backup to the normal distance keeping method so that no holes will be skipped.
Here is an *old* video of the machine (changed some parts since then):
Wire EDM Machine
I spent the last weeks and months learning how to build an EDM Drill and Wire EDM machine and although I could successfully build and test both machine setups they are both not what I want to achieve with this project.
The EDM Drill worked well, but I did not like the way the workpiece was clamped to the Y-axis, and because the electrodes that I used (4mm brass tubes) were not straight, but slightly bent, the rotation was wobbly like a bent drill.
The Wire EDM machine did also work very well - as long as the wire did not break - what happened randomly, no matter what I tried to prevent it from breaking.
The cuts were very clean and precise, but because I could not finish a single workpiece without at least one wire break, I think that no one of you would bother to work with such a system. I also spent around 100€ on a 10kg spool of EDM wire, which makes it quite expensive.
So, what should I do next.....
The goal of this project is to build a machine for cutting metals that you can use in your apartment at any time of the day without getting in trouble with the neighbors - So no noisy CNC mill/router or plasma cutter that needs a loud air compressor.
The machine should also be cheap with no expensive consumables.
And the most important thing:
- It has to work!
The machine should be as reliable as a 3D printer, where you can start a printing job and leave for the next 8 hours, just to find a finished print on your machine when you come back.
To achieve this goal, the machine has to be fail-safe, which is easier to do with machines that did not apply force to the workpiece like a laser, plasma, water jet - cutters, and 3D printers and harder to do with CNC machines.
If everything works as it should EDM machines do also not apply force to the workpiece, but only because they can sense the current or voltage between electrode and workpiece to keep the right distance. If now the electrode or workpiece gets covered with some not conductive material from the cutting process, the machine can no longer keep the right distance to the workpiece and so the electrode or wire can crash into the workpiece which leads to a wire break, lost steps or incorrect positioning.
Because this error can happen at any time I have to build the machine in a way, that this error will not lead to a failed machining job.
More about that in the next build log.....
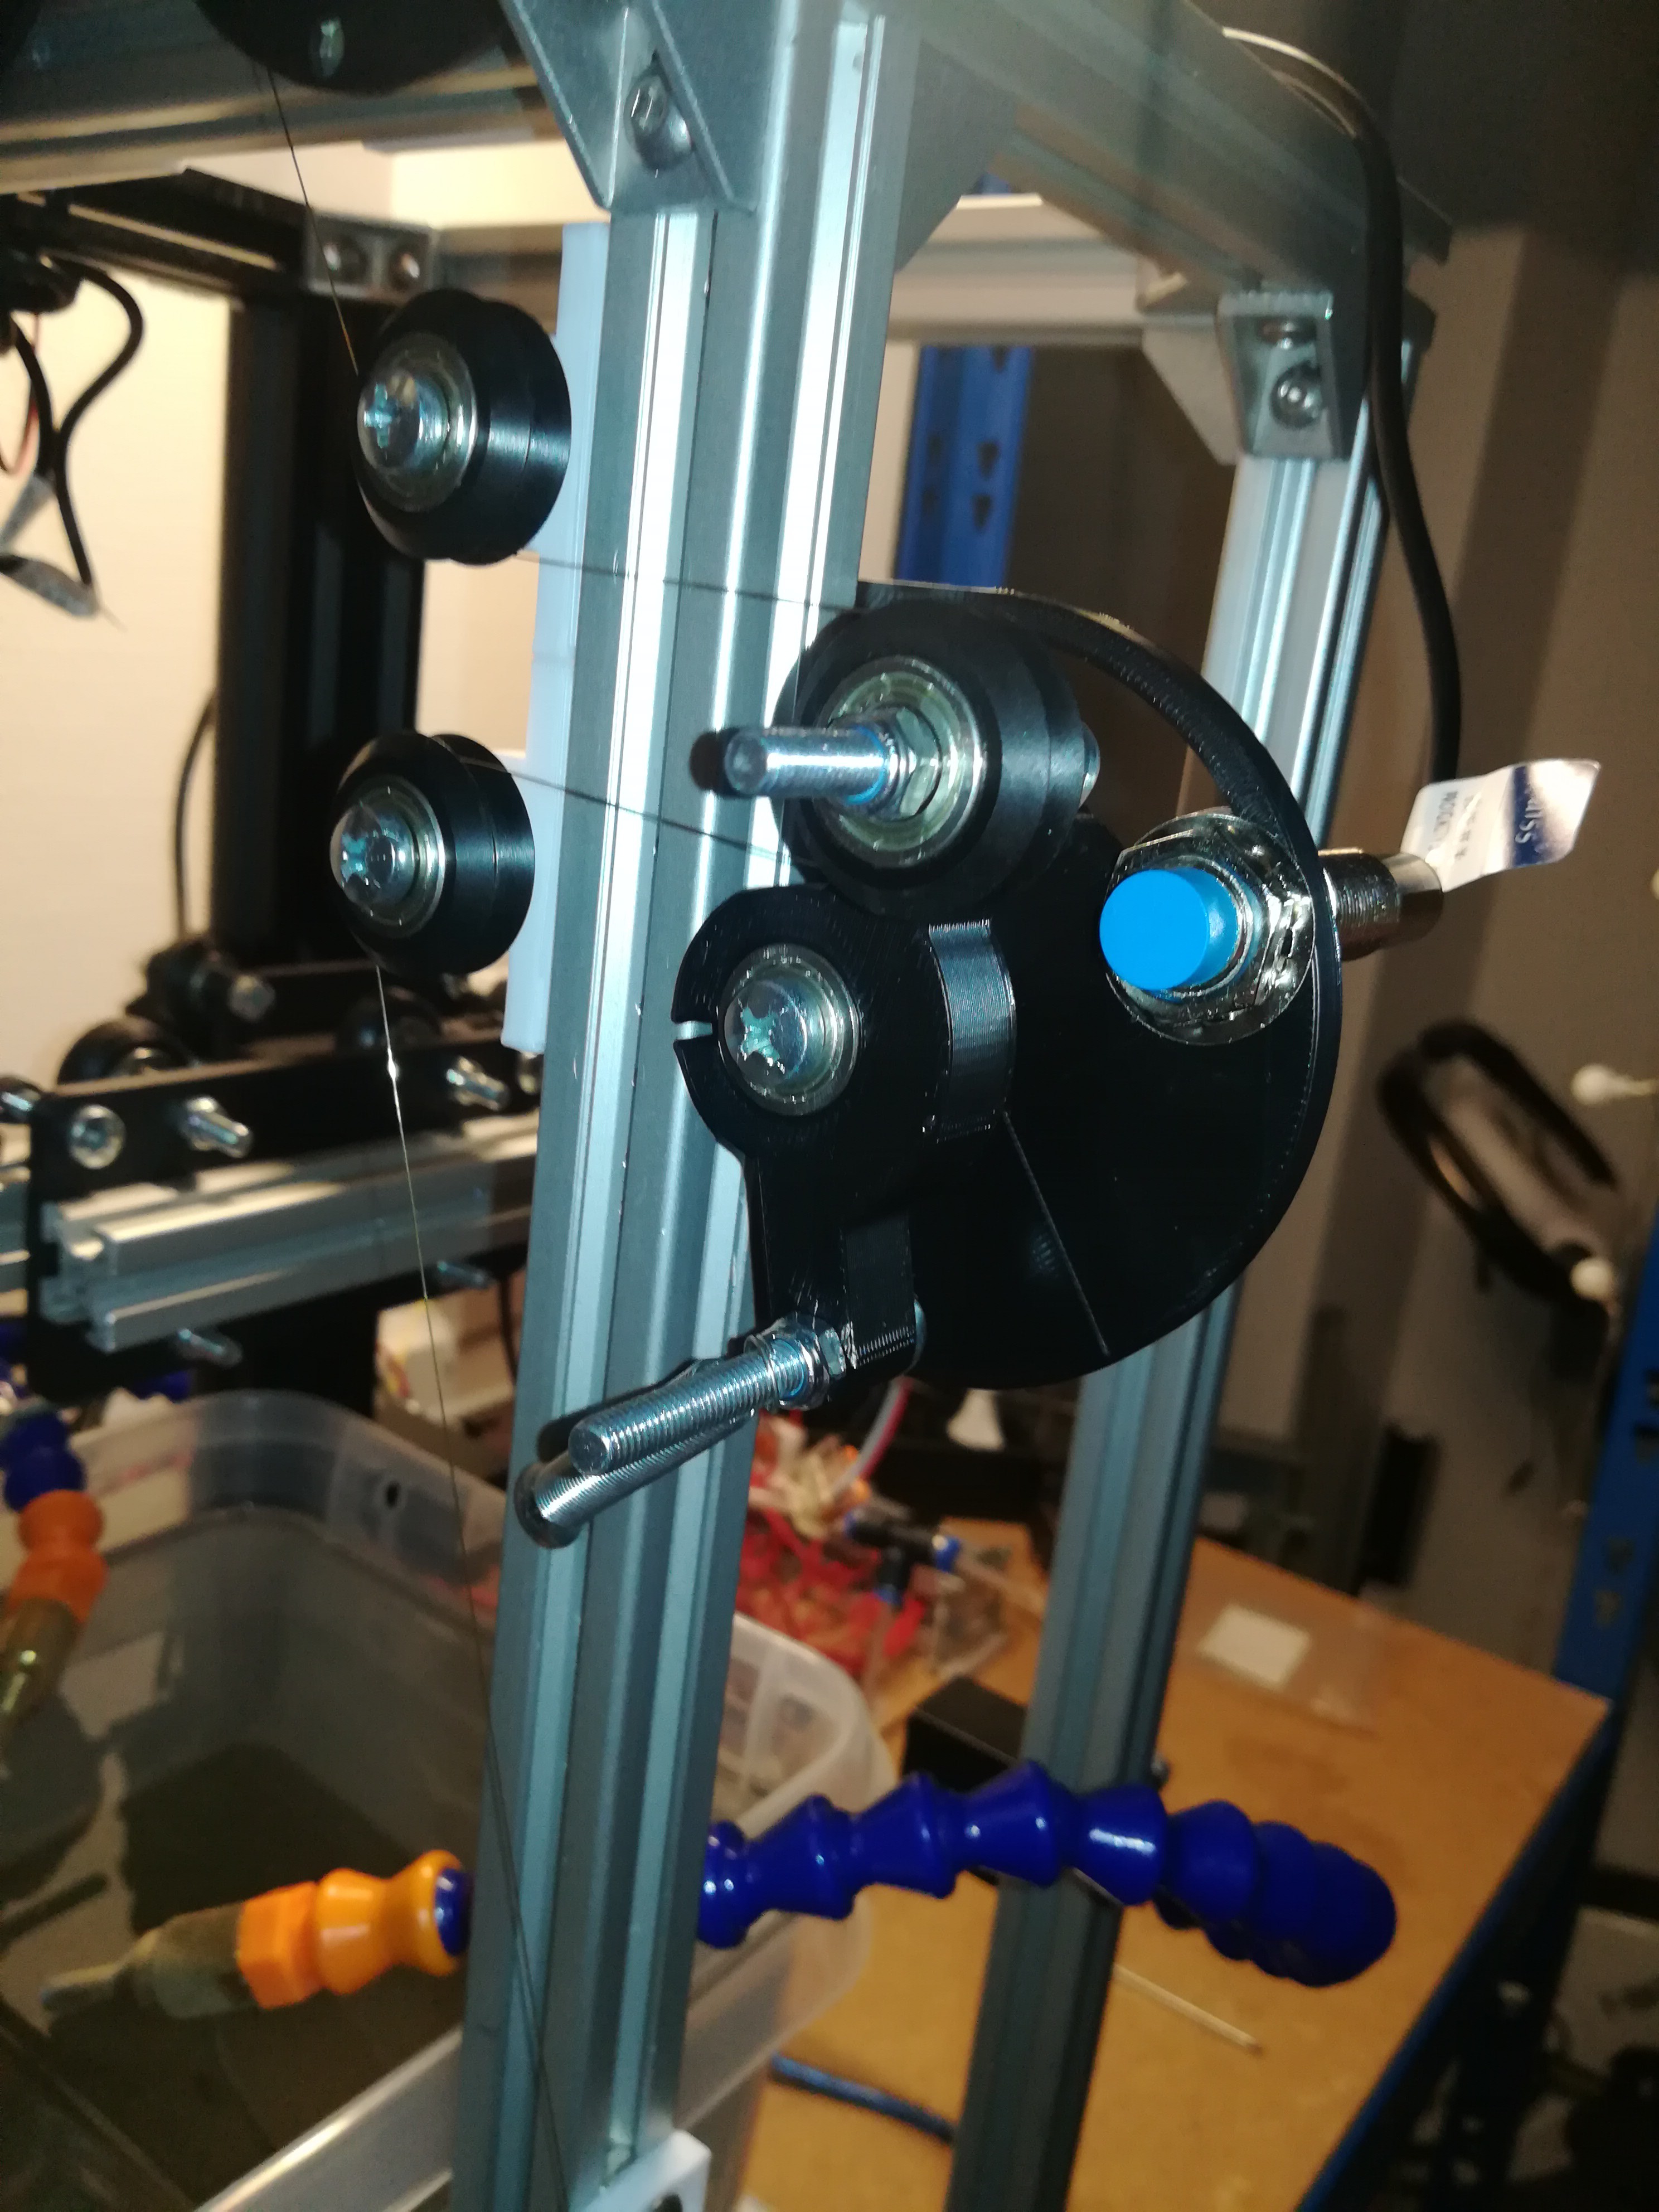
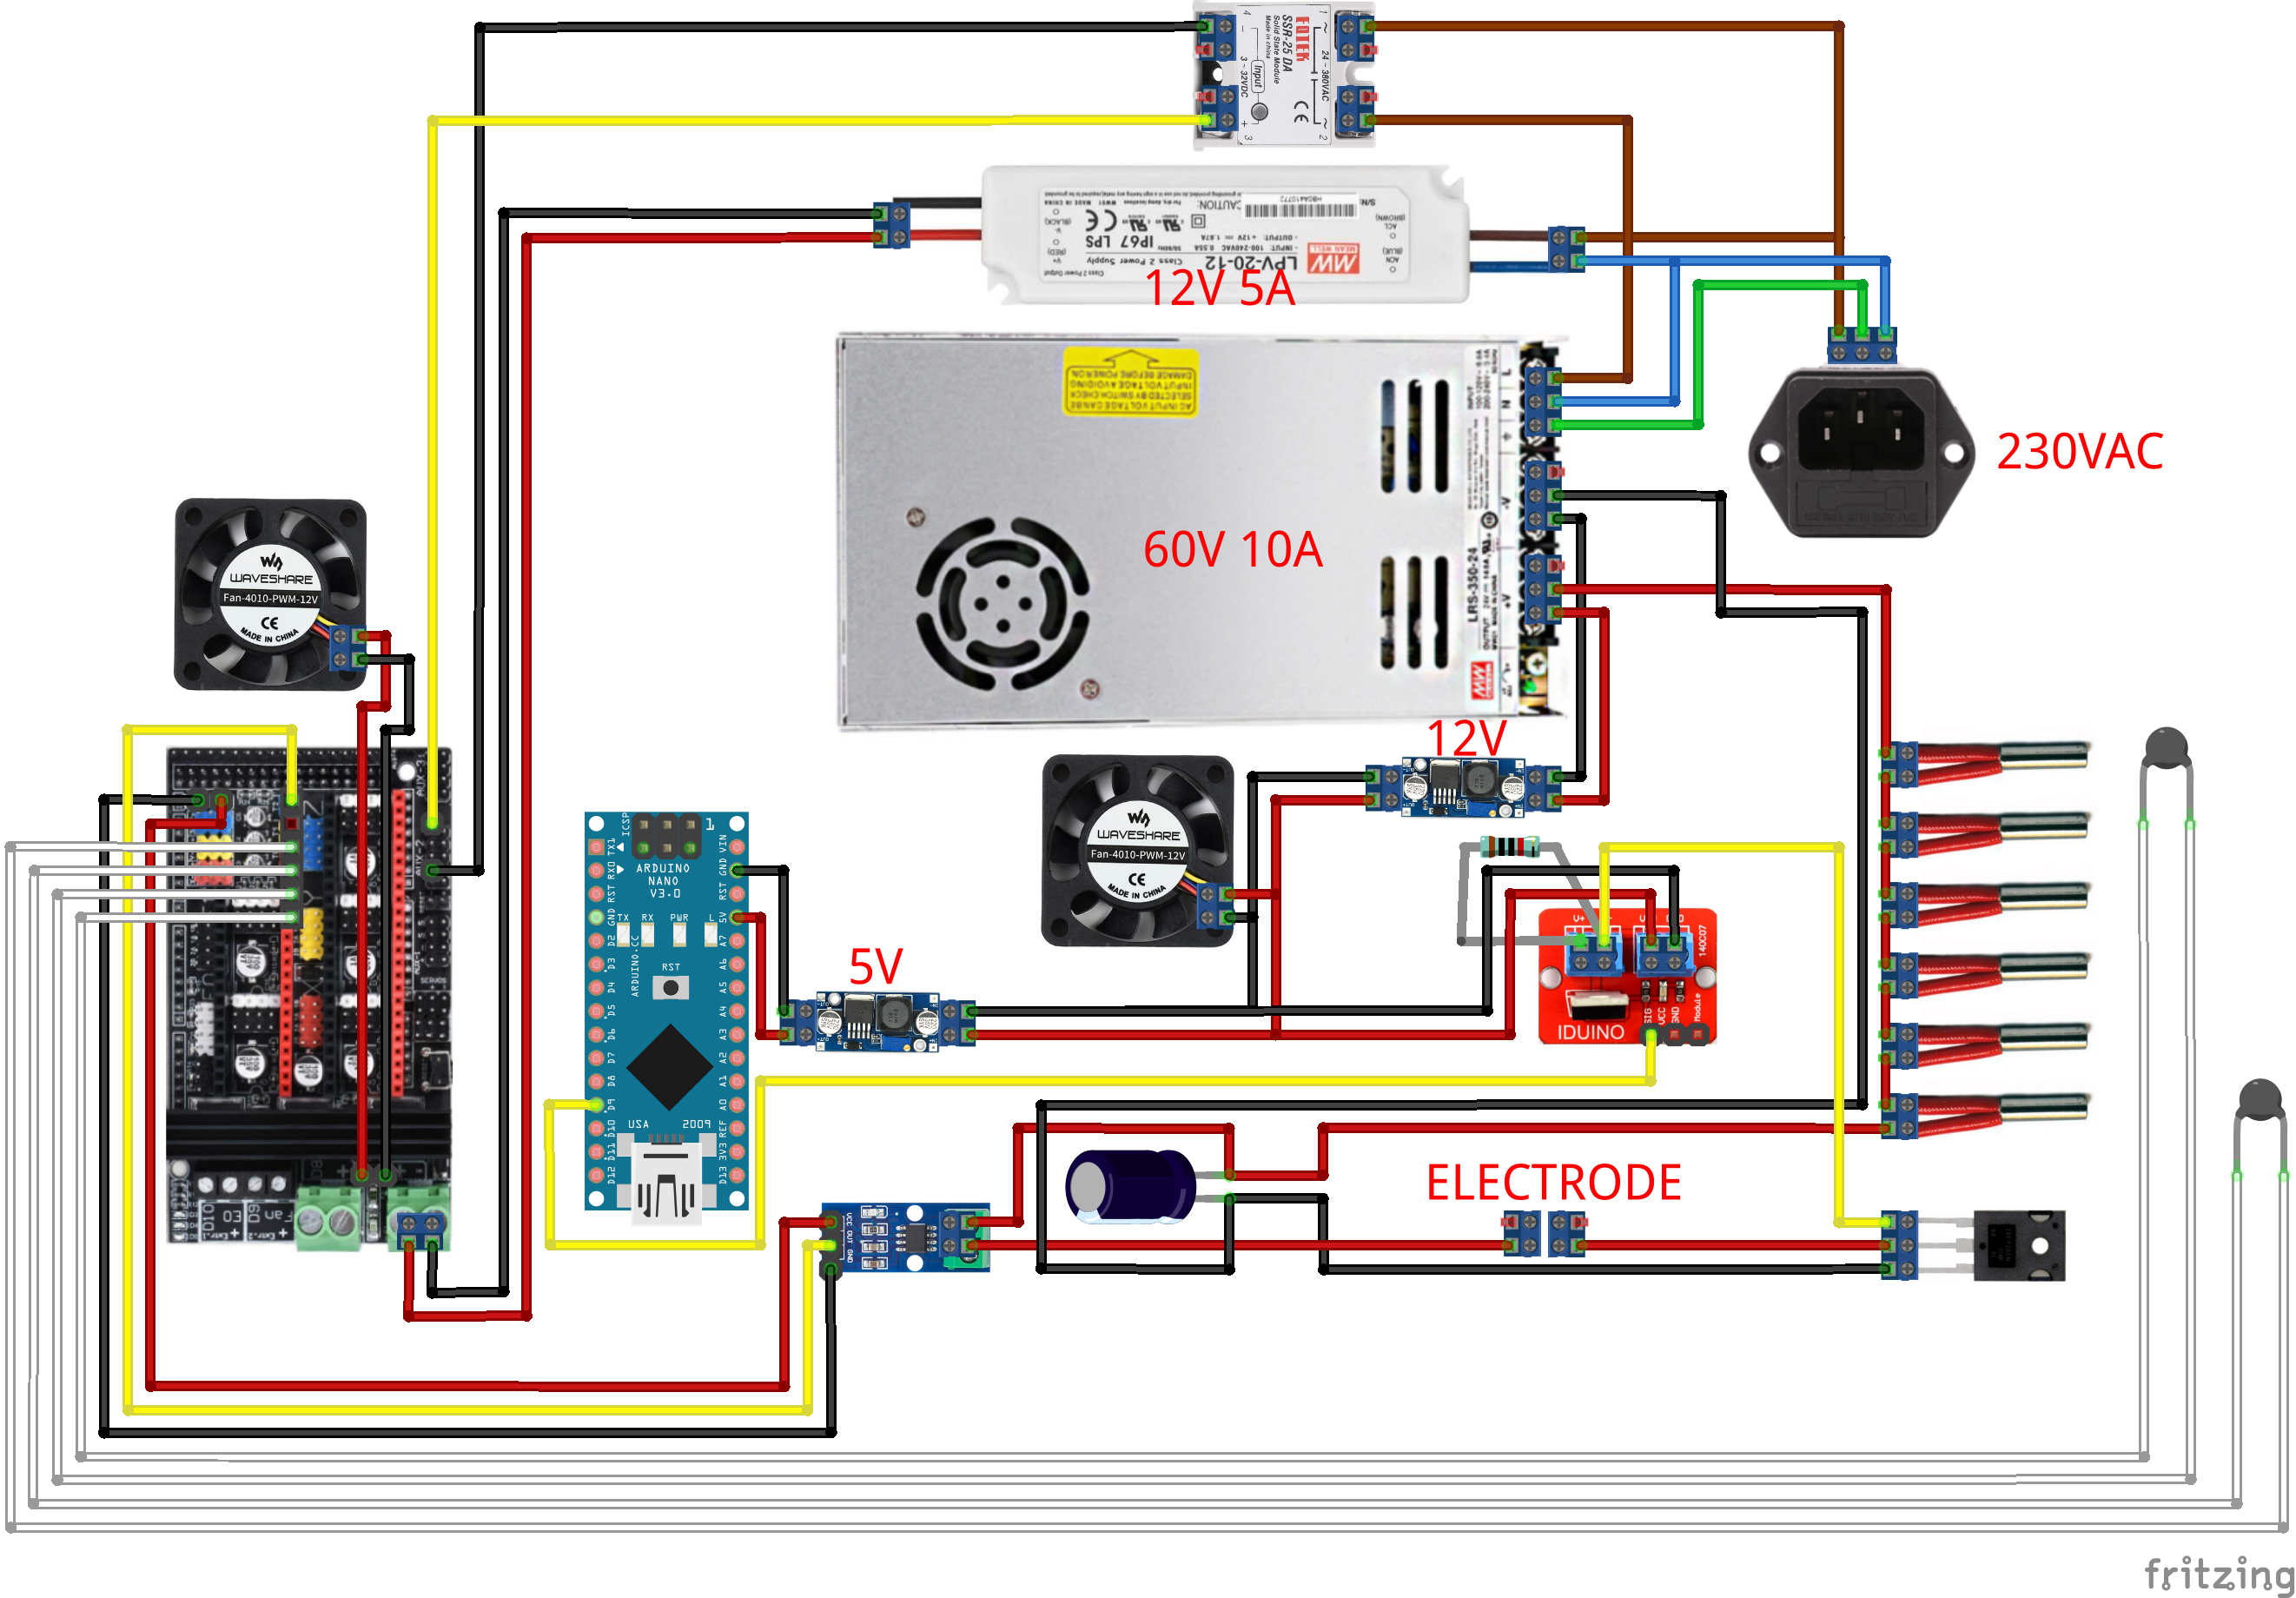
I added another switch for detecting a wire break. If the wire loses all tension the spring pulls the wheel back and triggers the switch. The switch is connected to the machine controller and calls the gcode for turning the EDM power suppy and wiredrive off.
With some changes of the machine, arc frequency and duty cycle I could finally cut the 20mm aluminum bar, on which I failed miserably, yesterday. It took me almost an hour and around 1/3 of the wire spool, but I'm really happy to see that it's possible to cut such thick metal on a cheap desktop machine. I'm confident that I will find ways to further improve the machine over time to achieve faster cutting speed. In the footage, I cut the bar from outwards in, because for some strange reason the cutted parth got narrower as soon as the wire almost cut through the bar, so that the wire got pinched and broke up. I think doing it this way does also look better, because you can see the arc along the surface of the bar which would otherwise be inside the bar. The surface finish is also very smooth and you can see positions where the wire has broken up or the wire stayed in place for some time.
I think the next thing that I want to try is cutting some shapes.
I simplified the wireguide by removing the loadcells that were used for monitoring the wire tension and controlling the respooling motor, because I think they are not really needed and could cause some problems when affected by noise. Because the wire needs some tension after the wirespeed motor, I replaced the loadcell on the backside with a springloaded wire tensioner, which has two sensors for starting and stopping the respooling of the wire.
Yesterday, I tried cutting a 20*20mm aluminum rod, but the wire broke after just a few millimeters. I tried increasing the wire speed and decreasing the tension, but that did not really help. Later, I will also try to decrease the duty cycle and frequency of the arc and if that should not help, maybe changing the spark capacitor and resistance could help...
I also ordered a closed timing belt to replace the old one.
This is the first time that I tried out cutting some metal with my wire EDM machine and I'm really happy that the wire did not break and I could actually cut the workpiece.
For me that was the best possible outcome, because my expectation also included that the wire would break as soon as it touches the workpiece and I would have to change the arc generator circuit for less power or so.
But it worked out and so I can now work on optimizing the system and I can try to cut thicker, more complicated workpieces.
I also have to post more footage and details about the project to make it easy to replicate for those who would like to build their own Wire EDM Machine.
 Chuck Glasser
 Roger
Roger