 Brian Brocken
Video can be found here:
As mentioned above i thought it would be nice to test if it would be possible to 3D-print watertight hydraulic parts.
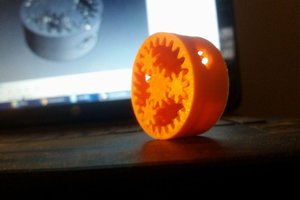
Gears
The gears used inside the pump are double helical gears, also called herringbone gears. I chose to go for this type because they produce less noise compared to regular spur gears. For the gears connected to the motor and the drive shaft i chose for regular spur just to make assembly a little easier.
Here are some specs of the gears:
- Gear 1: Spur gear -> 30 teeth, module 1
- Gear 2: Spur gear -> 38 teeth, module 1
- Gear 3: Double helical gear -> 12 teeth, module 1.5
- Gear 4: Double helical gear -> 12 teeth, module 1.5
Additional parameters used:
- Gear type: radial system
- Helix angle: 30 deg
- Pressure angle: 20 deg
- Backlash: 0.2mm
Motor
The original idea was to use a 775 brushed motor but after designing the pump chamber this turned out to be overkill. Instead of a brushed motor i went with a 2200kv brushless motor that's often used for rc planes and quadcopters. Brushless motors have an overall better efficiency compared to brushed motor but their start torque can be on the low side. For this reason the pump needs to be started under no load. The higher efficiency of the brushless motor is preferred when you're going to use it for robotics projects running on battery power.
Seals and gaskets
To get everything watertight I 3D-printed some custom seals in TPU (rubber) filament. They do a great job in keeping the fluids in and the air out. The seal between the body and lid is being compressed and held in place by 6 bolts. The shaft seal is being held in place be a seal tensioner. The most important part in keeping this thing watertight is to use enough grease. Grease also keeps your TPU filament supple which is also great to prevent leaks.
Bearings
As you might've noticed, this pump doesn't have any bearings. The main reasons for this are:
1. I didn't have the right ones in stock and had to wait to long for them to arrive
and 2. when testing out the fitment for the herringbone gears inside the pump i noticed the chamber itself held the gears perfectly in place since there's a huge contact area between them. this in combination with some grease (or oil if you're using it as hydraulic fluid) works great to get the pump working with little to no wear on the components.
Specs
To get some specific numbers on flow rate, pressure etc... I will have to do some more testing. If you're interested you can check out this section for any updates.


 Crypto [Neo]
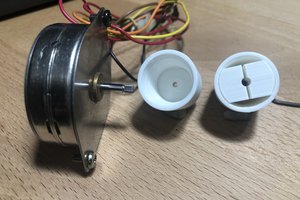
 kmatch98
 Dongil Choi
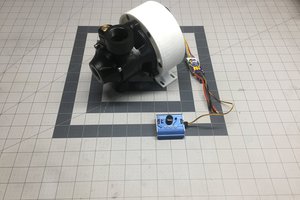
 Andrew Mayhall
I'm wondering what the pressure of this pump is - that is just as, somewhat more important than the flowrate.
As you said, the motor needs to be started under no load and has lower torque at startup (which shouldn't be true, electric motors have the best torque at no rotation speed, but that might be the motor controller requiring some EMF to adequately control it), so while it can pump a lot, you ultimately want a pump that can build up enough pressure, and use hydraulic buffers to use as storages for temporary high energy motions.