In this project, make the fuse indicator for the cartridge fuse. These fuses are usually used along with a holder which is used to put the fuse in the circuit. If this fuse gets blown due to overcurrent, the circuit will break. This project will take you to a detailed article about making your own circuit which can actually work as an indicator. It indicates whether the fuse is good or blown by generating an audio alarm and glowing LED.
Concept
This circuit is based on a 555 timer wired as an astable multivibrator. A multivibrator circuit is basically a non-sinusoidal oscillator with regenerative feedback. It is a two-state circuit that has zero, one, or two stable output states. Depending on the number of stable output states there are three basic types of multivibrator circuits namely Bistable multivibrator having two stable states, Monostable multivibrator having one stable state, and Astable multivibrator having zero stable states. In the case of Monostable and Bistable multivibrator, an external trigger pulse is required for their operation whereas in the case of Astable multivibrator it has automatic built-in triggering which switches it continuously between its two unstable states both SET and RESET.
Astable Multivibrator
These circuits are not stable in any state and switch outputs after predetermined time periods. The result of this is that the output is a continuous square/rectangular wave with properties depending on the values of external resistors and capacitors. Thus, while designing these circuits following parameters need to be determined:
- Frequency (or the time period) of the wave.
- The duty cycle of the wave.

You can read more about the Astable Multivibrator from here.
Working
When the fuse is not blown, a positive voltage is applied at junction P (IC’s pins 2 and 6) through R2 and D1. This holds the voltage at the junction above 2/3 Vcc and prevents the IC from oscillating.
When the fuse blew off, IC is free and starts oscillating. Pin 3 drives the loudspeaker (8-ohm) and gives an audio alarm. D2 lights with a constant intensity when the fuse is not blown but dims when it is blown off.
If you wish to use this circuit with a low power supply (say about 5V), then it is better to reduce the value of R3 to about 330 ohms. (In any case, the current through LED should be less than 20 mA). The frequency of oscillation may be changed by changing C2’s value to 0.001uF or 0.01uF, or even 0.02uF.
If you wish to change the frequency by changing R1, then make sure that R1 and R2 are such that at point P, the voltage is above 2/3 Vcc. The voltage across R1 (assuming voltage at pin 3 corresponding to low state is oV) is given by

Where Vcc is the supply voltage, VTD is the threshold voltage of the diode (D1), and VTD = 0.6V. It should be > 2/3 Vcc. For 555 IC, Vcc is such that 5V ≤ Vcc ≤ 16V.
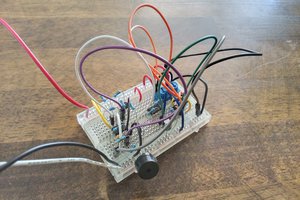
Putting all the stuff together


Follow the below steps to assemble the device at home easily:
- Download the Gerber files for the PCB from here or from the files section.
- Go to PCBWay.com and upload the files get your PCBs at home at a very low price. Also, you can get a $5 Welcome Bonus. They are the most cost-effective and quality-oriented PCB manufacturers. You can order your prototype PCBs in a small quantity, as small as 5 pcs of PCB. In addition to the standard PCBs, we could also support advanced PCBs, FPC/rigid-flex PCBs, and other related services.
- Solder the components on the PCB as per the schematic and design shown below.
- Put the fuse in the fuse holder.
- Connect the input power supply (DC) in the input terminals and load on out terminals.
 UTSOURCE
 555Techlab
 Sagar 001