 Electroniclovers123
If, like me, bought a DSLR during Christmas, you may want some accessories soon (and make sure to check out these great websites for tips on DSLRs and DSLR video tutorials). There is no doubt that one accessory you will want is a remote shutter. This allows you to place the camera on a tripod or on a tripod and trigger the shutter without the chance of shaking when holding the camera, and it can also be used for self-portraits without a timer. Today, I will explain the magic of remote shutter release, how to make your own photos and how to extend it to high-speed photography.
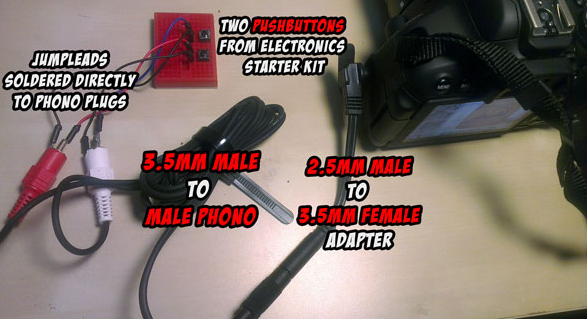
The first thing to know is that there is actually no magic or complex digital protocol involving shutter release; this is a simple switch that completes the circuit-touch two wires to solve the problem. No need to worry about voltage, power supply or electronic schematic, just switch. On the camera side, this is a standard 2.5mm stereo jack.
My Canon Rebel T4i (reviewed here) can focus and release the shutter remotely, although you may only do the shutter. Since most cameras still have autofocus, you may not even need a remote focus button, but I will install it anyway.
On the side of the camera: 2.5 mm male plug
2.5mm is especially used to connect external microphones or earpieces on old mobile phones or walkie-talkies. Please note that 2.5mm is smaller than the 3.5mm standard plug used in most consumer headsets and cheap speakers. Although I can use many 3.5mm cable coils, I had to find a small 2.5mm male to 3.5mm female to fit the camera. As long as you have a 2.5mm male plug that can be plugged into the camera, you can assemble some useful things.
Trigger
You have a few options here:
If the trigger end has a 3.5mm or 2.5mm male connection and you want the real McGyer to work without breaking or welding the original cable, then tie the pull tab from a can of soda and bend it in the middle with pliers. Mount it tightly on the base of the plug, then press it to the tip to complete the circuit and trigger the blinds. This instructor does a great job showing you how to do it, so I will point you in this direction; except that I don’t drink soda, (don’t mistake me for a self-righteous “I’m healthy” Statement-I brew my own beer, so I can supply unlimited!)
For a more reliable choice, you may need one or two buttons; these switches are briefly connected before the spring is pushed back again.
This is what I use: 2.5mm male to 3.5" female adapter, 3.5mm male to phono audio plug
2 jumpers have been soldered. Every phono plug with a turntable I found in the Arduino starter kit comes with 2 momentary buttons.
For wireless solutions, please think about it. To take it to another level, use a basic transistor (such as 2N2222) or a transistor-controlled opto-isolator Arduino. Coupled with a sound sensor and external flash, you will get an extremely advanced trigger for high-speed photography, as shown in the video below. A single button can turn off the lights in the room, trigger the flash and shutter when sound is detected, and then turn on the lights again. (The code is available on GitHub)
 Timescale
 The_Mekon
 Quinn
Quinn