Close
0%
0%

LibreServo

LibreServo is a project with the goal of easily converting any standard size servo into the smartest servo possible.

Similar projects worth following
In the past (more than 10 years ago), I bought more than 20 5990TG servomotors from Hitec to build my second biped robot. They were expensive, with good hardware but still as dumb as the cheapest servo.
Years have passed and I always had a thorn in my side. Why not instead of dumb servos with excellent mechanics modify them to have clever servos with excellent mechanics? And, since we are going to design something new... why not make it in such a way that they would be compatible with future servos that I may buy?
The idea is to design the electronics of the servomotor to turn any standard servo into the smartest one in the world.
Text extracted from: https://www.libreservo.com/en/articulo/libreservo-objectives

This project was born as a necessity of mine to build a biped robot with intelligent servos to be able to “feel the muscles” to walk more human like. In the past we had OpenServo, and I think this project inherits something from it, but OpenServo died many years ago and it didn't reach my expectations anyway (power, communications...), and the commercial alternatives are way too expensive (Dynamixel, Herkulex, Lynxmotion...).

DY-BOT
DY-BOT v2

It’s not hard to find servo motors with about 25-30 kg/cm of torque nowadays with quality ok, not great but ok for less than 20-25€ each although now everything has increase their price, and with that power from one of the well-known companies a smart servo costs more than 120-150€ easily, so we have room to play with. We can use cheap servo motors, just the hardware, with the coolest servo controller I can design for under 40€ everything.

5990TG disassembled
5990TG disassembled
Chinese servomotors I have bought

My goal with LibreServo is to make any standard servo the “smartest” one in the market. The "gold standard" nowadays is Robotis-Dynamixel, LibreServo should be better than that, that’s my goal at least.
A few characteristics of LibreServo:

  • Compatible with standard servo motors (No need to change the bottom cover of them!)
  • Voltage: From 4.5V up to 18V (Recommended: 5-13V)
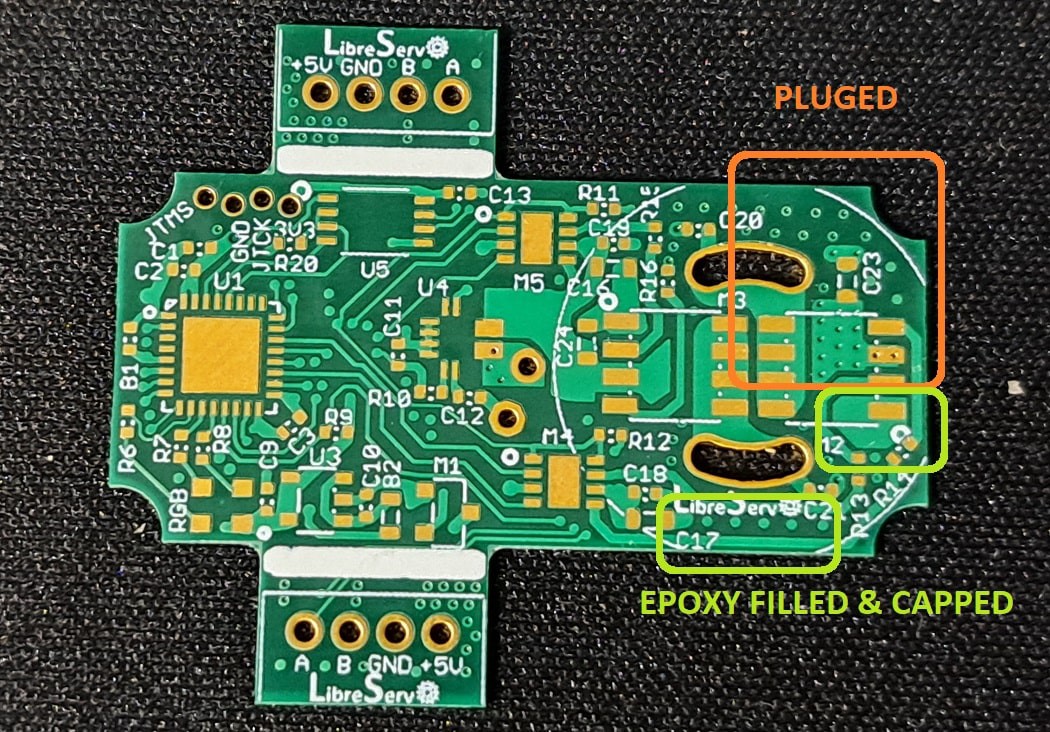
  • Communications: RS-485 half-duplex. Max Speed 9Mbps. Daisy chained. CRC-16
  • Amp: Up to 7A continuous (FDS8858CZ || VBA5311)
  • Micro-Controller: STM32F301k8 (cortex-M4@72MHz)
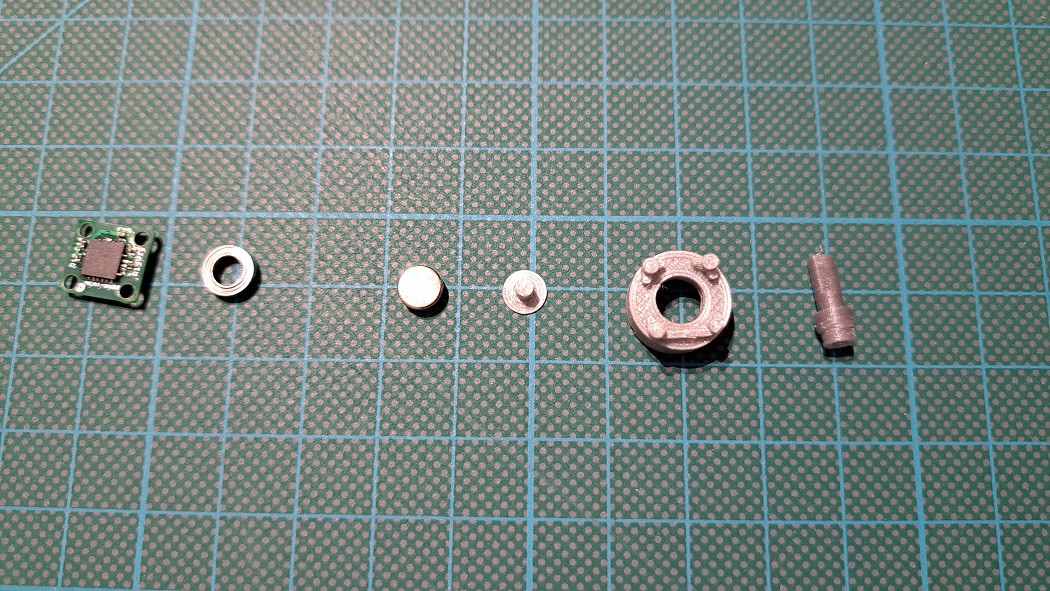
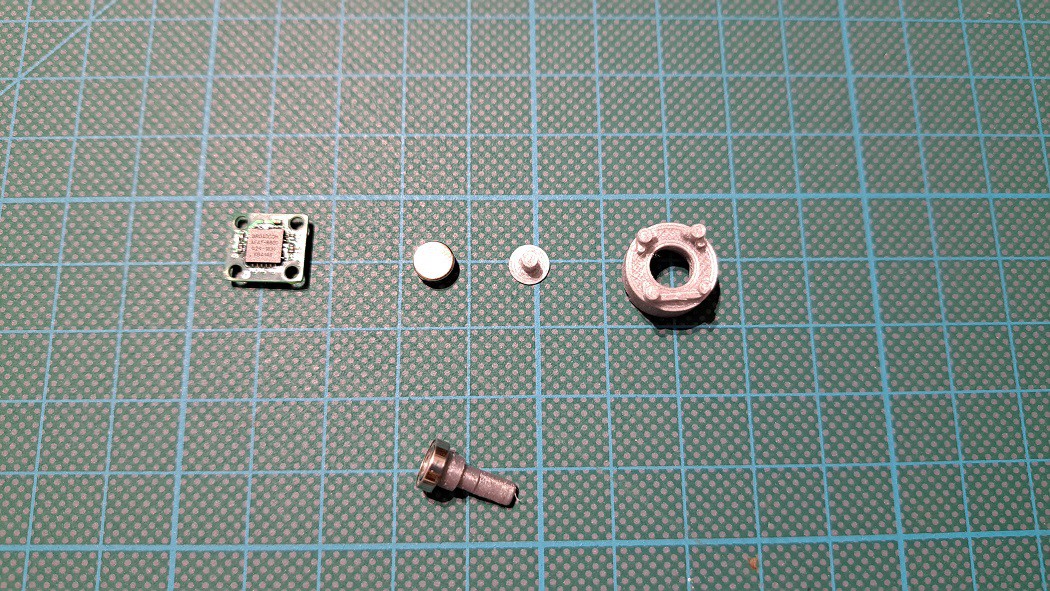
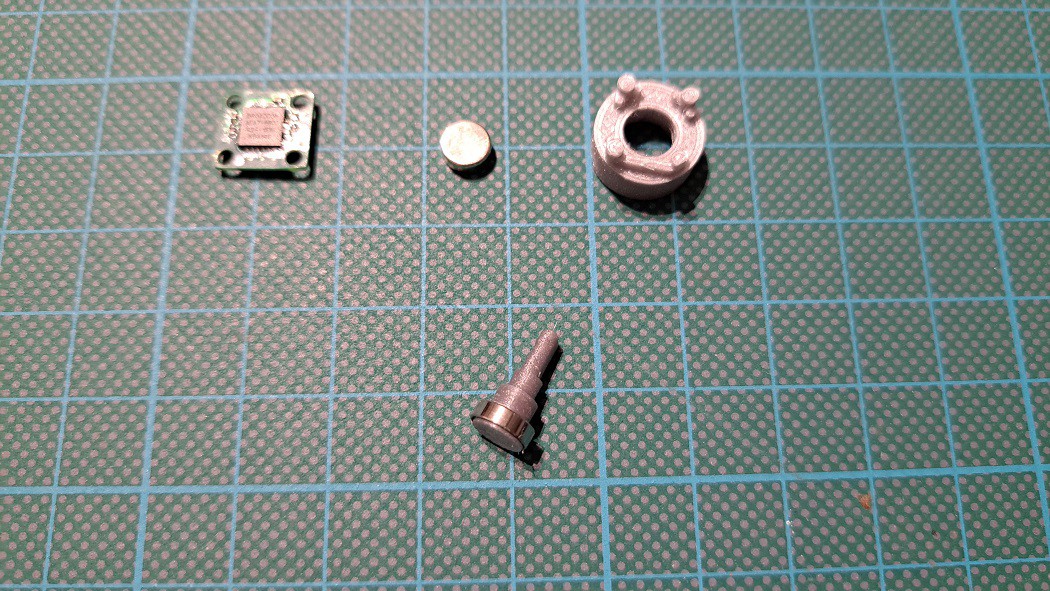
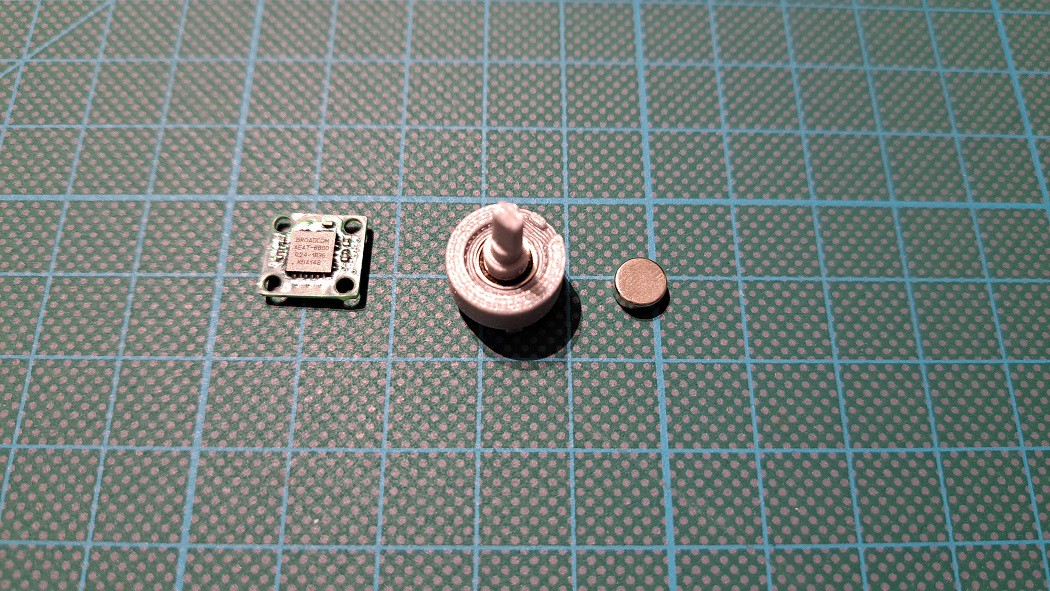
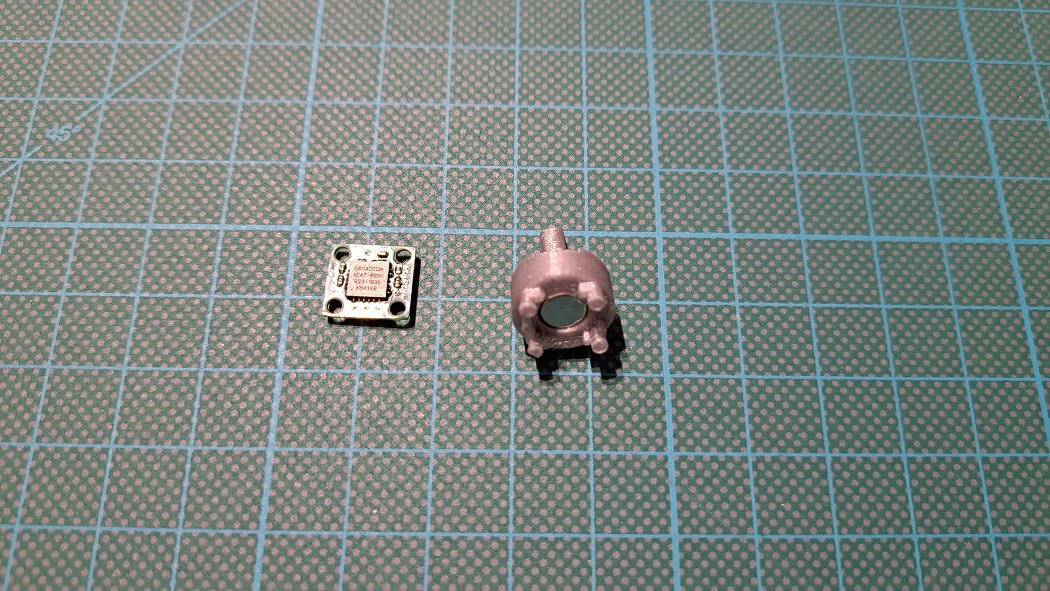
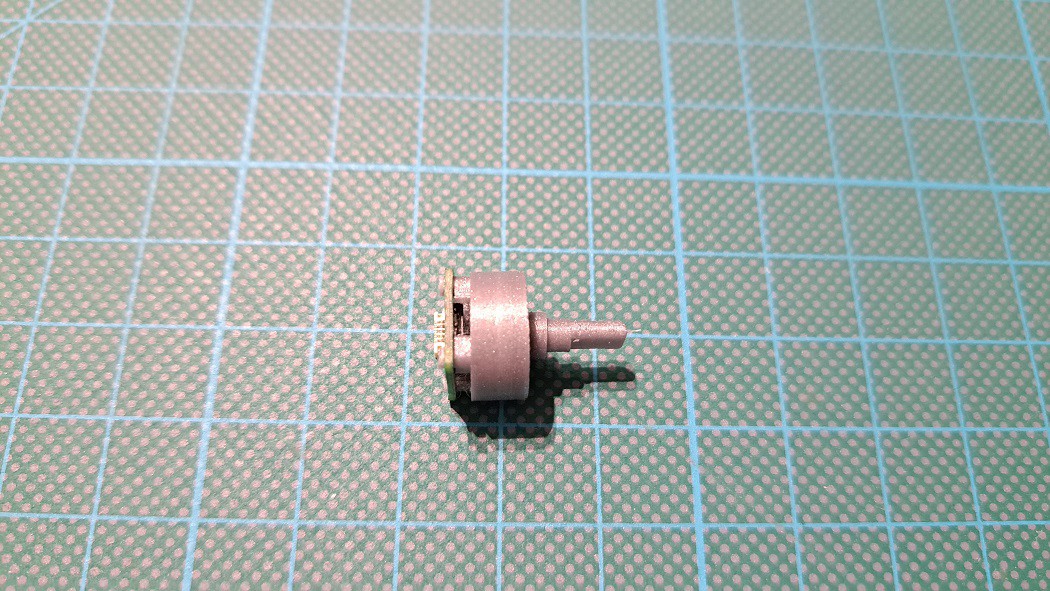
  • Position sensor: Magnetic encoder, 16 bits of resolution! 360 degrees (AEAT-8800). Using the servo motor potentiometer will be possible to lower the cost but will lost precision and some characteristics.
  • For the encoder I have designed 3D parts to substitute the potentiometer and used the same hole/space than the original.
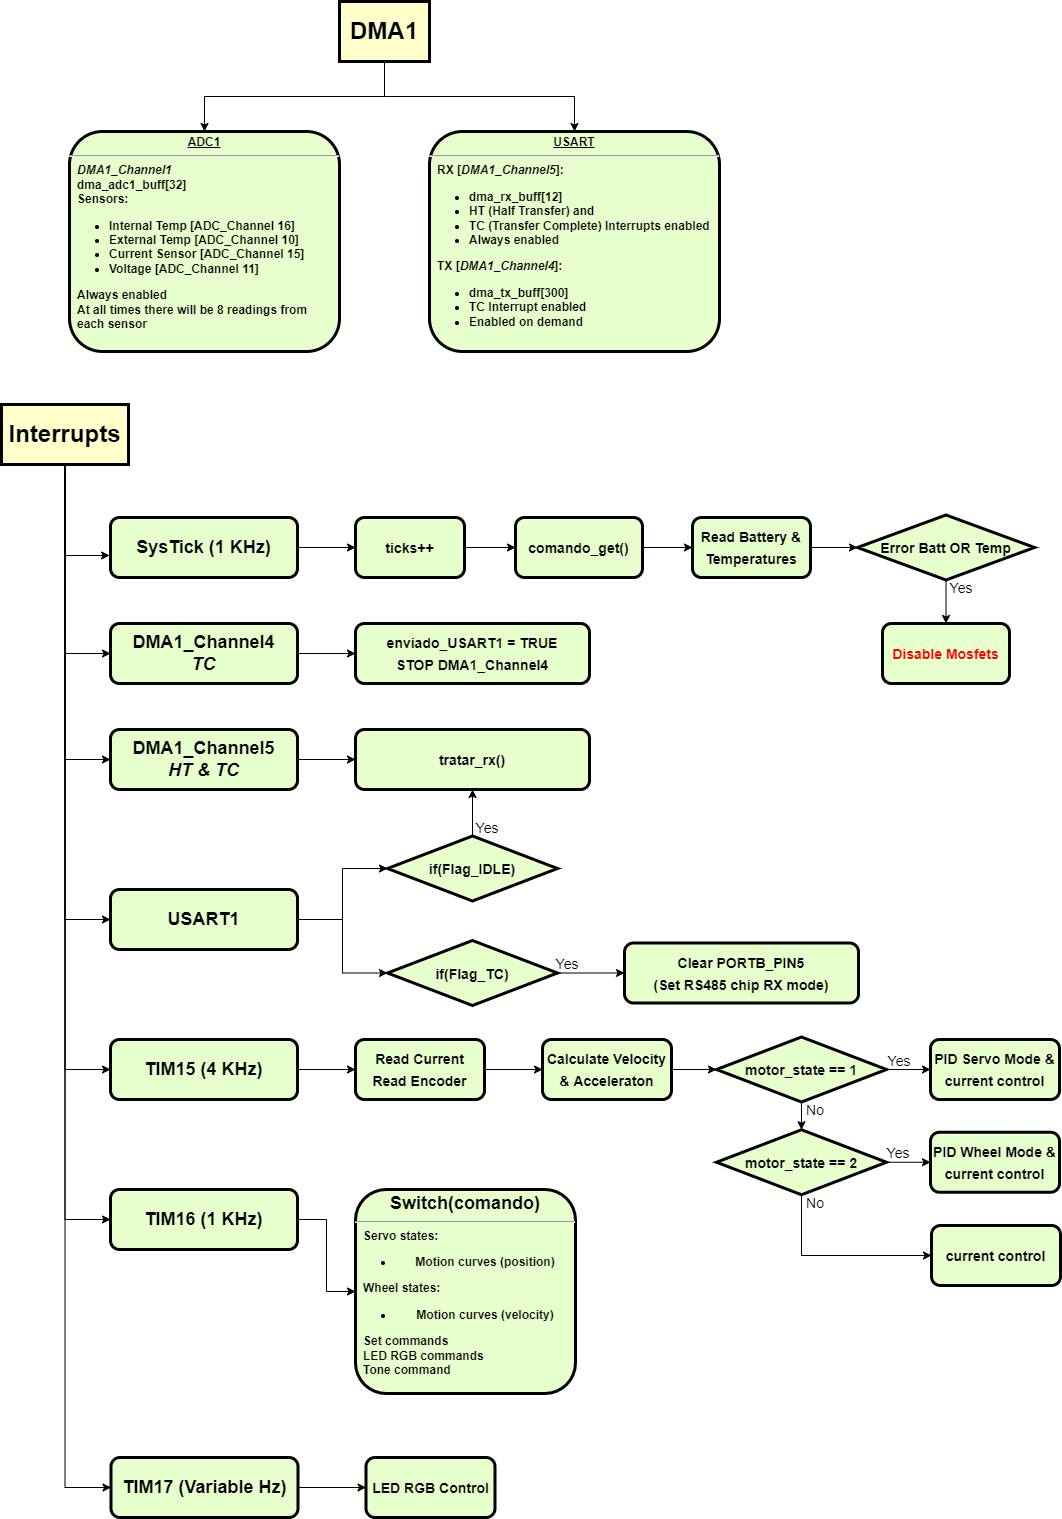
  • LibreServo will generate their own curves (sine ramps, trapezoidal ramps, hermitian curves...)
  • Current sensor: +-15A ACS711
3D potentiometer-encoder adapter

I have tried to use good hardware, better than the commercial ones, and then, in the software side, I will try to really shine against the competence, communication protocol, huge flexibility, different motor curves...

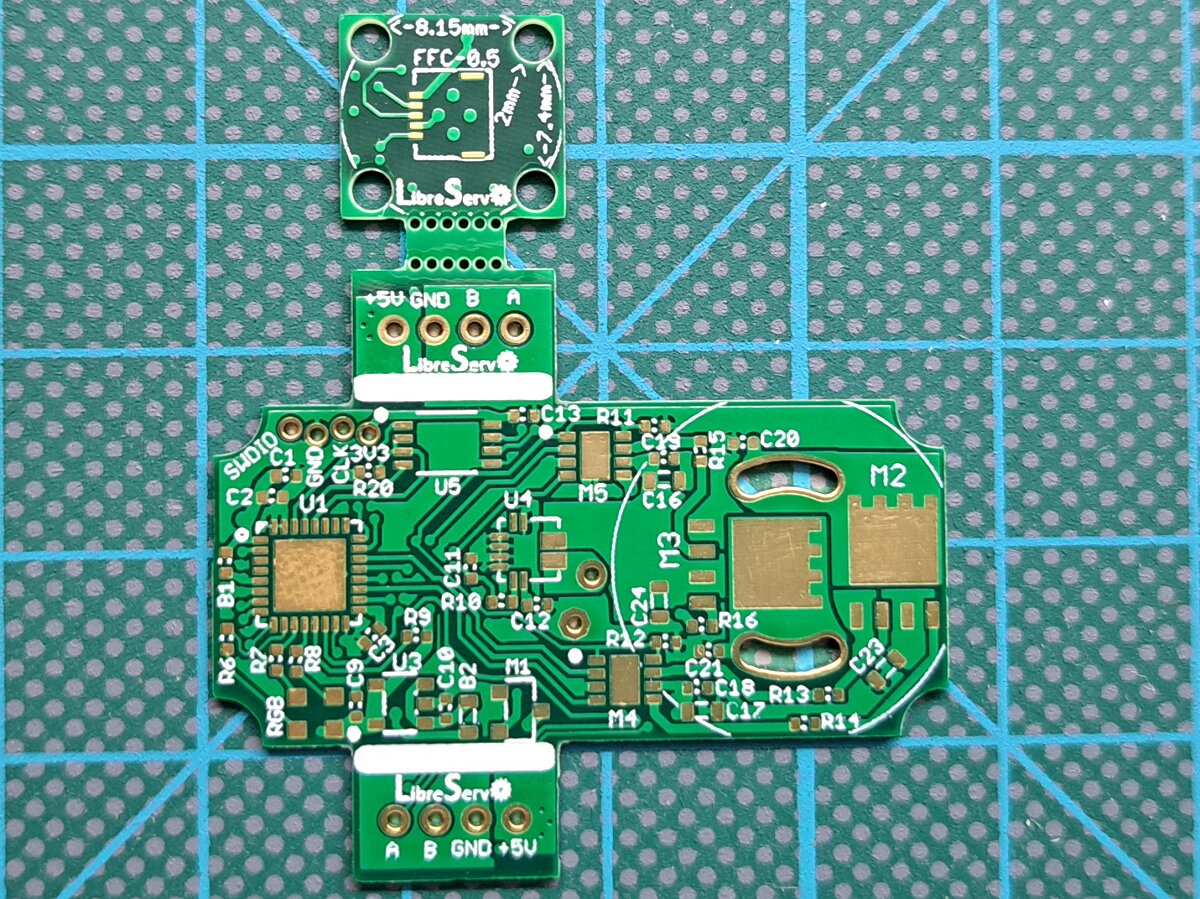
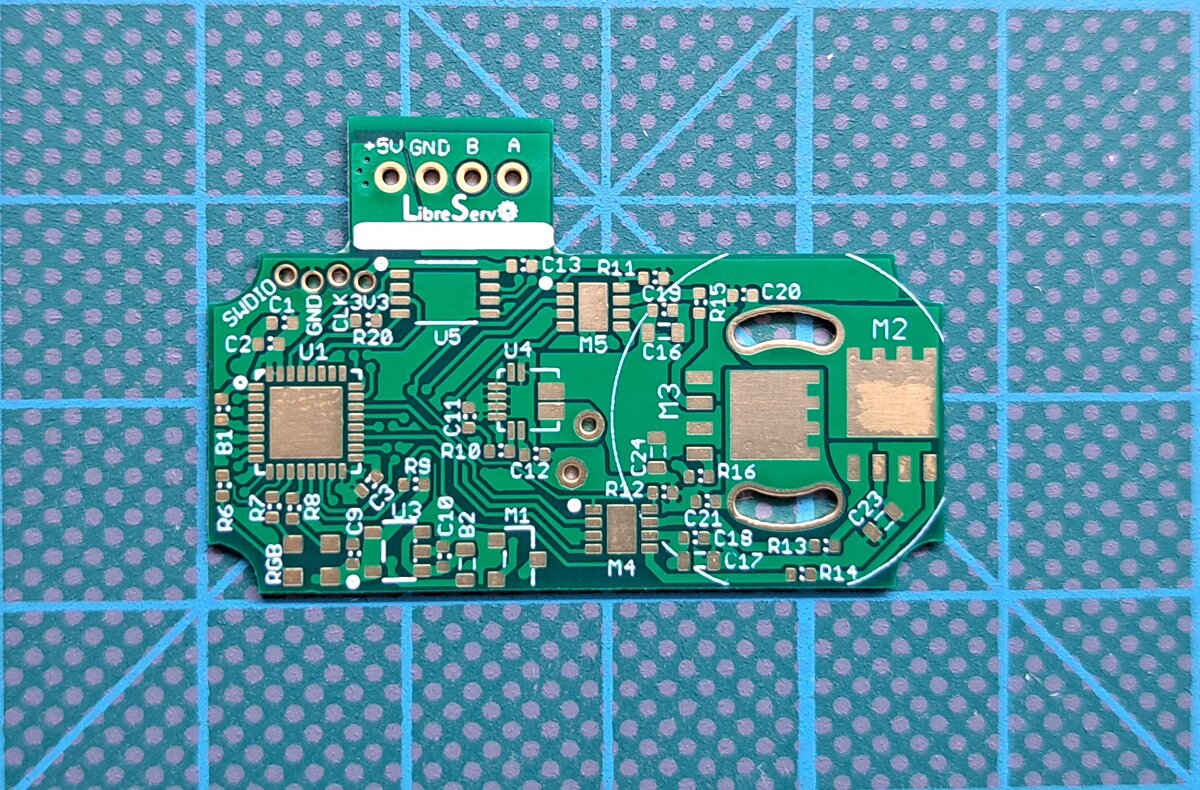
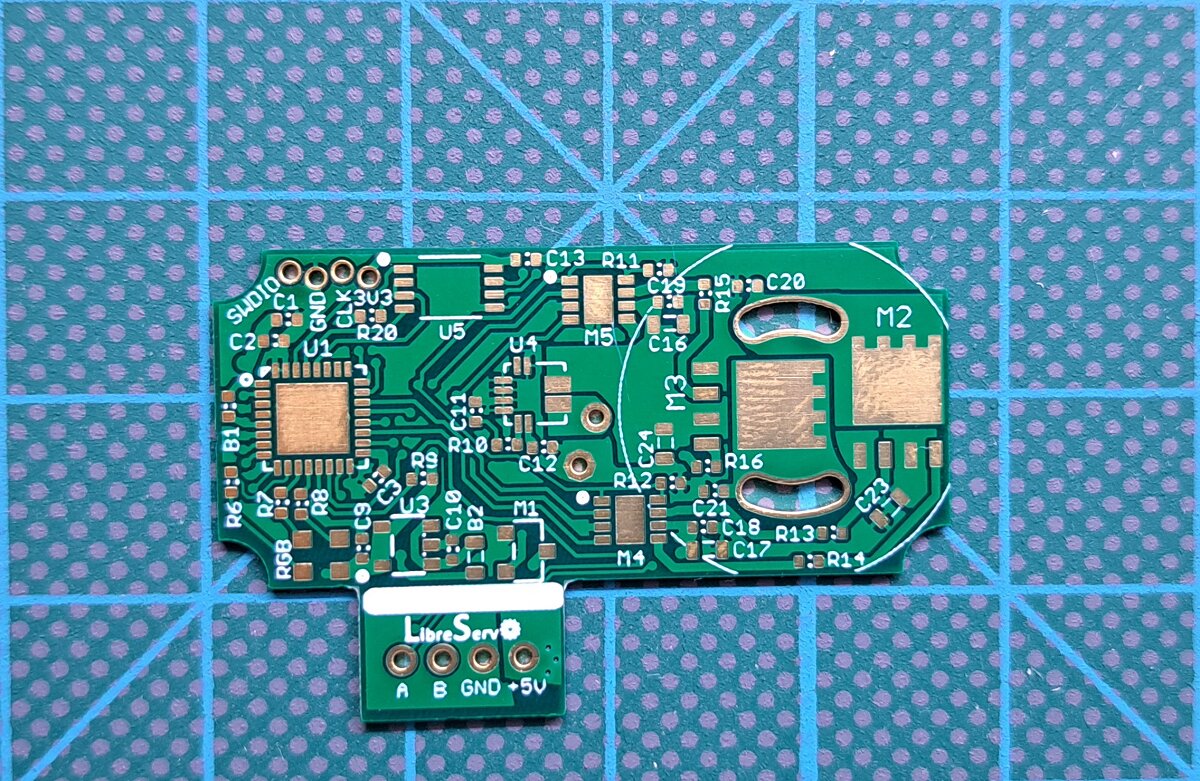
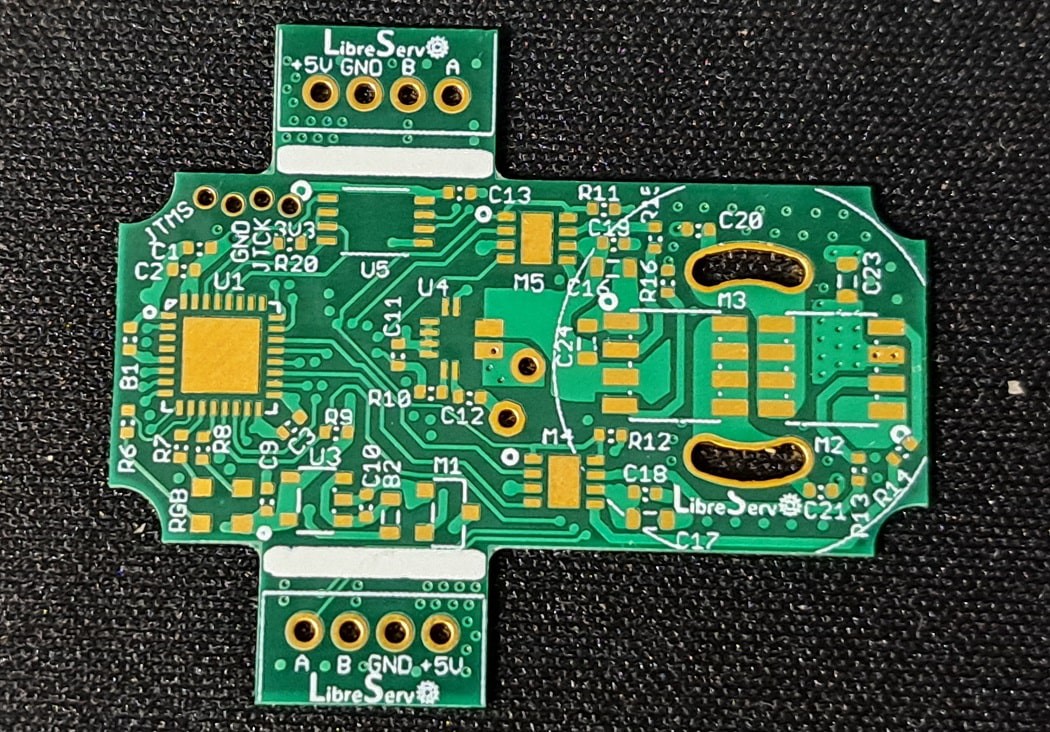
The project started 3 years ago, it has been progressing slowly because my lack of time but it will finish 100% sure even if it takes me 3 more years. I have been documenting my slow progress in the web/blog of LibreServo  (partially translated). I have finished the third version of LibreServo, with every component tested and selected. I have changed lots of components from the first designs and also the final form factor.

Old LibreServo v1
Old LibreServo v1
Old LibreServo v1
Old LibreServo v1
Newest LibreServo v2
Just to understand better the final result

**There will be versions with only one connector on one side or the other.

The following video is from the second version of the PCB test.


Creative Commons License

  • 1 × STM32F301k8 Microcontroller
  • 1 × SIT3485EUA RS485
  • 1 × MPM3610 DC-DC
  • 1 × AP2112 Power Management ICs / Linear Voltage Regulators and LDOs @3V3
  • 2 × FAN3227/3 Mosfet Driver

View all 10 components

  • LibreServo v2.3.1. Release Version

    Luis05/24/2023 at 13:49 0 comments

    LibreServo has finally reached the first final Hardware release (version 2.3.1)!

    party


    It has been a long road and there is still a long road ahead, but now on the software side. LibreServo will not stop here and later on there will come new projects that make use of LibreServo, like a possible 3D biped robot, but all of that will come in the future and all of it will be announced here so let's stop the guessing and talk about the now.

    In this version small modifications were made to the release candidate 2.3 as we saw in the changes in the final version article. In addition, all the promised versions of LibreServo were already made, version with two connectors and version with only one connector on one side to facilitate its use in any project and situation.

    LibreServo v2.3.1

    LibreServo v2.3.1LibreServo v2.3.1

    The schematic has also been modified and it has been used to find and put in it alternative parts that are compatible with the PCB. In these times of scarcity it does not hurt to remember the stores that I personally use to find and buy components.

    Finally, not only the schematics have been uploaded to the LibreServo github, but also the gerber files so that you can have LibreServo produced directly (to produce LibreServo in 4 layers instead of 6, remove the .G2 and .G3 files from the compressed file). Except the encoder file, the rest are ready to use the Specify a location option in the Remove Order Number option offered by JLCPCB, the control number that JLCPCB puts is under the JST connector once the board is soldered, so it is perfect. In the encoder you will have to use the Yes option in Remove Order Number because it is such a small PCB that the JLCPCB number does not fit.

    You can check also the schematics and more info in the article of the Realease Version of LibreServo

  • How well gold suits LibreServo!

    Luis01/31/2023 at 14:33 0 comments

    A few days ago I received the LibreServo boards I had ordered from JLCPCB. As I told you in the article of changes in LibreServo v2.1, the new version of LibreServo added two extra layers to reach the 6 layers and thus have the offer of JLCPCB and after receiving them and see them ... I only have words of absolute amazement.

    The result is magnificent, not only the gold finish looks great in it 😎, the silkscreen itself is much better than when you order plates of four layers or less and the tracks filled with epoxy and covered in copper give an extraordinary result, not only at electrical/routing level and for soldering is a huge improvement, but also allows silkscreen printing on top of vias without any problem, which in LibreServo with the philosophy that has to point all the components to facilitate then when soldering, it comes great.

    The only problem I have seen is that many vias have not been filled with epoxy and covered in copper. I have looked at the JLCPCB website and you have to indicate exprocess that you want to fill all the vias, which I did not do and that's why many arrived well, and many others as normal vias.

  • How to properly tune a PID

    Luis01/20/2023 at 10:18 0 comments

    This article comes to summarize the fantastic video that Peter Harrison made a few days ago on YouTube about the simplest and most effective way to tune a PID in a few minutes instead of days. I followed that video to tune the LibreServo PID and the results were amazing.

    There are hundreds of guides on the Internet on how to adjust a PID and they can all be summarized in the following simple steps:

    • Set KD and KI to zero and increase KP until the system corrects the error and starts oscillating. That would be the maximum KP
    • Increase KD until the KP oscillation stops.
    • Increase KI slightly so that the system fully corrects the error.

    They seem like three simple and quick steps, but the reality is that in the end it becomes a sort of trying to guess the constants and after hundreds of tests and hours, if you are lucky, you get a relatively stable PID. It is a rather cumbersome task that rarely achieves a completely satisfactory result.

    Let's forget about all that and try to obtain KP and KD mathematically. KI in a dynamic system is not necessary on most occasions and introduces more disadvantages than advantages, so we will forget about it for now. From now on, although I talk about a PID, I am really referring to a PD.

  • LibreServo v2.1 changes

    Luis01/20/2023 at 10:15 0 comments

    In the previous article on how to tune a PID, you can see how LibreServo is already fully operational. All the collected data you see in the graphs are data returned by LibreServo and the movements in the video are also real LibreServo movements. With this I want to say that LibreServo is already very close to a final and mature version of the project, at least in the hardware part, since in the software part there is always room for adding features and improving those already present.

    With all the above said, I have made a new version of the hardware improving the little things that I have been seeing in the last months. Although at first glance it is not noticeable, changes and tweaks have been made throughout the board:

    • More space has been given between the connectors (the PCB has been "widened" by 1.2mm), so that it fits correctly into the servomotors.
    • Space has been given in the four corners to be able to reinforce the cover of the servomotor that has been designed in 3D. In the previous version I was limited by space and if the servomotor cover was screwed on tightly, it would crack in the screw area.
    • JLCPCB has come out with a VERY AGGRESSIVE offer for 6 and 8 layer boards, so aggressive that it is cheaper than the 4 layer even though it includes ENIG finish (gold finish), epoxy filled vias and tin capped... all for $2 instead of $63 which would be their already low price. This is almost certainly a one-time offer. Even so, I have modified LibreServo to 6 layers, but maintaining full compatibility on 4 layers. When generating the Gerber files, just remove the two central layers, simple. The biggest benefit that is achieved with the two extra layers in LibreServo is that the flow through LibreServo to other LibreServo is more efficient, something that if a LibreServo is intended to hang more than three LibreServos would be something to value.
    • We have tried to improve the routing of several components, use polygons where possible and improved the use of tracks.
    • All the texts on the board have been tweaked.
    • The LibreServo schematic has been reworked to meet certain standards.

    Not content with that, and even though I have already ordered the new boards, I already have three other small changes that I will make soon to round the LibreServo design and make it the final design (I hope):

    • I will change the oscillator to a 33% more compact, cheaper and more accurate version.
    • I will change the order of the FFT cable between the main board and the AEAT-8800 sensor to give it a little more noise immunity.
    • I will connect the exposed pad of the STM32F30X to ground, something that when I started with LibreServo ST indicated not to do, but now it has rectified and indicates that it is advisable... ST stuff 🤷

    Finally, in the software part, the FP function has been added to find out the direction of rotation of the servomotor. The LibreServo Commands article has been updated.

  • LibreServo v2 Schematics

    Luis06/18/2022 at 16:38 0 comments

    The schematics are exactly the same with which I made the LibreServo v2 PCBs but with the texts corrected in position so they read better.

    In previous posts as you can read in the article of the first LibreServo test board and in the conclusions of the second LibreServo test-board, the LibreServo changes were massive in each and every aspect. Virtually every component was overhauled and moved to a two PCB, four-layer design.

    The result is as seen below, in addition, I have uploaded the design files to the LibreServo Github in the PCB folder.

    An interactive version of the photos is available on the LibreServo website.

    LibreServo v2 Schematic
    LibreServo v2 Schematic
    Top & Bottom
    Top & Bottom
    Top
    Top
    Bottom
    Bottom
    Middle Bottom
    Middle Bottom
    Middle Top
    Middle Top

  • New version of the 3D encoder parts

    Luis06/12/2022 at 22:30 0 comments

    To know the position of the servomotor axis, LibreServo uses the AEAT-8800 16-bit encoder. This encoder replaces the potentiometer that the servomotors have and with it we get much more precision and allows the servomotor to rotate 360 degrees.

    To achieve this, LibreServo makes use of a tiny 10.2x11.2 mm PCB to which a 3D printed part of the same size and shape as the original potentiometer is attached. This 3D printed part consists of 3 small parts, a 4x7x2mm bearing and a small 6x2.5mm diametrically magnetized magnet. Only a glue point is needed to fix the magnet. The rest of the parts, bearing and PCB are designed to be snap-fitted and fixed.

    With the first release of the LibreServo software, the 3D parts have also been updated. The .stl is uploaded to the Libreservo github in the 3D folder. The parts are designed to be printed with 0.1mm layers.

    LibreServo encoder assembly video

  • LibreServo commands (part two)

    Luis06/06/2022 at 06:23 0 comments

    I have spent a lot of time on the command part of LibreServo and I think it is one of the most important parts of the project, it is how LibreServo is presented to the user. It offers a flexibility and possibilities that I have never seen in any manufacturer.

    The documentation of the commands will be divided into two articles, this article is more focused on examples and explanation of execution and the other article is focused on the description of LibreServo commands.

    LibreServo has a task manager for the high-priority engine management part and a separate low-priority task manager for sending data to the user only (commands GX). This must be taken into account since the order and timing will be independent between the commands to receive data and the rest of the commands.

    All commands start with the character 'S' and at least one servomotor number and end with ';'. Commands can be chained with the character '|' so that all commands are treated together as a block.

    This article will be divided into the following topics:

    Servomotor Selection

    All commands start with the character 'S' followed by at least one servomotor ID. The ID of a servo motor ranges from 1 to 255 (default is 1). LibreServo allows sending the same command to different servomotors at the same time. The '-' character indicates a range and the ',' character indicates independent servomotor IDs. For example, the commandS1,3,4,10-20M1000; means that servomotors with ID 1, 3, 4 and all with ID between 10 and 20 (both included) should move to position 1000. In addition, ID 0 is reserved (it is for broadcast) and any command sent to ID 0 will be like sending the command to all servomotors regardless of their actual ID.

    Example:
    S5MW500|S0M12000:1000; All servomotors will move to position 12000 in 1000 milliseconds, but servomotor 5 after a 500ms delay.
    S2,5,10-14,6M2000:500; Servomotors 2, 5, 6, 10, 11, 12, 13 and 14 will move to position 2000 in 500 milliseconds

    Command chaining

    As we have seen, all commands start with the character 'S' and at least one servomotor number and end with ';'. You can chain commands with the '|' character so that all commands are treated together as a block. This is very useful for many reasons, one of the main ones being that until LibreServo sees the ';' character it doesn't start executing, so if you want different servomotors to execute different commands but want to make sure they all start moving at the same time, sending all the commands in one command is the way to make sure they start at the same time. Also, it is useful to send the variable reading commands along with the rest of the commands.

    Example:
    S1L255:0:0|S1T1567:300:100|S1T1567:10:0|S1T1567:300:100; Chain a series of Tone and LED commands, it can be the start of a song
    S2M1000:500|S3M2000:1000|S2M500:500; Servomotor 2 will move to 1000 in 500ms and then to 500 in 500ms while servomotor 3 moves to 2000 in 1000ms
    S2M1000:500|S2Gs13,11:500:1; Servomotor 2 will move at 1000 in 500ms and will report every millisecond its position and current consumption for viewing on the Serial Plotter of the Arduino, for example

    Immediate commands [ ! ]

    Another unique feature of LibreServo is immediate or priority commands. A command can be sent as immediate with the '!' character before ';' or '|'. To take effect, it must be the first command for that servo motor that is sent, if it is sent with more chained commands, the one that is marked as immediate. An immediate command causes the execution of the command being executed to be aborted and clears all other commands in the task manager. An immediate command from the variable reading group (GX) does not affect the other commands as it is in a separate task manager, the same as the other immediate commands does not affect the...

    Read more »

  • LibreServo commands (part one)

    Luis06/05/2022 at 17:52 0 comments

    I have spent a lot of time on the command part of LibreServo and I think it is one of the most important parts of the project, it is how LibreServo is presented to the user. It offers a flexibility and possibilities that I have never seen in any manufacturer.

    The documentation of the commands I will divide it in two articles, this article is more focused on the description of the commands and the second part is focused on examples and explanation of execution in LibreServo.

    The LibreServo commands are as follows:

    Motion commands

    These are specific commands for the movement and control of the servomotor. The different motions and their curves are explained in more detail in the article on motion curves.

    Linear motion [M]

    • S12M12000[:1000]

    The notation we see for 12000[:1000] indicates that the M command forces one parameter to be passed, but the second parameter is optional. It also tells us that the ':' character is used to separate the parameters. This notation is used for all other commands.

    Returning to the command, the M command is a command in which the servomotor moves at constant speed to the end position.

    param1: the first parameter indicates the position we want to go to (a 360 degree turn is 65,535). Range: -2.147.483.646, +2.147.483.647
    param2 (optional): the second parameter indicates in milliseconds, ms, the time in which the movement should be completed, if no time is indicated LibreServo will try to arrive as soon as possible. Range: 0, +2.147.483.647
    Example:
    S12M12000:1000; Servomotor 12 shall move to position 12000 in 1000 ms (1 second).

    Trapezoidal motion [MT]

    • S12MT12000[:150]:1000;

    The MT command is a constant acceleration and deceleration motion calculated based on a fixed acceleration duration.

    param1: final position. Range: -2.147.483.646, +2.147.483.647
    param2 (opcional): acceleration and deceleration time in ms. If not specified, the default value stored in flash (t_ramp_t) is taken. If the acceleration and deceleration time is greater than the total movement time, they are reduced to fit into the total movement time. Range: 0, +2.147.483.647
    param3: total movement time. Range: 0, +2.147.483.647
    Example:
    S12MT-8000:1000; Servomotor 12 shall move to position -8000 in 1000ms. The ramp time shall be the one that is at t_ramp_t
    S12MT-8000:150:1000; Servomotor 12 shall move to position -8000 in 1000ms. The ramp time shall be 150ms

    Trapezoidal motion 50% [Mt]

    • S12Mt12000:1000;

    It is the same as MT, but the acceleration time will be half of the total movement time and the deceleration time the other half.

    param1: final position. Range: -2.147.483.646, +2.147.483.647
    param2: total movement time. Range: 0, +2.147.483.647
    Example:
    S12MT-8000:1000; Servomotor 12 shall move to position -8000 in 1000ms. The ramp time shall be 500ms (500*2 = 1000)

    Accelerated trapezoidal motion [MA]

    • S12MA12000[:150]:1000;

    It is a trapezoidal movement, but instead of indicating the acceleration time, you indicate the desired acceleration and LibreServo calculates the required acceleration and deceleration time.

    param1: final position. Range: -2.147.483.646, +2.147.483.647
    param2 (opcional): Aceleración y desaceleración de la rampa. If not specified, the default value stored in flash...
    Read more »

  • Updated LibreServo software (version v0.1)

    Luis06/05/2022 at 09:38 0 comments

    After several months of work, LibreServo has finally reached version 0.1 in the software. What does this mean? It means that LibreServo is still in Beta version, but it is mature enough to present itself in society. This will be only the first of several entries that I will be uploading these days.

    I have updated the Github of LibreServo with the latest files and I will try to keep it updated.

    In the next few days I will upload the documentation of LibreServo commands, but in case anyone wants to read the code itself, I have made two small diagrams to help understand how LibreServo works.

  • Last steps for first official release

    Luis06/04/2022 at 21:13 0 comments

    Although I had many parts of the code already done, the truth is that putting all the code together and making all the functions and internal structure non-blocking has been a much more laborious task than expected. In addition, I have programmed dozens of commands and the first version of the LibreServo Software is much more complete than I had originally anticipated.

    In the following posts I will detail a little more the functions and operation of LibreServo, for now I leave a curious little video I made with the LibreServo test board v2 a few weeks ago as a small preview testing the sound function of LibreServo. Yes, LibreServo is able to generate sound making use of the DC motor.


    LibreServo allows you to send blocks of commands making it much easier to send dozens of commands at once. LibreServo takes care of storing them and executing them one after another. This simple test was not really about generating music, but about seeing that the whole internal LibreServo system worked. 

    The commands used are as follows.

    /*****IMPERIAL MARCH*****/
    S1L255:0:0|S1T1567:300:100|S1T1567:10:0|S1T1567:300:100|S1T1567:10:0|S1T1567:300:100|S1T1567:10:0|S1L0:255:0|S1T1244:300:100|S1T1244:10:0|S1T1864:60:100|S1T1864:10:0|S1L0:0:255|S1T1567:300:100|S1T1567:10:0|S1T1244:300:100|S1T1244:10:0|S1T1864:60:100|S1T1864:10:0|S1L0:255:255|S1T1567:400:100|S1T1567:20:0|S1L255:255:0|S1T2349:300:100|S1T2349:10:0|S1T2349:300:100|S1T2349:10:0|S1T2349:300:100|S1T2349:10:0|S1L255:0:255|S1T2489:300:100|S1T2489:10:0|S1T1864:60:100|S1T1864:10:0|S1L0:255:0|S1T1480:300:100|S1T1480:10:0|S1L0:255:255|S1T1244:300:100|S1T1244:10:0|S1T1864:60:100|S1T1864:10:0|S1L255:255:255|S1T1568:500:100|S1T1568:10:0|S1LR;
    
    /******MAIN THEME******/
    S1T1174:75:70|S1T1174:10:0|S1T1174:75:70|S1T1174:10:0|S1T1174:75:70|S1T1174:10:0|S1T1568:450:100|S1T1568:10:0|S1T2349:450:100|S1T2349:10:0|S1T2093:75:70|S1T2093:10:0|S1T1975:75:70|S1T1975:10:0|S1T1760:75:70|S1T1760:10:0|S1T3135:450:100|S1T3135:10:0|S1T2349:450:100|S1T2349:10:0|S1T2093:75:70|S1T2093:10:0|S1T1975:75:70|S1T1975:10:0|S1T1760:75:70|S1T1760:10:0|S1T3135:450:100|S1T3135:10:0|S1T2349:450:100|S1T2349:10:0|S1T2093:75:70|S1T2093:10:0|S1T1975:75:70|S1T1975:10:0|S1T2093:75:70|S1T2093:10:0|S1T1760:450:100|S1T1760:10:0;
    
    /*******Still D.R.E.*******/
    S1T2093:100:100|S1T2093:10:0|S1T2637:100:70|S1T2637:10:0|S1T3520:100:70|S1T3520:10:0|S1T2093:300:100|S1T2093:10:0|S1T2637:100:70|S1T2637:10:0|S1T3520:100:70|S1T3520:10:0|S1T2637:100:70|S1T2637:10:0|S1T1975:100:100|S1T2093:10:0|S1T2637:100:70|S1T2637:10:0|S1T3520:100:70|S1T3520:10:0|S1T1975:300:100|S1T2093:10:0|S1T2637:100:70|S1T2637:10:0|S1T3520:100:70|S1T3136:10:0|S1T2637:100:70|S1T2637:10:0|S1T2093:100:100|S1T2093:10:0|S1T2637:100:70|S1T2637:10:0|S1T3520:100:70|S1T3520:10:0|S1T2093:300:100|S1T2093:10:0|S1T2637:100:70|S1T2637:10:0|S1T3520:100:70|S1T3520:10:0|S1T2637:100:70|S1T2637:10:0|S1T1975:100:100|S1T2093:10:0|S1T2637:100:70|S1T2637:10:0|S1T3520:100:70|S1T3520:10:0|S1T1975:300:100|S1T2093:10:0|S1T2637:100:70|S1T2637:10:0|S1T3520:100:70|S1T3136:10:0|S1T2637:100:70|S1T2637:10:0;
    
    S1T2093:25:100|S1T2637:25:70|S1T3520:50:70|S1T3520:5:0|S1T2093:25:100|S1T2637:25:70|S1T3520:50:70|S1T3520:5:0|S1T2093:25:100|S1T2637:25:70|S1T3520:50:70|S1T3520:5:0|S1T2093:25:100|S1T2637:25:70|S1T3520:50:70|S1T3520:5:0|S1T2093:25:100|S1T2637:25:70|S1T3520:50:70|S1T3520:5:0|S1T2093:25:100|S1T2637:25:70|S1T3520:50:70|S1T3520:5:0|S1T2093:25:100|S1T2637:25:70|S1T3520:50:70|S1T3520:5:0|S1T2093:25:100|S1T2637:25:70|S1T3520:50:70|S1T3520:5:0|S1T1975:25:100|S1T2637:25:70|S1T3520:50:70|S1T3520:5:0|S1T1975:25:100|S1T2637:25:70|S1T3520:50:70|S1T3520:5:0|S1T1975:25:100|S1T2637:25:70|S1T3520:50:70|S1T3520:5:0|S1T1975:25:100|S1T2637:25:70|S1T3136:50:70|S1T3136:5:0|S1T1975:25:100|S1T2637:25:70|S1T3136:50:70|S1T3136:5:0|S1T1975:25:100|S1T2637:25:70|S1T3136:50:70|S1T3136:5:0|S1T1975:25:100|S1T2637:25:70|S1T3136:50:70|S1T3136:5:0|S1T1975:25:100|S1T2637:25:70|S1T3136:50:70|S1T3136:5:0;
    
    S1T2093:25:100|S1T2637:25:70|S1T3520:50:70|S1T3520:5:0|S1T2093:25:100|S1T2637:25:70|S1T3520:50:70|S1T3520:5:0|S1T2093:25:100|S1T2637:25:70|S1T3520:50:70|S1T3520:5:0|S1T2093:25:100|S1T2637:25:70|S1T3520:50:70|S1T3520:5:0|S1T2093:25:100|S1T2637:25:70|S1T3520:50:70|S1T3520:5:0|S1T2093:25:100|S1T2637:25:70|S1T3520:50:70|S1T3520:5:0|S1T2093:25:100|S1T2637:25:70|S1T3520:50:70|S1T3520:5:0|S1T2093:25:100|S1T2637:25:70|S1T3520:50:70|S1T3520:5:0|S1T1975:25:100|S1T2637:25:70|S1T3520:50:70|S1T3520:5:0|S1T1975:25:100|S1T2637:25:70|S1T3520:50:70|S1T3520:5:0|S1T1975:25:100|S1T2637:25:70|S1T3520:50:70|S1T3520:5:0|S1T1975:25:100|S1T2637:25:70|S1T3136:50:70|S1T3136:200:0|S1T1975:25:100|S1T2637:25:70|S1T3136:50:70|S1T3136:5:0;
    ...
    Read more »

View all 11 project logs

Enjoy this project?

Share

Discussions

robonxt wrote 03/26/2023 at 07:00 point

Looking forward to seeing this come to life! Currently learning how to maximize the potential of my servos and lx16a serial servos, but would love to mod my old dumb servos and give them new life!

  Are you sure? yes | no

Luis wrote 03/29/2023 at 06:27 point

There will be updates soon.

  Are you sure? yes | no

yOyOeK1 wrote 02/02/2023 at 00:59 point

Nice !

  Are you sure? yes | no

Daniel Collins wrote 07/16/2022 at 07:11 point

Hi Luis, just wanted to say great work on this project, it looks excellent. Can I ask some dumb questions to understand how applicable this project is for my applications? a) is LibreServo suitable for continuous rotation servos? b) Regarding communicatoin speed, what is a realistic top speed for LibreServo commands per second? c) how many commands can be buffered in the on-board memory? d) Will the PID parameters of the controller be accessible via commands? Many thanks

  Are you sure? yes | no

Luis wrote 07/16/2022 at 19:14 point

Hello Daniel,

No question is dumb question.

Yes LibreServo is suitable for continuous rotation servos, it has many commands for that matter (as you can see in the log) and use a magnetic encoder for that reason (among others).

commands per second? LibreServo has a limitation of 1 thousand movement commands per second that can execute by himself because the main loop runs at 1KHz, BUT, as is daisy chained, it can "read" more than that (commands for other servos).

Now, I put a limit of 100 commands (https://hackaday.io/project/182523-libreservo/log/207027-libreservo-commands-part-two#AdminTareas), but is just a number in the code, can be easily change it (is just a variable).

Yes, PID parameters and MUCH more!! You can check the commands in the logs of the project:

https://hackaday.io/project/182523-libreservo/log/207008-libreservo-commands-part-one#variables_tabla

The project is not finished, so just wait a little bit please :)

  Are you sure? yes | no

Similar Projects

Does this project spark your interest?

Become a member to follow this project and never miss any updates