Close
0%
0%

21 Days - IoT Habit Forming Picture Frame

Challenging myself to be healthier! Having fun while I'm at it!

Similar projects worth following
21 Days is a IoT habit tracking picture frame and iPhone app that is super simple to use. Tracks up to 6 daily habits. Reward yourself for completing habits with flashy blinky things!!

Fun features!
- lights illuminate the wall from the side of the frame!
- occasionally, satisfying sounds play!
- the LED grid shows off your great progress!
- customize the the grid with animated borders, clocks, or whatever else you can imagine!

Practical features!
- server to backup history
- lights dim when you're trying to sleep
- iPhone app to track on the go

What is it?

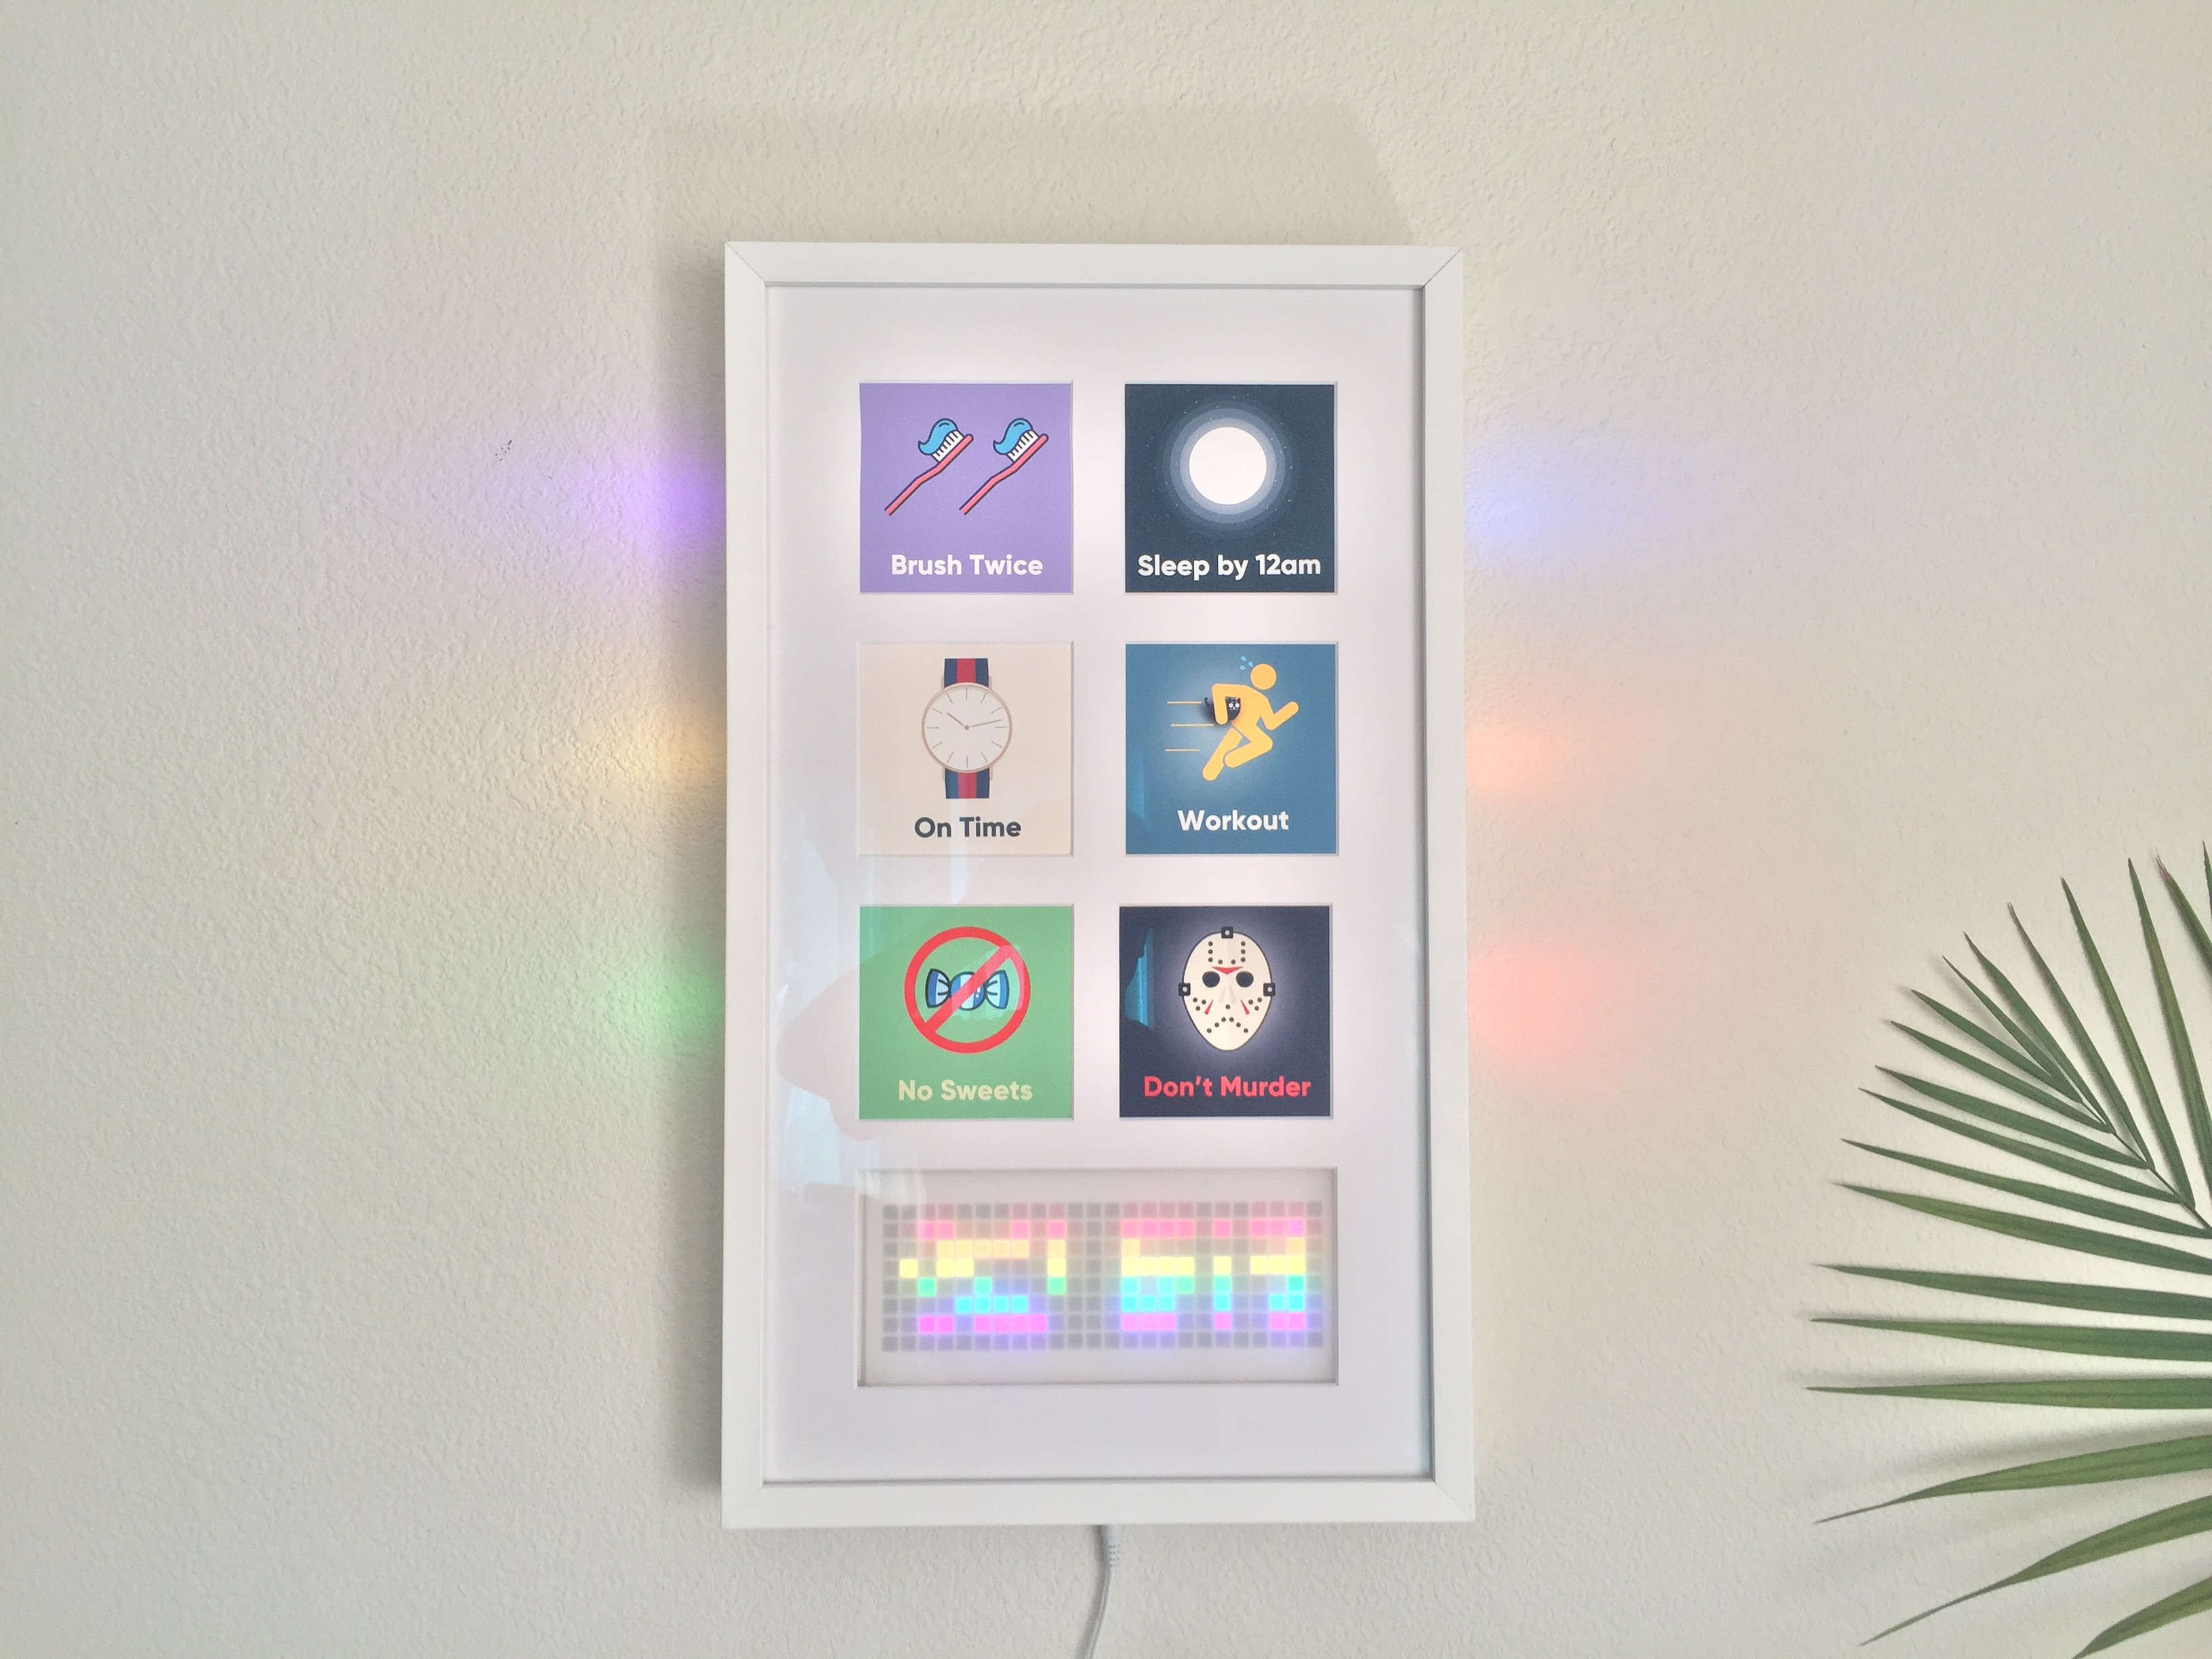
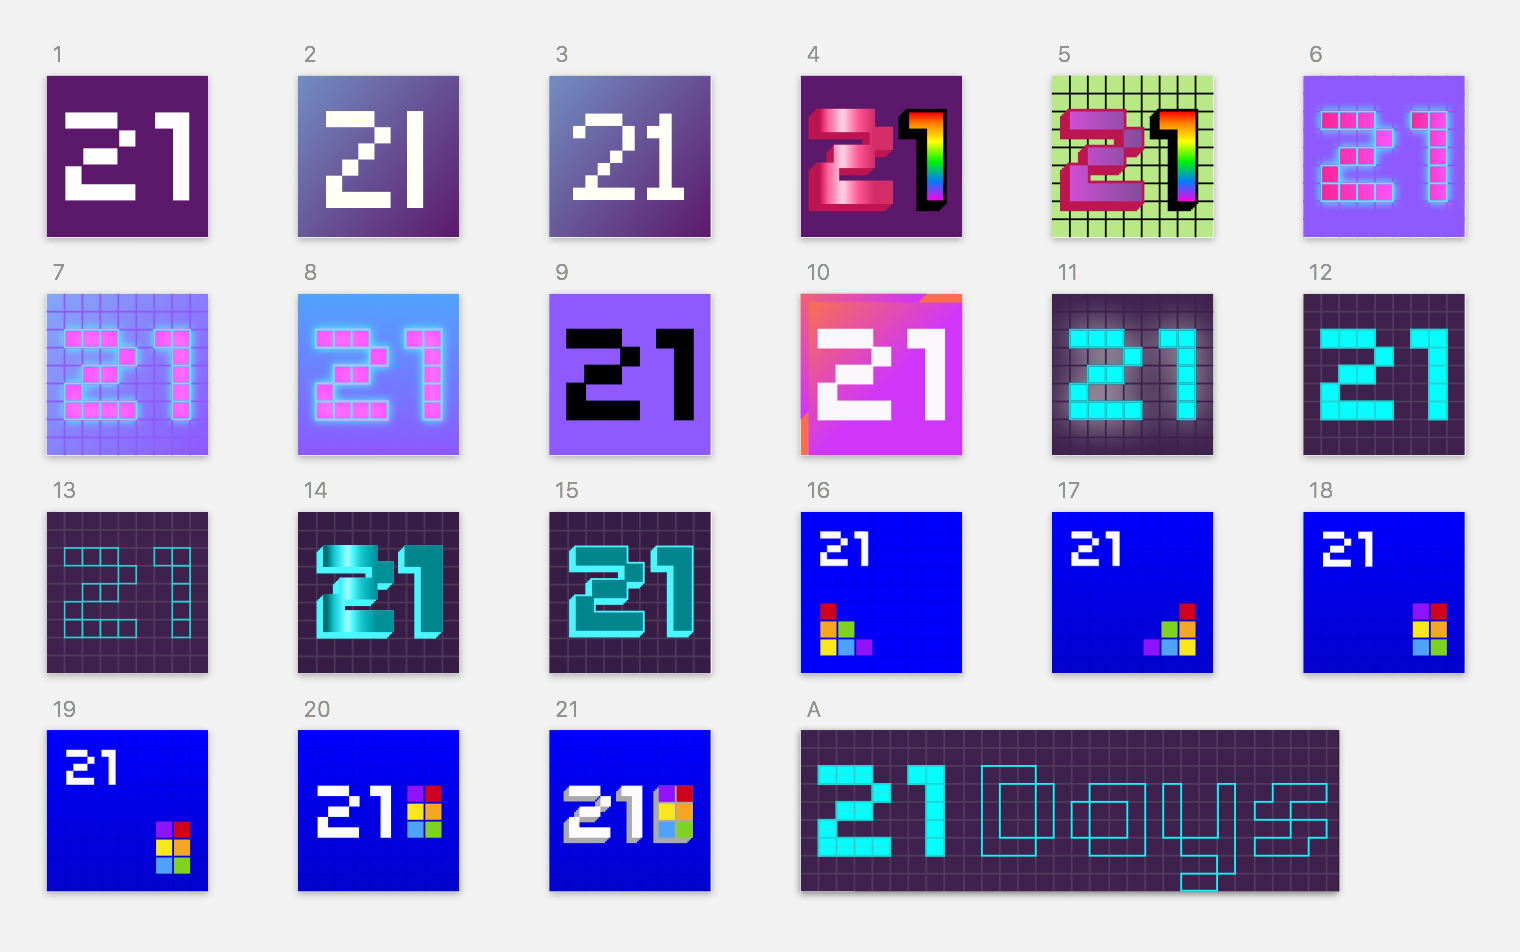
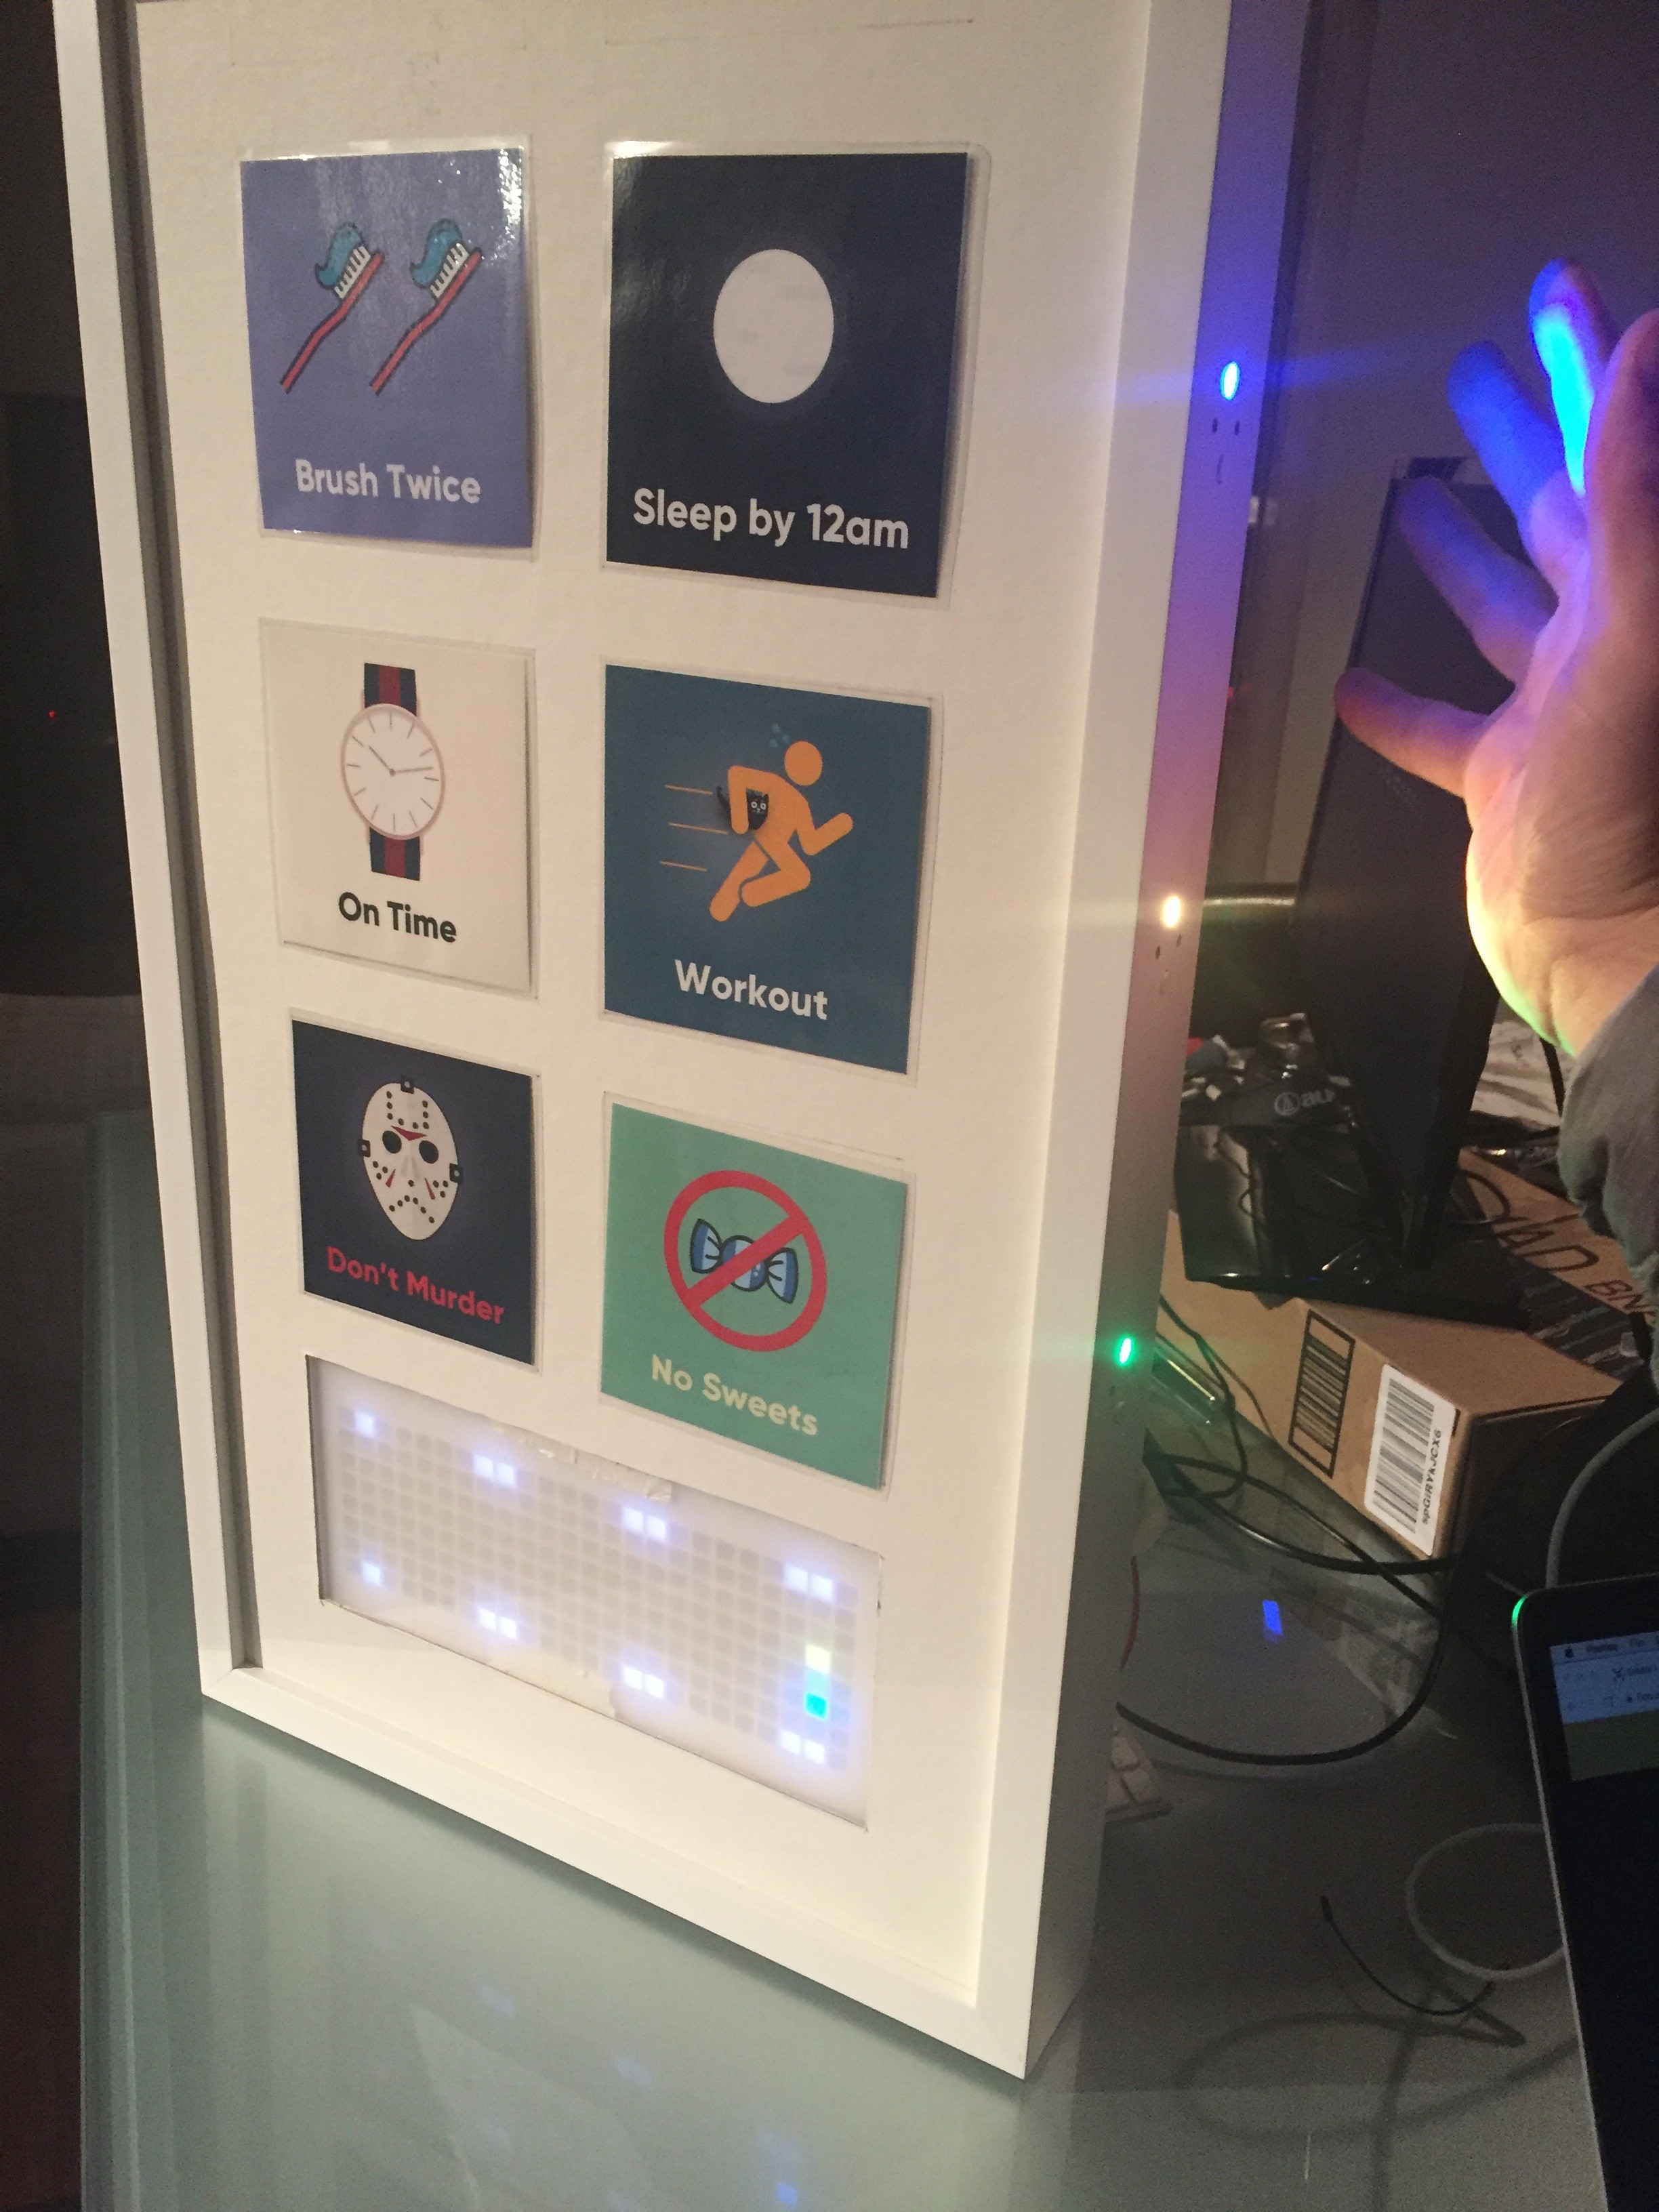
21 Days is interactive art encouraging me to have good habits.

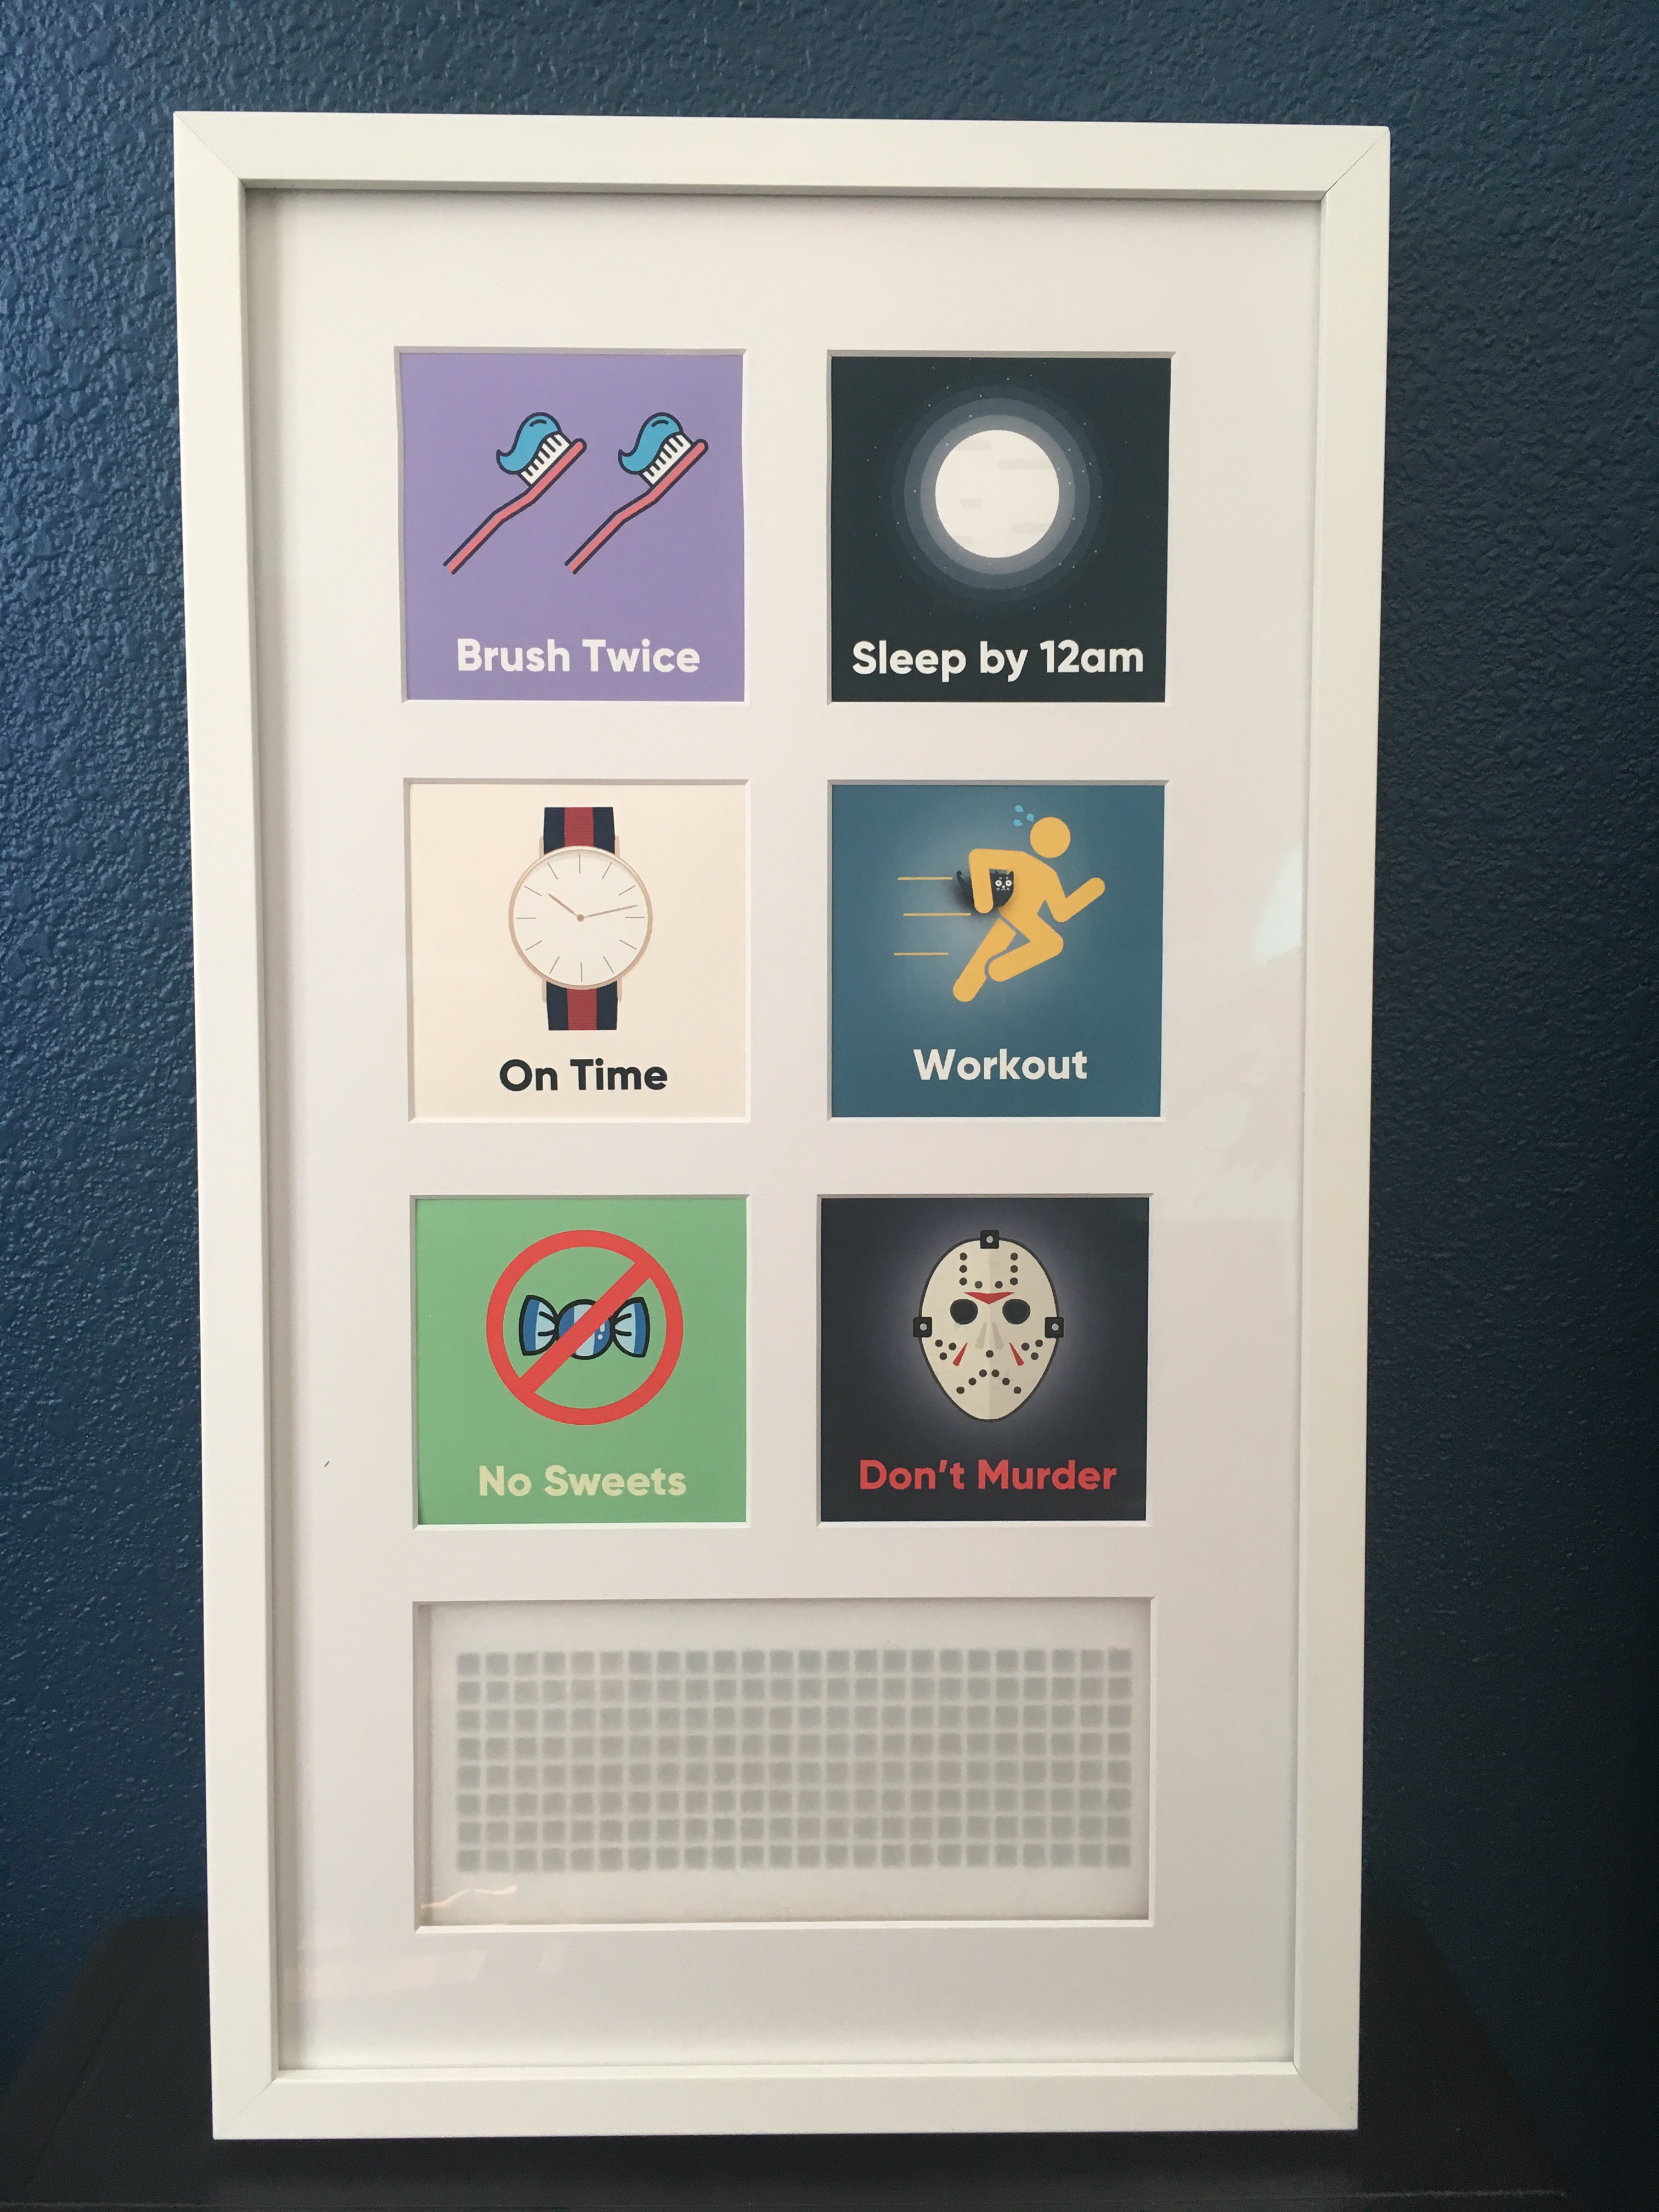
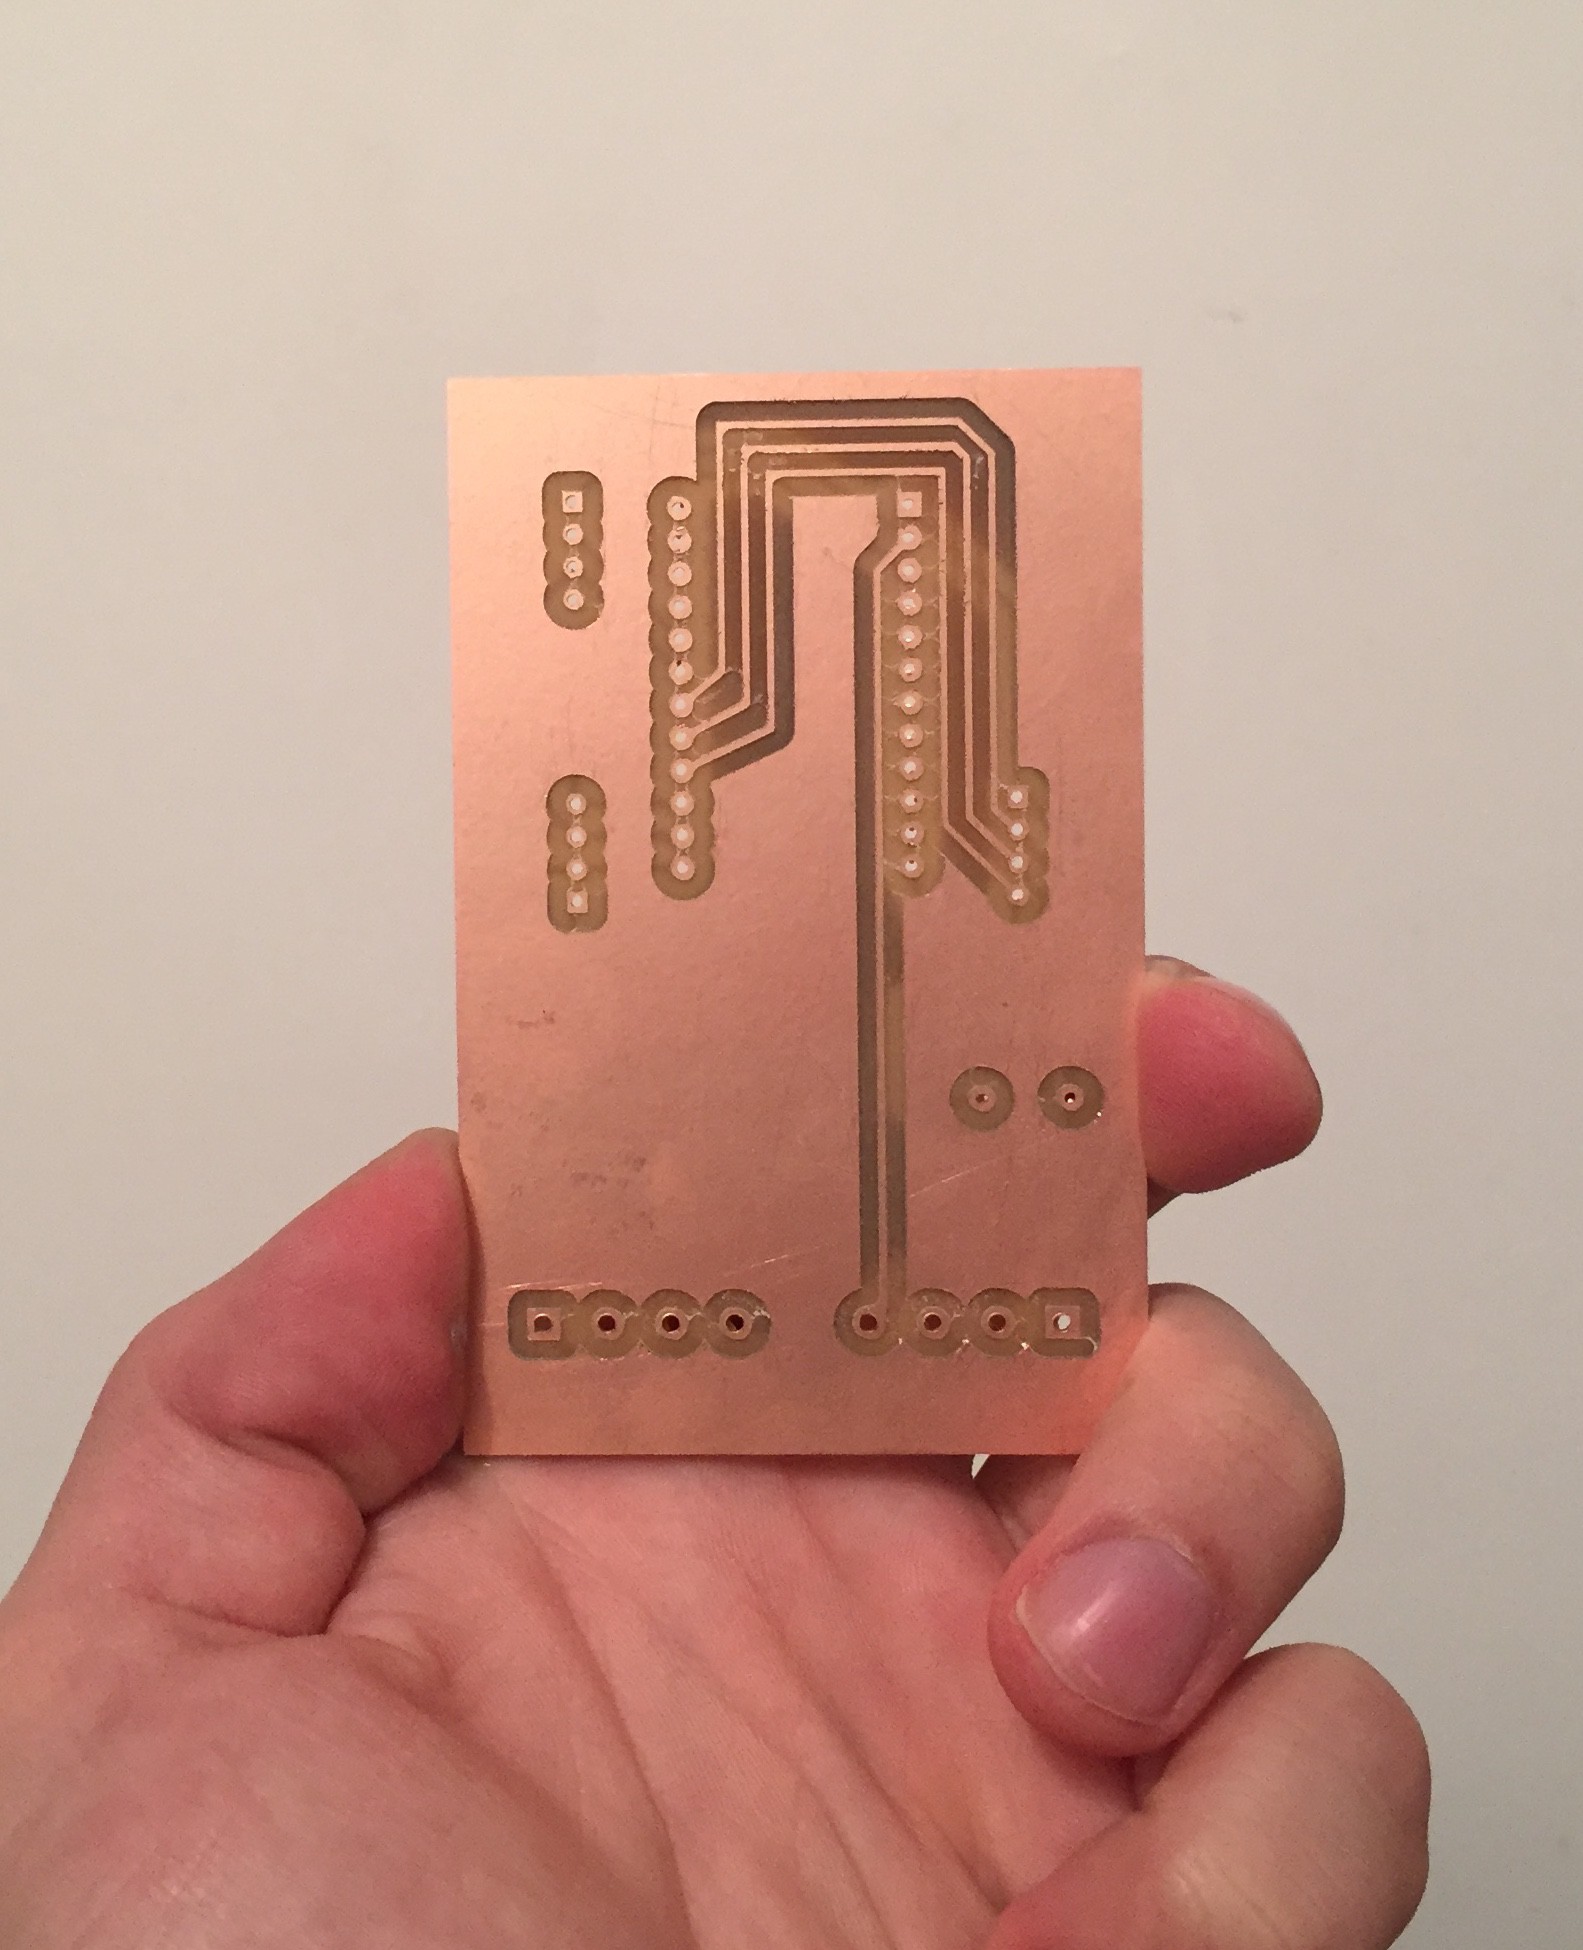
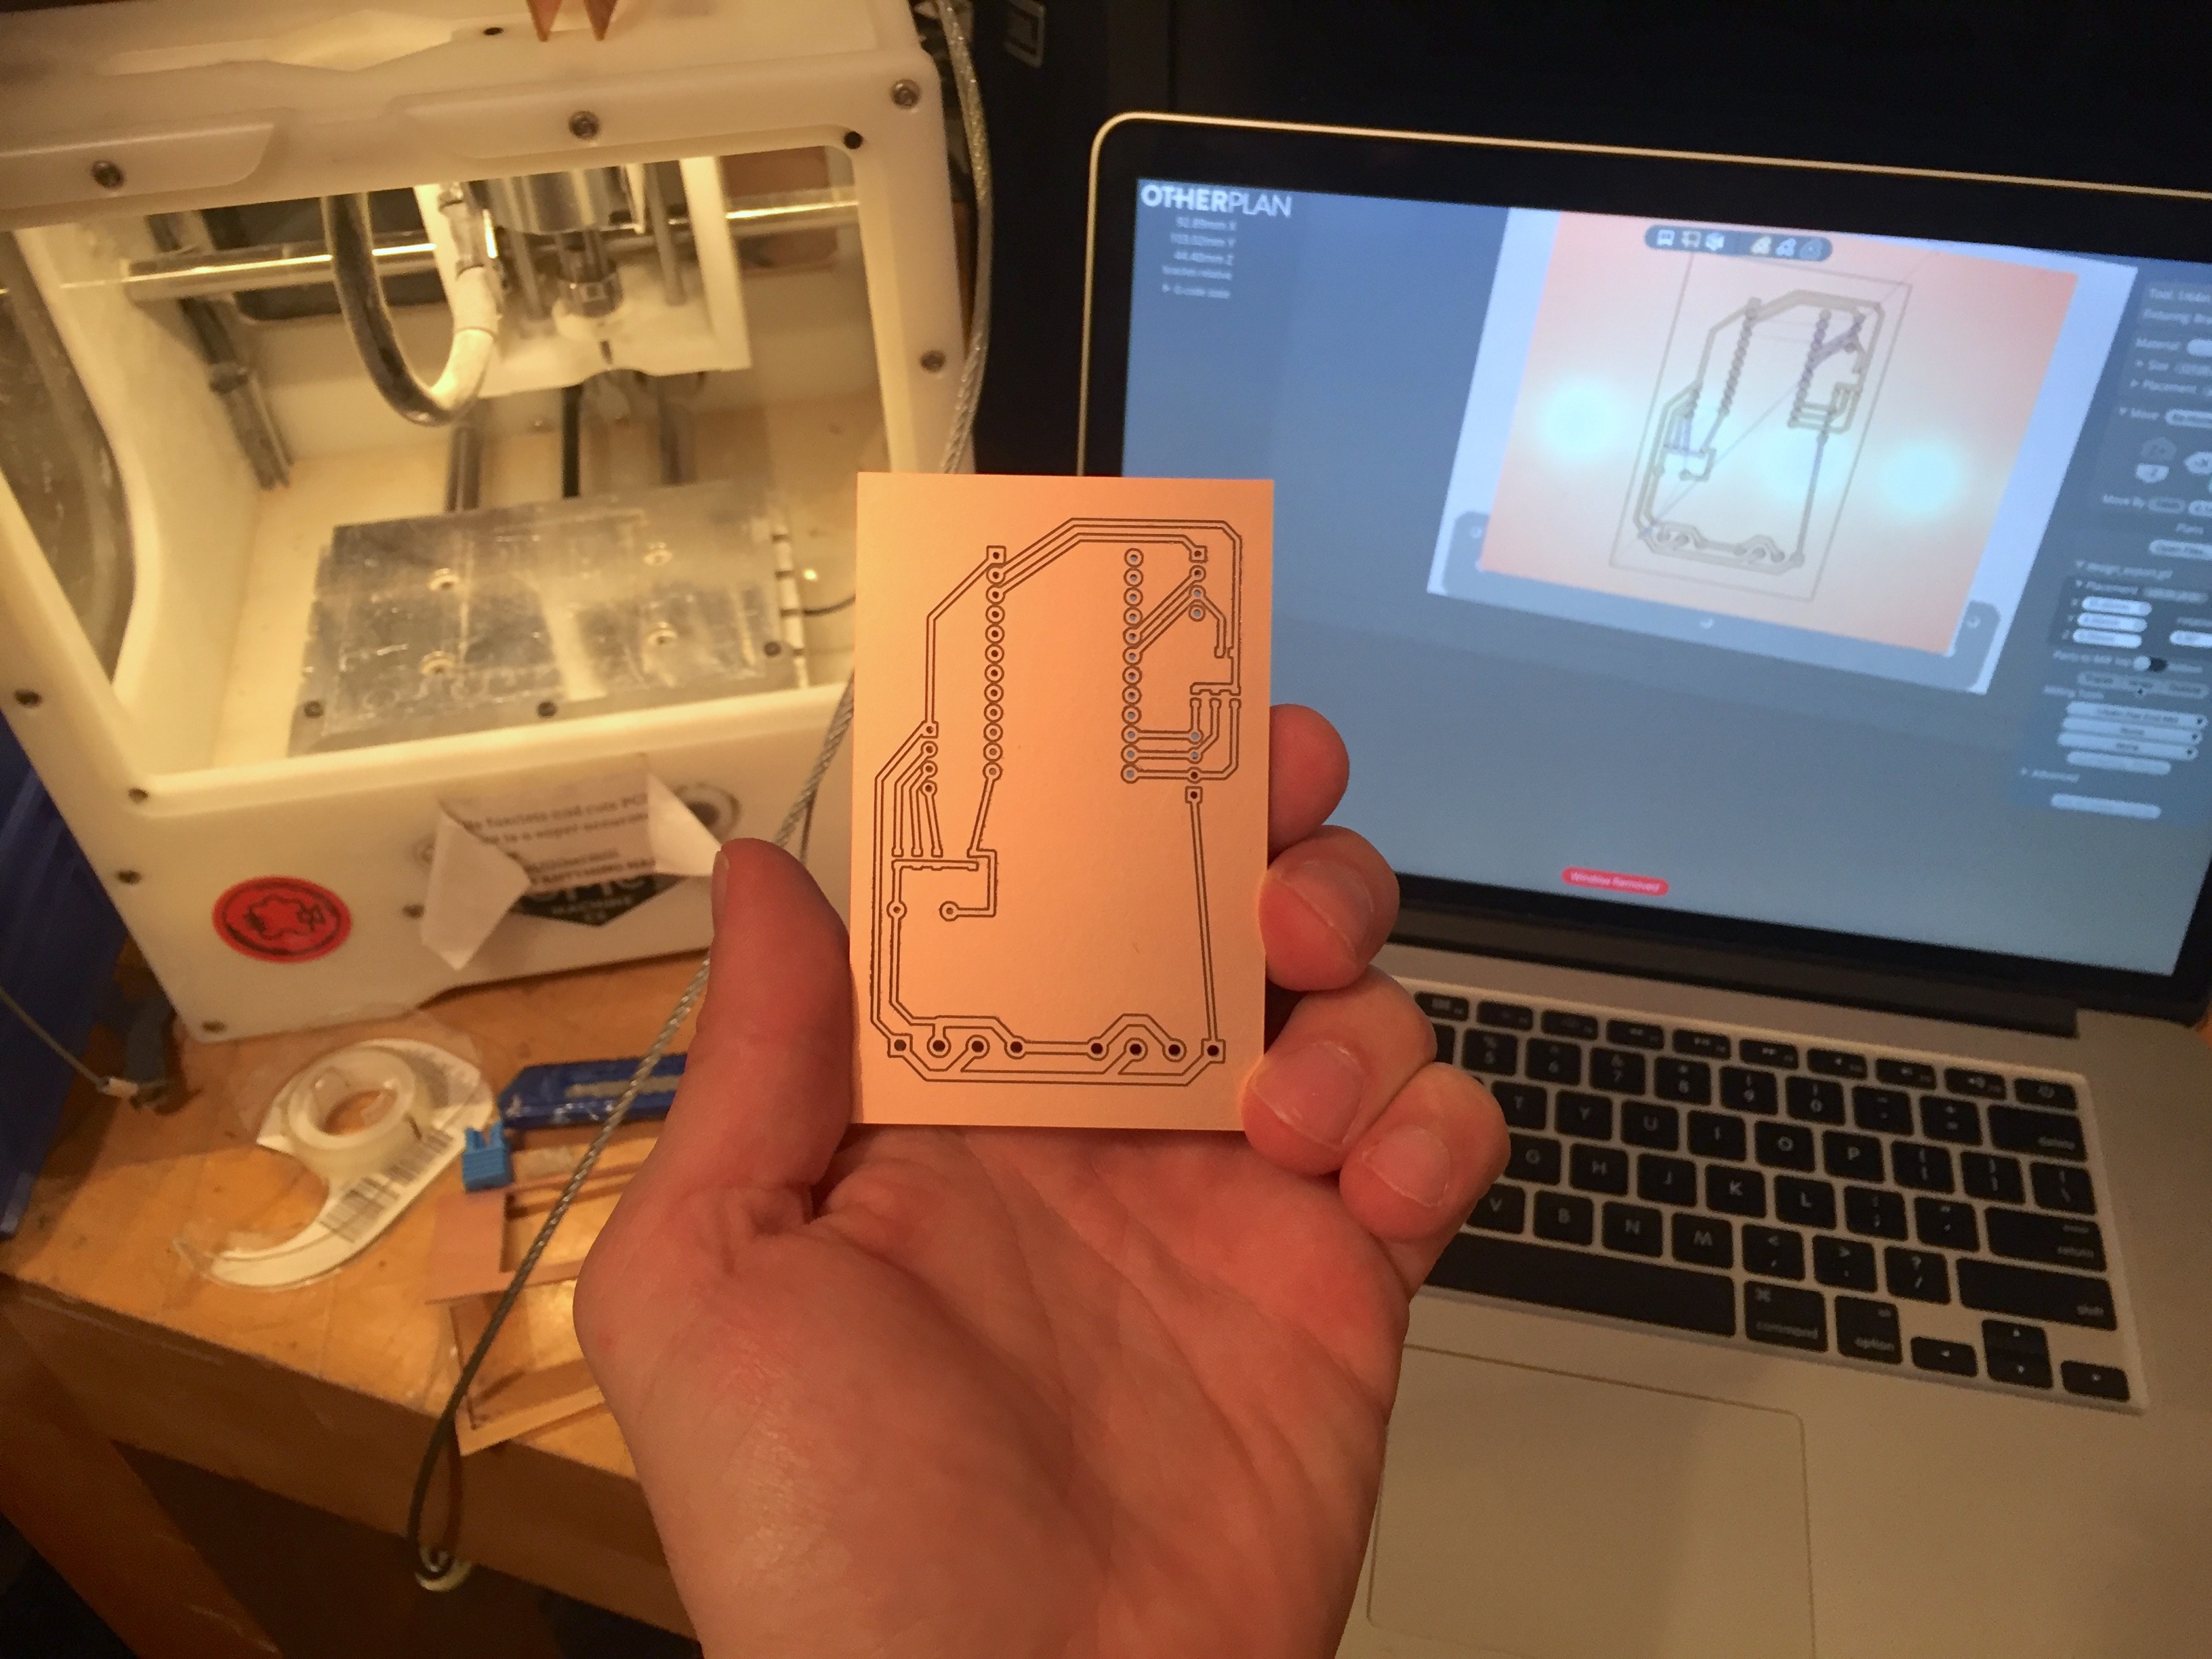
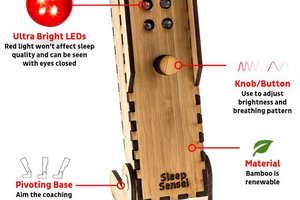
I designed a 4x4in infographic for each habit I'd like to keep. Then I had it framed, built an electronic calendar, and put it on my wall!

To mark the habit done for the day, just tap a button on the frame, and enjoy a vivid display of colored LEDs! There is also a calendar of the last 21 days to keep an eye on consistency. An ambient light sensor will kick in a few minutes after use so when it's time for bed I can sleep in darkness. By the time I wake up the calendar will have shifted left for the new day. That's it!

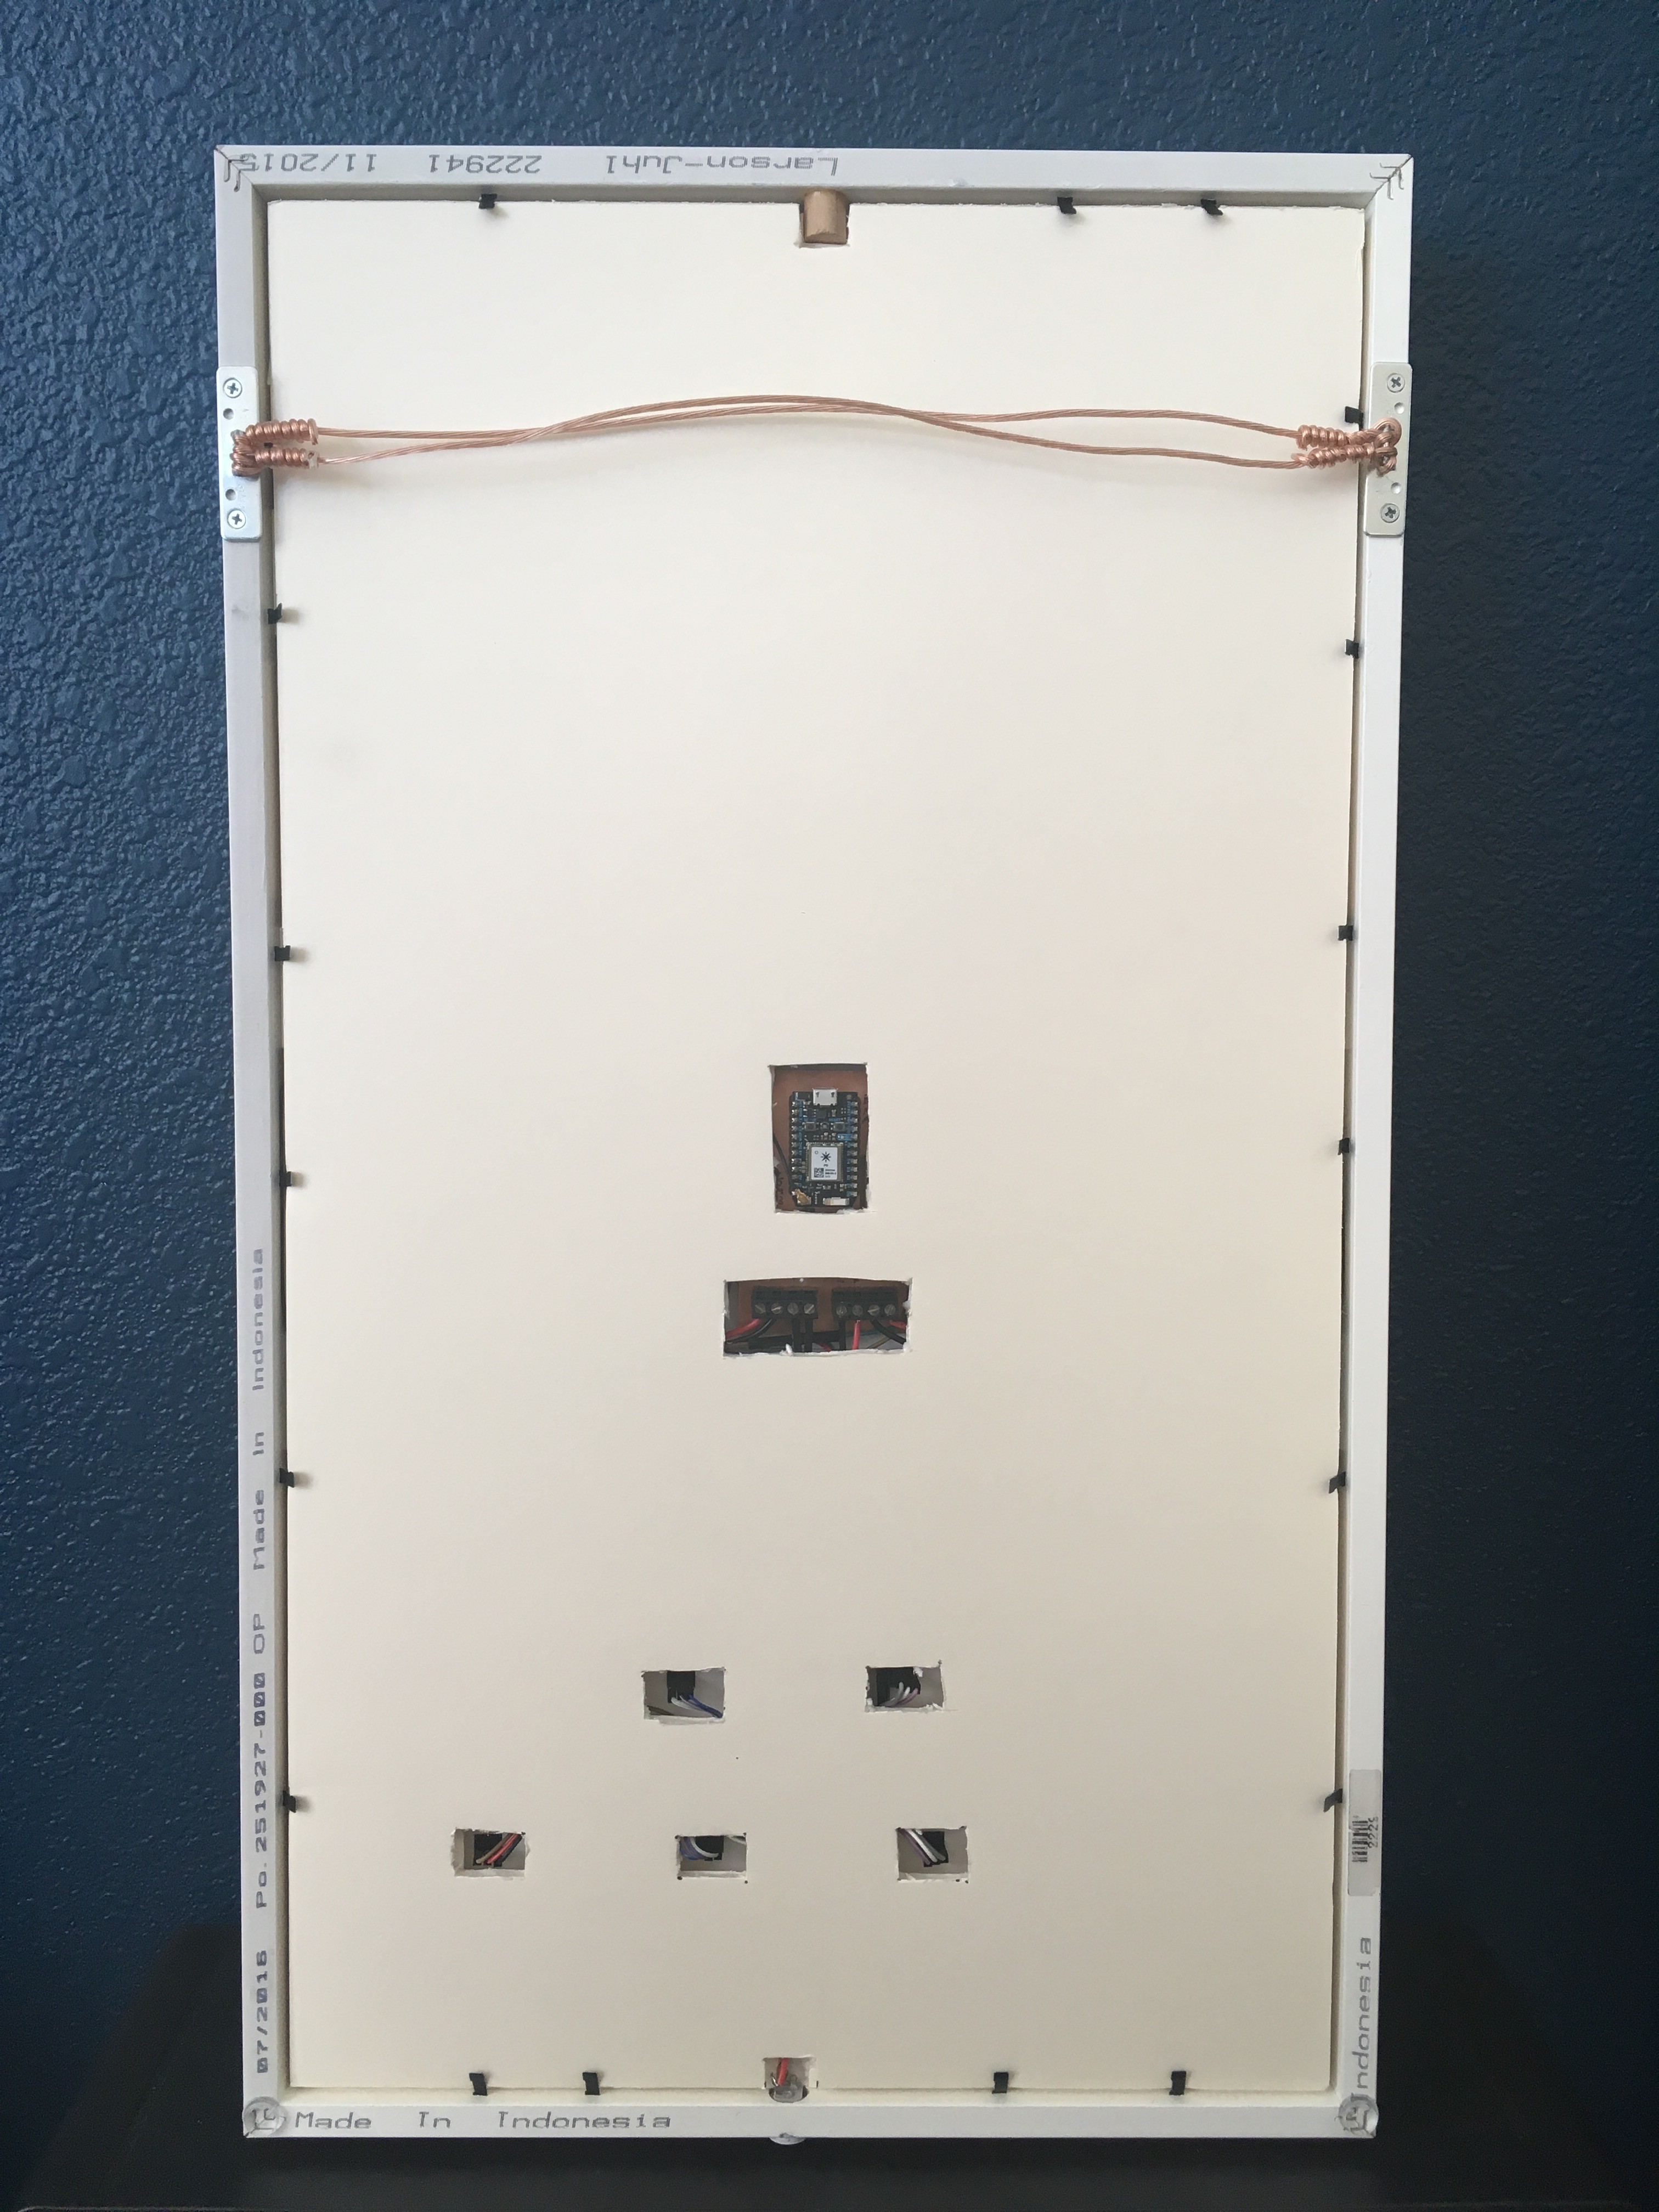
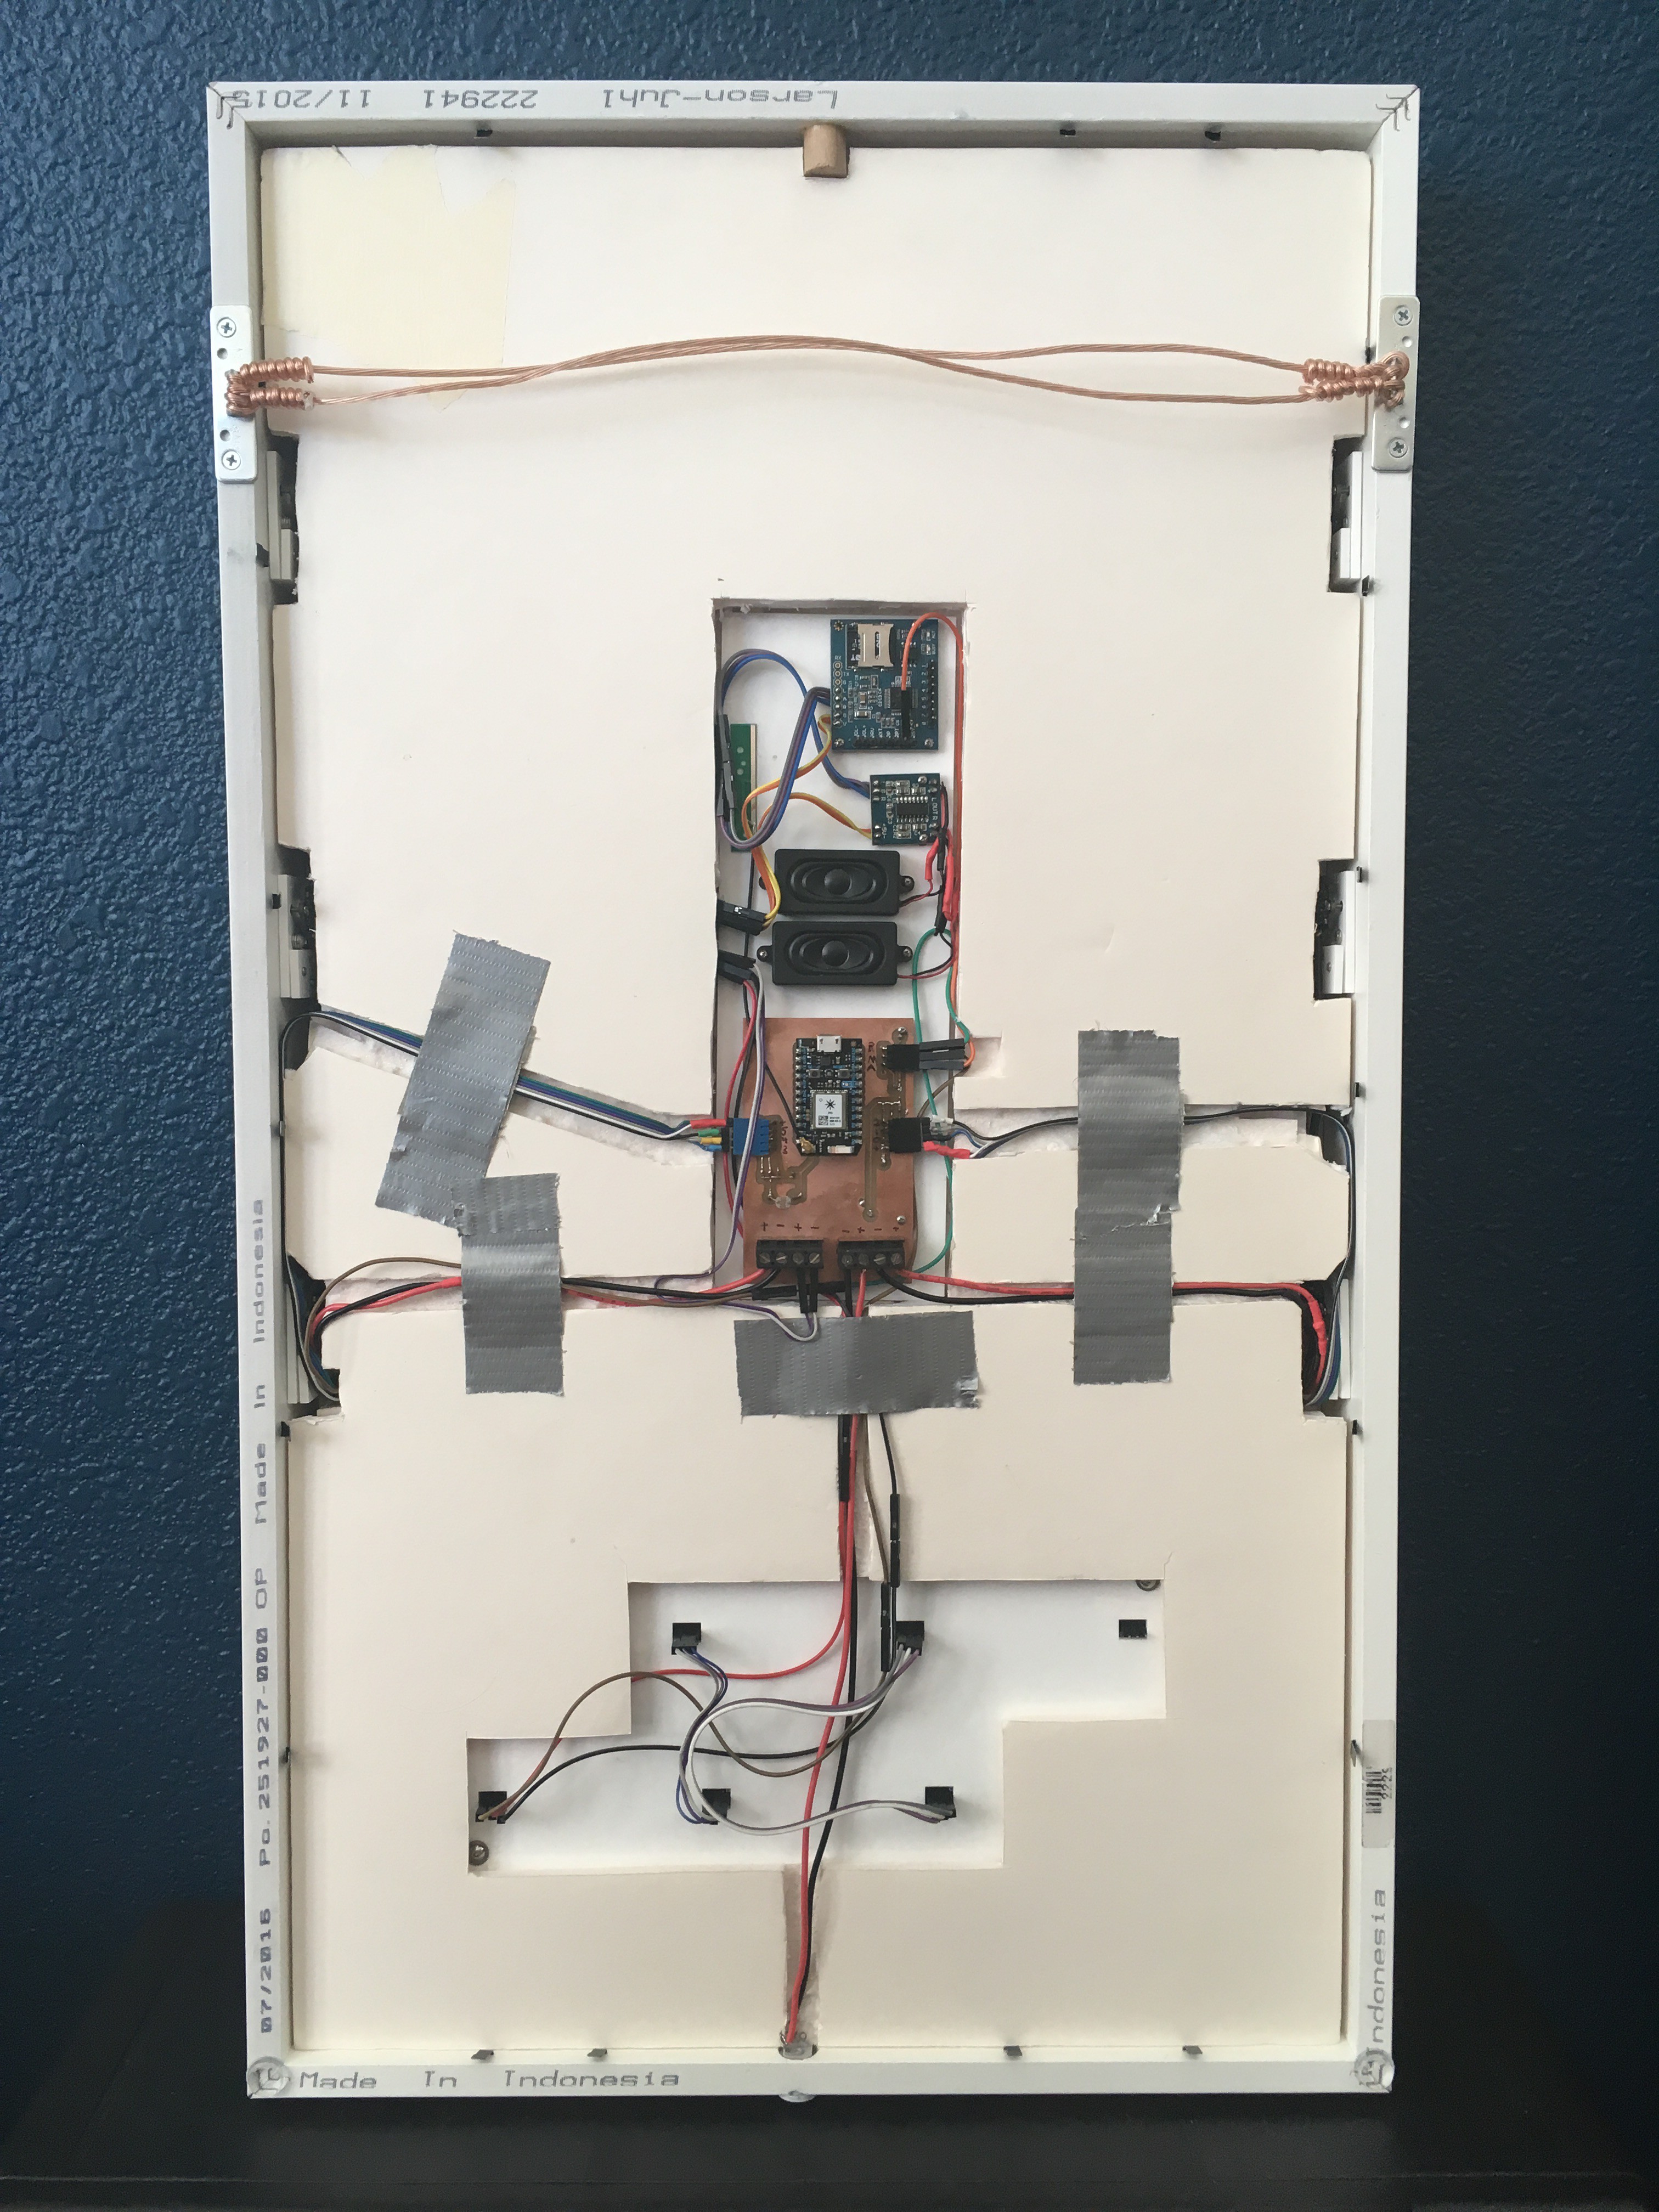
Behind the scenes I'm storing my history in the cloud (which will soon be visible at 21days.gervang.com)

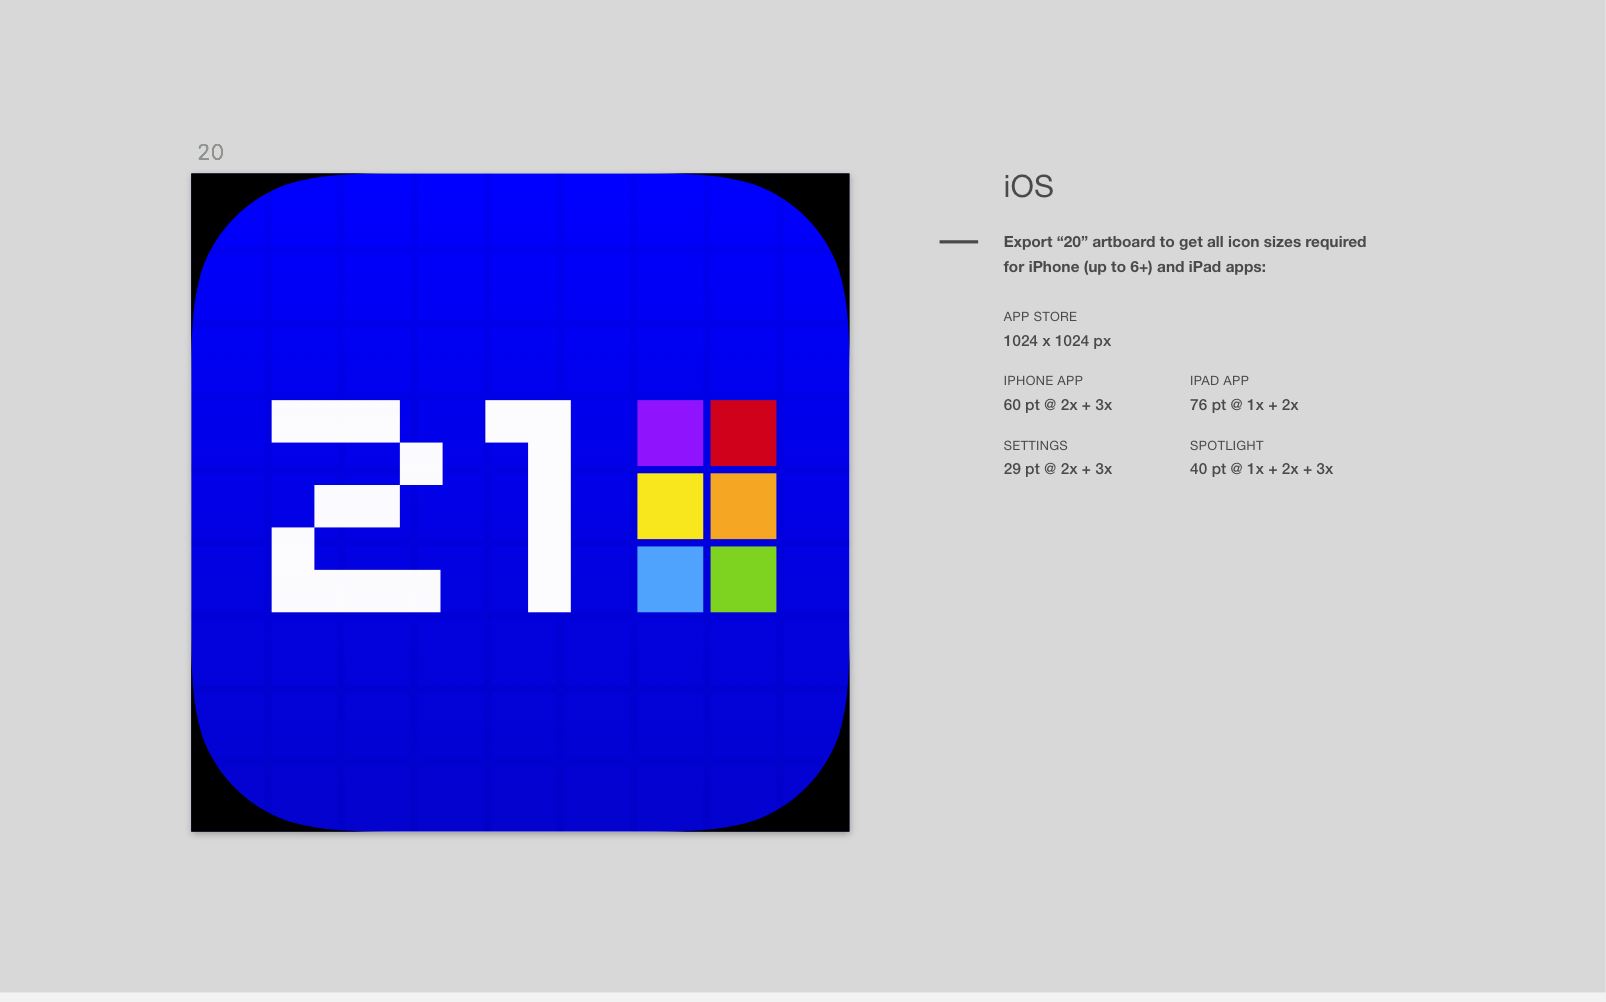
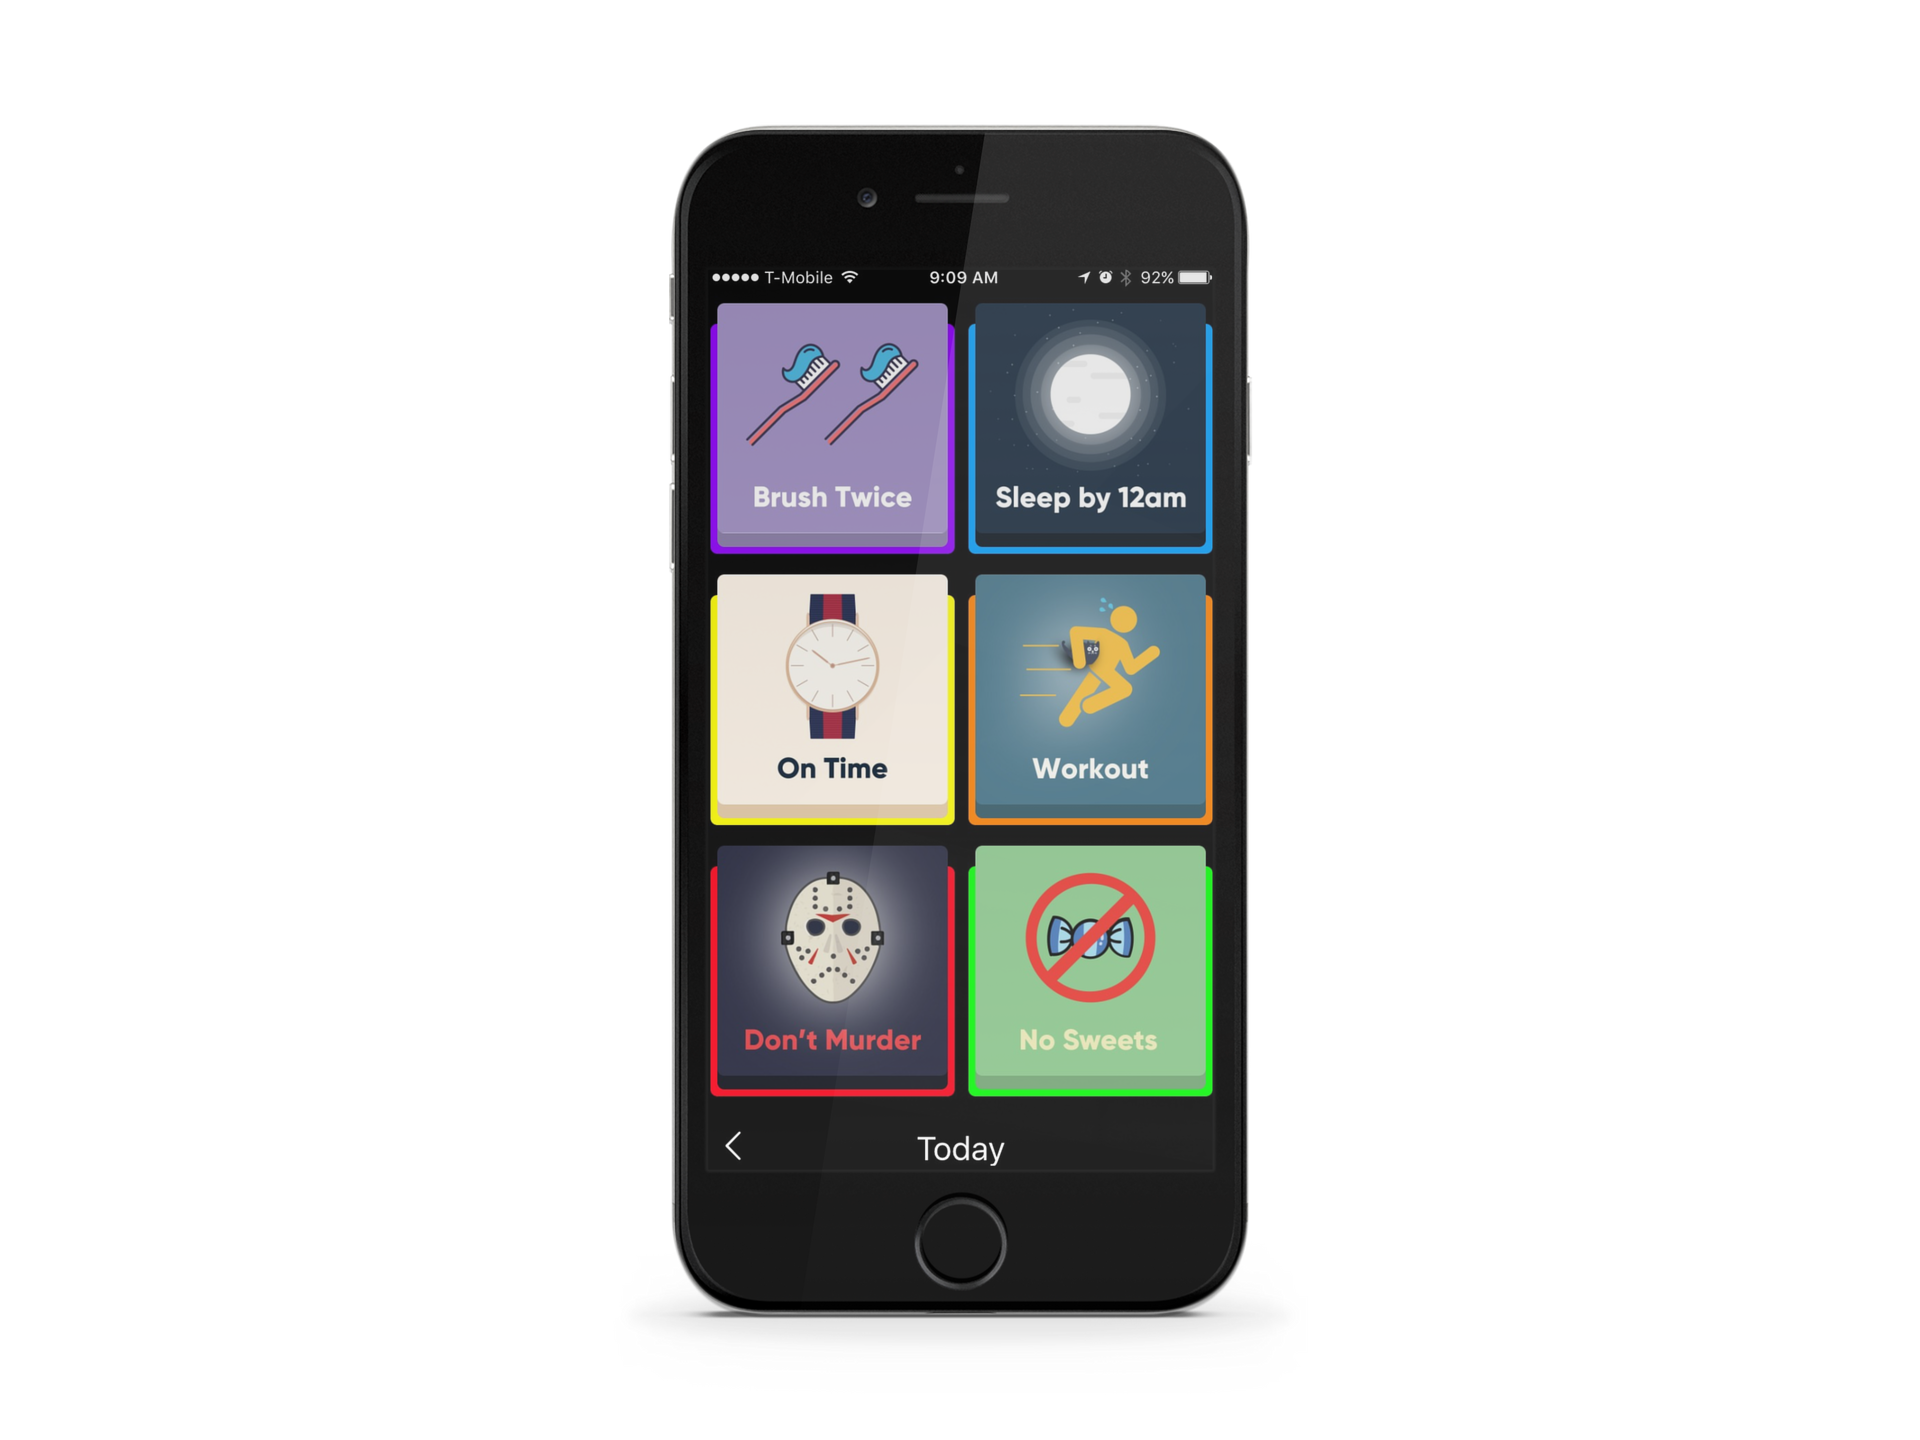
And for days I'm not home, I've put together an iPhone app. That way I can track from

Why?

Mostly for fun! For some time now I've been taking a more active role in my health, and I wanted a way to track my habits with something more permanent and specialized than an app on my phone. I had a good conversation with my girlfriend about the habits I've been forming right before thanksgiving and thought, why not make something to help myself?

Which habits?

I'm picking habits that may not need to be done everyday, but should be completable within a day. They aren't over specific and are a balance of passive and active tasks. I also added a habit that will (hopefully) give me a reason to use it every day... (can you guess which one that is?) >.>

What was learned?

This project helped me reflect on which habits I want to focus on. I also learned how simple it can be to get a custom frame built and to design infographics (this was one of my first design experiences and I had a lot of fun figuring out the color and feeling for each image).

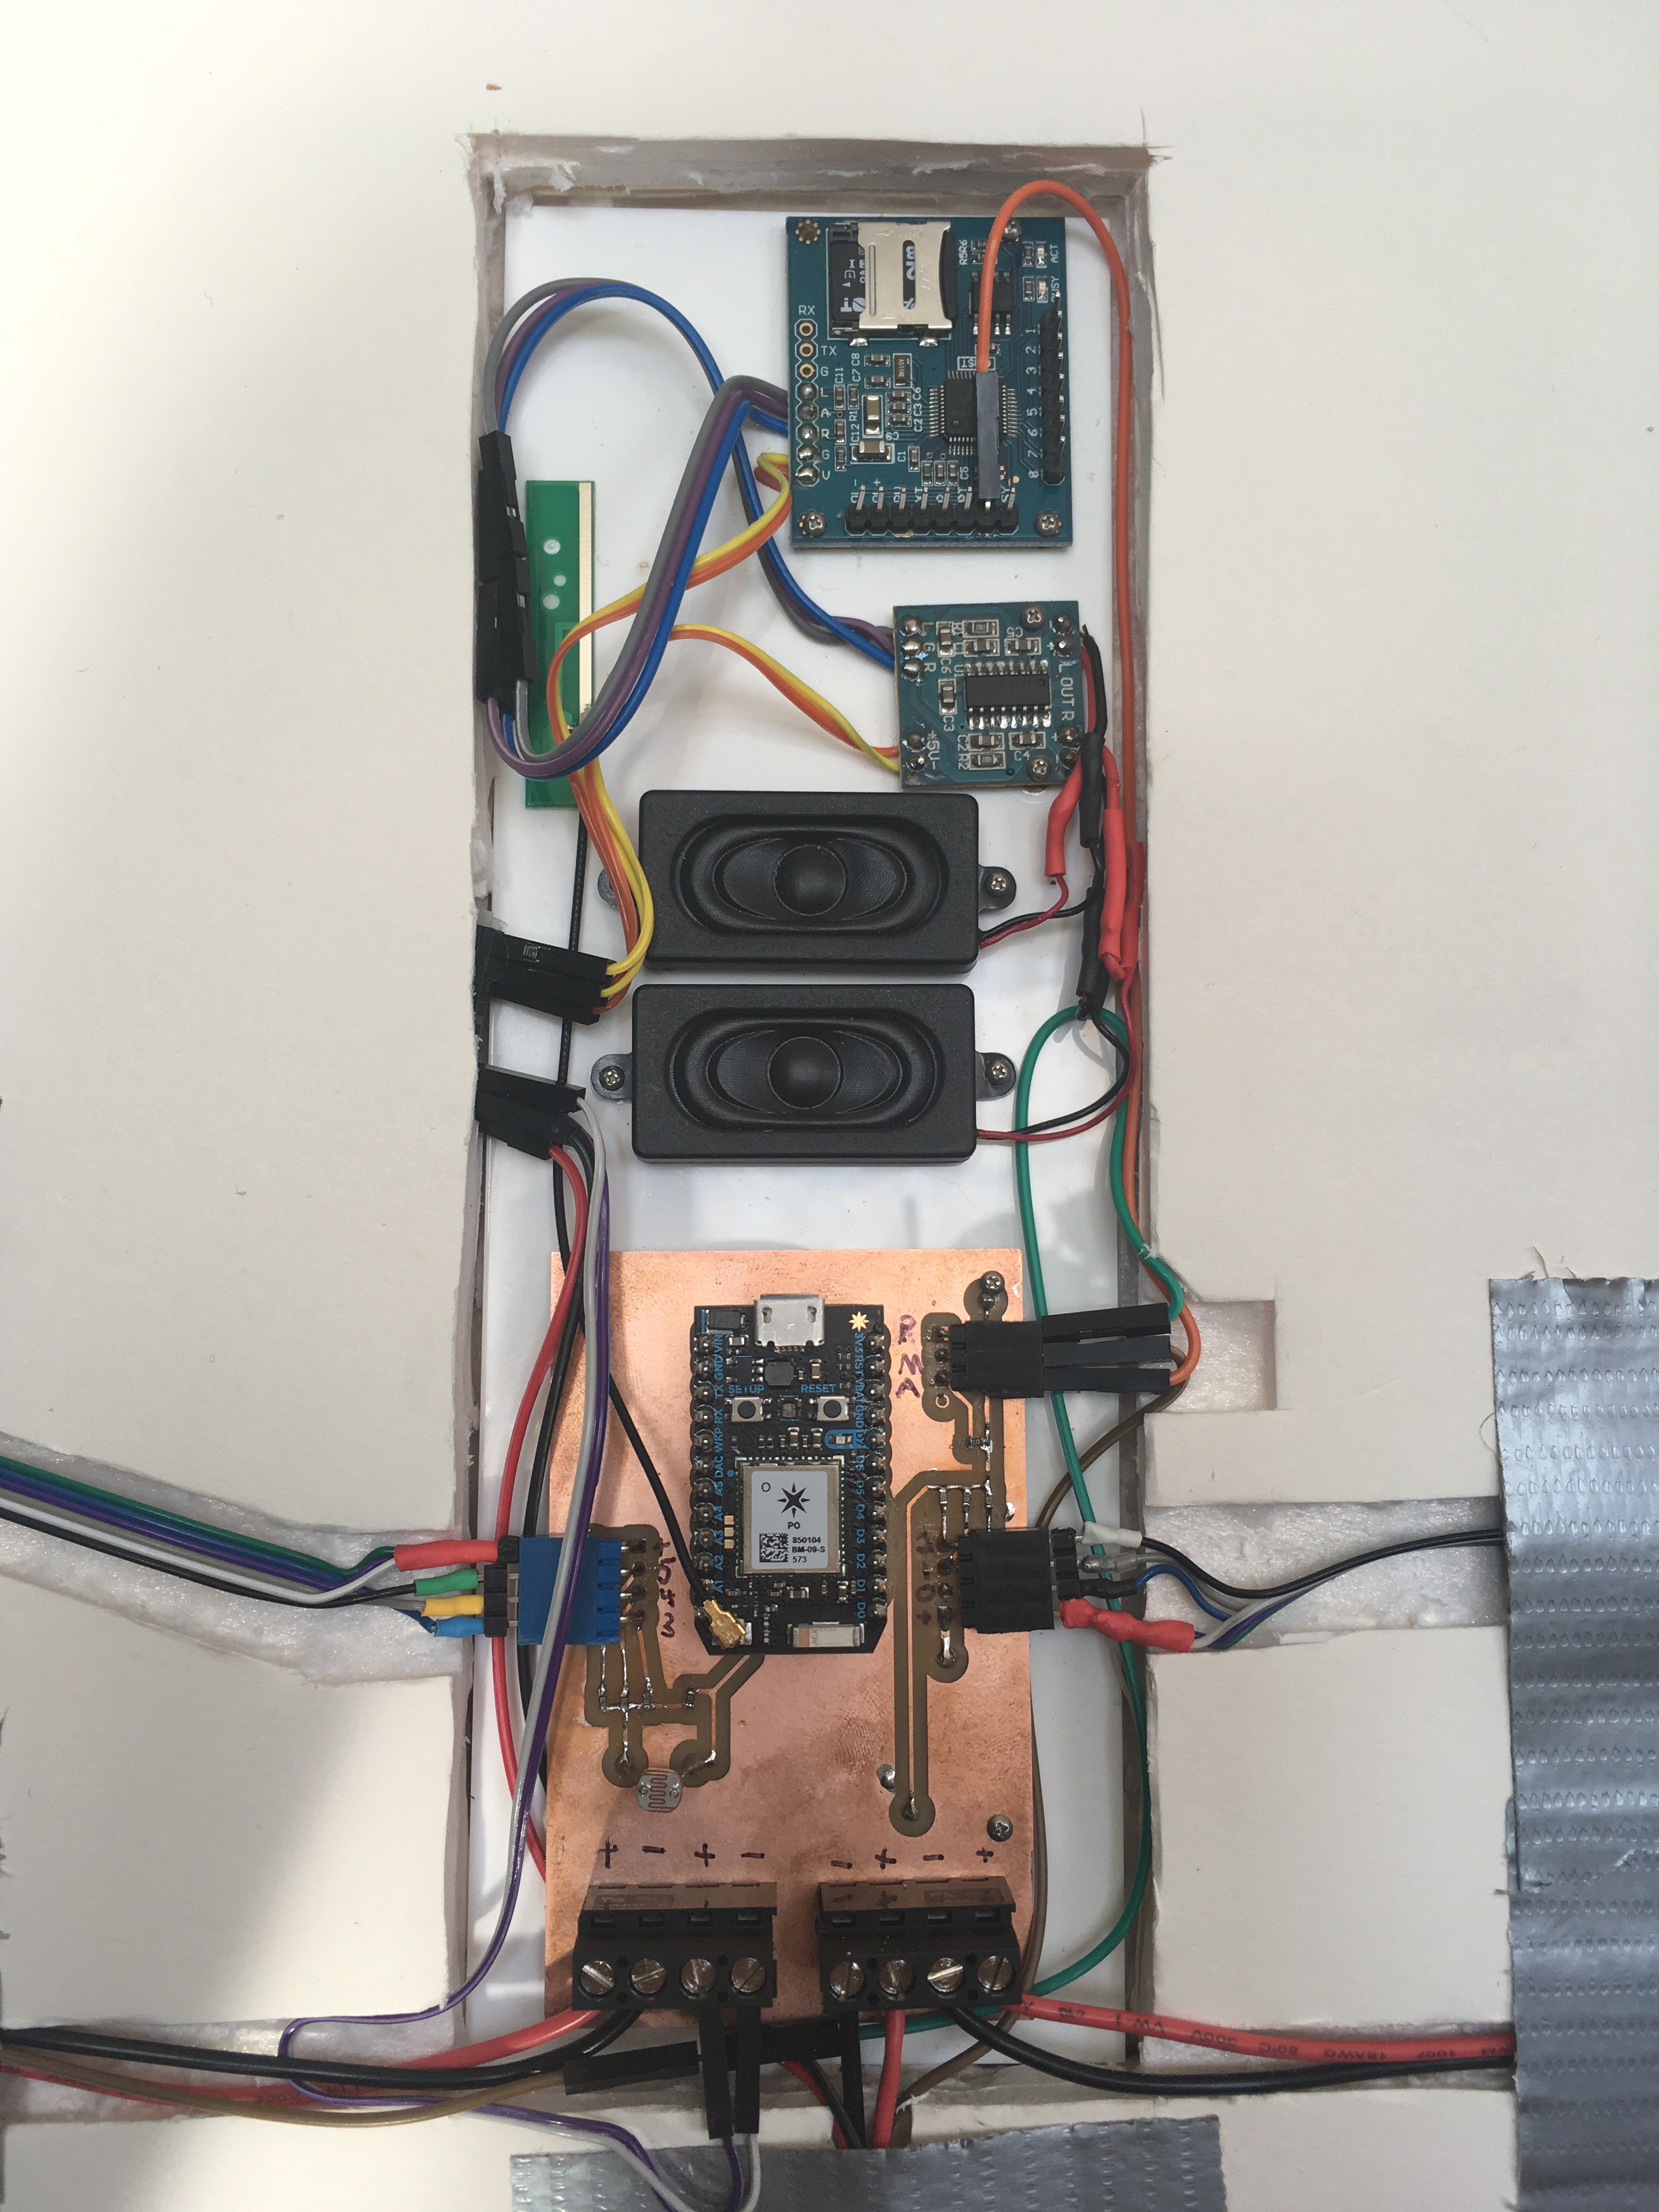
What does it look like?

Check out the project logs and watch it come together!

How do you use it?

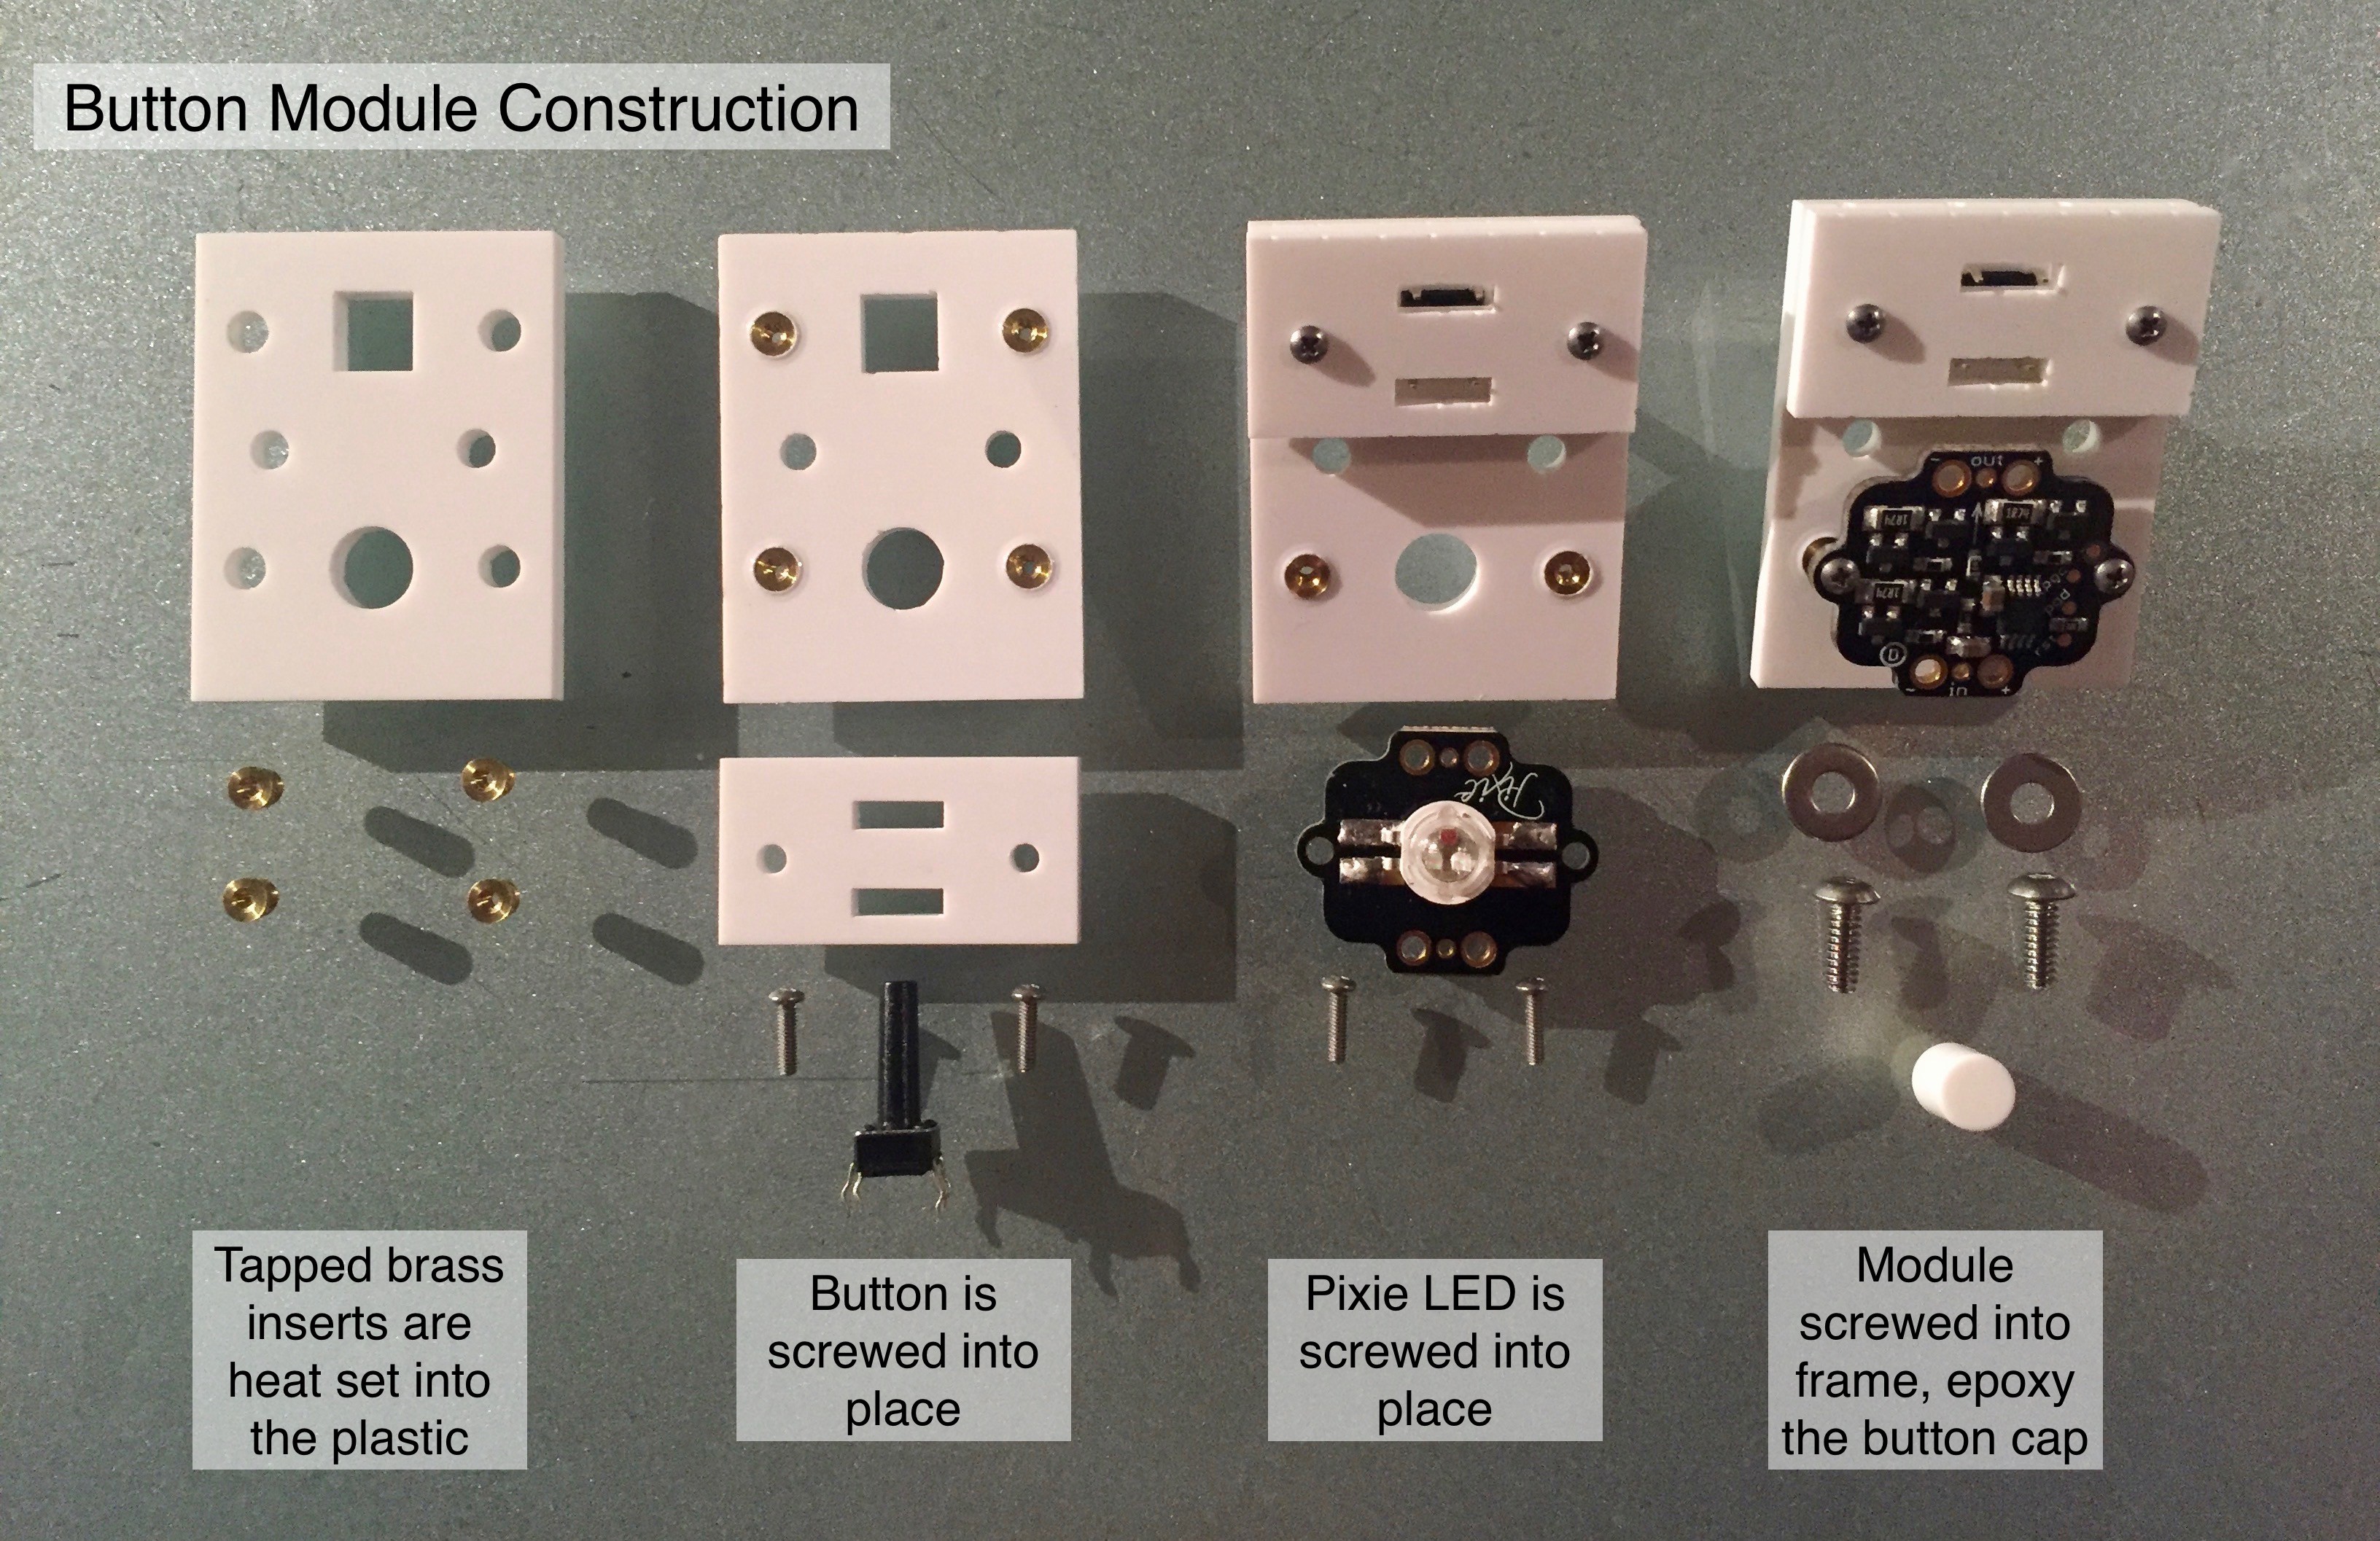
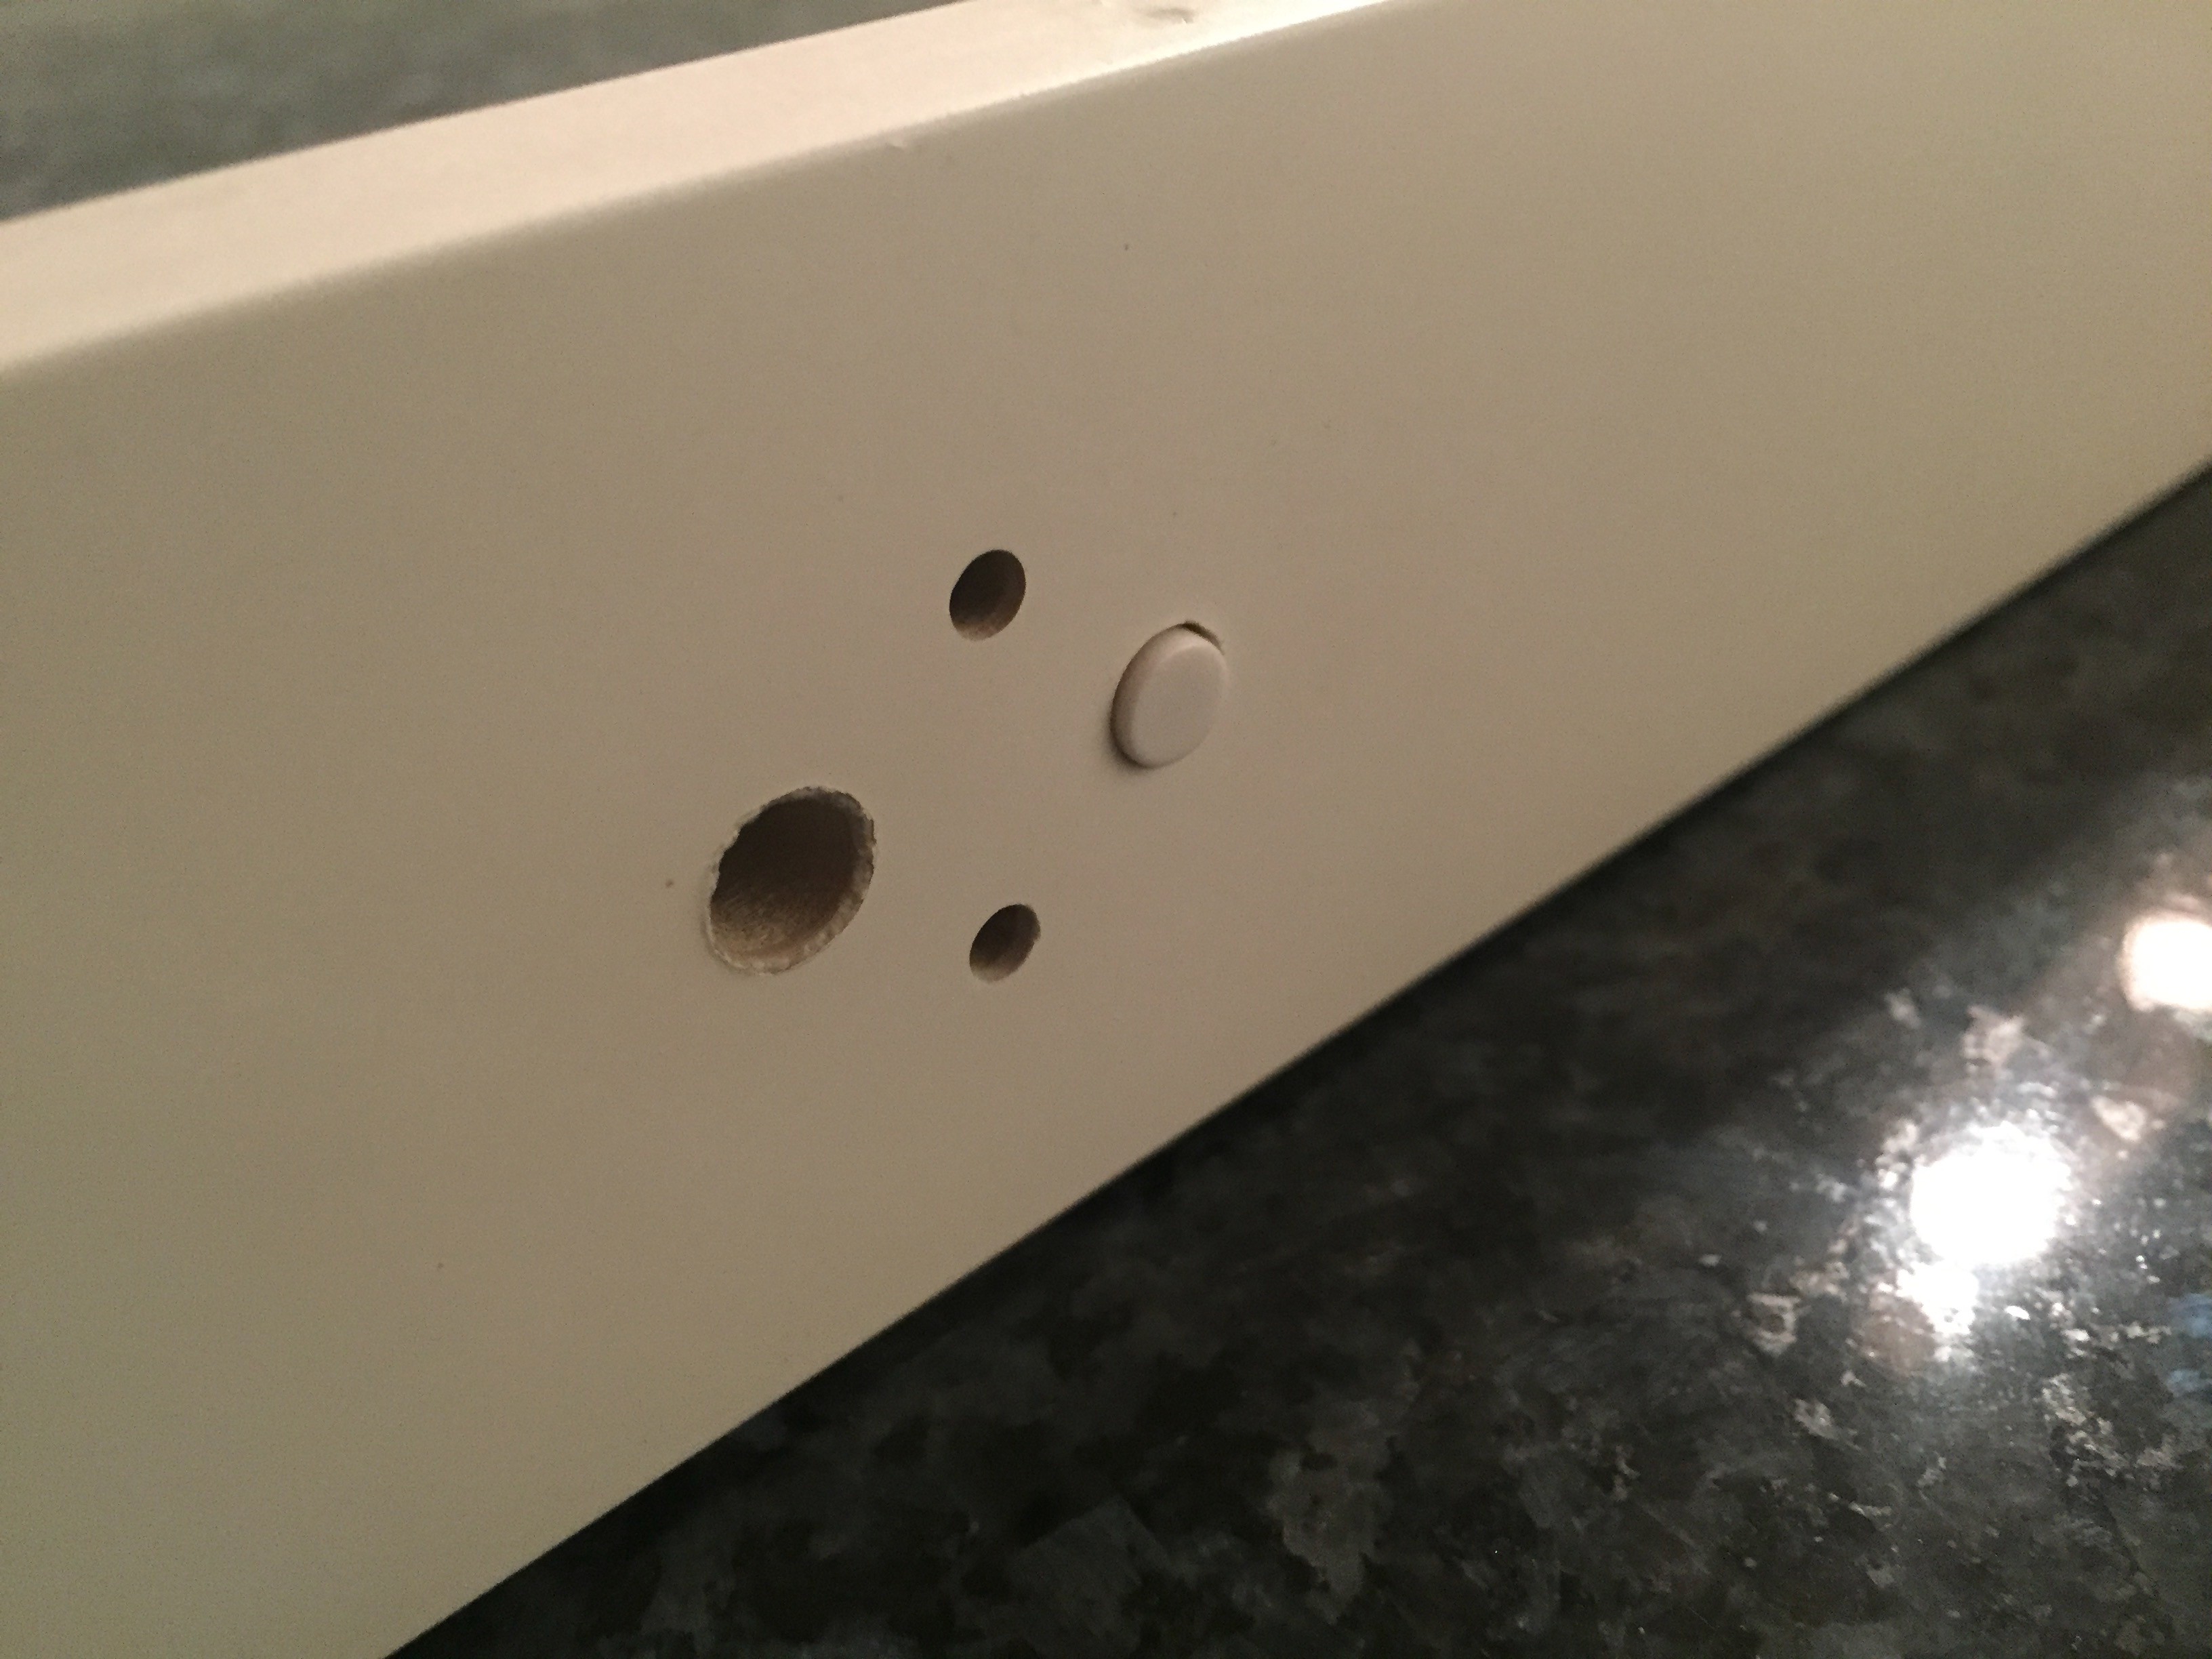
Each day before bed I'll mark each habit as done with a button on the side of the frame.

If I forgot to use it before falling asleep I can mark the previous day with a double tap.

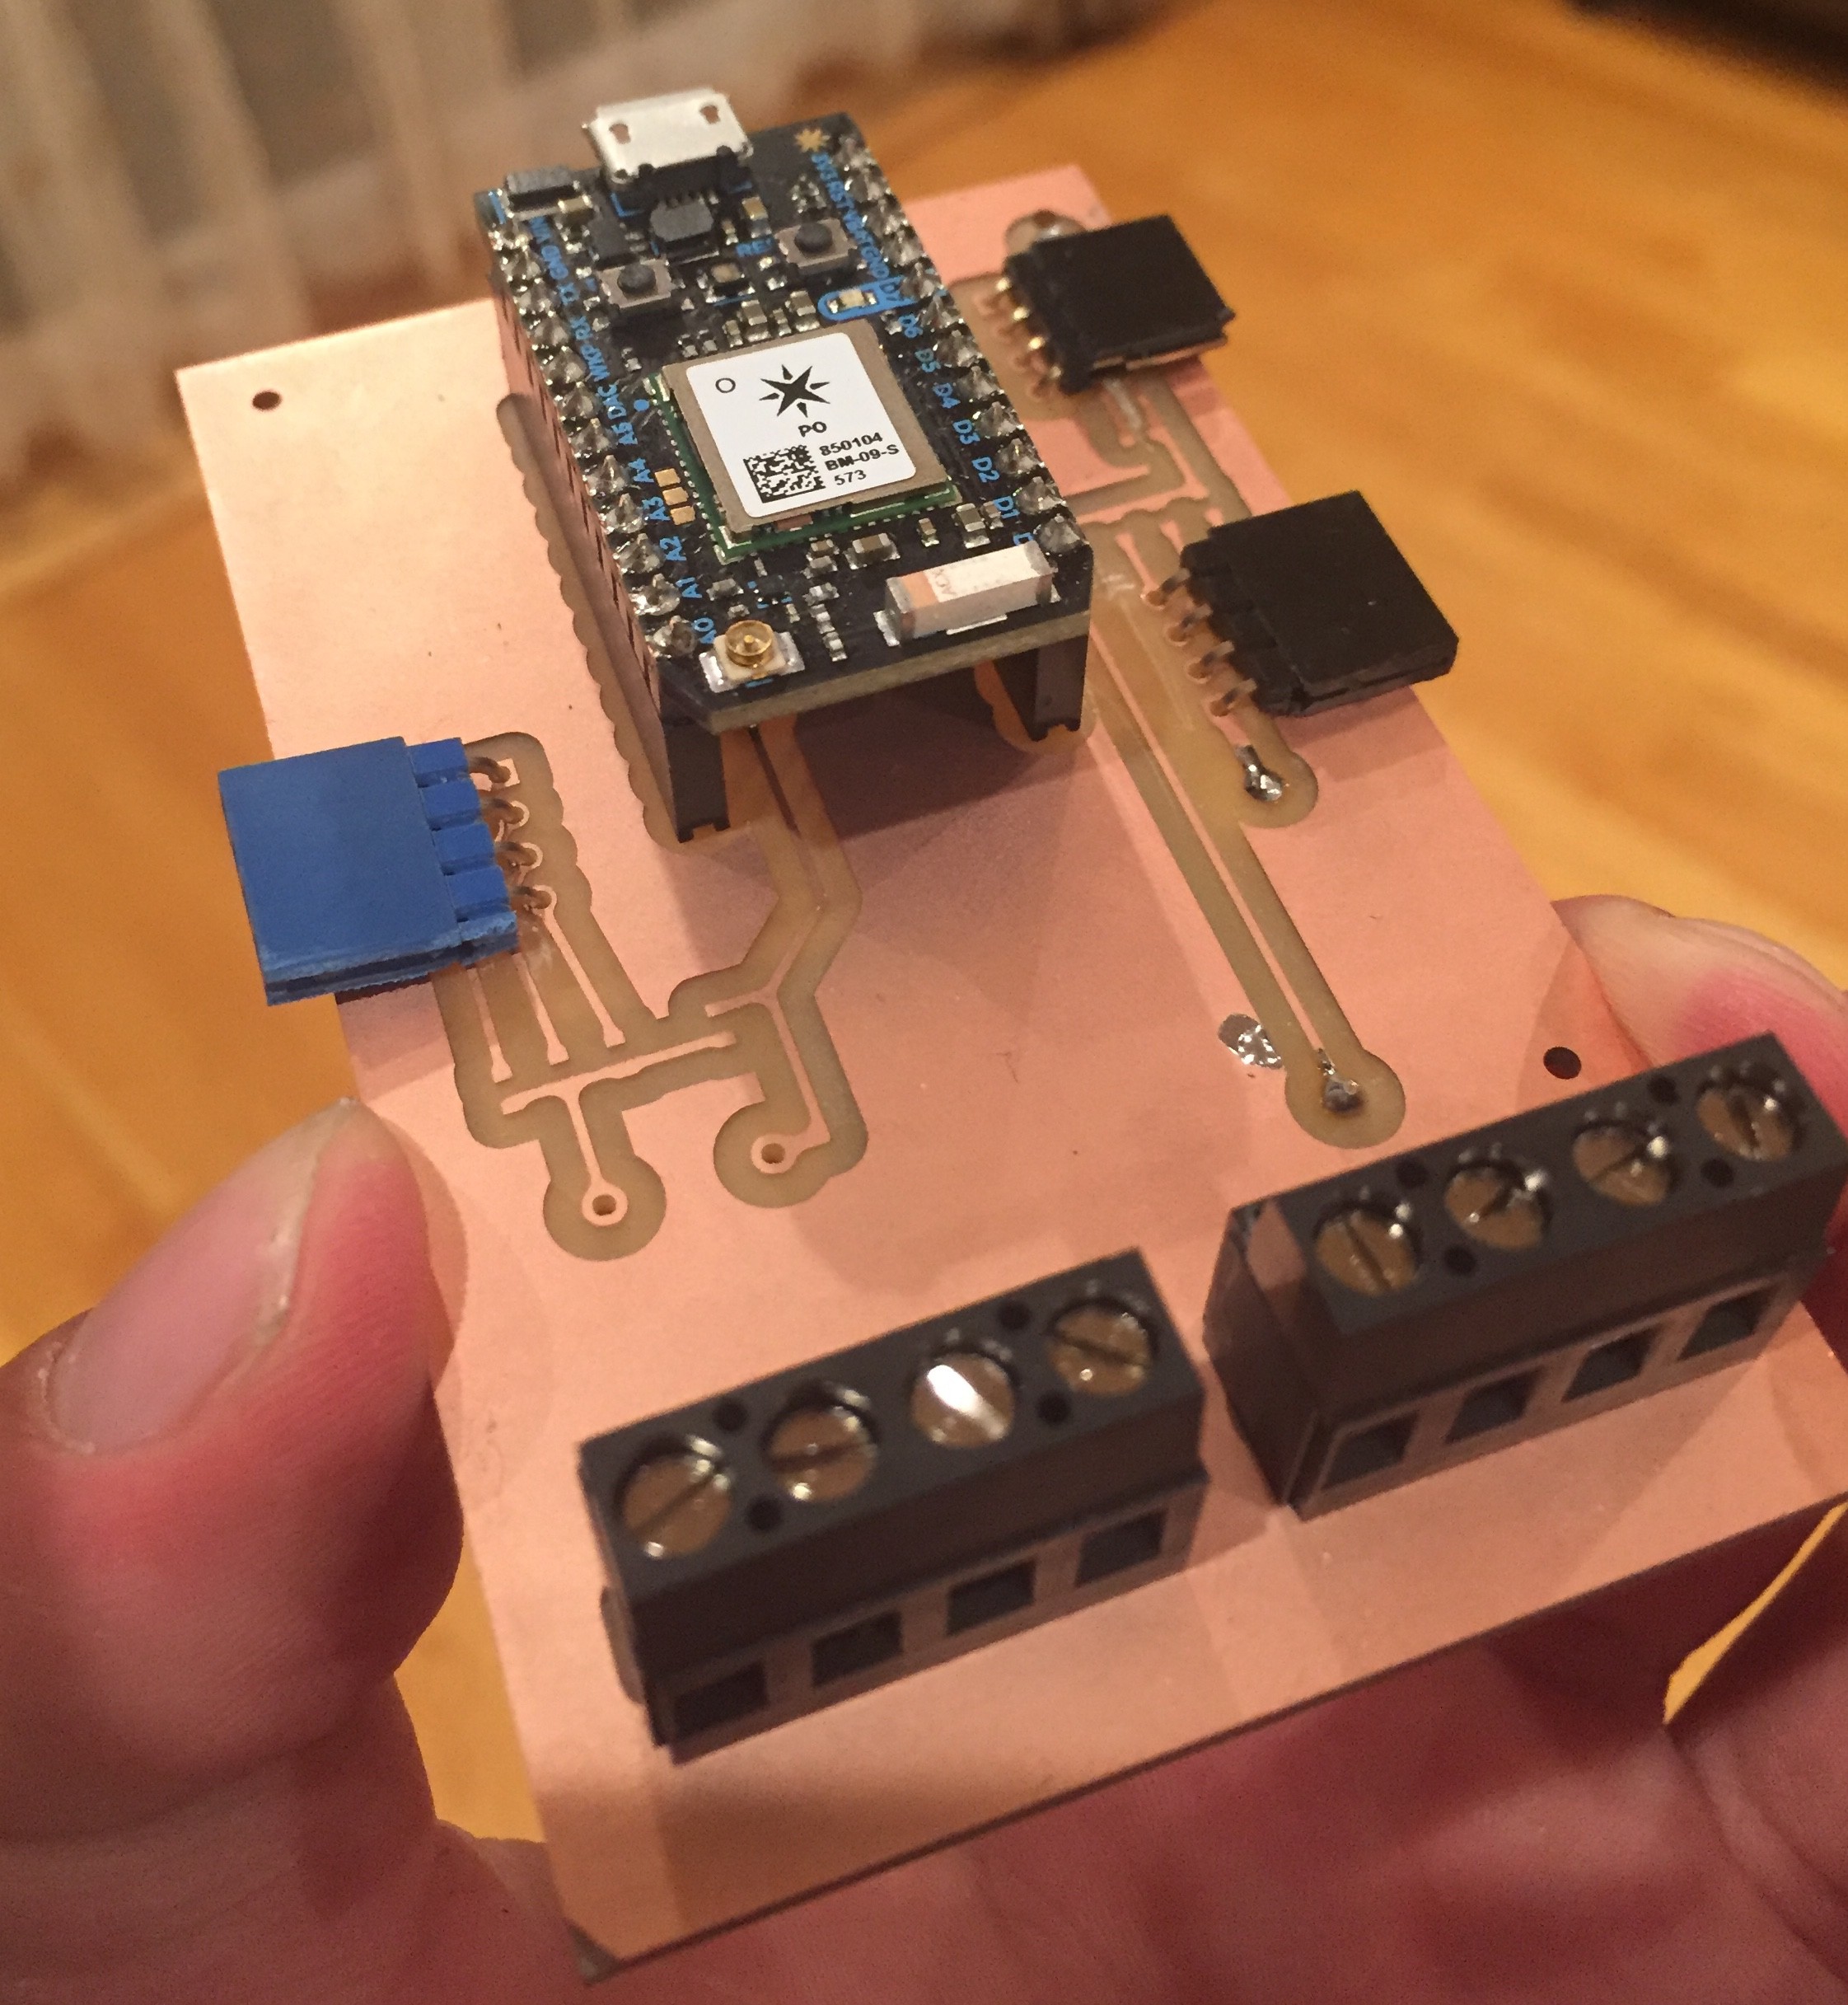
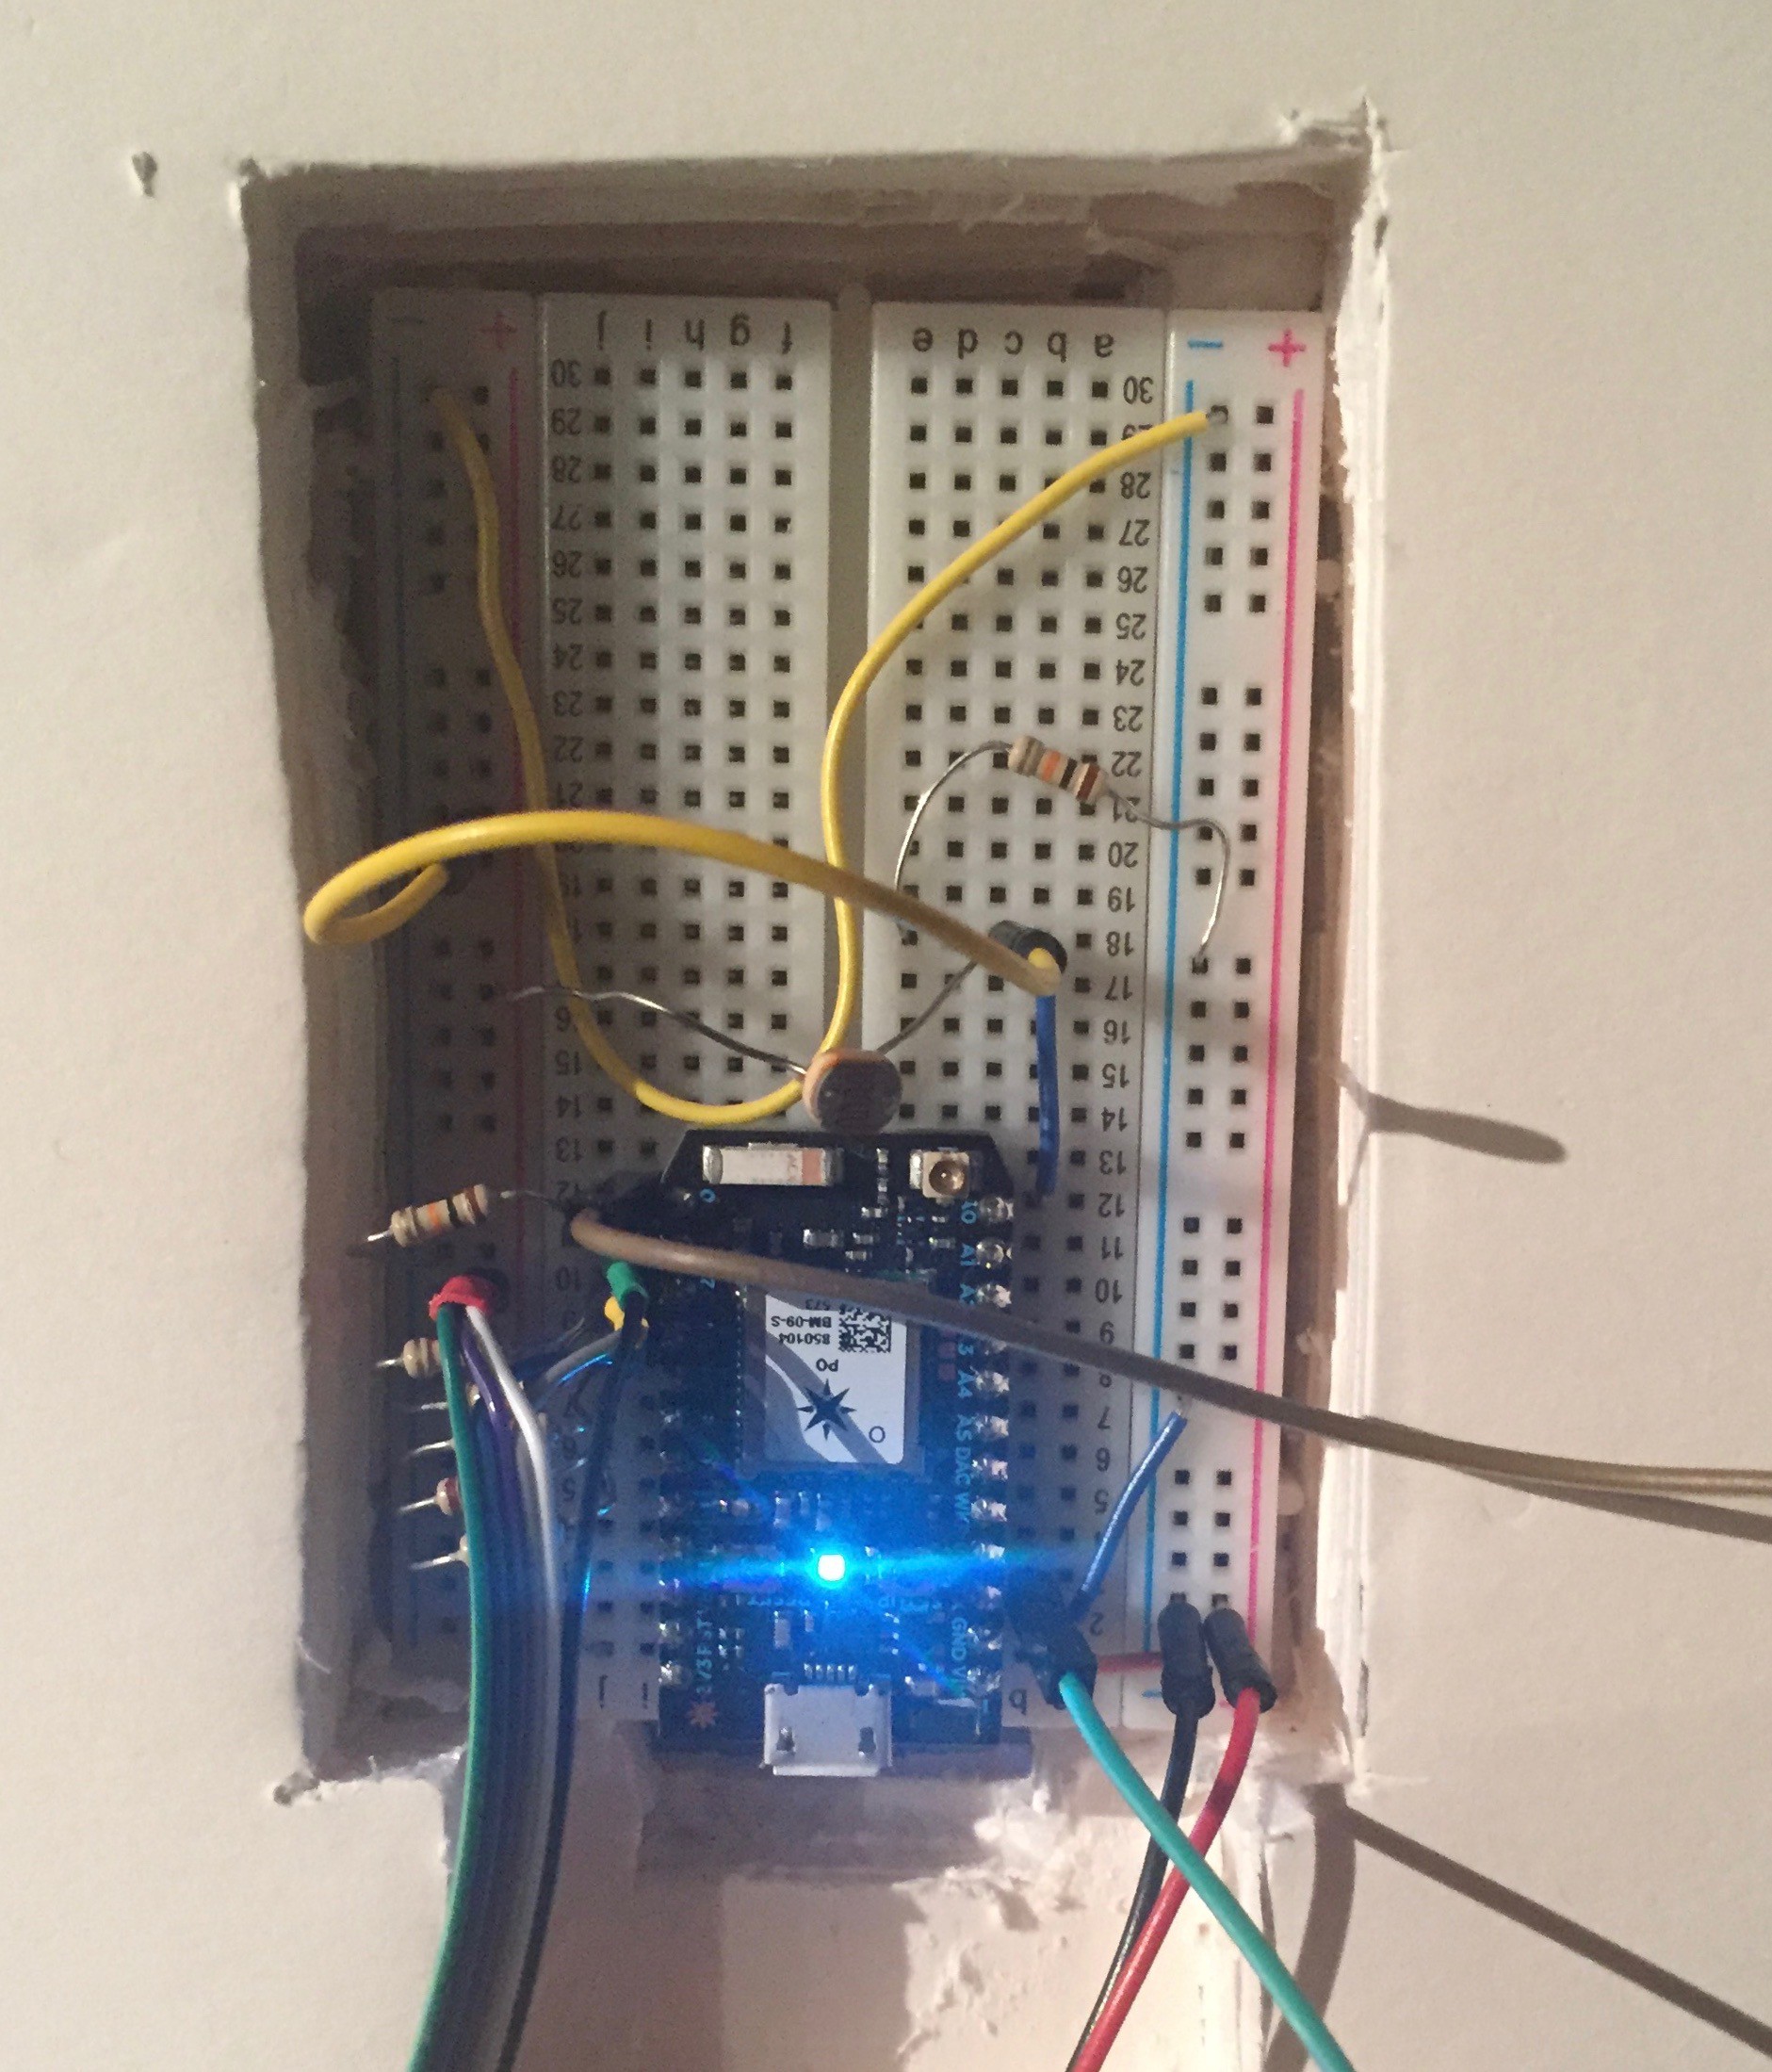
If I'm away from home I can mark the habit as done with an app I made. (Using the Particle Photon as my Arduino made it super easy to set up an IoT api!)

Thanks

Thank you Casey for inspiring the Don't Murder habit and calendar layout. Thank you Michelle for an inspiring conversion that planted this project idea. Thank you lolcolors.com for color inspiration. Thank you Jj and Michelle for your amazing design feedback.

Support the artists!

Pooping Cat - Created by Denis Sazhin

Mr. Voorhees - Created by Dustin Weeres

Running - Created by Mungang Kim

Toothbrush - Created by Sergey Demushkin

Candy - Created by LSE Designs

Daniel Wellington Illustration - Created by Pierre Borodin

Portable Network Graphics (PNG) - 162.76 kB - 04/10/2017 at 01:53

Preview
Download

21d.ai

Habit Illustrations

postscript - 5.58 MB - 11/23/2016 at 01:28

Download

  • 2 × 4"x9"x1/8" Acrylic Tap Plastic. Any color, I choose white. PCB Plugs and PCB Border layer.
  • 1 × 4 1/4"x9 1/4"x1/8" 60% Translucent Acrylic Tap Plastic. Front layer of the calendar which diffuses the LED Grid.
  • 6 × 4"x9"x1/8" Acrylic (minimum is 3 pieces if there aren't any Screw Through Grid layers) Tap Plastic. Any solid color, I recommend sign white. Screw Through Grid and Terminate Grid and No Hole Grid layers.
  • 4 × 4-40 Machine Screws (minimum length is 1/2") McMaster Car. Calculate length: 1/8" + 1/8" + 1/4" + (1/4" x N) where N is the number of Screw Through Grid layers.
  • 4 × 4-40 Brass Heat Set Inserts for 1/4" Acrylic McMaster Car.

View all 13 components

  • Final Construction!

    Chris Gervang06/14/2017 at 17:35 0 comments

    This project has been a lot of fun to make, and a great challenge to design. I'm proud to share the finished hardware!

    Front (powered off)

    Back

    Back (guts exposed)

    Back (circuit close up)

    Thanks for checking out my project!

  • CNC Circuit Boards!

    Chris Gervang06/14/2017 at 16:57 0 comments

    I have a backlog of posts to make.. for my first I wanted to share all of the photos I took while making the PCB using an Othermill.

    PCB Design is Open Source and available on Upverter.

    I'm amazed at how fast and accurate the Othermill is

    v2 before soldering components


    v1 front / back

    the whole setup!

  • Logo Designs, iOS, and Server Updates

    Chris Gervang04/14/2017 at 22:21 1 comment

    Icon Design

    Over the last week I focused on logo design for the iOS app, and for the website. I had a lot of fun browsing Dribbble for inspiration and art direction. I made around 21 variations, which one is your favorite?

    In the end, I choose version 20.

    It features a super light grid in the back, and a colored square for each habit I'm forming. The bold blue background with a slight darkening gradient stands out on my phone.

    These files are now on github in the design folder!

    New Features

    In addition to updating rect-native (which took hours), I added some new features and refactors.

    Build Scripts

    # In 21days/ios
    
    # For release on the phone build in ios:
    npm run build
    # Open Days in XCode, click play
    
    # For debug build on iphone simulator:
    react-native run-ios

    iOS

    • Organized view code into <Bar/>, <Day/>, and <Track/> components
    • Added a file for api calls
    • Added redux and react-redux to handle app state
    • On load, queries the server for history (buttons that have already been pressed now appear pressed)
    • I can scroll to see today and yesterday's habits.

    Server

    • Organized endpoints into a device and web folder
    • For tracking from iOS and getting a JSON of history:
      • /web/history
      • /web/track
    • For tracking today from the Picture Frame:
      • /device/track renamed to /device/complete
      • /device/undo (WIP)

  • Parsing JSON on embedded is troublesome!!!

    Chris Gervang02/13/2017 at 04:28 0 comments

    I'm using SparkJson (a simple port of ArduinoJSON) and ran into an issue where the buffer size required may be too large for the Photon (when I set it somewhere above 3284 the Photon starts to flash red, which means death). I'm not sure where to go from here other than abandon the JSON data structure for a simpler, less human readable structure.

    Can someone help me determine the maximum buffer size I can set on the Photon, or think a modification to the SparkJson library that could reduce the required buffer size, or have answer to a question I don't know how to ask?


    The JSON in question.

    String length is 366.

    {
      "history": {
        "brush twice":[0,0,0,0,0,0,0,0,0,0,0,0,0,0,0,0,0,0,0,1,1,0],
        "dont murder":[0,0,0,0,0,0,0,0,0,0,0,0,0,0,0,0,0,0,0,0,0,0],
        "no sweets":[0,0,0,0,0,0,0,0,0,0,0,0,0,0,0,0,0,0,0,0,1,0],
        "workout":[0,0,0,0,0,0,0,0,0,0,0,0,0,0,0,0,0,0,0,0,0,0],
        "sleep by 12am":[0,0,0,0,0,0,0,0,0,0,0,0,0,0,0,0,0,0,0,0,1,0],
        "on time":[0,0,0,0,0,0,0,0,0,0,0,0,0,0,0,0,0,0,0,0,0,0]
      }
    }


    Calculating Buffer Size.

    I used the ArduinoJson assistant site to determine the max required buffer size, which according to them comes out to 3920 in the JSON above and 3284 for the smaller JSON example below.

    Do note, the BUFFER_SIZE number calculated by the Photon and the site is inconsistent.

    // Calculating Buffer Size on Photon
    const int CHAR_LENGTH = 284;
    const int BUFFER_SIZE = 5*JSON_ARRAY_SIZE(22) + JSON_OBJECT_SIZE(1) + JSON_OBJECT_SIZE(5) + CHAR_LENGTH;
    // 3172 w/ CHAR_LENGTH, 2888 w/o. Both worked in my trials below.
    

    So, around 3172. Yet the site recommends:

    AVR 8-bit1252
    ESP82661756
    Visual Studio x863200
    Visual Studio x643284


    The correct BUFFER_SIZE is probably the one calculated on the Photon (it seems to work, anyways).


    The Code In Question.

    My Particle.subscribe() handler:

    void handleHistory(const char *event, const char *data) {
        int length = strlen(data) + 1;
        // copy char[] out of const since SparkJson needs to write.
        char json[length];
        strcpy(json, data);
        const int CHAR_LENGTH = 366;
        const int BUFFER_SIZE = JSON_ARRAY_SIZE(22) * 6 + JSON_OBJECT_SIZE(6) + JSON_OBJECT_SIZE(1) + CHAR_LENGTH; // 3822
        StaticJsonBuffer<BUFFER_SIZE> jsonBuffer;
        JsonObject& root = jsonBuffer.parseObject(json);
        if (!root.success()) {
            Particle.publish("parseObject() failed", String(System.freeMemory()));
        } else {
            Particle.publish("parseObject() success!", String(System.freeMemory()));
        }
    }
    // This code fails for me, causing the Photon to flash red. 


    The library definitely works.

    I've determined that a smaller test JSON (length 284) parses perfectly when the buffer is set to 3172 or 2888 (both work).

    char small_json[] = "{\"history\":{\"brush twice\":[0,0,0,0,0,0,0,0,0,0,0,0,0,0,0,0,0,0,0,1,1,0],\"dont murder\":[1,0,0,0,0,0,0,0,0,0,0,0,0,0,0,0,0,0,0,0,0,0],\"no sweets\":[0,0,0,0,0,0,0,0,0,0,0,0,0,0,0,1,0,0,0,0,1,0],\"workout\":[0,0,0,0,0,0,0,0,0,0,0,0,0,0,0,0,0,0,0,0,1,0],\"sleep by 12am\":[0,0,0,0,0,0,0,0,0,0,0,0,0,0,0,0,0,0,0,0,1,0]}}";
    

    System.freeMemory() reports 60908 before the buffer is created, and 60960 upon success.

    In the particle console I see the webhook response containing the entire json string, and on the Photon I'm publishing the length of that string to confirm it is what I expect.


    So far I'm sure...

    • The parser works for smaller JSONs of similar structure.
    • The entire JSON char[] is making it to the handler's `const char* data`
    • Reducing the buffer size significantly below to the size calculated by on the Photon will cause the parse to fail.
    • The Photon's max buffer size for me is somewhere between 3284 and 3920

    Having spent around 6 hours on this issue so far I'm going to try the simpler, but ugly data structure. Wish me luck!

  • Lets get this frame on the wall!!!

    Chris Gervang02/08/2017 at 08:40 0 comments

    Here is the frame as it stands today!

    Its just missing is 3 buttons, the final prints, and the glass!


    Getting There

    The frame had a date with the drill press to make holes the button modules. 24 holes later and we're done! The large hole is 1/4in, the smaller is 9/16th in.

    Don't forget the sacrificial wood, the wooden drill guide, and the clamps!

    Next I put threaded inserts into the 9/16th in. holes so that I could screw the button modules on.


    Button Module Wiring

    I wired the buttons and side lights together so that 3 button modules are connected to each other. I've only made one side of buttons for now, but after some testing I'll make the other side.

    Materials

    • 16AWG black and red wire for Pixie power
    • Ribbon cable with 6 different colors for button signal
    • 12 right-angled through-hole pins for low profile Pixie data headers
    • A strip of straight through-hole pins for button signal headers
    • 24AWG breadboard cable for Pixie data (female to female, female to male, male to male)
    • Heat shrink tubing to seal the solder joints

    How To Wire the Three Buttons

    1. With 3 button modules screwed into the frame, measure out a length of ribbon cable long enough to connect all buttons together. Be sure to have extra length so that the header side of the cable can reach from the lower side of the frame to the breadboard centered in the frame.
    2. We'll start with the button at the top of the frame. Split off two colors of the ribbon cable and separate the 4 remaining colors until you're just past the middle button.
    3. Cut off a length of the 4 colors so that the length is an inch or so of extra of what you need to connect two of the remaining four wires with the middle button later.
    4. Disassemble the top button and place it in a third hand, as shown in the picture.
    5. Strip the tips of the two colored wires and cut two 1/2in pieces of heat shrink tube, as shown in the picture.
    6. Thread the two wires and heat shrink through the acrylic button backing. Be very careful about picking the hole you pick and stay consistent. Remember, the button backing is not symmetrical. I threaded the wire though the hole adjacent to the side with a slightly wider width.
    7. Solder the wires to the button, ensuring the pins you choose to solder to are not electrically connected unless the button is pressed. The result should look like the picture. Try screwing the button back on to the rest of the button module (which should still be screwed into the frame) to check that the lengths are appropriate.
    8. Now onto the middle button. Split off two colors from the remains 4 colors of ribbon cable, and separate the 2 remaining colors until you've just past the bottom button.
    9. Repeat steps 3 through 7 to finish wiring the middle button.
    10. Repeat steps 3 through 7 again to finish wiring the bottom button.
    11. Now that all of the buttons are soldered, clamp the terminating end of the ribbon cable and strip the ends of all 6 colors.
    12. With pliers, snap off 1 straight though-hole header and a segment of 3 headers.
    13. As shown in the picture, cut 3 pieces of heat shrink tubing and solder every other color to the segment of 3 headers.
    14. Solder the remaining 3 colors to the 1 header.
    15. The red header in the picture plugs into +3.3V on the breadboard. The segment of three headers should be connected to the Digital input pins on the breadboard. You may need to modify which D pin is assigned to a particular habit in the Particle Photon's source code.

    All three buttons should look something like this.


    Foam Board Meets Knife

    I got out the Exacto knife and carved out a cavity for the breadboard and button modules.

    Back of the frame Front of the frame (exposing the foam core)
    Breadboard wiring Close up of the foam core cuts needed the make space for the buttons.

  • Building the Button Modules

    Chris Gervang01/18/2017 at 08:16 0 comments

    I'm very excited to announce I manufactured the six button modules! The module design took many iterations, but after all of that work the button feels just right.

    Key design considerations I took into account included:

    • Must be replaceable and repairable
    • No glue in its construction (except for the button cap)
    • Had mounting holes smaller than the hole for the button and LED
    There are only four steps to construct one of the modules, as shown below.

    The laser cutting for all 12 pieces of 1/8" acrylic took about a minute to complete (DXF files I used are on github). The buttons are around 13mm tall so that they go all of the way through the frame. The screws are 0-80 for the components and 4-40 for the mounting. The length of the mounting screw can vary, but the components screws are set at ???.

    Once mounted into the frame, the button can be pressed on the side and the LED can shine on the wall.
    From the insideFrom the outside

    What remains to be seen is if there is enough room for the glass, so I'll be calling Blick's frame department to learn more.

    Read more »

  • React Native iOS App

    Chris Gervang01/17/2017 at 17:41 0 comments

    To take full advantage of the Particle Photon's cloud capabilities my friend Chris Chan and I built a mobile app that can connect to the 21days frame and track my habits. Building a cross platform mobile app if you're familiar with ReactJS or javascript/html is now easier than ever thanks to React Native.

    You can download the source for this app from my Github repo and compile it with Xcode. Also, I'm open to feature requests!

  • Building the Calendar Enclosure, Version 2

    Chris Gervang12/19/2016 at 09:03 0 comments

    In order to display my habit consistency over time I decided to build a calendar out of LEDs. Each column represents a day in the last 21 days and it is either dark or colored depending on if I had done a habit on that day. Each row in the calendar represents a different habit I am tracking. The color of the LEDs match a primary color from the habit illustration that it represents.

    My design requires a way of diffusing the light produced by the circular LEDs so that the light can fill a crisp square cavity. I choose to laser cut a number of grids and stack them on top of each other to achieve this look. As the light travels from the LED it reflects off of the glossy surface of the grid wall and scatters. The walls have to be tall enough so that the light is sufficiently scattered by the time it hits a layer of 60% translucent acrylic. This final acrylic layer softens the light and hides the circuitry underneath.

    Previously, I built the grids out of white 1/4" thick acrylic that allowed 20% of the light to shine through the material. This turned out to be too transparent as the light from each pixel mixed with adjacent pixels, muting the colors as you can see here.

    As this was undesirable I began to look into sourcing a cheap white acrylic that is not as transparent. It turns out opaque 1/4" thickness acrylic is not a very common item to stock at any of my local plastic shops, however, they do stock 1/8" acrylic that is about 5% translucent. Rebuilding the grids with this material produces a much better result, as you can see here, but it also introduced a new set of problems.

    The problem with laser cutting 192 7mm squares in 3 minutes is that the plastic deforms because a ton of heat is transferred from the laser to the cutting bed and into the plastic. Its as if the plastic was resting on a stove top for a few minutes. I tried a number of different settings on the laser cutter, but due to time constraints and the limited material I had on hand I was not able to produce a perfectly flat piece.

    I did, however, find that I could flatten the piece if I heated it up again on a stove and put it under a book that had weights stacked on top of it.

    I am very satisfied with look of the 1/8" opaque grid because it achieves much higher light isolation, while still providing glossy walls to diffuse the light. I was afraid that if this hadn't worked I would have had to make the grids out of wood and then hand paint the walls of each square with white glossy paint to reflect and diffuse the light, a process that would have been extremely time consuming.

  • Livestream - Animating the LED Matrix

    Chris Gervang12/19/2016 at 07:32 0 comments

    Another livestream! This time we implemented the LEDs on the calendar matrix that display the habits I've done over the last 21 days.

    https://www.livecoding.tv/chrisgervang/videos/MqxV1-animating-a-led-matrix

  • First Livestream!

    Chris Gervang12/14/2016 at 06:54 0 comments

    Yesterday, I tried something new: I streamed while coding this project. It was actually really fun!!

    I'll be going live again soon, but if you missed it and would like to watch I've embedded the first stream videos.

    Part 1 - Note: The fun starts 15 minutes in.
    https://www.livecoding.tv/chrisgervang/videos/3Vyp6-lighting-up-a-led-matrix-sounds-buttons
    Part 2
    https://www.livecoding.tv/chrisgervang/videos/nOqaJ-lighting-up-a-led-matrix-sounds-buttons-2
    Part 3
    https://www.livecoding.tv/chrisgervang/videos/8j1We-lighting-up-a-led-matrix-sounds-buttons-3

View all 15 project logs

Enjoy this project?

Share

Discussions

Michelle Chan wrote 11/22/2016 at 06:59 point

What's up with the cat?

  Are you sure? yes | no

Similar Projects

Does this project spark your interest?

Become a member to follow this project and never miss any updates