Close
0%
0%

Ameba LCD Menu

One of the essential step to develop a multi-functional IoT terminal device is a simple yet useful MENU system, and here it is

Similar projects worth following
I have always wanted to develop a little IoT terminal looking device capable of performing some simple wireless task such as 1) scanning WiFi signal in close proximity, 2) Analyze the channel, signal strength of each WiFi signal, 3) acting as a simple MQTT client for data visualization and so on so forth, but the tricky part is -- I need a MENU system so that I can freely choose whatever function I need, that part is actually quite abit of work, as it must not only display each menu item correctly but also being able to highlight user's selection, and if the menu list goes too long, it must also able to scroll down to display more items, and it must take in item data elegently with well structured data containers etc.

Despite there are some working arduino libraries but they are either designed for other display type, or simply too abstract that adds in too much unnecessary overhead. Therefore, I decided to write a simple MENU system for TFT LCD display myself. So here it is

PS: This is a part of a ongoing IoT Terminal project

With this MENU system, you can,

1) Add in as many menu item as you want in a clear 2-dimentional array nicely placed at the top of the sketch for easy editing;

2) Highlight selected item with any color of your choice;

3) By selecting a menu item, the corresponding task will then run continously;

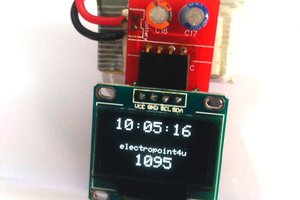
4) Save GPIO usage, as it only take 2 GPIO for Display and 2 for push button

Ameba_LCD_MENU.ino

arduino sketch

ino - 18.69 kB - 12/30/2021 at 19:39

Download

  • 1 × Ameba A1 Pico (BW16) IoT MCU
  • 1 × ILI9341 SPI TFT LCD Display
  • 2 × bread boards
  • 11 × jumper wires
  • 2 × push buttons

View project log

  • 1
    Arduino IDE board installation

    Add this following line to the "Additional Board Manager URLs",

    https://github.com/ambiot/ambd_arduino/raw/master/Arduino_package/package_realtek.com_amebad_index.json

    Then install Ameba D package from the board manager

    Then select RTL8722DN(BW16) from "Board"

  • 2
    Connect Ameba to the display and upload the code

    Check here for the pin map,

    and connect according to the code,

    #define TFT_RESET       PA27 #define TFT_DC          PB3 #define TFT_CS          PA15

    also BL/LED to Vcc

View all instructions

Enjoy this project?

Share

Discussions

Similar Projects

Does this project spark your interest?

Become a member to follow this project and never miss any updates