Close
0%
0%

Old Roomba, new tricks

Add mapping & MQTT-interfacing with ESP8266 and an IMU

Public Chat
Similar projects worth following
Using an ESP8266 module, control my Roomba 632 that I bought on Ibood some years ago.
It will clean my house, won't look like something I hacked together and is a perfect platform for experimentation.

Goals:
V - Add control with MQTT in Home Assistant for scheduled cleaning;
V - Play Macgyver theme song;
V - MQTT-autodiscover;
V - Read sensorstream data;
V - Add IMU;
V - Get vectordata from wheel encoder readings for location;
V - Get vectordata from IMU-readings for location;
V - Mapping;
o - Integrate IMU and wheel encoder readings to improve accuracy;
o - Correct vectordata with closed loop;
o - Controll and SLAM?
V - Having fun ;-)

Progress:

Ok. This project will take a while... A lot of stuff coming together on this one. 

I found out that the Roomba I've had for some years has a serial port and an open interface.

It's basically a iRobot Create 2, but this one can also clean my floor:

https://edu.irobot.com/what-we-offer/create-robot 

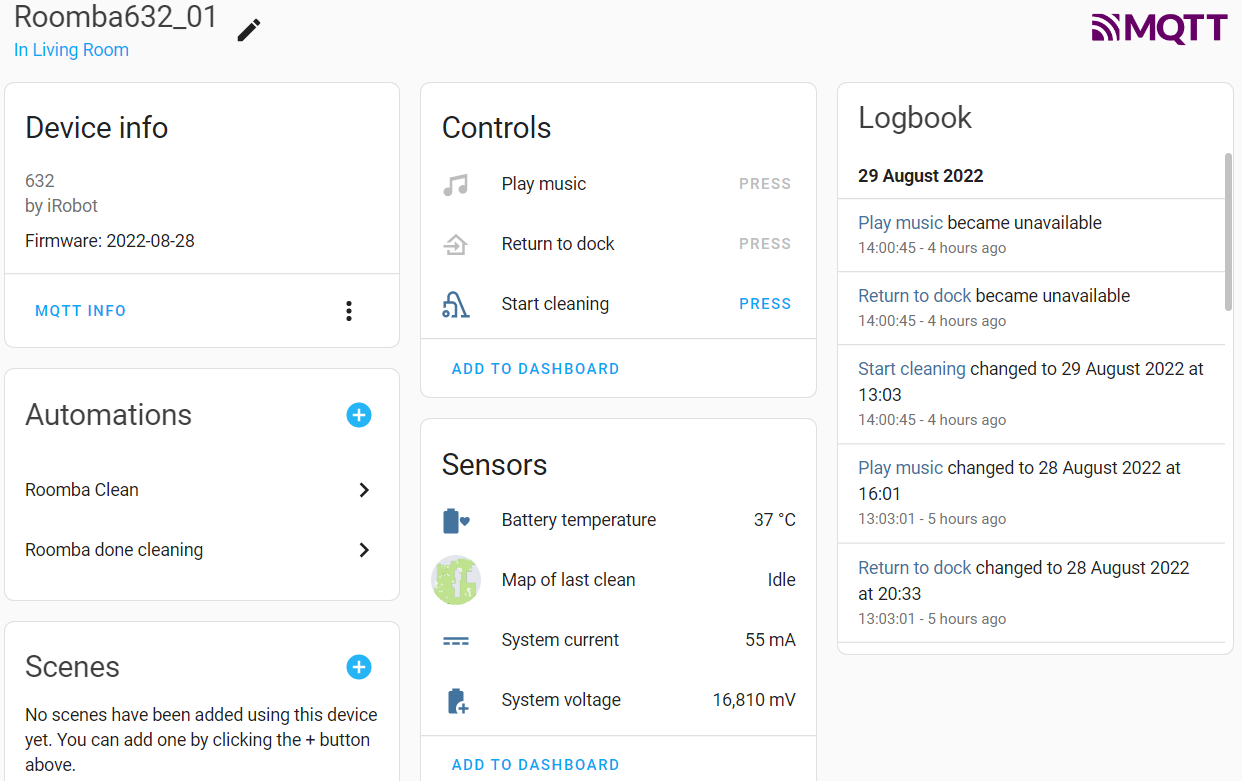
The Roomba is a 632 (600 series) without any scheduling or mapping capabilities... for now.

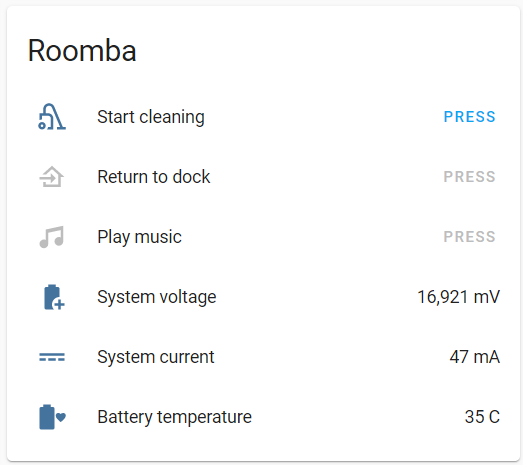
The interface allows me to not only send basic commands, but also to get full sensor readings. On everything from motors, bump and cliff sensors etc. 

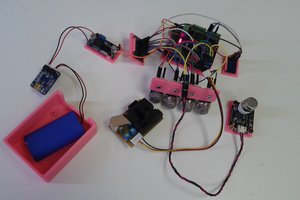
As always, the plan is pretty simple. Add microcontroller, some soldering, some typing, done!

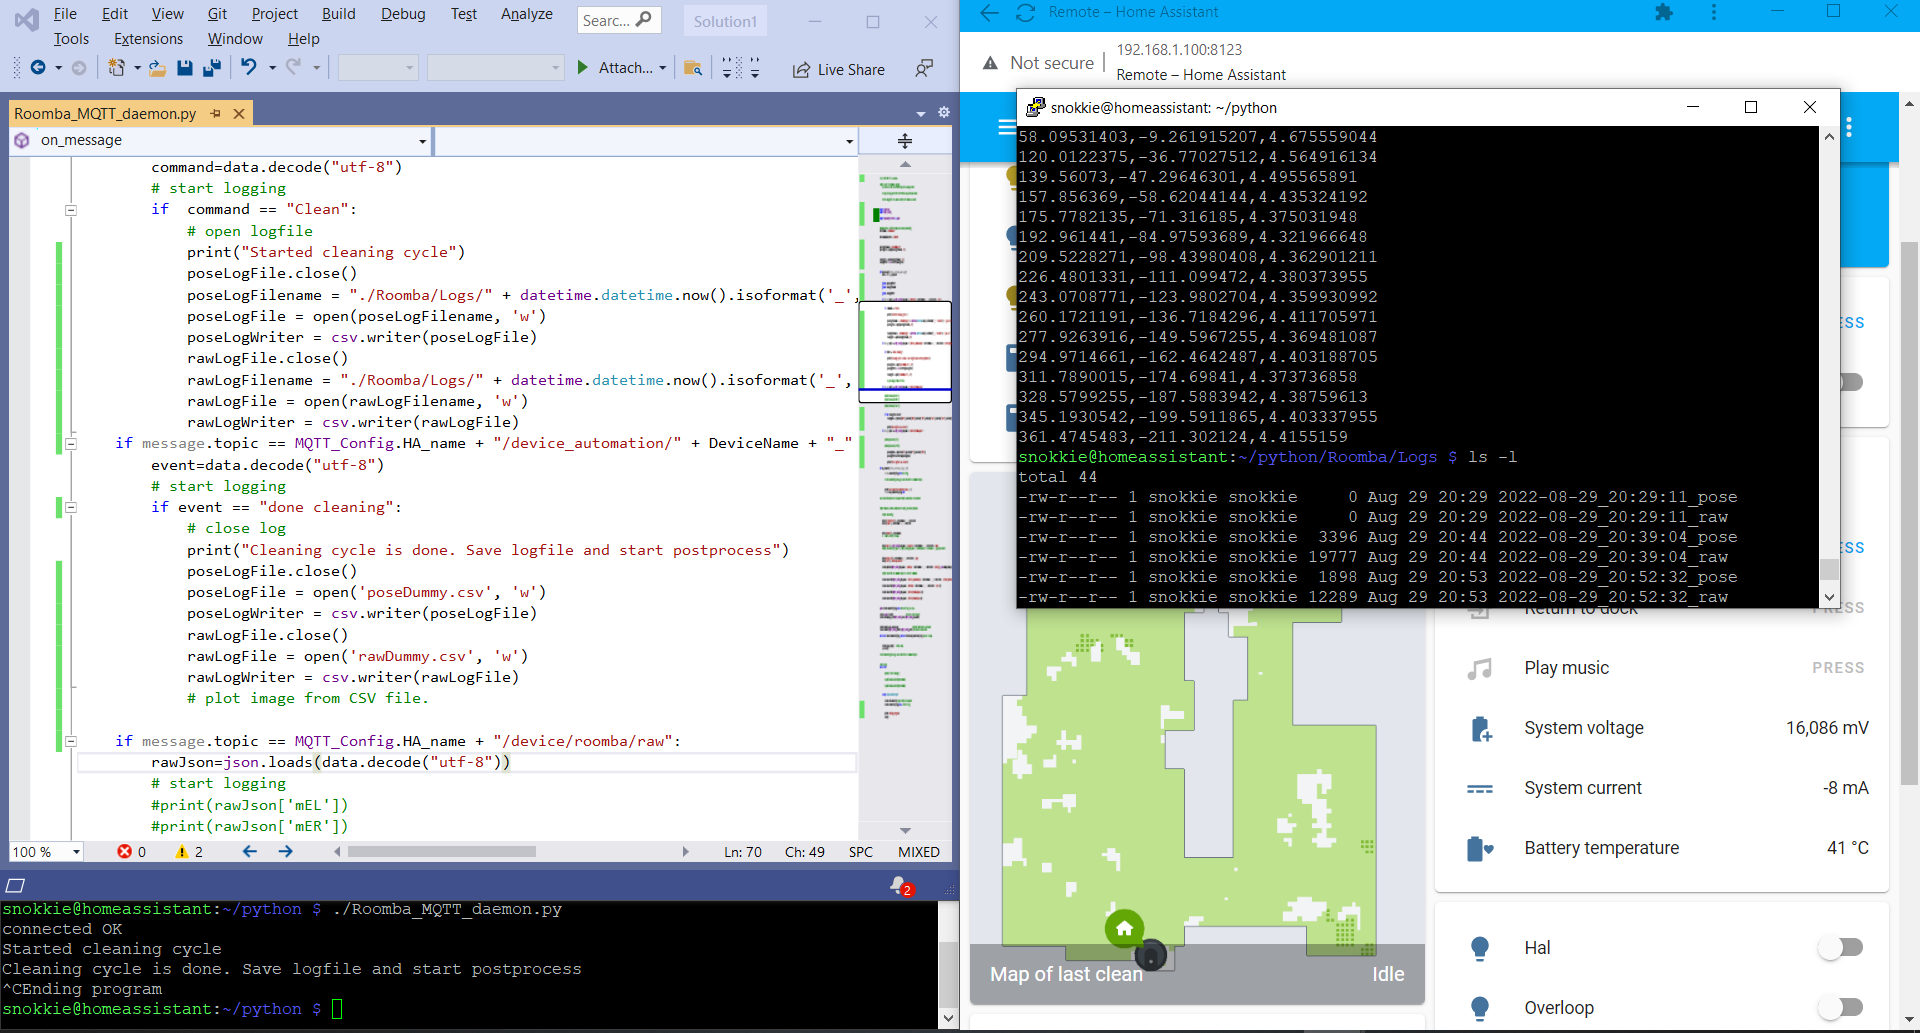
For starters, I want to be able to let Home Assistant send a CLEAN command via MQTT on a schedule. [DONE]

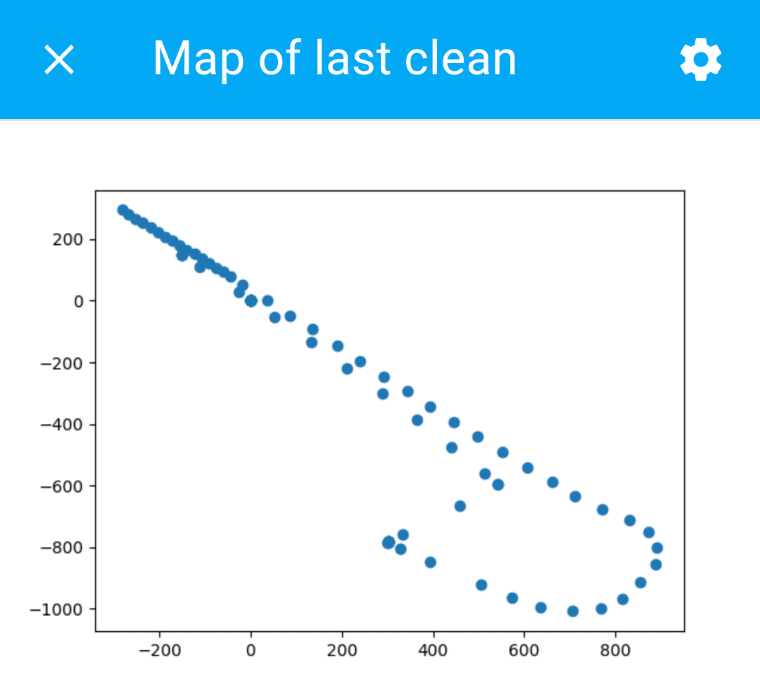
In the long run I want to add a IMU (MPU6050) and integrate this with the sensordata (odometry) from the Roomba to get mapping data. Tracks like you get with a handheld GPS. [DONE]

Then maybe do some loop-closing geodesy magic and take full control of the driving and cleaning.

Roomba_MQTT_daemon.py

Python service/daemon to run on a Pi for logging and mapping (and to do loop closures and error correction in the future)

text/x-python - 9.78 kB - 09/02/2022 at 09:53

Download

Roomba_MQTT.service

service file for systemctl to run the python script as a service

service - 297.00 bytes - 09/02/2022 at 09:53

Download

MQTT_Config.py

MQTT-credentials for python service

x-python - 80.00 bytes - 09/02/2022 at 09:53

Download

Zip Archive - 6.28 kB - 08/28/2022 at 19:30

Download

Roomba632_2022-08-21.cpp

Library source containing the Roomba632 class v.2022-08-21

plain - 26.09 kB - 08/21/2022 at 18:51

Download

View all 15 files

  • 1 × iRobot Roomba 632
  • 1 × ESP8266
  • 1 × IPEX antenna WiFi antenna for the ESP8266: https://hackerstore.nl/Artikel/1026
  • 1 × Buck step down DC/DC converter 3.3V
  • 1 × MPU6050

  • Logs and maps (part 5)

    Simon Jansen09/06/2022 at 17:33 0 comments

    Quick update on the update

    Writing live map image to buffer instead of file. Reduces load quite a bit. 

    img_buf = io.BytesIO()
    plt.savefig(img_buf, dpi=50, format='png')
    img_buf.seek(0)
    poseLogImageString = img_buf.read()
    poseLogImageByteArray = bytes(poseLogImageString)
    client.publish(MQTT_Config.HA_name + "/camera/" + DeviceName + "_" + DeviceID + "/map",poseLogImageByteArray,0,False)
    img_buf.close()

    It's still not fast enough for a real live feed though. Other small changes I made are: using "zorder" to make sure the scatter plot with dots is on top. Changing the size of the dots with s=120 and setting the resolution for both live-map and post-process-map with "dpi".

    Updated python script is uploaded.

    I guess, now it's time to do the deep dive into the accuracy of the positional data...

  • Logs and maps (part 5)

    Simon Jansen09/03/2022 at 10:22 0 comments

    Quick update: better live mapping:

    I noticed the live mapping would slow down and fail. This was because of the way I used the scatter plot function. I added a new layer with just one dot for each value. 

    Now I clear the plot and map out the complete path it took with a red dot on its last position. This works much better.

    Updated python script is uploaded to files.

  • Logs and maps (part 4)

    Simon Jansen09/02/2022 at 10:01 0 comments

    Live mapping and better maps!

    I added a live mapping feature. While cleaning, every 10 position readings are added to a scatter plot. The image of the plot is then published by MQTT.

    I tried omitting saving to file and using an io-buffer instead, but I can't get this to work. This means it's not fast enough to send an updated plot every 500ms (the update-rate of positional data). I have it set now to post every 10 datapoints. So an updated plot every 5 secs.

    plt.scatter(poseJson['X'],poseJson['Y'], color='r')
                
    #-every 10 seconds records?
    liveFeedCounter=liveFeedCounter+1
    if liveFeedCounter == 10:
        liveFeedCounter = 0
        #img_buf = io.BytesIO()
        #plt.savefig(img_buf, format='png')
        #poseLogImageString = img_buf.read()
                
        plt.savefig("live.png",format='png')
        poseLogImageFile = open("live.png", "rb")
        poseLogImageString = poseLogImageFile.read()
        poseLogImageByteArray = bytes(poseLogImageString)
        client.publish(MQTT_Config.HA_name + "/camera/" + DeviceName + "_" + DeviceID + "/map",poseLogImageByteArray,0,False)
        poseLogImageFile.close()
        #img_buf.close()

    Also, the map created after a clean is much better. It's an overlay of a 2D histogram to show where the roomba has spent most of it's time. Then the positional points as scattered dots to indicate speed. And a line to get a sense of the completed track. This is all presented with equal axis to not distort the map and with a grid to get a sense of scale.

    The plot should also be cleared in between cleaning cycles with plt.close()

    plotData = np.array(plotData)
    x,y = plotData.T
    plt.close()
    plt.hist2d(x,y, bins=25, cmin=1, norm=col.LogNorm())
    #plt.plot(x,y,linestyle='--')
    plt.scatter(x,y,marker='.',color='r')
    plt.plot(x,y,linestyle='-',color='b')
    #OutlineX = []
    #OutlineX = []
    #plt.plot(OutlineX,OutlineY)
    plt.axis('equal')
    plt.grid(True)
    #plt.xlim([-2000, 8000])
    #plt.ylim([-5000, 5000])          
    plt.savefig(poseLogFilename + ".png", format='png')
    plt.close()
    plt.axis('equal')
    plt.grid(True)
    # - publish map
    poseLogImageFile = open(poseLogFilename+".png", "rb")
    poseLogImageString = poseLogImageFile.read()
    poseLogImageByteArray = bytes(poseLogImageString)
    client.publish(MQTT_Config.HA_name + "/camera/" + DeviceName + "_" + DeviceID + "/map",poseLogImageByteArray,0,False)

    Full python script is uploaded to files.

  • Logs and maps (part 3)

    Simon Jansen08/30/2022 at 18:01 0 comments

    Aaaand, it's done!

    Using numpy and matplotlib. It's not pretty, but it works! Actually I wanted to use a heatmap. But this will work for now.

    Full python code:

    #!/usr/bin/env python
    # (c) 2022-08-30 S.E.Jansen.
    
    # MQTT-layer for Roomba logging
        # Listen for the start and stop of cleaning event
        # Log raw and positional data to file
        # Loop closing and error correction on positional data
        # Render map from positional data as a imagefile
        # Post imagefile to camera entity for Home Assistant
    
    import time
    import datetime
    import MQTT_Config
    import json
    import paho.mqtt.client as paho
    import csv
    import matplotlib.pyplot as plt
    import numpy as np
    
    #Roomba device info for Home Assistant autoconfig
    DeviceName = 'Roomba632'
    DeviceID = '01'
    DeviceManufacturer = 'iRobot'
    DeviceModel = '632'
    
    poseLogFilename = 'poseDummy'
    poseLogFile = open(poseLogFilename + ".csv", 'w')
    poseLogWriter = csv.writer(poseLogFile)
    rawLogFilename = 'rawDummy'
    rawLogFile = open(rawLogFilename + ".csv", 'w')
    rawLogWriter = csv.writer(rawLogFile)
    
    #MQTT callback functions
    def on_message(client, userdata, message):
        data = message.payload
        global poseLogFilename
        global poseLogFile
        global poseLogWriter
        global rawLogFilename
        global rawLogFile
        global rawLogWriter
    
        if message.topic == MQTT_Config.HA_name + "/button/" + DeviceName + "_" + DeviceID + "/set":
            command=data.decode("utf-8")
            # start logging
            if  command == "Clean":
                # open logfile
                print("Started cleaning cycle")
                poseLogFile.close()
                poseLogFilename = "./Roomba/Logs/" + datetime.datetime.now().isoformat('_', 'seconds') + "_pose"
                poseLogFile = open(poseLogFilename + ".csv", 'w')
                poseLogWriter = csv.writer(poseLogFile)
                rawLogFile.close()
                rawLogFilename = "./Roomba/Logs/" + datetime.datetime.now().isoformat('_', 'seconds')+ "_raw"
                rawLogFile = open(rawLogFilename + ".csv", 'w')
                rawLogWriter = csv.writer(rawLogFile)
        if message.topic == MQTT_Config.HA_name + "/device_automation/" + DeviceName + "_" + DeviceID + "/event_DoneCleaning":
            event=data.decode("utf-8")
            # start logging
            if event == "done cleaning":
                # close log
                print("Cleaning cycle is done. Save logfile and start postprocess")
                poseLogFile.close()
                poseLogFile = open('poseDummy.csv', 'w')
                poseLogWriter = csv.writer(poseLogFile)
                rawLogFile.close()
                rawLogFile = open('rawDummy.csv', 'w')
                rawLogWriter = csv.writer(rawLogFile)
                # plot image from CSV file.
                with open(poseLogFilename + ".csv", 'r') as plotDataFile:
                    plotData = list(csv.reader(plotDataFile, delimiter=",",quoting=csv.QUOTE_NONNUMERIC))
                plotData = np.array(plotData)
                x,y = plotData.T
                plt.scatter(x,y)
                #plt.imshow(plotData, cmap='hot', interpolation='nearest')
                plt.savefig(poseLogFilename + ".png", format='png')
                # - publish map
                poseLogImageFile = open(poseLogFilename+".png", "rb")
                poseLogImageString = poseLogImageFile.read()
                poseLogImageByteArray = bytes(poseLogImageString)
                client.publish(MQTT_Config.HA_name + "/camera/" + DeviceName + "_" + DeviceID + "/map",poseLogImageByteArray,0,False)
        if message.topic == MQTT_Config.HA_name + "/device/roomba/raw":
            rawJson=json.loads(data.decode("utf-8"))
            # start logging
            #print(rawJson['mEL'])            
            #print(rawJson['mER'])            
            #print(rawJson['rTh'])            
            #print(rawJson['Xacc'])            
            #print(rawJson['Yacc'])            
            #print(rawJson['Yaw'])
            if not rawLogFile.closed:
                rawLogData = [rawJson['mEL'],rawJson['mER'],rawJson['rTh'],rawJson['Xacc'],rawJson['Yacc'],rawJson['Yaw']]
                rawLogWriter.writerow(rawLogData)
            else:
                print("Raw logfile was closed")
        if message.topic == MQTT_Config.HA_name + "/device/roomba/pose":
            poseJson=json.loads(data.decode("utf-8"))
            # start logging
            #print(poseJson['X'])            
            #print(poseJson['Y'])
            #print(poseJson['rTh']) 
            if not poseLogFile.closed:
                #poseLogData = [poseJson['X'],poseJson['Y'],poseJson['rTh']]
                poseLogData = [poseJson['X'],poseJson['Y']]
                poseLogWriter.writerow(poseLogData)
            else:
                print("Pose logfile was closed")
    #call back function for MQTT connection
    def on_connect(client, userdata, flags, rc):
        if rc==0:
     client.connected_flag=...
    Read more »

  • Logs and maps (part 2)

    Simon Jansen08/29/2022 at 18:59 0 comments

    Captains log, stardate...

    Nice! logging is done. I'll get csv-logfiles on every clean cycle. 

    poseLogFilename = 'poseDummy'
    poseLogFile = open(poseLogFilename + ".csv", 'w')
    poseLogWriter = csv.writer(poseLogFile)
    rawLogFilename = 'rawDummy'
    rawLogFile = open(rawLogFilename + ".csv", 'w')
    rawLogWriter = csv.writer(rawLogFile)
    
    #MQTT callback functions
    def on_message(client, userdata, message):
        data = message.payload
        global poseLogFilename
        global poseLogFile
        global poseLogWriter
        global rawLogFilename
        global rawLogFile
        global rawLogWriter
    
        if message.topic == MQTT_Config.HA_name + "/button/" + DeviceName + "_" + DeviceID + "/set":
            command=data.decode("utf-8")
            # start logging
            if  command == "Clean":
                # open logfile
                print("Started cleaning cycle")
                poseLogFile.close()
                poseLogFilename = "./Roomba/Logs/" + datetime.datetime.now().isoformat('_', 'seconds') + "_pose"
                poseLogFile = open(poseLogFilename + ".csv", 'w')
                poseLogWriter = csv.writer(poseLogFile)
                rawLogFile.close()
                rawLogFilename = "./Roomba/Logs/" + datetime.datetime.now().isoformat('_', 'seconds')+ "_raw"
                rawLogFile = open(rawLogFilename + ".csv", 'w')
                rawLogWriter = csv.writer(rawLogFile)
        if message.topic == MQTT_Config.HA_name + "/device_automation/" + DeviceName + "_" + DeviceID + "/event_DoneCleaning":
            event=data.decode("utf-8")
            # start logging
            if event == "done cleaning":
                # close log
                print("Cleaning cycle is done. Save logfile and start postprocess")
                poseLogFile.close()
                poseLogFile = open('poseDummy.csv', 'w')
                poseLogWriter = csv.writer(poseLogFile)
                rawLogFile.close()
                rawLogFile = open('rawDummy.csv', 'w')
                rawLogWriter = csv.writer(rawLogFile)
                # plot image from CSV file.
    
        if message.topic == MQTT_Config.HA_name + "/device/roomba/raw":
            rawJson=json.loads(data.decode("utf-8"))
            # start logging
            #print(rawJson['mEL'])            
            #print(rawJson['mER'])            
            #print(rawJson['rTh'])            
            #print(rawJson['Xacc'])            
            #print(rawJson['Yacc'])            
            #print(rawJson['Yaw'])
            if not rawLogFile.closed:
                rawLogData = [rawJson['mEL'],rawJson['mER'],rawJson['rTh'],rawJson['Xacc'],rawJson['Yacc'],rawJson['Yaw']]
                rawLogWriter.writerow(rawLogData)
            else:
                print("Raw logfile was closed")
        if message.topic == MQTT_Config.HA_name + "/device/roomba/pose":
            poseJson=json.loads(data.decode("utf-8"))
            # start logging
            #print(poseJson['X'])            
            #print(poseJson['Y'])
            #print(poseJson['rTh']) 
            if not poseLogFile.closed:
                poseLogData = [poseJson['X'],poseJson['Y'],poseJson['rTh']]
                poseLogWriter.writerow(poseLogData)
            else:
                print("Pose logfile was closed")

    Only thing left now is to plot the pose-log to an image-file and post that with MQTT....

    Anyone who knows how??

  • Logs and maps (part 1)

    Simon Jansen08/28/2022 at 19:43 0 comments

    Always fun when your wild ideas seem quite possible

    I'm doing some experimenting with python on the Pi to log positioning info. I edited the sketch to output a stream of calculated pose data to construct a map with. And a stream with raw positional sensordata to do postprocessing, analysis and hopefully improve the accuracy of the system. 

    The python daemon will listen to these streams and make separate log-files. These files are opened/created and closed/saved on the start and end of a cleaning cycle. 

    After a cleaning cycle is done, the pose-log will be used to create a map-image. This image can be sent with MQTT and will display in Home Assistant. This seems to work brilliantly when testing with a dummy image:

    I'm very curious if someone has a better way of getting something like a map in Home Assistant.

    The MQTT autodiscovery and setup for the map and topics to subscribe to:

    #Roomba device info for Home Assistant autoconfig
    DeviceName = 'Roomba632'
    DeviceID = '01'
    DeviceManufacturer = 'iRobot'
    DeviceModel = '632'
    
    # MQTT autoconfig
    device = {}
    device['identifiers'] = DeviceName + "_" + DeviceID
    device['name'] = DeviceName + "_" + DeviceID
    device['manufacturer'] = DeviceManufacturer
    #device['sw_version'] = ""
    device['model'] = DeviceModel
    # - Camera entity for maps
    data = {}
    data['name'] = "Map of last clean"
    data['topic'] = MQTT_Config.HA_name + "/camera/" + DeviceName + "_" + DeviceID + "/map"
    #data['availability_topic'] = MQTT_Config.HA_name + "/camera/" + DeviceName + "_" + DeviceID + "/available"
    #data['payload_available'] = 'yes'
    #data['payload_available'] = 'no'
    data['unique_id'] = DeviceName + "_" + DeviceID + "_Map"
    data['icon'] = "mdi:map-outline"
    data['device'] = device
    client.publish(MQTT_Config.HA_name + "/camera/" + DeviceName + "_" + DeviceID + "/config",json.dumps(data),0,True)
        
    # MQTT subscribe to command topics to receive commands
    # - Start clean cycle:
    client.subscribe(MQTT_Config.HA_name + "/device_automation/" + DeviceName + "_" + DeviceID + "/event_DoneCleaning",0)
    # - Event for ending of clean cylce:
    client.subscribe(MQTT_Config.HA_name + "/button/" + DeviceName + "_" + DeviceID + "/set",0)
    # - Positional data calculated on roomba:
    client.subscribe(MQTT_Config.HA_name + "/device/roomba/pose",0)
    # - Raw sensordata for postprocess calculation of position
    client.subscribe(MQTT_Config.HA_name + "/device/roomba/raw",0)

    I'm able to listen to the pose and raw topics and can also deconstruct the JSON message. It shouldn't be that hard to log to file and plot something of a map... to be continued

  • Quick update

    Simon Jansen08/21/2022 at 18:44 0 comments

    Out of office replies are great, no?

    The roomba should have this too. I added "availability" to the button actions. See the buttons grey out? 

    Also added more tunes 8-)

    • While docked, only the clean-button is available; 
    • While cleaning, both the dock- and music-button are available;
    • While docking, both the clean- and music-button are available;
    • While idle, all buttons are available;
    • While playing music, none are available;

    Docked:

    Because of all the previous work, it was quite easy to add an event-trigger on "state-change" with callback in the library. Then add a function to check whether an action should be available or not, depending on the state of the roomba, and post this via MQTT. Add this availability to the MQTT-autodiscover, et voila! All latest files are uploaded:

    https://hackaday.io/project/183524-controll-yer-roomba-600-series-with-esp8266#menu-files

    I'm not sure how to display states in Home Assistant though. Should this be a sensor with a numeric value and templating to display it's corresponding state in text? 

    Or a "select" without the ability to actually select? 

    https://www.home-assistant.io/docs/mqtt/discovery/

    If someone has any brilliant ideas, don't be shy.

    I have decided how I want to handle the logging, correction and mapping of the positioning data:

    On a seperate Pi (or the same, but outside of the HA-virtual enviroment) I will create a python script that runs as a service / daemon. This will subscribe to various MQTT-topics to check when a cleaning cycle (or callibration script) starts and ends. To start with, it will log (raw) sensordata to files. I can use these files to correct my positioning algorithms. 

    Later on, I will have this piece of software do loop closing / resolving and the creation of map-images. 

    These images can be posted with MQTT as "camera" to display the latest map. 

  • Let it sing!

    Simon Jansen08/20/2022 at 22:53 0 comments

    Showing progress is sometimes more important than making actual progress

    There are a few things I want to accomplish before tackling the difficult maths. First off, The ability to do something that normal robot-vacuums can't. Just to make a point as to why I don't just buy the €100 more expensive model. Most of them can do scheduling and keep me posted on progress, but how many can play any tune I want?

    Playing the macGyver theme song was one of the fist things I did with this roomba. 

    https://hackaday.io/project/183524-controll-yer-roomba-600-series-with-esp8266/log/202547-important-high-level-stuff

    Back then, I was using a previous library and this was more a proof of concept. Which also showed I had full control and was master of all robots! Now we know better off course and welcome our robot overlords.

    By now I have produced a library of my own, somewhat in secrect, and want to show off my mastery of this inanimate object. What better way than to let it sing for me.

    The video shows the Home Assistant MQTT-autodiscover buttons and sensors. Also the notification in the end using the event trigger when the Roomba is docked again. 

    Some of the code I added:

    void Roomba632::playMusic(uint8_t song[],int songNumberOfBytes){
        //set music to be played
        p_songPointer = song;
        p_songNumberOfBytes = songNumberOfBytes;
        p_playMusicFlag = true;
    }
    
    //in the roomba state handler:
    case roombaIdle: //IDLE: not charging, driving, playing music or cleaning
        p_stopFlag = false; //Clear stop request flag if set
        //Keep alive
        //Check flags in appropriate order of prirority
        if(p_cleanFlag){
            SendCleanCommand();
        }
        else if(p_dockFlag){
            SendDockCommand();
        }
        else if(p_playMusicFlag){
            SendPlayMusicCommand();
        }    
        if((millis() - p_undockedTimer) > DOCKEDDEBOUNCETIME){
            if(docked){
                roombaState = roombaHome;
            }
        }
        break;
    
    //The state machine for playing music:
    case roombaMusic:
    p_playMusicFlag = false;
    b_songPlaying = true;
    //time music or poll state
    static int songPointerIndex;
    static uint8_t maxIndex, i;
    static int musicState;
    static unsigned long commandTimerMusic, musicTimer, songTime;
    switch (musicState){
        case musicInit:
            songPointerIndex = 0;
            musicState = musicWriteSongHeader;
            //Serial.write(OCPauseDatastream);
            //Serial.write(0);
            commandTimerMusic = millis();
            break;
        case musicWriteSongHeader:
            if ((millis() - commandTimerMusic) > COMMANDTIMEOUT){
                Serial.write(OCSong);
                Serial.write(1);
                songTime = 0;
                if ((p_songNumberOfBytes-songPointerIndex)<MAXSONGLENGTH){
                    maxIndex = (p_songNumberOfBytes-songPointerIndex);
                }
                else{
                    maxIndex = MAXSONGLENGTH;
                }
                Serial.write(maxIndex/2); //number of notes
                musicState = musicWriteNotes;
                i = 0;
                commandTimerMusic = millis();
            }
            break;
        case musicWriteNotes:
            if ((millis() - commandTimerMusic) > COMMANDTIMEOUT){
                if(i < maxIndex){
                    Serial.write(p_songPointer[songPointerIndex]);
                    if(songPointerIndex % 2 != 0){
                        songTime += p_songPointer[songPointerIndex];
                        if (p_songPointer[songPointerIndex] != 0){
                            songTime -= 2;
                        }
                    }
                    songPointerIndex++;
                    i++;
                }
                else{
                    musicState = musicStartSong;
                }
                commandTimerMusic = millis();
            }
            break;
        case musicStartSong:
            if ((millis() - commandTimerMusic) > COMMANDTIMEOUT){
                musicTimer = millis();
                songTime = (1000 * songTime)/64;
                musicState = musicPlaySong;
                Serial.write(OCPlaySong);
                Serial.write(1);
            }
            break;
        case musicPlaySong:
            if((millis() - musicTimer) > songTime){
                if(songPointerIndex >= p_songNumberOfBytes){
                    musicState = musicInit;
                    //Serial.println("done singing");
                    roombaState = roombaIdle;
                    b_songPlaying = false;
                    SendStopCommand();
                    //Serial.write(OCPauseDatastream);
                    //Serial.write(1);
                }
                else {
                    musicState = musicWriteSongHeader; //next song
                    //Serial.println("next song");
                }
            }
            //waiting while song plays
            break;
    }
    break;
    //And seperate function to start the music commands:
    void Roomba632::SendPlayMusicCommand(){
        static int commandstate;
        static unsigned long commandTimer;
        switch (commandstate){
            case...
    Read more »

  • Autoconfigure Home Assistant

    Simon Jansen08/15/2022 at 07:04 0 comments

    Because it's always easier when it says "auto"

    Home Assistant has an option to discover MQTT-entities with their capabilities and features. The device needs tot send it's information in a proper format to a specific topic. The MQTT-autodiscovery service will see this and configure the corresponding devices and features. 

    https://www.home-assistant.io/docs/mqtt/discovery/ 

    This way of configuring Home Assistant is necessary for using device triggers for example (the way I want to use events)

    Now, there is an entity "vacuum" that should be perfect. I'm still missing some things though. It doesn't have event triggers the way I want to use them. Also, I'm missing a way to log positions for mapping and I want a bit more flexibility. Of course the way I set up the autoconfig messages here can be easily adapted to configure a "vacuum" entity. 

    All this means choosing my own "schema" and setting up a bunch of entities/attributes for a new device.

    The device (roomba) will output a bunch of formatted messages to a config topic for each entity on startup. Entities are for instance:

    • Event "done cleaning" (device trigger);
    • Action "Clean" (button);
    • Sensor with numeric value, temperature, battery voltage (sensor);
    • Binary value for docked state (binary sensor);

    These entities have their own topics for configuration, state, command etc. They can be given the same device information and are therefore seen as attributes of said device. 

    My schema will broadly look like this:

    Device:
    Name: Roomba632_01
    Model: 632
    Manufacturer: iRobot
      Done cleaning event [trigger] (device_automation)
      Start cleaning command [button] (action)
      Return to dock command [button] (action)
      Play music command [button] (action)
      State info [sensor] (states)
      Sensor vallues [sensor] 

    I'm still trying to follow the "official" vacuum-entity and for now have the actions and event trigger configured. 

    I put everything in a single Autoconfigure function that runs when (re-) connecting to MQTT.

    void MQTTAutoConfig() {
      //Event triggers
      mqttClient.publish(
        HANAME "/device_automation/" DEVICENAME "_" DEVICEID "/event_DoneCleaning/config", 
        0, true, 
        "{"
        "\"automation_type\": \"trigger\", "
        "\"payload\": \"done cleaning\", "
        "\"unique_id\": \"" DEVICENAME "_" DEVICEID "\", "
        "\"topic\": \"" HANAME "/device_automation/" DEVICENAME "_" DEVICEID "/event_DoneCleaning" "\", "
        "\"type\": \"action\", "
        "\"subtype\": \"button_short_press\", "
        "\"icon\": \"mdi:vacuum\", "
        "\"device\": {"
            "\"identifiers\": [\"" DEVICENAME "_" DEVICEID "\"], "
            "\"name\": \"" DEVICENAME "_" DEVICEID "\", "
            "\"manufacturer\": \"" MANUFACTURER "\", "
            "\"sw_version\": \"" VERSION "\", "
            "\"model\": \"" MODEL "\""
            "}"
        "}"
        );
      //Actions
      //Start cleaning
      mqttClient.publish(
        HANAME "/button/" DEVICENAME "_" DEVICEID "/clean_button/config", 
        0, true, 
        "{"
        "\"name\": \"Start cleaning\", "
        "\"command_topic\": \"" HANAME "/button/" DEVICENAME "_" DEVICEID "/set" "\", "
        "\"payload_press\": \"Clean\", "
        "\"unique_id\": \"" DEVICENAME "_" DEVICEID "_Clean\", "
        "\"icon\": \"mdi:vacuum-outline\", "
        "\"device\": {"
            "\"identifiers\": [\"" DEVICENAME "_" DEVICEID "\"], "
            "\"name\": \"" DEVICENAME "_" DEVICEID "\", "
            "\"manufacturer\": \"" MANUFACTURER "\", "
            "\"sw_version\": \"" VERSION "\", "
            "\"model\": \"" MODEL "\""
            "}"
        "}"
        );
      //Return to dock
      mqttClient.publish(
        HANAME "/button/" DEVICENAME "_" DEVICEID "/dock_button/config", 
        0, true, 
        "{"
        "\"name\": \"Return to dock\", "
        "\"command_topic\": \"" HANAME "/button/" DEVICENAME "_" DEVICEID "/set" "\", "
        "\"payload_press\": \"Dock\", "
        "\"unique_id\": \"" DEVICENAME "_" DEVICEID "_Dock\", "
        "\"icon\": \"mdi:home-import-outline\", "
        "\"device\": {"
            "\"identifiers\": [\"" DEVICENAME "_" DEVICEID "\"], "
            "\"name\": \"" DEVICENAME "_" DEVICEID "\", "
            "\"manufacturer\": \"" MANUFACTURER "\", "
            "\"sw_version\": \"" VERSION "\", "
            "\"model\": \"" MODEL "\""
            "}"
    ...
    Read more »

  • Life changing events

    Simon Jansen08/11/2022 at 20:06 0 comments

    Important events deserve to be noticed

    To give the library some actual reason to be among us, it needs some practical benefits. I think all tinkerers and hackers know the "So what does it actually do?" question... 

    At the moment it can only clean on schedule. It would be nice to know when it is done cleaning for example.

    For this, I wanted to use some type of event handling. The code in the library should decide when this event comes to pass, but the action should come from the sketch.

    This meant using function callbacks in the library so it'll be independent of the sketch. Yaaaay, function pointers!

    This is all new to me. It took me quite some googling... so for your benefit

    Added in header file:

    class Roomba632 {
    public:
        void setCallbackDoneCleaning(void (*callbackFuncDoneCleaning)());
    private:
        void (*_callbackFuncDoneCleaning)();
        void EventDoneCleaning();
    };

    Added in source file:

    void Roomba632::setCallbackDoneCleaning(void (*callbackFuncDoneCleaning)()){
        _callbackFuncDoneCleaning = callbackFuncDoneCleaning;
    }
    void Roomba632::EventDoneCleaning(){
        if (_callbackFuncDoneCleaning){
            _callbackFuncDoneCleaning();
        }
    }

    Whenever the roomba library decides it's done cleaning, it will call EventDoneCleaning() Wich in turn will call the function from the sketch that's been set as a callback.

    In my sketch something like this:

    void onDoneCleaning(){
      mqttClient.publish(MQTT_PUB_TOPIC, 0, false, "done cleaning");
    }
    void setup(){
      roomba.setCallbackDoneCleaning(onDoneCleaning);
    }
    

    Are we learning yet 

    I think this will come in handy later. Now I can set up Home Assistant to be triggered on these events and send me a notification with the results of the cleaning cycle for instance. Also, adding new features postpones the difficult maths :) So next up: Home Assistant MQTT-autoconfig setup.

View all 28 project logs

Enjoy this project?

Share

Discussions

Simon Jansen wrote 08/15/2022 at 18:43 point

I'm not using anything proprietary though. Just the OPEN API which iRobot has mostly/fully documented and encourages tinkering. One of the reasons why I went for an iRobot device in the first place.

It's a shame you can't document and share your progress any further. I'm sure never to buy anything from Shark in your support :)

  Are you sure? yes | no

Simon Jansen wrote 08/15/2022 at 18:38 point

Thanks for the support Jon and Holy Sh*t for your project dude! Not cool!

  Are you sure? yes | no

Jon Steel wrote 08/15/2022 at 16:40 point

Great Work! You have a nice approach that will hopefully not get your toes stepped on, unlike what has happened with my project.

  Are you sure? yes | no

Similar Projects

Does this project spark your interest?

Become a member to follow this project and never miss any updates