Product stage: End of Life
"You know. Analog inputs for the controls would be very nice. Buttons to control other portions like landing gear, lights and brakes would also be wonderful. And maybe a throttle stick. And a VTOL/Trim stick for when I play Simpleplanes. Oh, and make it appear like a dedicated controller to the computer."
Bucket list finished! Now let's start building it. First, let's grab a bin and put all the wonderful mechatronics actuators inside as they arrive from different Alps Alphine storage facilities.
[insert photo]
And ... hm. You know the parents, how they, eh, don't like their kids to be wasting their time playing video games? So yeah, I'm going to make it look like NOT a game controller. I'm going to make it square, like one of the fancy VCR controllers with 100 buttons. Or maybe I want to make it hexagonal so it's "cool".
[insert scratchy drawings]
Pictures will be uploaded. I just need to gather it from my (frustratingly re-entering the password) stupid iPad.
Hardware
Almost all input components come from Alps. RS**1 SuperSlide,EVQ11K07K and SKHHLMA010 (will be updated), and the RKJXV ThumbPointer. For the controller, I went for the trusty 32U4 (a.k.a. Arduino Micro).
Yes, the Micro. You don't get to use your shoddy Pro Micro that can't even agree on a single wiring scheme. I support official Arduino product.
Story (continued)
Holy shite I need to take a shower today.
Hm. So maybe a little bit like this. Look alright to me.
[insert initial layout picture]
So let's start measure where the leads go (attempt to jam components onto a 0.1 inch proto board). Ok. Maybe here. And this is ... hm. oh it's actually 2mm, which is ....ugh.
Anyhow. I think this will do.
Now let's add our "flood fills", since we don't want to etch all of our useless copper away. That create too much waste and is not good for the environment. Plus, I can use some extra shielding.
Oh. I need a net to do that. Well then. I might as well start making footprints, I guess.
(fiddling with KiKad later)
[insert production design picture]
Yeah. Much better. After this batch I am also going to make minor adjustments so that the footprints are more accurate. Since now we can have actual parts on the actual board.
While we are waiting on the PCB, I am going to play around with this 74HC165D for a bit (I soldered it to test my ability to handle SOPs).
[insert picture of testing 74HC165D]
Again, pictures are coming. Give me some time, people!
[insert pictures of arrived PCB]
Yes it's here! Let's get to assemble this thing.
(intense soldering later)
Man, those 0603 resistors are a true pain to deal with. And this is with me using leaded "organic flux" tin. Ugh.
I also should invest in maybe a desk fan or something. The fumes are acting up a bit, despite me being in a well-ventilated room. But anyhow, it's here.
[insert picture of finished board]
Now let's play around with the code. We all know that I had previously made a little "test jig" playing around with analog inputs, and thus we already have the "calibration" code.
"But I just wanted to play the game!"
Alright. Here goes nothing.
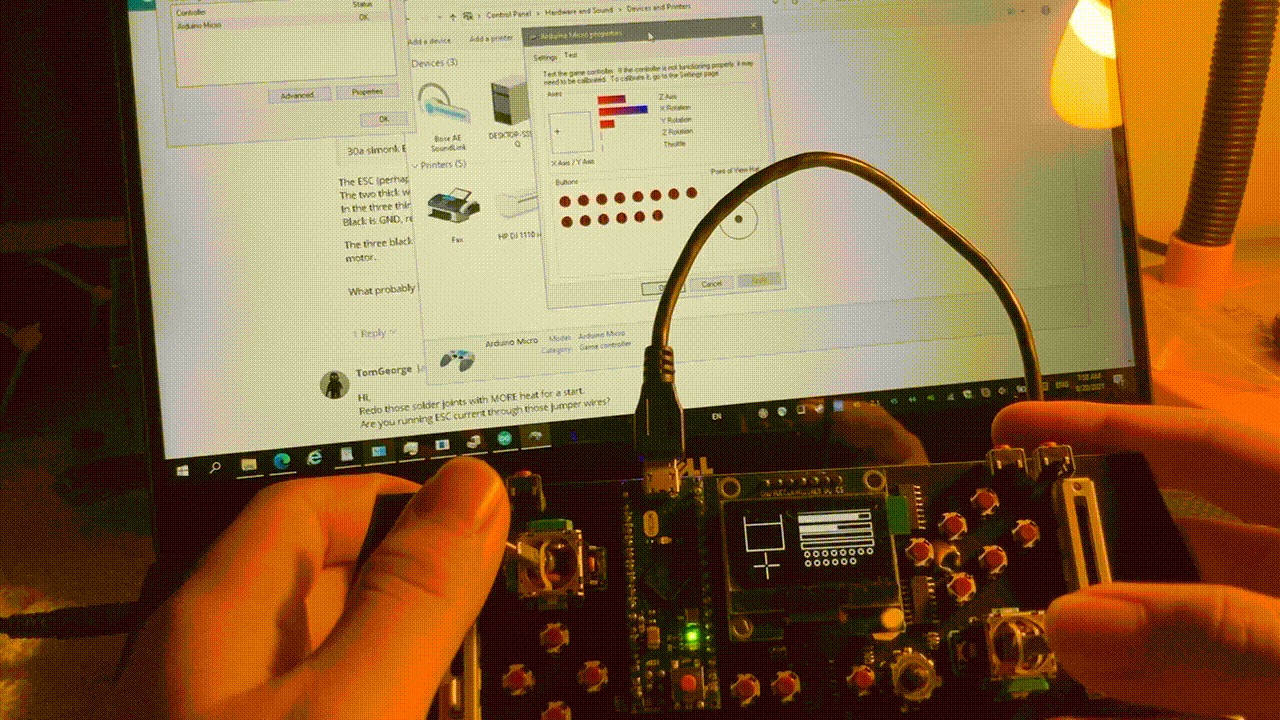
Ah. nice. animated Gifs.
Here you can see how the inputs on the computer screen match the display on the controller.
Note:
KSP doesn't like the -32768 to 32767 range (signed short) of outputs of controllers (which was oddly the default). I think I also tried unsigned short, but I don't think it worked. Regardless, the ADC of the 32U4 is only 10-bit precision anyway, so casting to more doesn't mean anything anyways.
[picture of controller and Pioneer MK5-2]
And with that, my little controller is complete. Now let's talk about code and sketches.
Sketches
The first and foremost sketch (named after the board) is the USB HID controller sketch. You can find it under the folder "sketches".
The second available sketch is one for a USB mouse. This sketch is written primarily to autoclick in Bitcoin Billionaire to make my life easier. The sketch used to use joystick inputs but after a little incident involving superglue I changed it to use the Stick Switch. It will be switched back to use joysticks.
[picture of bitcoin billionare stats]
There will also be a
The Future
Obviously having just the PCB and the code doesn't make a complete product. You can't really grip the controller because every time you do you will be pricked by the solder joints on the back, it flexes, the buttons are very difficult to reach (if you switch between right stick and button very frequently)
Although technically you are correct. Because the next "controller" will be so awesome, everything need (and will) be built from the ground up. There will be beefy USB-B connector, replaceable joysticks (yes) and buttons (maybe), replaceable 32U4, a shell, it's crazy.
I don't think we can do rubber domes for buttons unless demand is extremely strong. Until then, I think these are best suited to be "money-burning development boards that don't do anything". Yeah. But like, hey. Those switches are rated for a million presses, so