 Mrinnovative
Arduino-Remote-Controller-using-HC12-Wireless-Module

I will give you the complete schematics, codes and complete layout of all the boards used in this Arduino RC robot to make one yourself. So stay tuned!
6-Wheel Drive Rough Terrain Robot Chassis
The whole off-road robot chassis is built using 2 mm aluminum alloy and the surface is coated with aluminum.
Even though the material is lightweight, it is very strong and can carry all the; components - microcontroller, sensors and motors without any hassle.

It has 6 high-speed DC motors, with an RPM of 17, 000 combined with 1:34 full metal gearbox, enabling your 6-wheeled robot to obtain amazing speed and off-road performance. The use of six hydraulic spring dampers ensure adaptive driving experience even on rough terrains and uneven surfaces.
Arduino Off-Road Robot Components
Robot Chassis
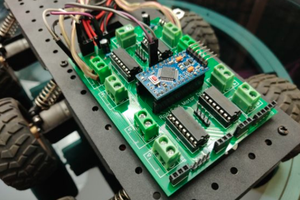
Arduino Pro Mini
HC12
Remote Controller
VNH2SP30 Motor Driver
LiPo Battery
Making Arduino RC Robot

HC12
Here, we will be using HC 12 wireless module for transmitting data from the DIY Remote Controller to the RC Robot.
They are commonly used in remote controlled robots and other wireless communication projects. This wireless module works under 433 megahertz frequency.
When combined with an external antenna, this wireless module can transmit and receive data from a distance
of up to 1 Kilometer line of sight and due to this reason we will be using this wireless module for our robot.

This wireless module can be easily connected to arduino or Raspberry Pi, and start using it for your project right away.
Another advantage of using HC12 wireless module for your RC robot is, this module requires only two pins – TX and RX, for data transfer.
You can save the rest of the pins of your arduino or Raspberry Pi for other things.
High current Motor Driver
As I mentioned earlier this robot chassis have 6 high speed DC Motors with a speed of 17000 RPM combined with 1:34 metal gear box.
Each motor draws a current of about 350 milli ampere. As you might know, for almost all of my Robots, I use either L293D motor driver or L298N motor driver.
Here also I tried L293D and L298N Piggybacked. Even though it worked fine, too much energy was wasted as heat after 5 minutes of continuous usage.

So I decided to go for another high current motor driver, named VNH2SP30, that can provide a peak current of 30 amperes.
If you are not familiar with this VNH2SP30 High Current DC Motor Driver, please click this link you know more about it.
This motor driver board can control only one motor at a time. So here we will be using two motor driver boards to control both DC motors.
Powering up the Off Road Robot
For this project I’ll be using a 12 volt Lithium polymer battery as a power source.
This can provide enough power to drive all the six DC Motors, power up the arduino, HC12 module and the motor drivers without any issues.

That's all you need to know about all the components used in this off road RC robot. started with making the robot.
Want to make one yourself? Complete code and circuit are available Arduino RC Robot
Arduino Remote Controlled Robot – The Remote controller

Basically what this remote controller does is, it reads analog and digital data from sensors such as accelerometer buttons joystick and store them in separate variables. These variables will be combined together to form a single long string and this string will be sent to our robot using the HC12 wireless module.
Circuit
I made a circuit which included all the components: the joystick, accelerometer, arduino nano and hc12 module connected to the GPIO pin of the arduino and assembled it on a breadboard.

t worked flawlessly but the problem was, the whole board looked really messy with all the jumper wires going here and there. So I decided to go with PCB.
In the PCB version, I added 4 switches which I will be using for the next project.
I also added a 7805 regulator which will help me to provide an input voltage...
Read more »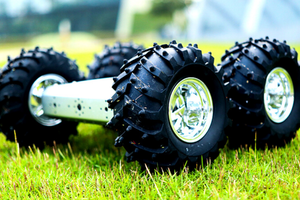
 Jithin Sanal
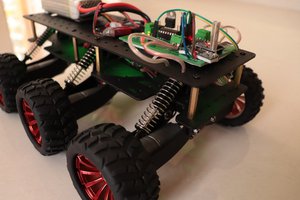
 Ricardo Ferro