 Augusto
The Robot it's based on a Raspberry Pi model B+ configured with a custom Wheezy OS. I has a WiFi card for creating his own network for remote conections and remote control. This allows the board to connect to a computer and access the telematics data contained in the board and the arduino. The connection is SSH based and updates can be sent to the board via a complementary TCP Socket.
The Raspberry Pi clearly doesn't have the computing power required for what I whant to achive ( Autonomous Driving and Image processing) so the way to go it processing everything in an external computer and then let the robot act. So the main robot application would run in a computer outside the robot and the robot would in term act as a "Puppet" for the machine. This way we can also control the robot remotely with a joystick and aquire the telematics data required for autonomous driving. This solves the issue of processing power at a relatively low cost enableing us to test much more advanced algorithms such as the VGG16 Neural Architecture.
The robot is capable of delivering telematics information on the following aspects:
- Video Feed of RGB images at 60 FPS with a resolution of 1080 by 720
- Wheels Speed based on PWM pulse frequency
- Servo Angles and Target Position for the camera
- Mono Audio input from the Camera's Microphone
- Any information contained in the Raspberry PI such as stoered images, files and GPIO data
Autonomous Driving
For the Autonomous driving part we mainly used a VGG16 Network headless. This means we deleted the dense netwok that classifies the features of the images and replace it with our own which in terms gives the desired wheel speeds as outputs. For training a circuit was drawn in the floor of my appartment using strips of paper, and the robot was configured for remote control. I piloted the robot through diferent circuits making sure to change it every few passes. The result was a havy Dataset containing information of the images and the recorded wheel speeds at each frame. We trained the Neural Net in the GPUs available at my university for a couple of hours. The result is a really good approcimation to autonomous driving, with a fairly reasonable speed considering the latency in the network transfer of images and processing. Every frame took 80ms to be processed with resized images in black and white. Future test would include a faster GPU for RGB processing and much more complet Neral Networks.
Face Recognition
Another application or usecase for the robot was recognizing people's faces. This was the main attraction when I presented the robot at a congress representing our University. People stopped for a minute and approached our posterbeacause as they said "I saw that robot looking at me". The algorithm was the well known Face Recognition algorithm using Haar-like Features coded in Python. Once it locates a face the servos move in order to center the face in the camera. Simple but quite effective and apparently friendly to many people. Simple interactions like this one help to ease the relationship between Humans and Robots by making sure the Human feels confortable in the presence of the Robot, deeming the Robot as approachable rather than alien.

 Jack Qiao
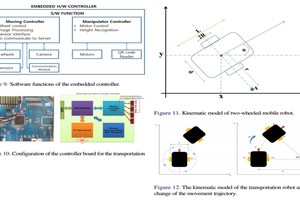
 ensafatef
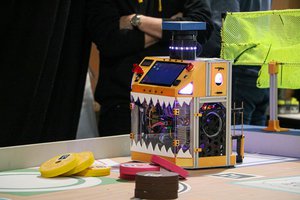
 Gaultier Lecaillon
 Pascal Buerger