Credits: My project uses two already existing projects by other authors so I didn't reinvent the wheel. Namely, Andrey Skvortsov's "Terminal-BASIC" interpreter on an Arduino MEGA 2560, and Grant Searle's "Video and keyboard interface". This project started when I ran into "Terminal-BASIC" and I thought that it would do justice to Andrey Skvortsov's BASIC interpreter to use a real hardware terminal. Fortunately, Grant Searle's "Video and keyboard interface" seemed to fit the purpose. So, I set out to combine them into one standalone computer.
I have links to both authors' pages for technical details, schematics and downloads. Full credit is given to both for their excellent work.
DETAILS
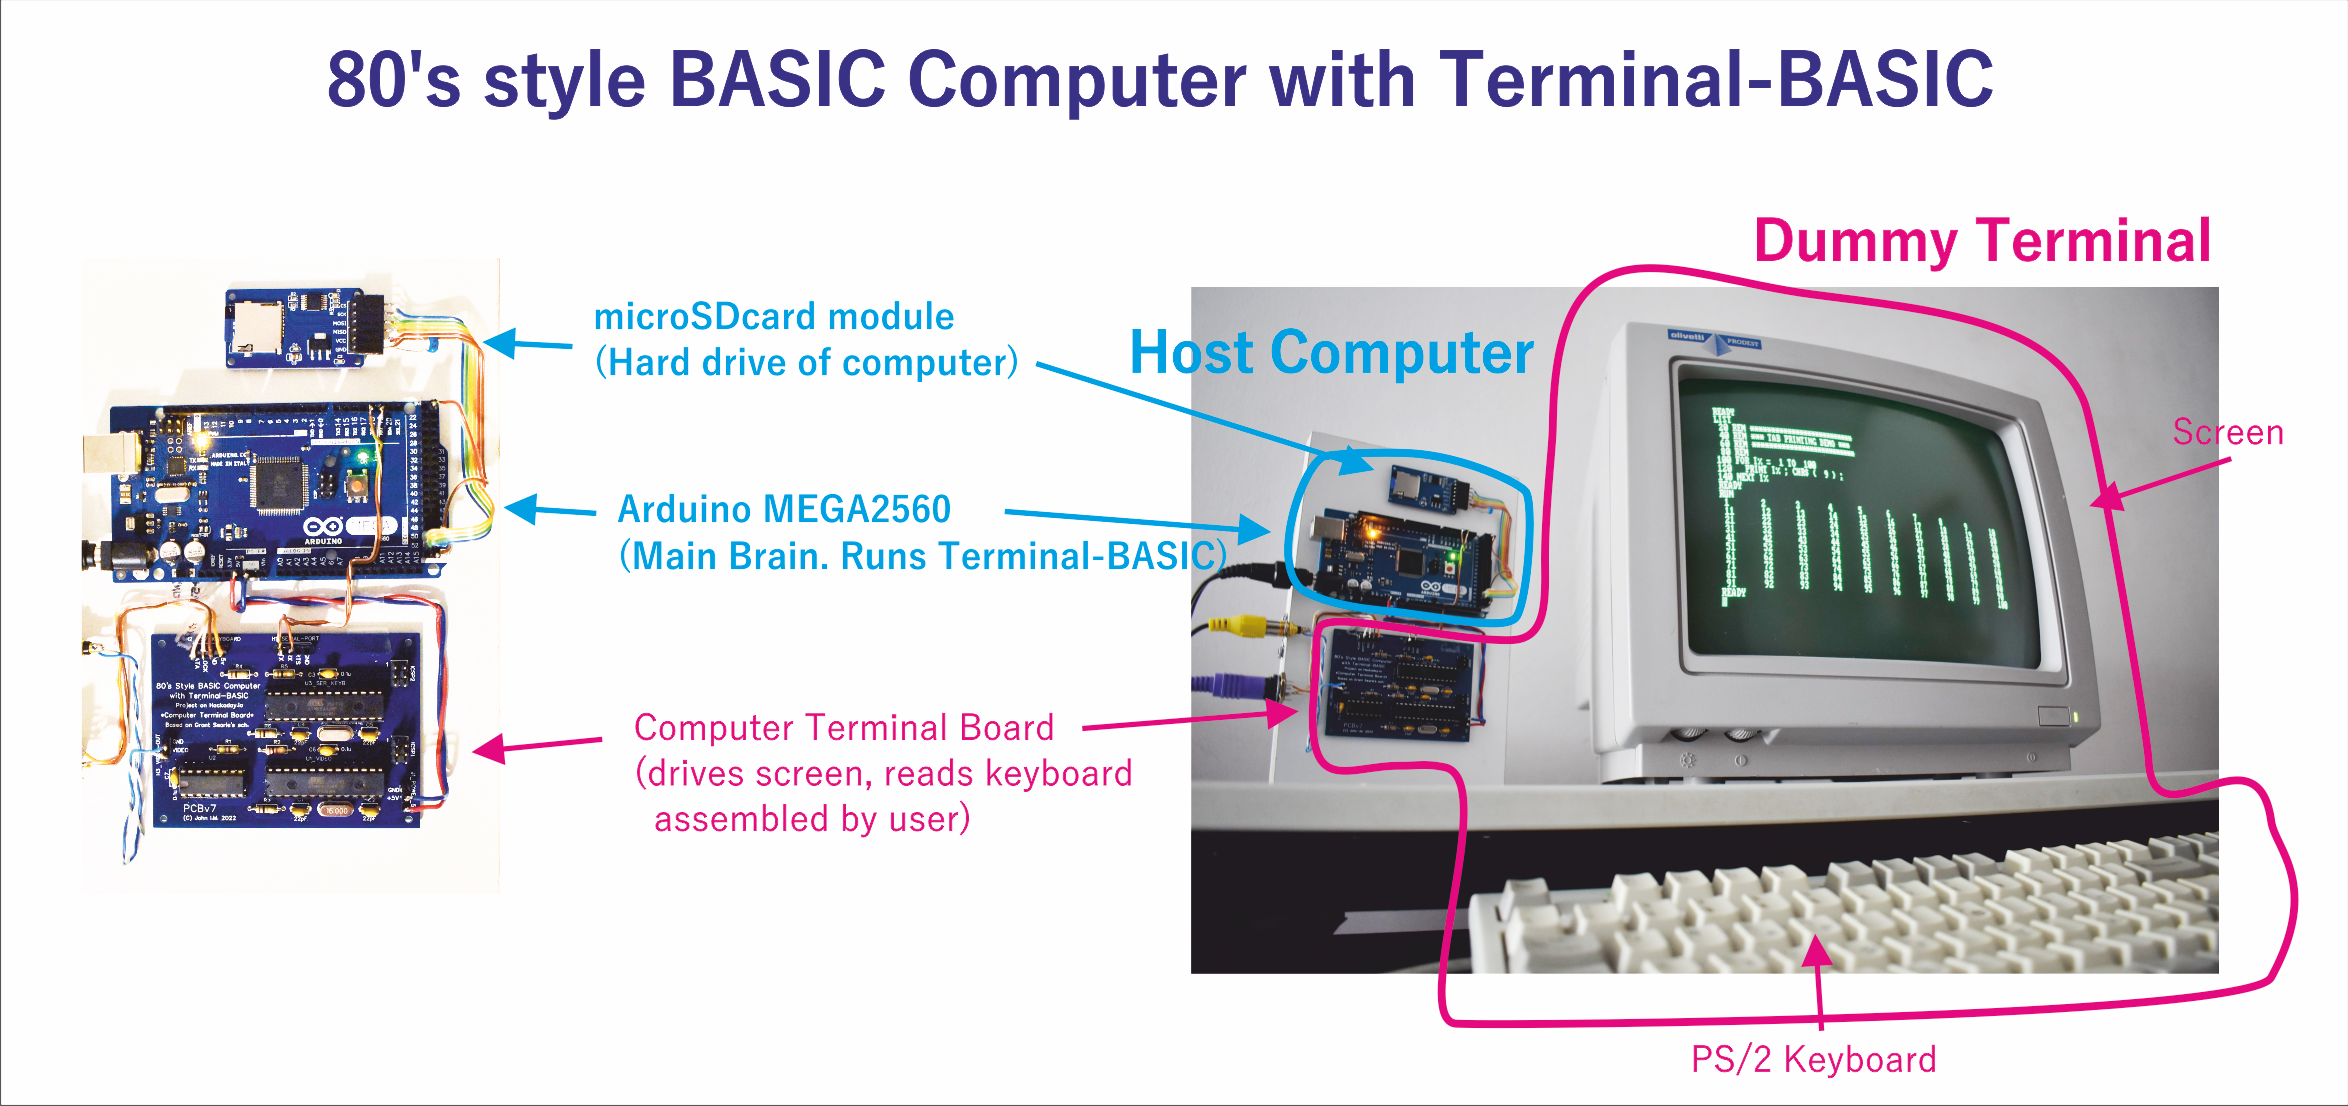
The "80's BASIC Computer with Terminal-BASIC" is comprised of two units as seen in the diagram above: 1. Dummy Terminal and 2. Host Computer.
1. The "Dummy Terminal", which is the first part of the system is made up of three parts: 1. A Screen, computer monitor, 2. A PS/2 Keyboard, 3. The "Computer Terminal Board". This a slightly modified version of the "Video and keyboard interface" by Grant Searle (check link), Initially constructed on 2 breadboards, now it is assembled on a proper printed circuit board or PCB. These 3 parts make up a complete physical computer terminal.
Now, this is a "Dummy Terminal" because it can only: a. read the keyboard and b. display characters on the screen; no processing of data takes place in it, hence the term "dummy". The terminal has a 80x25 characters resolution, which was the professional standard of the 80's computers, and just right for our purpose.
2. The "Host Computer" is made up of two parts: 1. The Arduino MEGA 2560, 2. A microSD-Card module. The Arduino MEGA runs the "Terminal-BASIC" language interpreter (by Andrey Skvortsov, check link). As soon as the MEGA boots up, the BASIC programming language is there and running. You can see the bootup message displayed and a cursor waiting for you to type somethin in.
BASIC, in general, is a very straightforward and user-friendly programming language. Terminal-BASIC, in particular, which is used here, has a treasure of features.
The SD-Card module is the "hard disc drive" of the computer.
During the prototyping, I consulted Andrey Skvortsov several times to get help for setting the various config options; many thanks go out to him for being kind and eager to help.
About the screen: The Screen used is a green-phosphor computer monitor, as seen in the pictures., and typical of the 80's era. The monitor sports a Composite-Video-Input RCA connector (or "cinch" connector) that connects to the "VIDEO-OUT" of the "Computer Terminal Board. In case you don't have a computer monitor with a Comp Video Input, no worries: your modern LCD Smart TV has such an input, too. Look on the back side. Either it's a yellow RCA connector stating "VIDEO IN" or "COMP IN" (commonly next to a red RCA and a white RCA Audio connectors), or a green/yellow RCA (as is the case with my TV) next to a red RCA and a blue RCA; you only use the green/yellow RCA input in the latter case. Or, there may be a SCART connector with the typical trapezoid shape, which is good, again. You only need a "SCART to RCA" adapter. One more alternative is to use a CRT TV with Comp Video Input.
About the keyboard: A good ol' PS/2 keyboard is also used and this connects to the "PS/2KEYBOARD" connector of the "Computer Terminal Board". Important: Keyboard layout of the terminal is the original Searle UK layout, so the Quote symbol is Shift+2. Doesn't matter if your keyboard has the Quote symbol on the same key as the Apostrophe (next to the Enter key); you still need to press Shift+2 to get the Quote symbol. The reason is that the Terminal board has control over what keystroke prints what. Keep that in mind when entering quotes.
 John
John