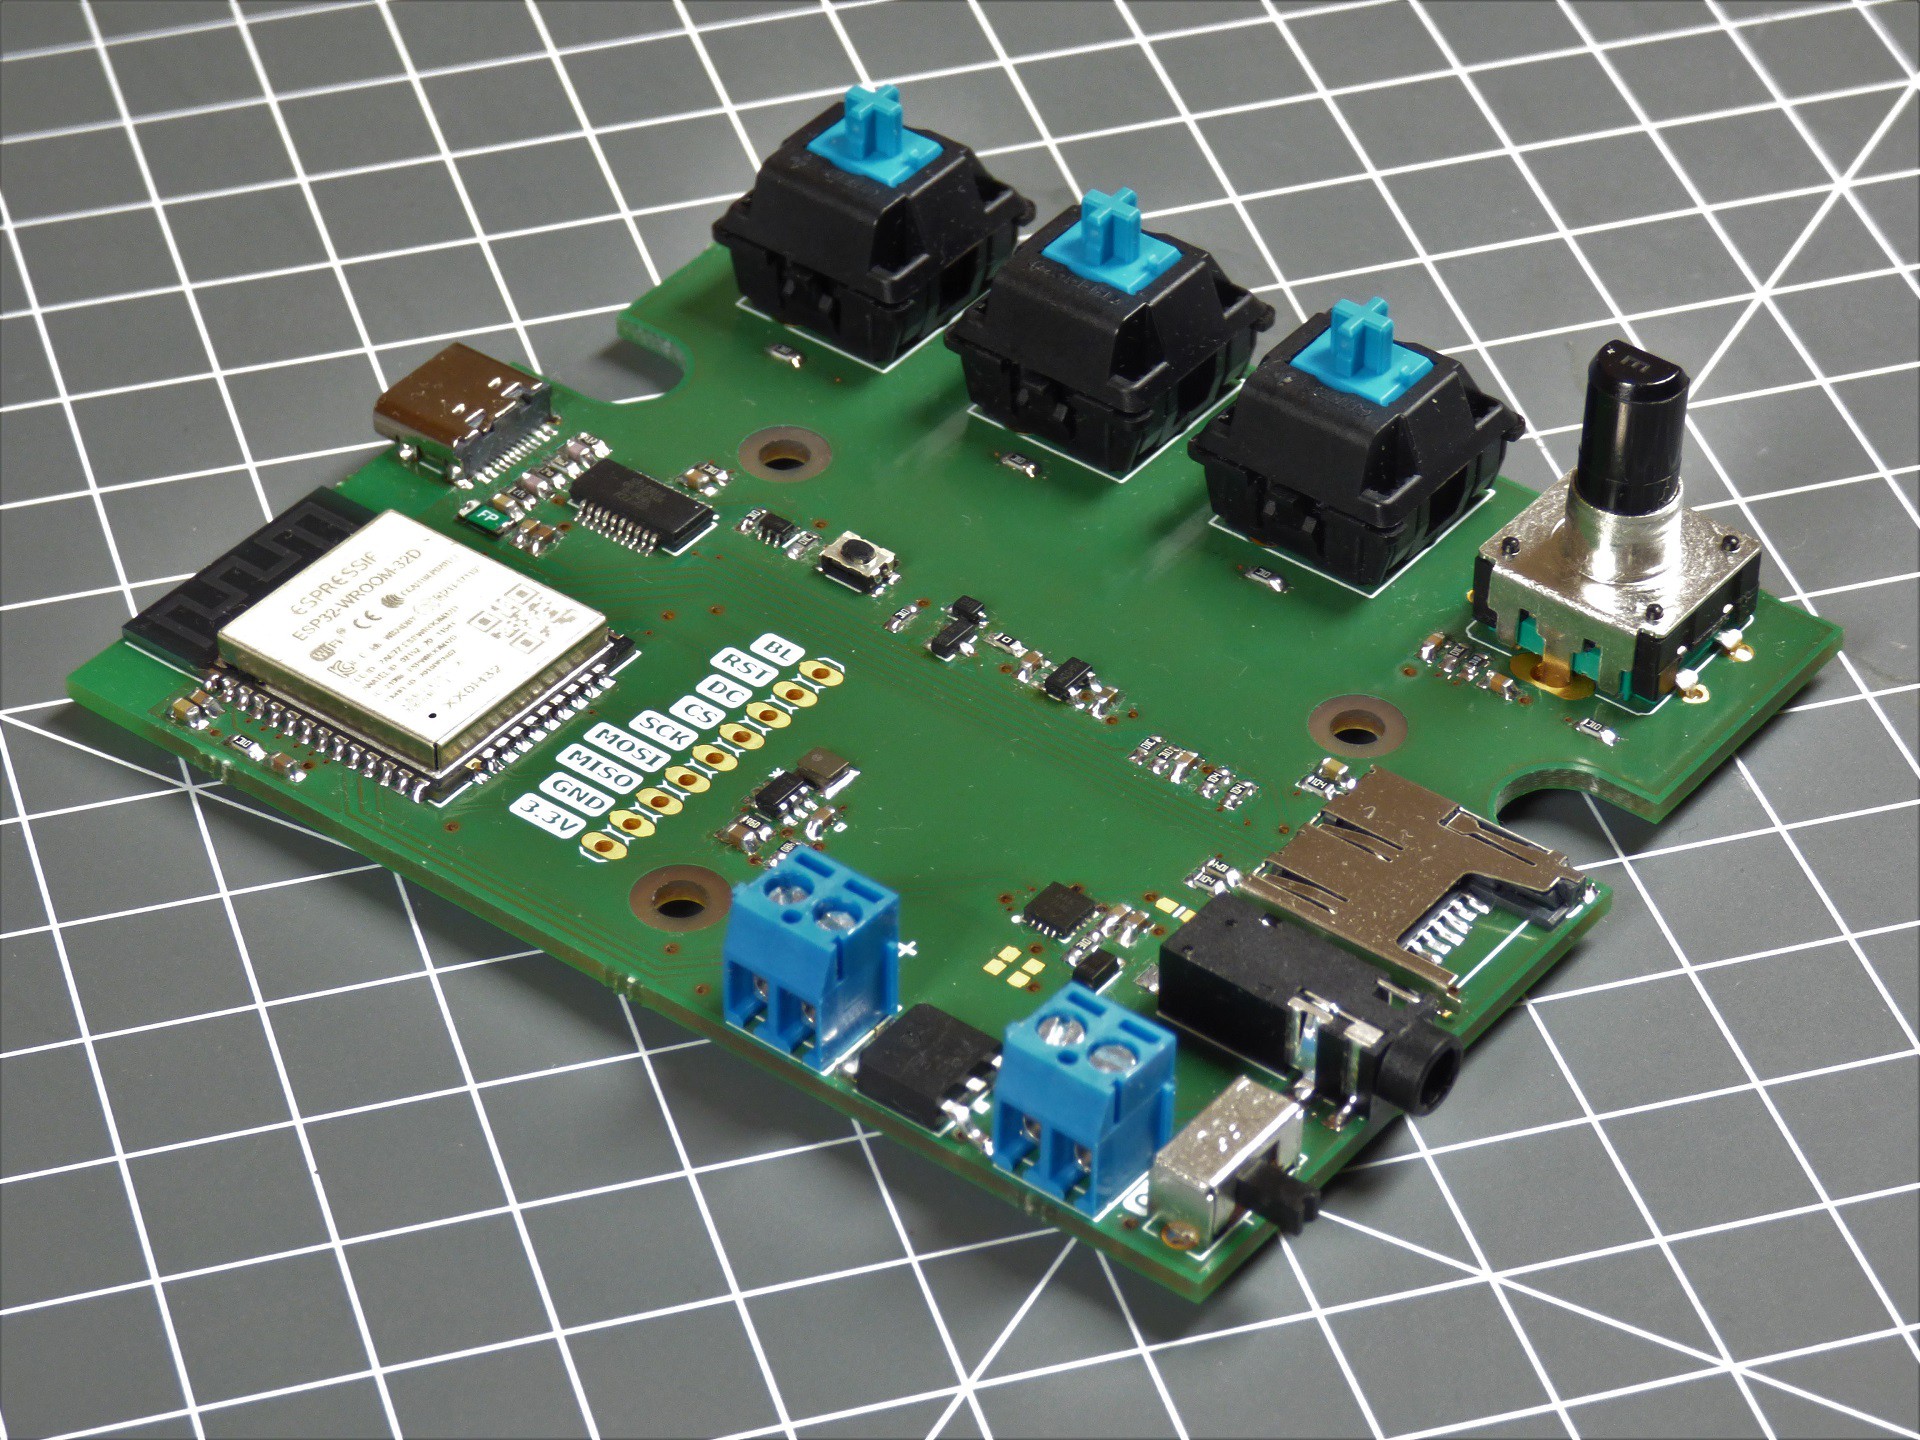
Close
0%
0%

DIY Retro Audio Player

Portable MP3 Player for Music and Audiobooks

Similar projects worth following
Inspired by 1980s tape recorders, this audio player was designed with ease of use and accessibility in mind. Despite its nostalgic appearance, it packs modern hardware. Powered by the ESP32, it plays music and audiobooks from a micro SD card, either on its internal speaker or though a headphone jack. A 2.8“ IPS screen and mechanical buttons make up the simplistic user interface. The software is built around the ESP32-audioI2S library by GitHub user Schreibfaul1.

Some of the key features:
· 2.8“ 320x240px IPS display
· Fully 3D printed case
· Integrated mono speaker and 3.5mm audio jack
· Easy to use interface with mechanical keys
· 8 hours of playtime with 4x AA batteries (20h without backlight)
· Automatically save and restore positions in audiobooks

PCB layout, source code and STLs on Github: https://github.com/CoretechR/Retro-Audio

Recently I was looking for a simple way to play audiobooks for a family member who is not used to touchscreens. As it turns out there are not many available options that are simple enough to use. As I have never worked with audio players or speaker, this seemed like a useful and straight-forward project.

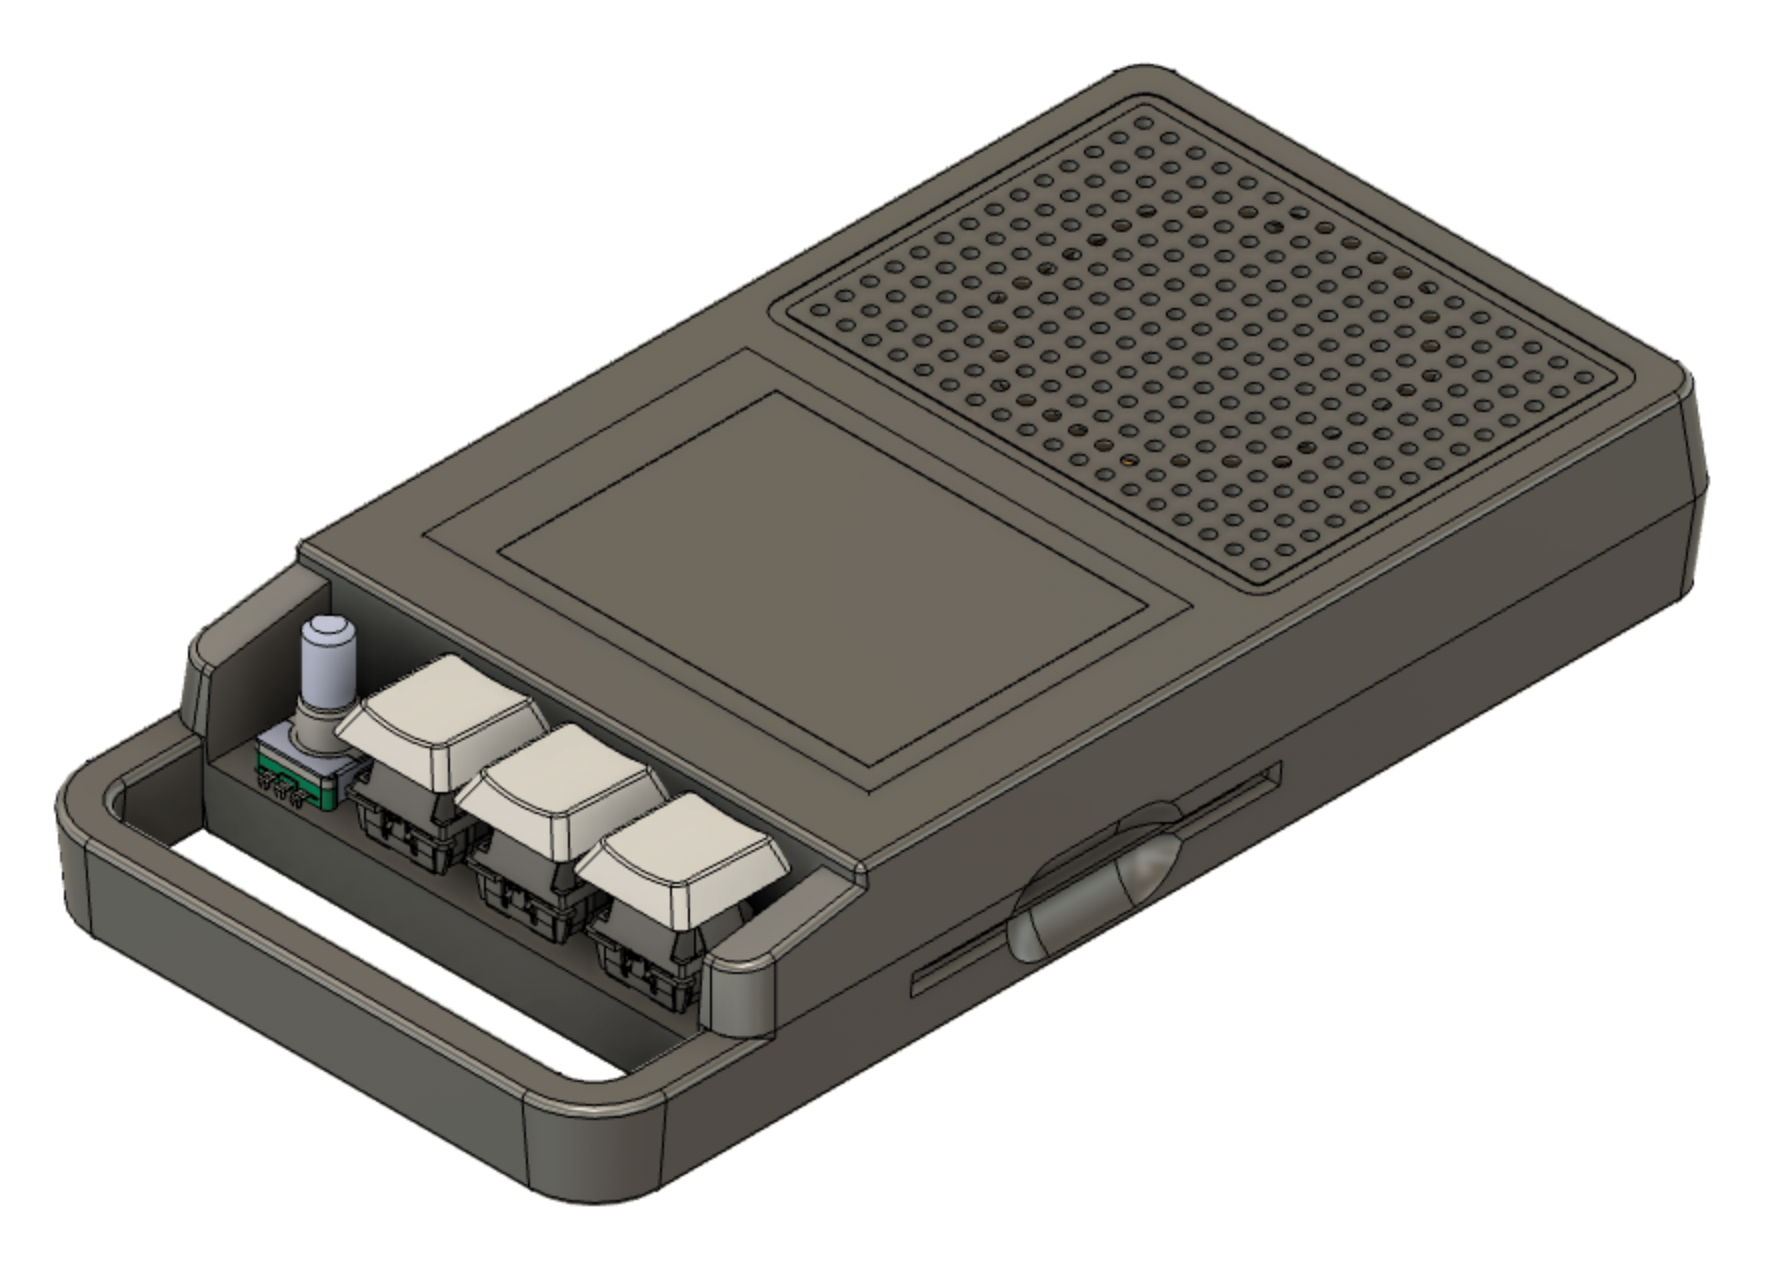
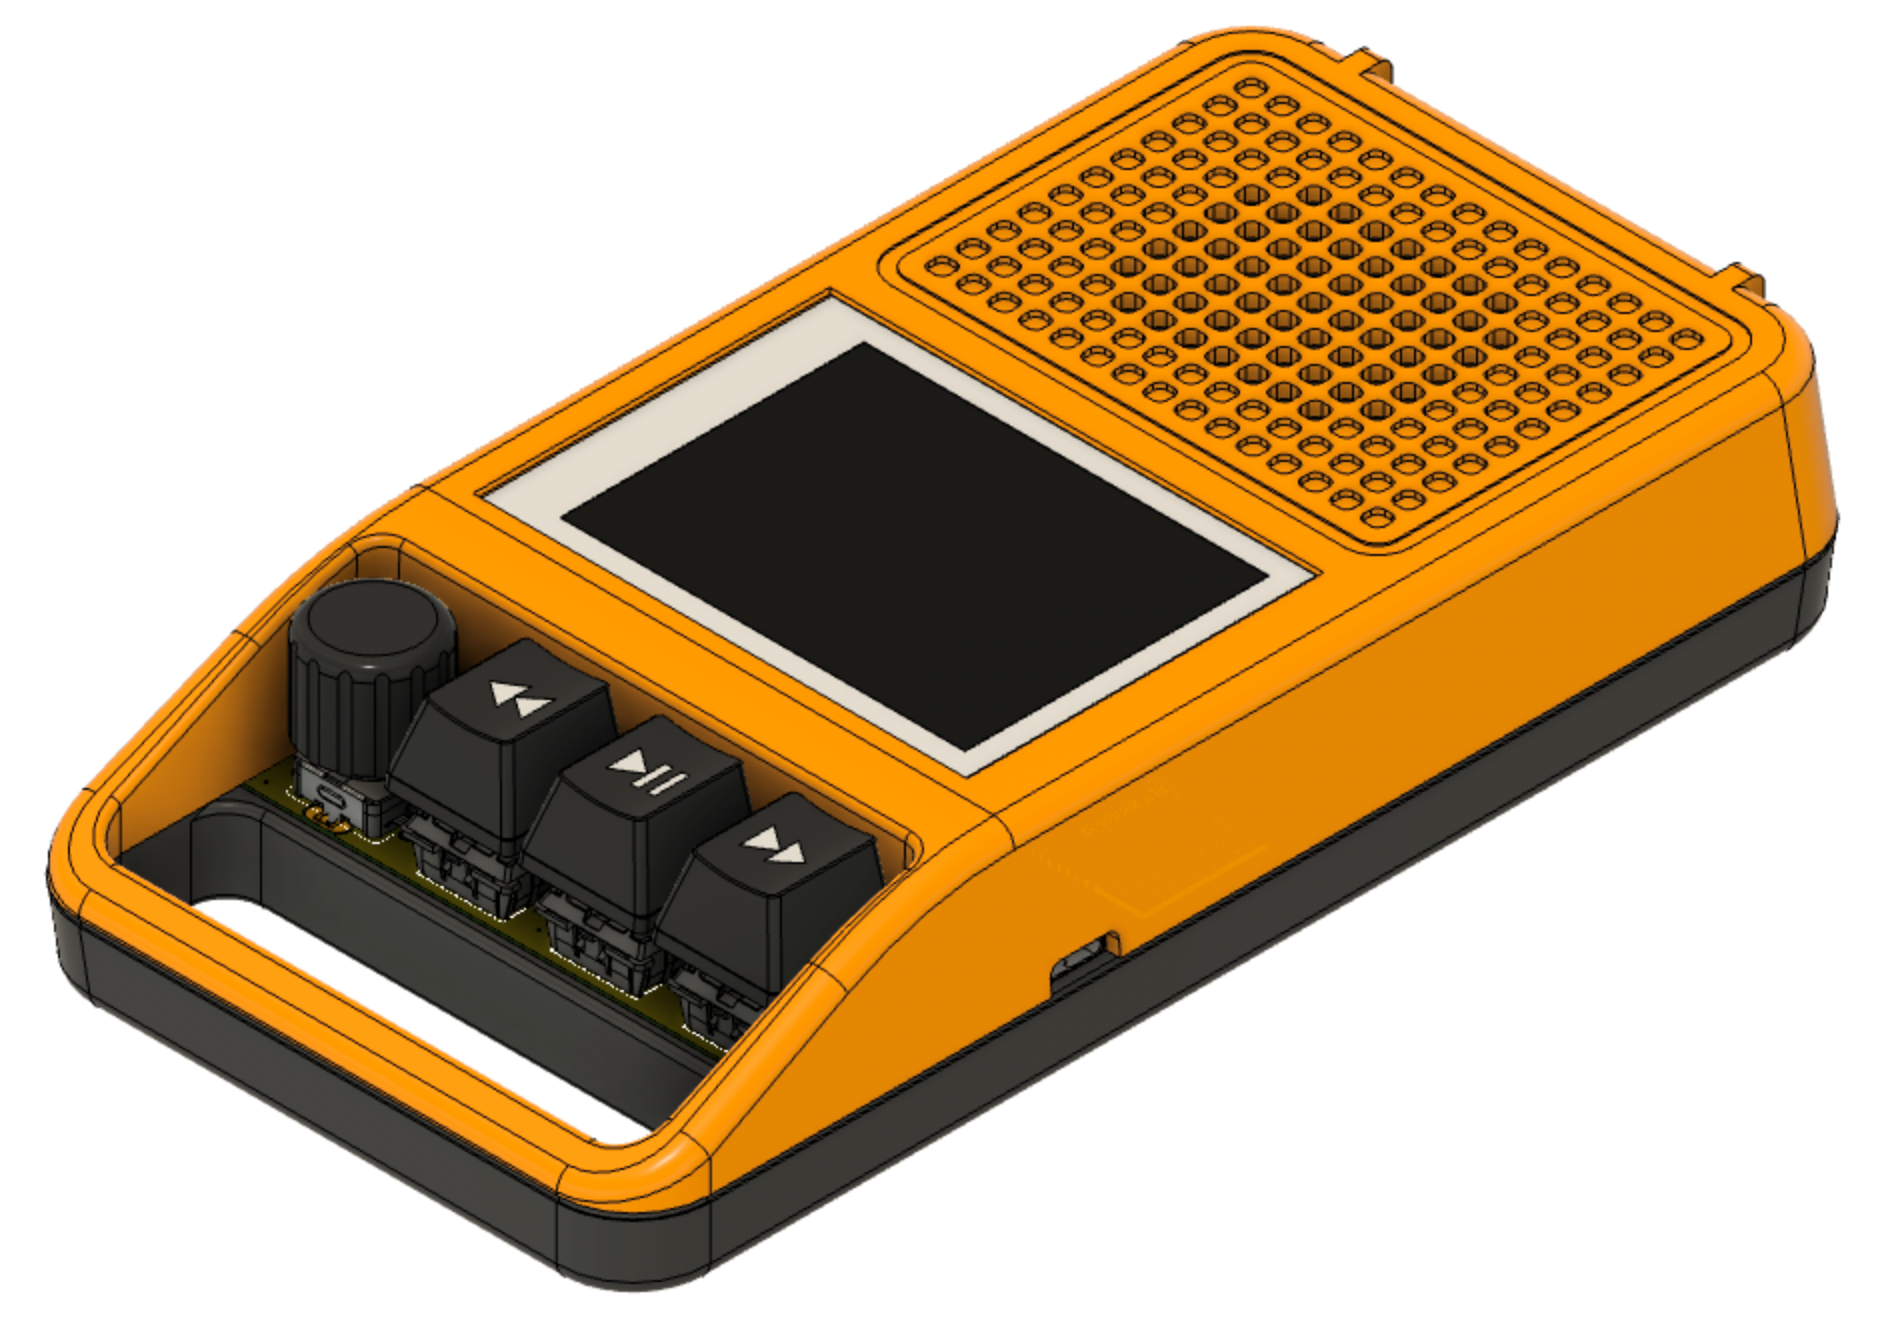
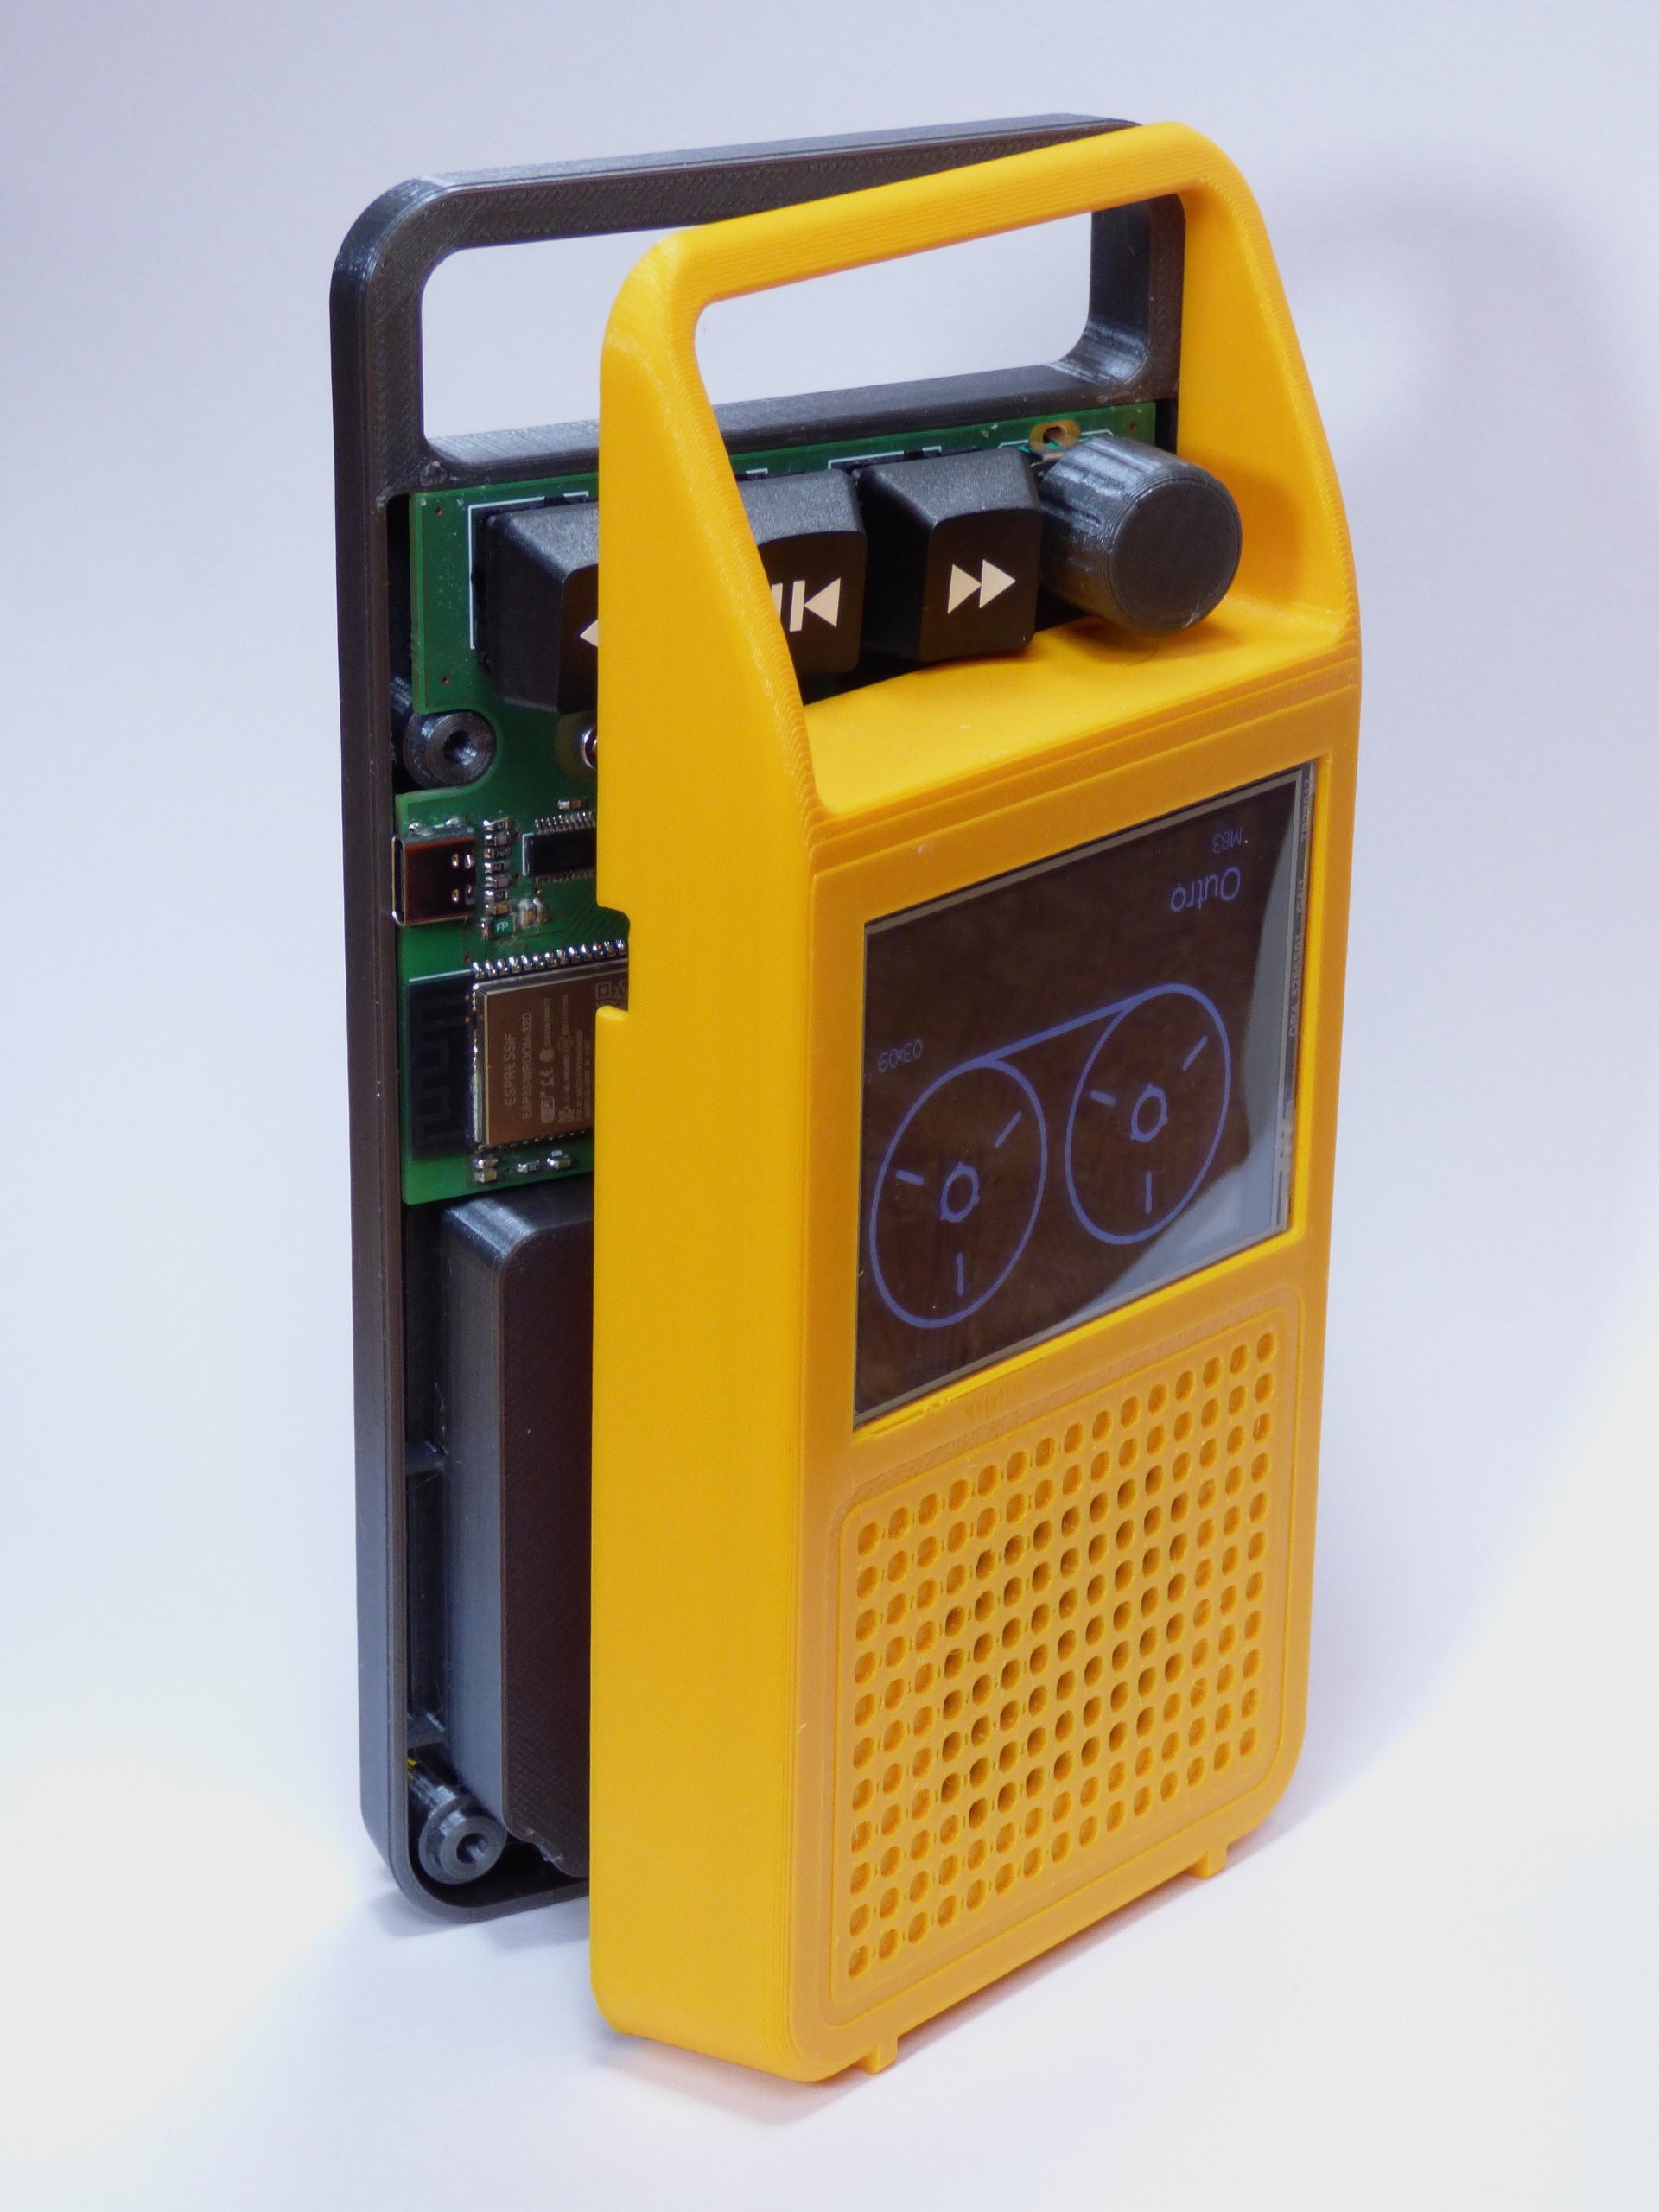
Making it easy to use does not mean that a device has to look ugly. I tried to build something that looks like a finished product with inspirations from 1980s electronics and Teenage Engineering.

View all 9 components

  • Software

    Max.K06/20/2022 at 19:24 0 comments

    Decoding mp3 files is not easy, but luckily it is a task that has been solved before. I found the library ESP32-audioI2S to be an ideal starting point for this project. It includes all the necessary functions to play audio files from an SD card, including ways to fast-forward and read id3 tags. The creator of the library, Schreibfaul1, even added support for very long audiobooks after I had trouble with those.

    While the audio library is feeding data to the amplifier, the user interface is displayed on the screen. This is done via a second library, TFT_eSPI. This makes it easy to draw the tape animation with decent efficiency. It might be even better to „pre-render“ the animation and just load individual frames from the flash memory, but I have not tried that yet.

    For audiobooks it is important to remember the position in a file. This means that the position has to be saves even when the power is switched off. There are multiple ways to solves this. Having a battery-backed SRAM is a good solution because unlike EEPROM or flash memory, RAM has unlimited write cycles. But eventually this extra battery is going to die and will need to be replaced. Instead of this I decided to use the available SD card and just limit the amount of wear. Saving the playback position only once per minute is enough for normal use. The data is written to a text file on the card, with every position being a new line in the file. Because all lines contain the same number of characters, restoring the position means simply jumping to the end of the file and reading the last line. This makes the code for saving and restoring short and simple while also saving the card from too many write cycles. The same method is used for saving the volume setting for the internal and external speaker. Now an audiobook can easily be stopped and resumed by simply turning off the device.

  • Hardware Design

    Max.K06/20/2022 at 19:14 0 comments

    From the beginning I knew that I wanted to go with a retro design. I had a few details in mind that I wanted to incorporate:

    The interface would be as simplistic as possible, with the classic buttons you can find on any cassette recorder. These recorders usually need big keys to actuate the tape mechanism. Regular mechanical keyboard keys are similar in size and travel, so these were ideal for the project.

    Cassette Recorders also have a nice way to show the tape reels rotating through a window. Instead of the physical tape, a screen would be used to show an animation of the spools. The sharp memory LCD would have been perfect for this, but without a protective cover, it would have been too fragile for a portable device like this. So I instead opted for a regular color LCD.

    Usually, rechargeable Lithium-Ion cells are the go-to option for something like this. But with the retro-tone of the project, regular AA cells seemed more fitting.

    With the buttons, screen and 4x AA batteries selected, the overall size of the device was set. I started to draw some concepts in Fusion360 that would allow me to arrange all the components while needing only a single custom PCB. These first designs looked really flat and boring.

    When I searched the web for some inspiration I came across the Philips 113, a portable record player from the 1970s. From this I took over the color theme and smooth shape.

    As most of my previous 3D-printed cases, this one is also made up of two half shells that are connected together by screws. I also included draft angles and a separation line to add to the molded part look. On the bottom a battery holder is secured in its slot, which has a 3D-printed cover that locks in place nicely.

    A custom PCB is necessary for the electronic components. Because of the raging component shortage the selection of processors was limited to pretty much only the ESP32. It has plenty of power to drive a display while decoding audio. The integrated WiFi means that features like internet radio can be added later through a software update. The ESP32 also has a I2S peripheral for an external audio amplifier. For this I selected the Maxim MAX98357A which is a common mono amplifier. Even though there’s only one internal speaker, I would have pick a stereo amp. But most of these devices are out of stock indefinitely. This means that a headphone that’s plugged into the 3.5mm jack also only plays mono audio. This is unfortunate but acceptable for an audiobook-centered device. Audio files are stored on a micro SD card, for which the PCB has a slot. The SPI display is connected through cables, which allows the top and bottom halves of the case to be separated later. To deal with the wide voltage range of AA batteries (1…1.5V), the 5V display gets its own boost converter. 

View all 2 project logs

Enjoy this project?

Share

Discussions

bronsonhughes0 wrote 09/17/2023 at 03:17 point

max, 


i am quite new to surface mount components - and just wondering what “value” means in the csv file for all of the components. Is there a way you could provide links for all the components, as it tends to get a little confusing for a newcomer like myself. 

  Are you sure? yes | no

goguelnikov wrote 05/01/2023 at 19:45 point

really nice project and Animation !

indeed it would be awesome to be able to read files from a USB stick. I tried, but it’s not that easy to create the data stream from the USB to the DAC… too bad we cannot use the USB as a filesystem as it works with the SD card…

Did anybody manage to do that ?

Best

  Are you sure? yes | no

matykl26 wrote 08/18/2022 at 11:18 point

Hi, 

Id like to customize and make my own version of this, and i dont want to make a PCB. 

So, i want to ask if you could upload a png/jpg file of the schematic? With all The components marked properly, like what each component is. If The chematic allready exists somewhere, i couldnt find it.

  Are you sure? yes | no

Max.K wrote 08/25/2022 at 06:50 point

Hi, you can find the schematic on GitHub: https://github.com/CoretechR/Retro-Audio/blob/main/EAGLE%20Files/Retro%20Audio%20Rev2.1.pdf

  Are you sure? yes | no

logan.d.armistead wrote 07/13/2022 at 01:05 point

Hello Max,


Could you possibly upload a Gerber RS274X format file for stream lining PCB production and components when ordering from companies like JLCPCB? A CLM/BOM file could be helpful as well. Or since people are having confusion on how to order PCB boards, maybe making a YT video on how to order your specific board?

  Are you sure? yes | no

Max.K wrote 07/14/2022 at 19:29 point

Hi, I have now added Gerber files to the GitHub Repo. I usually order from services, that take the EAGLE file directly, but I will add Gerbers to the projects in the future. Thanks for the suggestion to make a video. That would be really useful, as many people get confused with the process of ordering pcbs and components. 

There is also a .csv file BOM. Do you need any additional info on the parts?

  Are you sure? yes | no

Mmodarre wrote 07/12/2022 at 06:25 point

Hello max, 

Forgive my ignorance, I have never dealt with PCBs. As there is nothing in component's list about the ESP32, the keys, SD Card holder and etc. I was wondering if OSH Park will attach them and we only need to solder the screen?

  Are you sure? yes | no

Max.K wrote 07/14/2022 at 19:38 point

Hi, usually you will need to order the PCB and the components separately. OSH-Park only sells bare PCBs. There are limited options for ordering populated PCBs. I believe JLCPCB can do that but it's usually pricy and complicated to set up.

You can get the individual parts from suppliers like Mouser, Digikey, Farnell or LCSC. There is a csv file in the GitHub repository with a list of all the parts that have to be solder to the board.

  Are you sure? yes | no

Mark Barnett wrote 07/09/2022 at 06:10 point

Hello Max I want to build one but where can I get the circuit board?                                                        In the component list it does not show only the files. Please help

  Are you sure? yes | no

Max.K wrote 07/10/2022 at 14:33 point

You need to order the board from a PCB service like OSH Park or JLCPCB. The design files are on GitHub.

  Are you sure? yes | no

eBender wrote 07/01/2022 at 18:03 point

Great retro design and idea, brings me back! 

could see it being even more compact for the second version, iPod nano comes to mind.

any plans for that?

  Are you sure? yes | no

Max.K wrote 07/05/2022 at 19:09 point

Thanks, shrinking this to the size of an iPod nano is a whole other level of difficulty :D

  Are you sure? yes | no

eBender wrote 07/05/2022 at 19:18 point

haha for sure, i guess i was more referring to the aesthetic and not going full nano size.. maybe iPod classic?

on second thought, it might not be that hard. doing a custom pcb plus one of those smaller OLED screens and a rp2040 chip. i think i've seen people do that already tho, with the clickwheel and all. nevermind yours is great :D

  Are you sure? yes | no

Max.K wrote 07/05/2022 at 20:21 point

Something like an iPod Classic would be doable with a custom PC. You save a lot of space just by replacing the hard drive with a micro SD. But in terms of user interface and design there is not much room for improvement. There are a lot of cheap knock-offs like that already.

  Are you sure? yes | no

DamnFineCo wrote 06/26/2022 at 19:50 point

I love this design, would you be able to release the source files for the STL's? I'd like to adapt them for a 3.5" screen I have on hand.

  Are you sure? yes | no

Max.K wrote 06/27/2022 at 18:09 point

Thanks, 3.5" might be a a bit much, depending on the PCB size. You have a PM.

  Are you sure? yes | no

Ben wrote 06/24/2022 at 23:40 point

I love the aesthetics of this project. I'm curious what brand of filament you used for the top case.

  Are you sure? yes | no

Max.K wrote 06/25/2022 at 08:50 point

Thanks, the filament is from "DasFilament": https://www.dasfilament.de/filament-spulen/petg-1-75-mm/176/petg-filament-1-75-mm-melonengelb

  Are you sure? yes | no

Nazwa wrote 06/22/2022 at 21:55 point

1. please add usb host A for normal pendrive

2. second knob for adjust sound time , keyboard is not easy

3. is possible using different power? 18650 or(and) AA and meybe solar panel too?

4. in old good time i can give  my cassete to my friend. today, meybe put sound on 2d bar code or ... irda. yes this is still very good idea. irda not must working every time, only time to time

  Are you sure? yes | no

powiadam.ci wrote 06/24/2022 at 18:42 point

yes adjust time in audio book or longest file is difficult with keys, i prefer knob

  Are you sure? yes | no

Max.K wrote 06/24/2022 at 18:48 point

Thanks, those are a few good points if I every make a second version. Maybe I can even use the volume knob for scrubbing while holding down another key.

  Are you sure? yes | no

Emmanuel wrote 06/22/2022 at 08:08 point

Fantastic idea and wondefull execution ! This gives me some ideas to replace the overkilled built I did for my son's speaker (RasPi + Bluetooth remote + USB)

  Are you sure? yes | no

Max.K wrote 06/24/2022 at 18:53 point

Thank you! Yes, it might be a good shape for a DIY "Tonies" speaker as well. Maybe I should continue with this projects and add some more software features. A lot of the ESP32s functionality is unused right now. I'm thinking about a web radio, with the appropriate 80s style radio interface.

  Are you sure? yes | no

zpekic wrote 06/21/2022 at 00:18 point

Super cool idea and great retro look too! Could it be slightly extended to be usable as cassette tape "mass storage" for home computers of the golden era? 

https://hackaday.io/project/175680-cassette-interface-for-fpgas

  Are you sure? yes | no

Similar Projects

Does this project spark your interest?

Become a member to follow this project and never miss any updates