Recently, we made a all-metal Raspberry Pi robot car integrates mecanum wheels chassis and 5DOF visual robotic arm. We innovate some interesting applications based on Raspberry Pi’s AI power. Introducing MasterPi by Hiwonder.
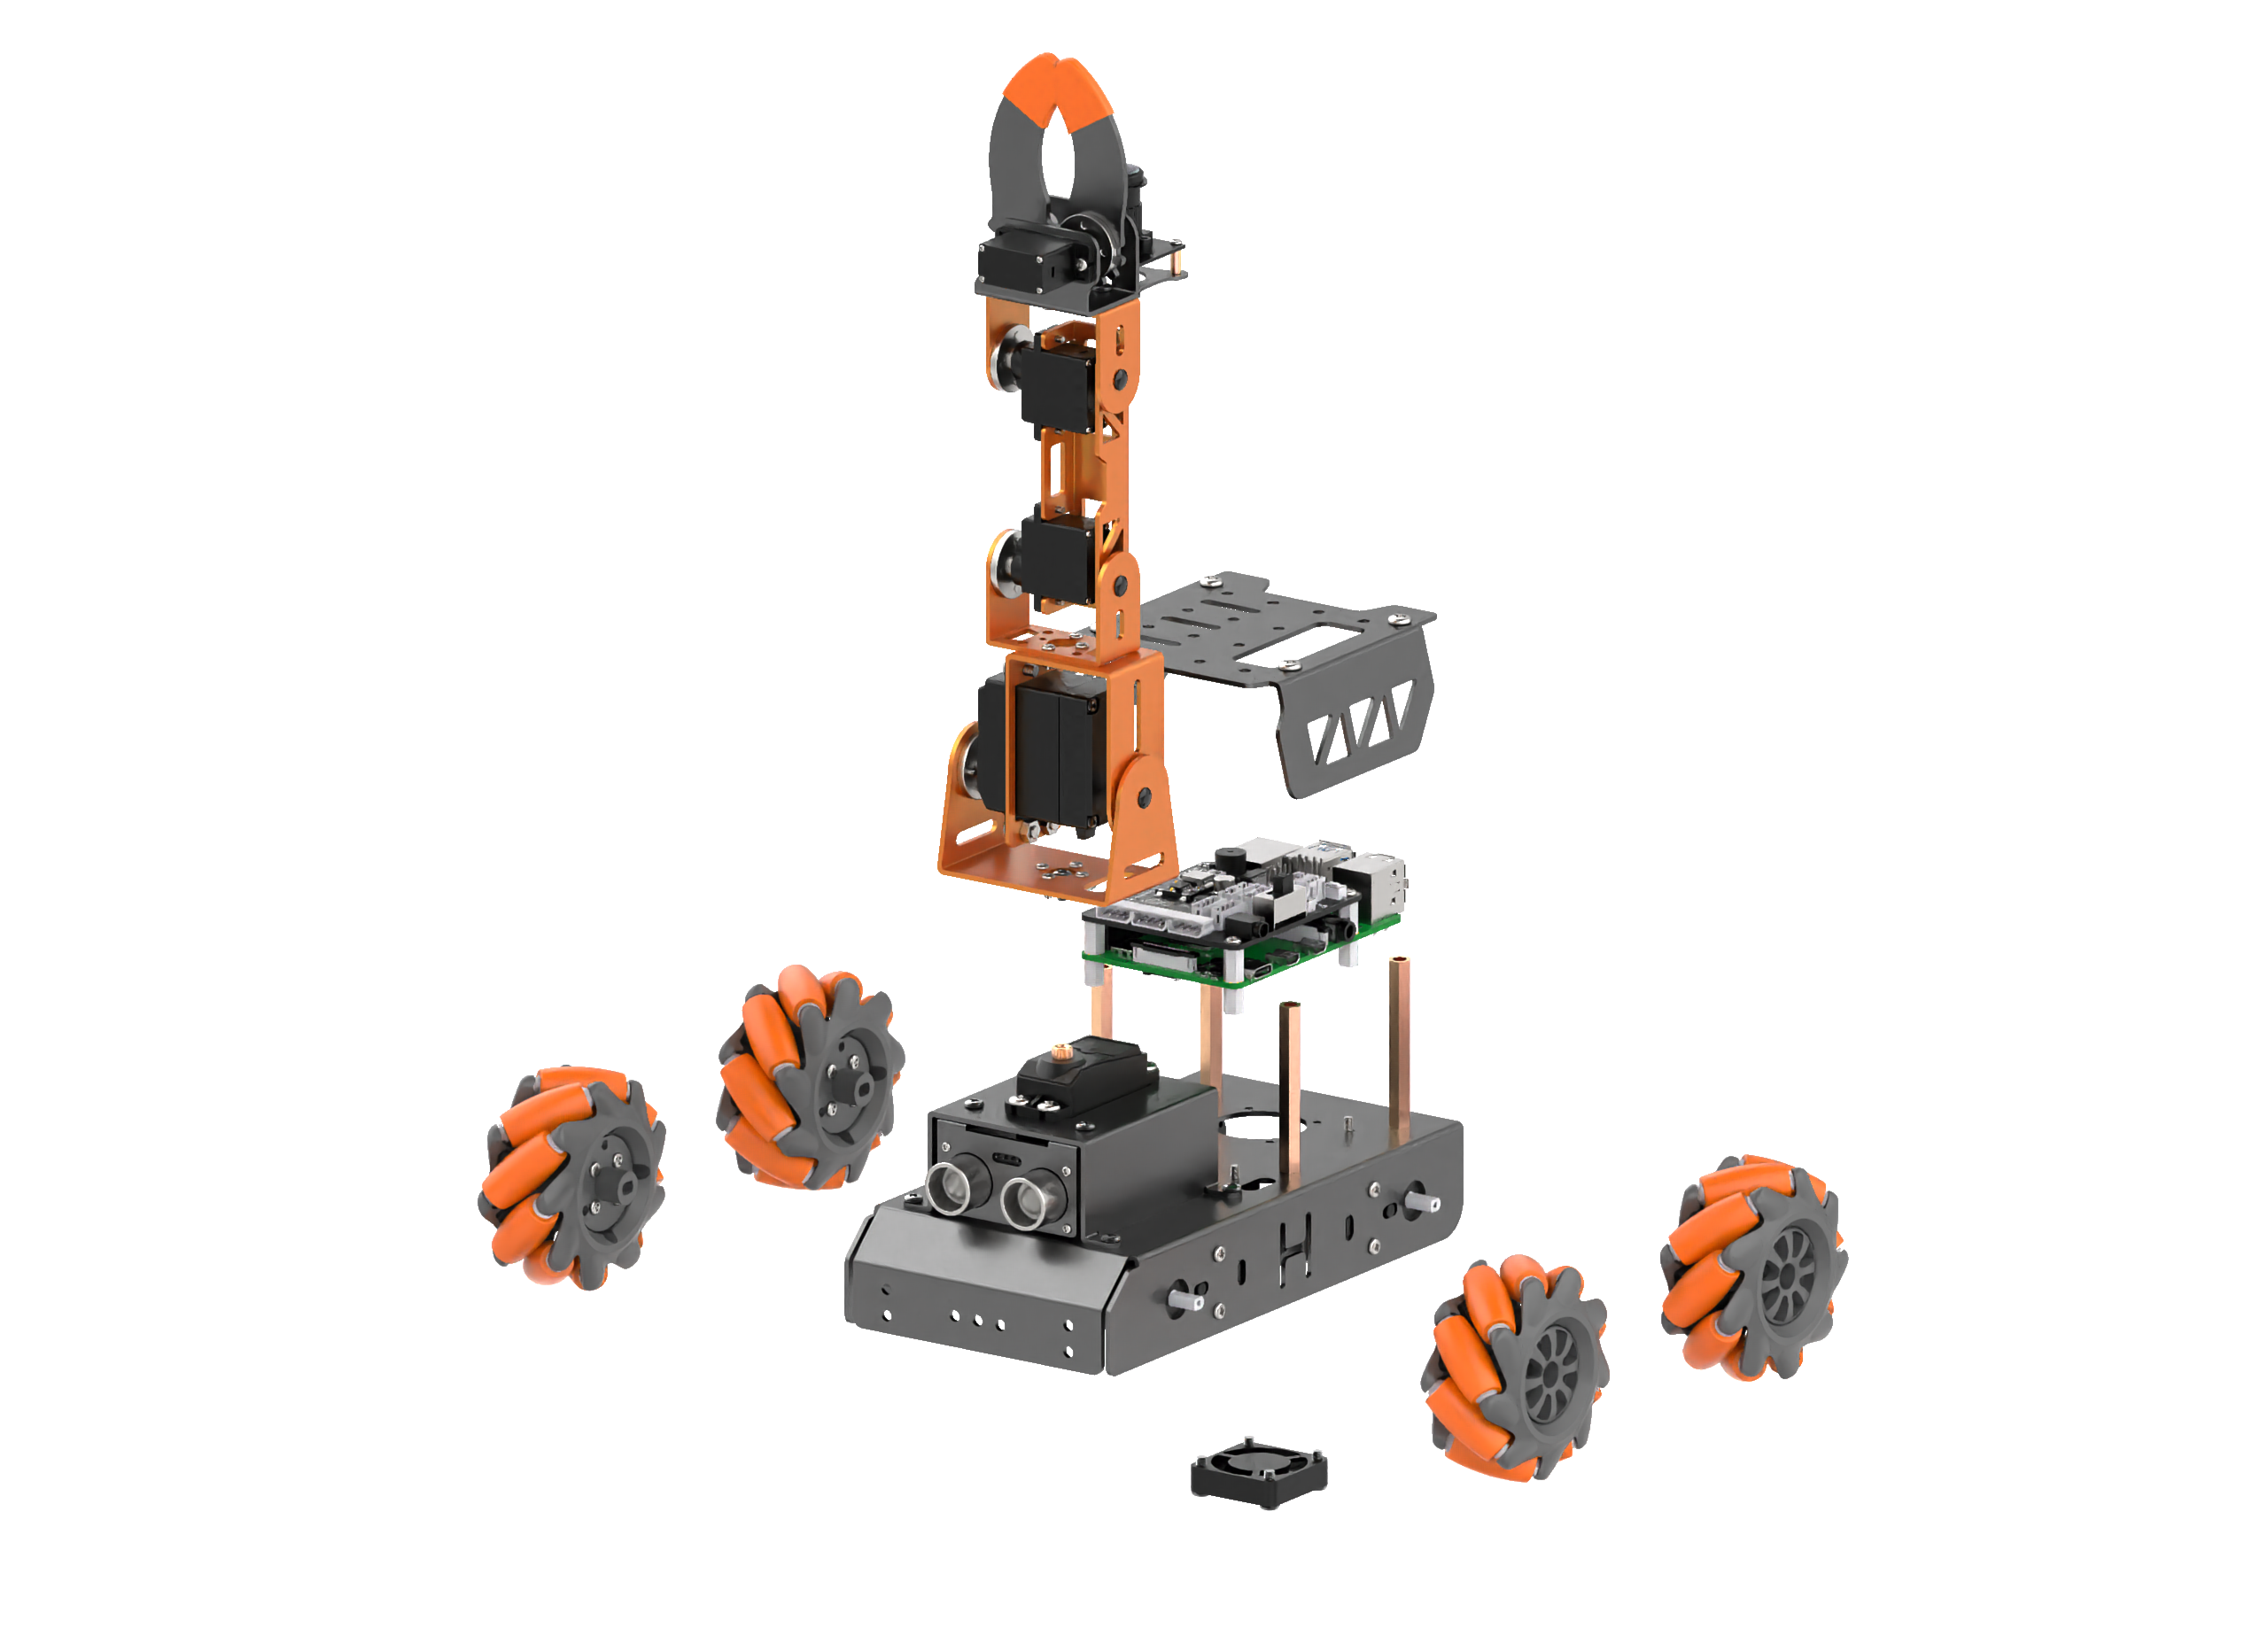
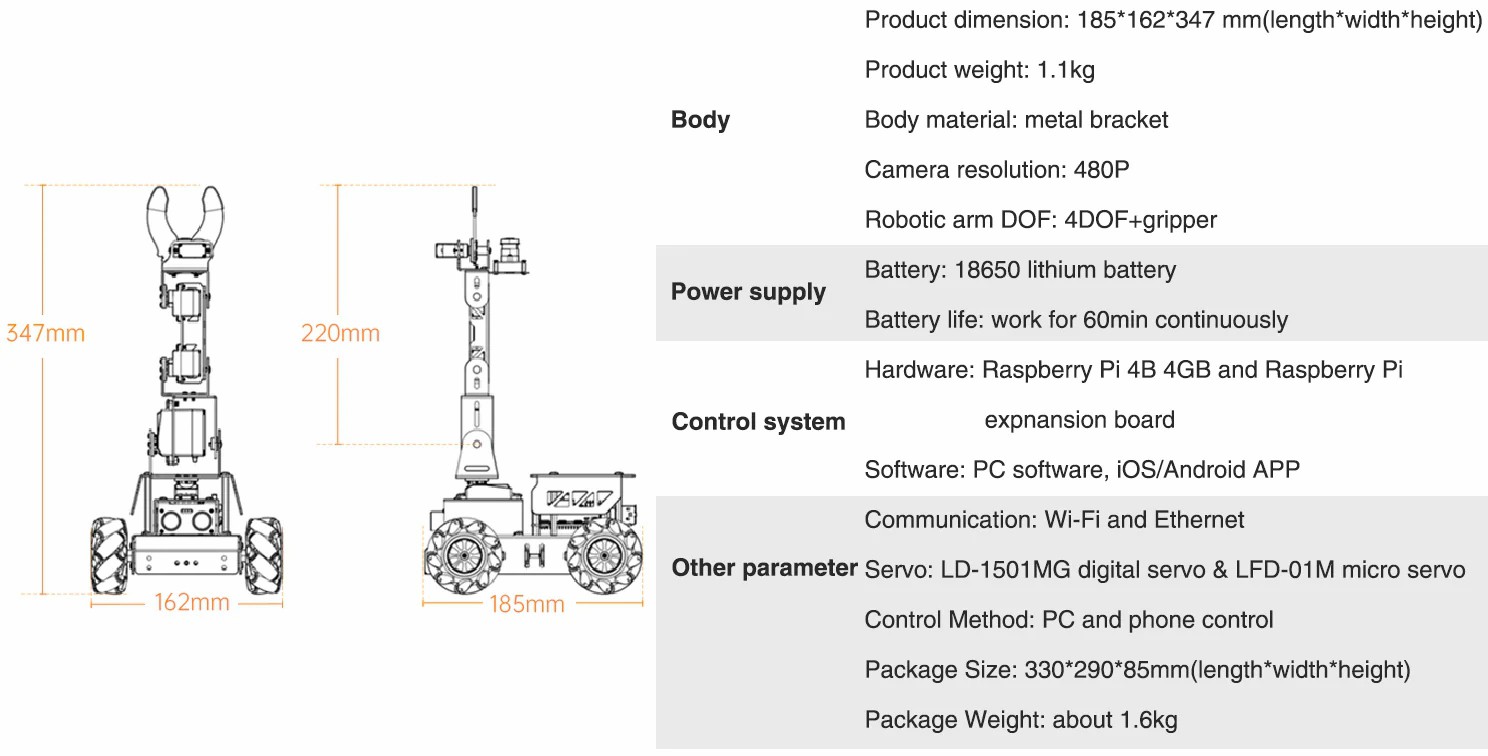
MasterPi’s chassis is composed of mecanum wheels and driven by four TT motors. Ingenious design of mecanum wheel allows MasterPi to move in all directions and make cool “drifting”. Above the chassis are Raspberry Pi and our developed Raspberry Pi expansion board. For better heat dissipation, we reserve a hole on the chassis for installing the fan and customize hollowed-out covers.
RGB ultrasonic sensor is installed on the front of the chassis, which enables MasterPi to avoid the obstacle smartly. Above the ultrasonic sensor is 5DOF robotic arm with monocular camera and a gripper. MatserPi utilizes OpenCV as vision recognition containing color recognition, object picking and placing after recognition.
To prove the astonishing performance of MasterPi’s synthetic ability,now I will explain the details of how MasterPi fulfill the task of sorting colored blocks while tracking lines.
The whole procedure is recognizing the color of the block and picking up, then call the corresponding position code. Next, it continues detecting the color of line. When first black transverse line is detected, MasterPi will count the number of transverse lines which each one is corresponding to a specific color of blocks. MasterPi will adjust its posture and place the block in designated position. After that, it will switch the vision to move along the line and loop.
The whole program named IntelligentSort has been uploaded on GitHub. Below is the realization logic of program. Firstly, after connecting MasterPi through VNC, copy program IntelligentSort.py to the path /home/pi/MasterPi/Functions. Next, open terminal and enter command “cd MasterPi/Functions/”.

Enter command “sudo python3 IntelligentSorting.py” and press “Enter” to start.

1.Color Recognition
MasterPi recognizes the color of block.

- Gaussian filter
Before converting the color space of image from RGB to LAB, reduce the noise of image first. The GaussianBlur() function in the cv2 library is used here for Gaussian filtering of the image.

The meaning of parameters in parentheses is as follow:
The first parameter “frame_resize” is the input image.
The second parameter “(3, 3)” the size of Gaussian kernel.
The third parameter “3” is the amount of variance allowed around its mean value in Gaussian filtering. The larger the value, the larger the allowed variance around the mean; the smaller the value, the smaller the allowed variance around the mean.
- Binarization processing

Use inRange() function in cv2 library to binary image.
Take “lab_data[color]['min'][0]” as example. The first parameter “lab_data[color]” in parentheses is the input image. The second parameter “min” and the third parameter “0” are the upper limit and lower limit of the threshold individually. When the color value of pixel point RGB is between the upper and lower limit, the pixel point is assigned a value of 1, otherwise, it is 0.
- Erosion and dilation processing
In order to reduce the interference and make the image smoother, process the image with open and close operation.

open() function will erode the image first, and then dilate.
Take the code “eroded = cv2.erode(frame_mask, cv2.getStructuringElement(cv2.MORPH_RECT, (3, 3)))” as example. The meaning of parameters in parentheses is as follow:
The first parameter “frame_mask” is the input image.
The second parameter “cv2.getStructuringElement(cv2.MORPH_RECT, (3, 3))” is the structure element or kernel that determines the nature of operation. Among them, the first parameter in parentheses is the kernel shape and the second parameter is the kernel size.
- Get the contour with the largest area
After the above image processing is completed, the contour of recognized target needs to be obtained. In this process, the findContours() function in cv2 library will be used.

The first parameter “closed” in function parentheses is the input image. The second parameter “cv2.RETR_EXTERNAL” is the retrieval mode of the contour. The third parameter “cv2.CHAIN_APPROX_NONE” is the approximation method of the contour.
Find the contour with the largest area among the obtained contours. To avoid interference, a minimum value needs to be set, and the target contour is valid only when the area is larger than this minimum value.

Then judge the color of the largest area, and circle the recognized object. In this process, putText() function in cv2 library is involved.

The meaning of parameters in function parentheses is are follow:
The first parameter “img” is the input image.
The second parameter “"Color: " + detect_color” is the displayed content.
The third parameter “(10, img.shape[0] - 10)” is the position where the content is displayed.
The fourth parameter “cv2.FONT_HERSHEY_SIMPLEX” is the type of font.
The fifth parameter “0.65” is the size of font.
The sixth parameter “draw_color” is the color of font.
The seventh parameter “2” is the thickness of font.
2.Pick the block
Then, pick the block through setting the servo on gripper.
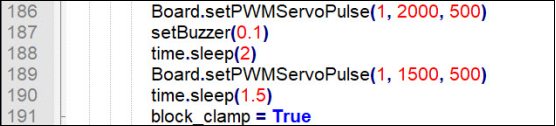
Take the code “Board.setPWMServoPulse(1, 2000, 500)” as example:
The first parameter “1” represents ID1 servo. The second parameter “2000” is the position value of servo rotation and this value is the pulse width. The third parameter “500” is the rotation time of servo and its unit is ms.
3.Line following
After picking the block, the car will start moving with the line. It will judge whether there is a line in the transmitted image. The code is as follow:

Next, subtract the value of the ideal center point from the abscissa of the line to obtain the offset of the abscissa.

Then, adjust the direction and magnitude of the speed by PID mapping.

Finally, set the motor value to follow the line through “Board.setMotor()” function.

Take code “Board.setMotor (1, int(42-base_speed))” as example:
The first parameter “1” represents No.1 motor.
The second parameter “int()” is transform functions that converts string into number, in which “42” indicates the set base speed and “base_speed” indicates the corrected speed (correct the speed of the offset position while driving). The speed of motor can be calculated by this function.
4.Recognize the transverse line
- Judge the number of transverse lines
When recognizing the color of the block, set the number of recognized lines corresponding to the placement position of the block, as the figure shown below:

If red is recognized, when a line is recognized by MasterPi, it will transport the block to the first line.
If green is recognized, only when two lines are recognized by MasterPi, it will transport the green block to the second line, so does the blue block.
In the process of following line, MasterPi keeps detecting the line and recognize it if the conditions in the figure shown below are met.

Next, judge the position of the line.

The width of line is obtained through the following function.

- Stop recognizing
When the number of lines is recognized, the recognition function will be stopped for a short time to prevent the same line from being repeatedly recognized and causing interference.

5.Place the block
When the number of recognized horizontal lines is equal to the number of horizontal lines corresponding to the target block position, the robot car stops at the position corresponding to the horizontal line, and control the robotic arm to place the block in the corresponding position.
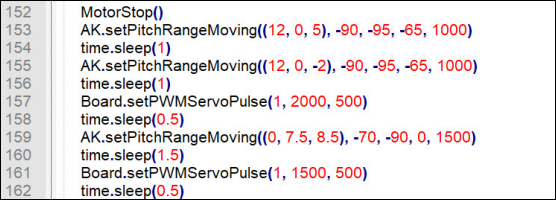
In the code shown in the figure above, inverse kinematics is used to set the movement of robotic arm. Take the code “AK.setPitchRangeMoving((12, 0, 5), -90, -95, -65, 1000)” as example:
The first parameter “(12, 0, 5)” represents the coordinate values of X, Y and Z axes of the end of robotic arm.
The second parameter “-90” is the pitch angel value of the end of robotic arm.
The third and fourth parameters “-95” and “-65” are the value range of the pitch angle.
The fifth parameter “1000” is the running time of robotic arm.
Due to the limitation of the recognition range, the line is not in the recognition range when the car hasn’t yet get to the corresponding position. Therefore, delay needs to be added, so that the car can keep moving a distance after it can not recognize the line.
To realize the recognition of different colors and prevent the interference of the recognized colors, the recognized colors will be removed from the color list.
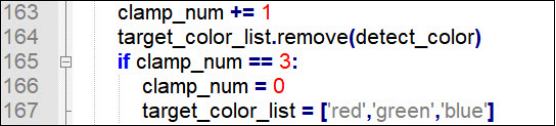
Then, the car will continue to follow line and start recognizing and sorting the next block. When all the blocks are sorted, the color list will be reset and a round of recognition, sorting and transportation is completed.
