sandy
sandyHumidity-temp-logger-project

How to measure temperature and humidity. The results are saved in DBF database and shown on 2D chart.
Logger for temperature and humidity
Used hardware
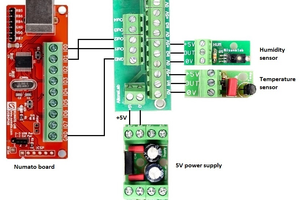
Numato 8 channel USB GPIO Module; Connector board for ADC 5V; AltonaLab temperature sensor; AltonaLab humidity sensor; 5V multi connector power supply board; 220V to 12V, 2A power supply;
A real image of the connected boards:

AltonaLab diagram is:

GPIO 0 and GPIO 1 of Numato board are used as analog inputs. Using the Connector board, the Temperature sensor is connected to GPIO 0 and the Humidity sensor is connected to GPIO 1. The both sensors are supplied with 5V power by 5V power supply board, connected to Connector board.
AltonaLab software has a specially developed functional blocks for temperature and humidity measurement: AltonaSensorTemp and AltonaSensorHumidity. These blocks are used in the diagram above:
Using the parameters of these two blocks, we just have to set that the input of the blocks gets raw ADC data from 10bit ADC, which works in range 0..5V and with parameter QueueSize to determine the amount of last measurements over which to calculate the average value of the measured signal:
The output OnRead of the Numato block is connected with Process inputs of AltonaSensorTemp and AltonaSensorHumidity blocks and when the data is read from Numato block, it signals the next blocks to start theirs calculations. The block AltonaSensorHumidity has a temperature compensation - input Temp, so if the temperature of the environment is known, it will change slightly the value of the humidity and will increase its accuracy.
When the diagram is run, to change the temperature, just touch the black sensitive element of the temperature sensor. Because the human temperature is higher, the shown temperature at the running AltonaLab diagram will increase. To increase the measured humidity, just blow on the sensor. Because your breath is moist, the sensor will detect more humidity.
The two sensor blocks AltonaSensorTemp, AltonaSensorHumidity. The outputs of the sensors blocks AltonaSensorTemp and AltonaSensorHumidity are shown with Text controls in Red (temperature) and Blue (humidity) colors.
Block DBFStorage - saves the measured values from sensors in DBF database. This kind of database is perfect for some applications where only one software saves/reads data. The database is very fast. The important parameters of this block are:
FullDBFFileName - here has to be entered the file path and file name of the used DBF. Then when a columns are set in parameter DataSet, the DBF database will be automatically designed and saved to this file; StoreType - determines the time type of the parameters StoreLast and StoreLastAtMemory, can get the next values: LastRecords, LastSeconds, LastMinutes, LastHours, LastDays; StoreLast - determines how many last measured values to be saved at the DBF database. For example, if StoreType is LastMinutes and StoreLast is 10, all the records in the DBF older than 10 min, will be deleted automatically. This is a tricky way the contains of the database to be self maintaining and the database size will never become too large; StoreLastAtMemory - determines how many last measured values to be stored at the block's memory and determines the contains of the output DataSet, which then will be shown in the Image control. DataSet - this is a very important parameter, which describes the design of the database. At our case, the database has three columns - Date, which has to be checked as Leading date column and is with Date data type, column Temp - with Analog data type and column Hum with analog type. We can add unlimited amount of columns. When we confirm this parameter, the DBF database will be redesigned with all the needful changes. At our case, the DBF database will consists of three columns: Date, Temp, Hum, and one index over the leading Date column. All the columns will appear as inputs of the block, as it is visible...
Read more »
 Mrinnovative
 Jeremy