Raspberry Pi Guitar Amplifier
Guitar Amplifier and effects made with Raspberry Pi and reused Vox amplifier case
Guitar Amplifier and effects made with Raspberry Pi and reused Vox amplifier case
To make the experience fit your profile, pick a username and tell us what interests you.
We found and based on your interests.
image_50438145.JPGBen's build in a boxJPEG Image - 1.69 MB - 08/12/2022 at 20:39 |
|
|
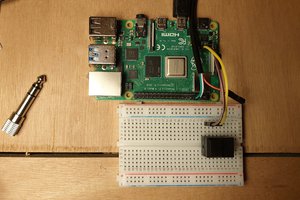
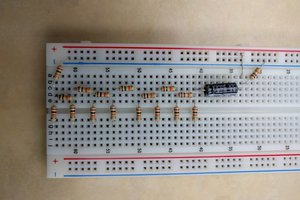
image_67188993.JPGMCP3008 wiringJPEG Image - 1.94 MB - 08/12/2022 at 20:39 |
|
|
image_67160321.JPGMCP3008 wiringJPEG Image - 1.74 MB - 08/12/2022 at 20:39 |
|
|
IMG_4982.movphoto of ben's buildquicktime - 31.41 MB - 08/12/2022 at 20:27 |
|
|
IMG_4844.HEICphoto of ben's buildheic - 1.98 MB - 08/12/2022 at 20:27 |
|
|
So I got my looper working. But not without pain, pain, pain. And not just from a guitar string snapping and ending up sticking out the back of my hand. You know when you have everything working and you go to do the final power on and it doesn't work? Yes. That's what happened.
Long story short, I believe that when I attached my homemade pedal with a six foot guitar cable (cause it looked boss) I brought the associated GPIO pin low because the signal just faded out over that length of thick wire. Oscilloscope testing later proved that to be the case, but that would be a few days later.
At first I thought I had maybe disabled one too many system services in my quest for performance and removing noise artifacts. That was a dead end, but I spend hours reinstalling drivers such as triggerhappy, rfkill, journald, which were completely unneeded.
I hadn't realized that the audioinjector card used the I2C gpio pins for initial setup. So when I tried to use pin 2 for my pedal, the card failed to initialize. But it had worked with a short bit of wire hooked to a switch, just not the long wire!
An option now was to use a shift register to open up more GPIO pins, but ugh, that sounds like real work. Maybe someday, but for now what I did was move the led for the looper to pin 2 (a short wire) and for the looper pedal I rewired to drive 1.5 volts with a hacked in voltage divider on the cable.
That looks like this:
I just soldered the resistors directly to the wires heading into the GPIO and wrapped with some heat shrink tubing. Not idea, but it works now.
And here's my what it looks like:
The wires labeled +3v and GND are the ones with 10K resistors hidden away beneath the black shrink tubing.
Super janky wooden pedal for looper switch in the works.
I updated the code on github and the instructions on the looper. I have to make a pedal next. I expect the router will see some use as I want this as janky as possible and I will likely just hock out a chunk of 2x4 to house the switch and connector.
I updated the code on github and the instructions on the looper. I have to make a pedal next. I expect the router will see some use as I want this as janky as possible and I will likely just hock out a chunk of 2x4 to house the switch and connector.
I've gotten the loooper working. Video here:
I have started updating the documentation and have to upload revised code, and will do so in the next few days.
It was a journey, and I managed to solder the lone LED required incorrectly multiple times.
To catch up, I've figured out how to:
-Trigger a record, loop, wait states using a button connected to a GPIO pin.
-Record the audio during the record phase.
But I cannot play the audio during the loop. I've got it working on my laptop, but on the PI, I get a SIGSEGV error from pyo's SfPlayer method.
I tried a bunch of different workarounds, which have not worked. I tried playing the audio via a different program, such as aplay, which does work in isolation. But it fails when trying to play with the main program because the two processes: pyo and aplay both want to lock the audio to them. And only one can win, ala Highlander.
Sooo, I suspect it may work if I use Jack as the audio backend instead of the default portaudio. But to do that, I have to compile pyo from scratch with Jack support enabled. I've tried twice and am not having luck with python recognizing the rebuilt pyo. I am trying again. Fingers crossed.
Ben is making progress on his build.
So I still can't get the looper working. I tried a workaround where I would start a subprocess to run SOX aplay to play the looping audio. But.....it conflicted with the already running pyo server and could not get access to the audio output at the same time. So, I am now seeing if using pulseaudio or jack server might fix the SIGSEGV I get from pyo's SfPlayer.
Why? Because I had SfPlayer working on my Arch Linux laptop and not running on the Raspberry Pi and one difference is the laptop uses Jack. I've been trying to avoid this, because it adds another layer into the audio stack and everything feels a bit fragile already.
So I am recompiling pyo with Jack support.
In the meantime, I broke everything when I installed pulseaudio. I almost lost my mind. But I found the problem, it was ALSA had been reset to use the mic input, and not line input. Who knows why?
So here's a picture of how the ALSA setup should look when you run alsamixer. (Also added this to the google slides doc.)
Added a photo of the MCP3008 board that Ben built. Much nicer than mine. Good reference.
OK, I've got a button working, and recording working, but when I try to do playback I get: terminated by signal SIGSEGV (Address boundary error)
I think the problem may be that I am somehow starting the pedalmaster main program at the same time and they are conflicting. So maybe not my code.
Here's the code, and I have button wired up to GPIO pin 2.
# Looper. This is test code that:
# on GPIO connected button press: starts a recording
# second press: stops listening and plays a loop of the recording
# third press: stops looping and returns to initial state
#!/usr/bin/env python3
from gpiozero import Button
from signal import pause
import pyo
import os

s = pyo.Server().boot()
s.start()
audio = pyo.Input()
loop_file = os.path.dirname(os.path.abspath(__file__))+'/myloop.wav'
times_clicked = 0

def looper_func(key):
    global times_clicked, rec, looper, audio, loop_file
    if times_clicked == 0:
        print("Recording")
        rec = pyo.Record(audio, filename=loop_file, fileformat=0, sampletype=1).out()
    if times_clicked == 1:
        print("Looping")
        rec.stop()
        looper = pyo.SfPlayer(loop_file, loop=True).out()
    if times_clicked == 2:
        print("Waiting")
        looper.stop()
    times_clicked = (times_clicked+1)%3
    print(times_clicked)

switch = Button(2)
switch.when_pressed = looper_func

pause()
I've also posted the current version of the slides here. The links to github and slides and demo video are all here as well.
I've made an overly long video going through every line of the code.
Create an account to leave a comment. Already have an account? Log In.
I don't have the skills to code up amp sims, but the amp is basically directly connected to the pi, so anything that will run on the pi can be output to through the amp and use the input of the guitar.
Guitar teacher here! This thing took on a life of its own...Mine is in the works!
Become a member to follow this project and never miss any updates

 shlonkin

 tdicola
Does / can your project run guitar amp sims, cabinet impulses, through the class D power amp?
Great project by the way.