Close
0%
0%

Ventbot: warm side cool, cool side warm

A DIY register booster project to even out the temps around my home.

Public Chat
Similar projects worth following
I have a common problem: upstairs rooms in my house are too cold in winter. Now that I have air conditioning, those same rooms are too warm in the summer. I'm trying my hand at making my own register boosters to try to fix that. This is way outside my area of expertise, even as a hobby, but let's see where it goes. (Update: It went pretty well.)

The content of this Hackaday project is mostly the project log documenting the exploration and design as it evolved. It doesn't have much in the way of a "how to".

A detailed description of how to build this is in this Instructable: Ventbot, a DIY Home HVAC Vent Booster: Warm Side Cool, Cool Side Warm

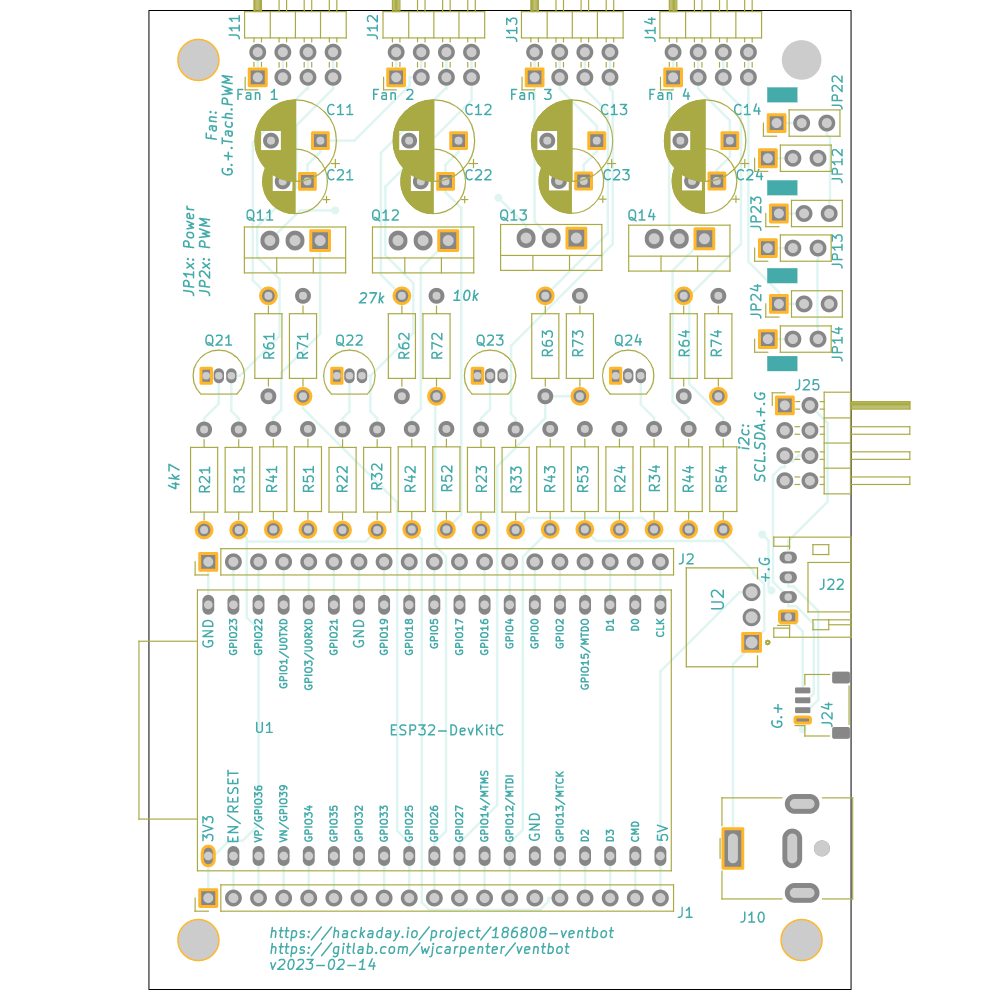
The repository for all project design files, both hardware and software is here: https://gitlab.com/wjcarpenter/ventbot

Finally, if you would like a to order the PCB that I designed and used with a couple of clicks, you can do that here:
Ventbot, a DIY HVAC Vent Booster: Warm Side Cool, Cool Side Warm

  • A tweak to Home Assistant ventbot scripts

    WJCarpenter09/03/2023 at 18:24 0 comments

    The occupant of one of the bedrooms with a ventbot sometimes wants to ventbot to operate and sometimes not. When they don't want it, on my advice they simply unplug the ventbot power from the wall. That worked fine when each ventbot operated independently. Under ecobee control, though, it triggered a problem. It took me a while to notice this. I was randomly perusing my Home Assistant dashboards and saw that ventbot disabled, which was not surprising. But two of the other ventbots were on and two were off. Hmmm.

    You saw my script for activating the ventbot in my previous project log. It calls a service for each ventbot. The problem is that it calls them in sequence, and the script stops with an error when it tries to call the ventbot that is offline. The fix is pretty simple. Instead of calling the services in sequence, I now call them in parallel. An error is logged for the offline ventbot, but it doesn't stop the calls to the others.

    Here's is the revised activation script:

    alias: Ventbots activate!
    sequence:
      - parallel:
          - service: esphome.ventbot_red_set_inout_neutral_zone_and_hold
            data:
              in_neutral_zone: false
              duration_seconds: 500000
          - service: esphome.ventbot_orange_set_inout_neutral_zone_and_hold
            data:
              in_neutral_zone: false
              duration_seconds: 500000
          - service: esphome.ventbot_yellow_set_inout_neutral_zone_and_hold
            data:
              in_neutral_zone: false
              duration_seconds: 500000
          - service: esphome.ventbot_green_set_inout_neutral_zone_and_hold
            data:
              in_neutral_zone: false
              duration_seconds: 500000
          - service: esphome.ventbot_blue_set_inout_neutral_zone_and_hold
            data:
              in_neutral_zone: false
              duration_seconds: 500000
    mode: restart
    icon: mdi:fan
    

  • To be or ecobee....

    WJCarpenter06/22/2023 at 16:14 0 comments

    I had this idea a while back and just implemented it. My smart thermostat now controls my Ventbots. When I finally got down to implementing it, I found it quite an enjoyable experience. Every time I learn a new aspect of Home Assistant, I am impressed by how thoughtfully organized things are. In my day job as a software developer, I work with a zillion different technologies and components every day, and most of them come with at least a few little quirks that leave you either shaking your head or at least wishing it were different.

    Our home's heat pump has an ecobee smart thermostat. It was chosen by the contractor as part of the heat pump package, but I don't have any complaints. There is already an ecobee integration for Home Assistant, so I had that going with just a few clicks soon after the ecobee arrived. The integration is cloud-based. I wish it were purely local, but I don't wish that so strongly that I'll avoid using it. The integration makes available the same sort of information you can see in the ecobee mobile app: comfort zone range, current temperature, operating modes, and what equipment is currently running. That last part is interesting here because it reports whether the heating or cooling is active. I showed that in some earlier project logs, but here is a refresher:

    The orange-ish areas indicate heating. When cooling is on, it's shown in blue.

    My idea was simple. Instead of relying on the associated temperature sensor to tell individual Ventbots when to turn on or off, I would use the ecobee's heating or cooling cycles to turn all of the Ventbots on or off. The design goal of the Ventbot is that it can operate completely standalone (other than firmware uploads) with no communication with each other or anything else. I did it that way because not everybody has home automation. But, hey, I do!

    I wasn't sure how complicated this was going to be since it uses areas of Home Assistant that I hadn't explored yet. The heating and cooling cycle information, which shows up automatically in the ecobee's history graph in Home Assistant, comes as what Home Assistant calls an entity attribute. I hadn't worked directly with attributes before; at a glance the documentation made it look inconvenient. While I was noodling around with this, I decided to also do parts of it as a Home Assistant script. I've done lots of things with Home Assistant automations, blueprints, and templates. The scripting is consistent with those. Even though I wasn't familiar with it, it didn't seem too much of a stretch.

    On the Ventbot side, which is implemented in the ESPHome framework, I had already implemented some services callable from Home Assistant. I did that for convenience of calibration, debugging, and troubleshooting, but with a little twinkle of doing something like this. There are services on the Ventbot for turning the fans on or off. In both cases, it goes through the ramp-up/ramp-down table. The calls also include a parameter for some number of seconds to hold, where "hold" means ignore the associated temperature sensor for that period. Those services have been in the firmware for quite a while and are tried and true.

    Here's the service of interest from ventbot.yaml.inc. Not shown in this snippet are the actions taken when this service is called.

    api:
      # These services can be called from Home Assistant for manual testing and temporary overrides.
      services:
        # Force pretending that the temperature is either in (true) or out (false) of the neutral zone.
        # Temperature sensor readings will be ignored until the duration expires or the hold is
        # canceled.
        - service: set_inout_neutral_zone_and_hold
          variables: {in_neutral_zone: bool, duration_seconds: int}
          then:
          # ....
    

    In my Home Assistant server, I watch for an attribute state change from the ecobee. When the state changes to heating or cooling, regardless of the previous state, turn the Ventbots on. Then, wait for another state change that goes to one of the...

    Read more »

  • A look at atmospheric pressure

    WJCarpenter06/12/2023 at 16:30 0 comments

    Ventbots are pretty reliable at using a temperature reading as a trigger. The temperature sensors I am using, BMP280 and BME280, and many other temperature sensors also provide a reading of atmospheric pressure. I think that's because in common use cases for these sensors, the interesting value is the pressure, and it is sometimes necessary to take temperature into account for pressure readings.

    Anyhow, I got to wondering if it would have been feasible to use a change in the pressure reading as a trigger for Ventbots. The HVAC is blowing air, and it's at least conceivable that that would lead to a change in air pressure inside the vent cavity. If that worked out, I'd have to figure out a way to compensate for the additional effects of the Ventbot fans to correctly trigger turning the fans off.

    Well, an interesting hypothesis, but basically a dead end. Here is a graph of 3 Ventbots during a couple of heating cycles.

    The top graph is the Fan 1 tachometer reading, the middle graph is the temperature reading, and the bottom graph is the pressure reading. If you graphed more data and did some fancy signal processing, Fourier transforms, and a generous amount of squinting, I think you could convince yourself that there was some effect on the pressure readings. But it would be so tiny that it would be hard to reliably dope it out from the normal pressure variations, both in the physical world and in the tolerance of the sensor.

    Now we know.

  • Configuration musings

    WJCarpenter06/06/2023 at 03:21 0 comments

    The firmware always logs the temperature triggers and ramp-up/ramp-down table the first time through. It looks like this in the ESPHome log for the Venbot:

    [19:58:48][I][ventbot:848]: Temperature triggers: Low 60.5, High 85.1
    [19:58:48][I][ventbot:849]: There are 8 ramp steps
    [19:58:48][I][ventbot:853]: Fans:            Fan 1       2       3       4
    [19:58:48][I][ventbot:858]: Fan control:         1       2       3       -
    [19:58:48][I][ventbot:862]:   { 0.0,  0.0, {  0.00,   0.00,   0.00,   0.00}}, /* 1*/
    [19:58:48][I][ventbot:862]:   { 2.0,  1.0, {  2.00,   0.00,   0.00,   0.00}}, /* 2*/
    [19:58:48][I][ventbot:862]:   { 2.0,  1.0, {  2.00,   2.00,   0.00,   0.00}}, /* 3*/
    [19:58:48][I][ventbot:862]:   { 2.0,  1.0, {  2.00,   2.00,   2.00,   0.00}}, /* 4*/
    [19:58:48][I][ventbot:862]:   { 5.0,  5.0, { 20.00,  20.00,  20.00,  20.00}}, /* 5*/
    [19:58:48][I][ventbot:862]:   { 5.0,  5.0, { 40.00,  40.00,   0.40,  40.00}}, /* 6*/
    [19:58:48][I][ventbot:862]:   { 5.0,  5.0, { 60.00,  60.00,  60.00,  60.00}}, /* 7*/
    [19:58:48][I][ventbot:862]:   { 5.0,  5.0, { 80.00,  80.00,  80.00,  80.00}}, /* 8*/

    A while back, I made two changes related to this in the firmware.

    • The table gets logged again if one of the Home Assistant service calls is made to the device. I figured that the reason someone is doing that is for troubleshooting or tuning, so a reminder of that info is helpful.
    • The activity right after boot-up now includes cycling through ramp-up and ramp-down. Although the same thing can be achieved by pushing the button on the ESP32 through the opening in the case, that turns out to be pretty inconvenient once the Ventbot is installed into a vent cavity. Sure, you could still trigger that from a Home Assistant service call, but it might not be convenient to use your computer far away from the Ventbot you want to observe. Now, you can just cycle the power and you can see (or, more importantly, hear) the full ramp up and down cycles.

    These things got me thinking about what else I could do for convenience and customization. That's something I wondered about at the start of the project but never really got to. 

    • I am now thinking I will now report some of the configuration items as ESPHome text sensors (or some other mechanism) so they can be conveniently displayed in Home Assistant. 
    • It's a step from there to implementing service calls so that Home Assistant can be used to set configuration values. The values in the ESPHome configuration YAML file would just be defaults that service calls could override.
    • I can probably use the ESP32 preferences API to store overridden values in flash to persist across reboots, with maybe another service call implemented to restore defaults (by erasing or replacing the values in flash or something).

    Another thing I have pondered is how to give someone control over the Ventbot in a particular room without opening the door to misbehavior. We're all friendly family members here, and it's not an issue. I'm just in the habit of thinking about security. The Home Assistant permissions scheme for dashboards would let me create a separate dashboard for each Ventbot and restrict access to that dashboard to some particular user. I could imagine having a tablet with a Home Assistant dashboard for controlling the Ventbot in a room (though I'm not sure I can imagine spending the money for that limited purpose). I'm already using passwords to guard the APIs, and the Home Assistant server (that I control) could know all those passwords. Separate passwords for Ventbot instances guards against someone operating a rogue client for the ESPHome API. I know this is kind of overkill in the average home environment, but I'll feel better if I get time to implement it instead of just wishing I had.

  • A few lessons learned

    WJCarpenter06/03/2023 at 18:17 0 comments

    With all five of my Ventbots now installed and operational for about a week, I can make a few "real life" observations.

    First, vent openings can be tricky things. They look all nice an regular when covered with a register grating, but look inside and you might possibly find all kind of bent metal and force-fitting operations. Each of the vent openings that got a Ventbot was a little bit different, and each required some cuss-based persuasion to get the register grate back in place after placing the Ventbot fans.

    I made the thickness of my fan brackets 2mm for durability, which I thought was also pretty thin. I didn't count on the tight tolerance between some of the vent openings and the register grate sides. I probably would have made the brackets thinner, or maybe even added an OpenSCAD parameter for a different thickness for that part of the bracket (I will probably still do that for the benefit of others, and to stop the nagging in my brain), except that I had already printed all the brackets twice and had all the fans screwed in place. So, more cussing, and I squeezed things into place.

    When I did my initial testing for temperature triggers, I observed quite a large swing. I defaulted the configurable triggers to the values shown here. The idea was that these temperature extremes would never be reached if the HVAC was not doing it (at least for a house with both heating and cooling HVAC).

      ## CONFIG ##
      # If the temperature is above the high trigger, the vent is blowing
      # heated air. If below the low trigger, the vent is blowing cooled
      # air. Boosting is desired for both cases.
      HIGH_TRIGGER: "85.1"
      LOW_TRIGGER:  "60.5"
    

    Three of my five Ventbots had a "heat on" temperature significantly lower than that and did not turn on when the HVAC blew heat. I haven't observed it yet, but I imagine those same rooms will have "cooling on" temperatures significantly higher than that. I configured those Ventbots to have triggers that were closer together. In at least one case, the new triggers are kind of close to the comfort band temperatures for the thermostat, which means they might be reached without the HVAC being active. On a warm summer day or a chilly winter day, the Ventbot might turn on its fans to accelerate blowing warmer or chillier air into that room. I'm going to let this one ride for a while to see how it goes, but I think that I will most likely eventually change things so that the Ventbots ignore their local temperature sensors and get turned on and off by Home Assistant service calls triggered by events coming out of the smart thermostat.

    One of the side-effects of a Ventbot having a lower HIGH_TRIGGER is that it takes longer for it to decide to turn the fans off. The neutral zone is narrower, so it takes longer to get there. Look at the purple lines in this chart. (Despite the Home Assistant optical illusion, that purple line is for my orange Ventbot. Not my fault.) The top half is tachometer readings for Fan 1. The bottom half is temperature sensor readings, which also illustrate my point about the different peak temperatures for "heat on".

    Finally, when I bought the 12vdc power supply wall warts, the longest cords I could get were just short of 2 meters. That was right on the edge of being long enough for use with my prototype Ventbot, so I also bought a collection of 2 meter extensions with the same barrel connectors. In three of the Ventbot locations, the electrical outlet was pretty close to the vent; in two of those cases, it was on the wall right beside the vent. I could have skipped the extensions in those cases, but the power supplies themselves each had a ferrite bead that made it impossible to push the end through the register grates we have. Doh! I've ordered a few inexpensive register grates that have a different grillwork pattern that I hope resolves this issue, though having a wire passing through the grate is not an elegant look in any case.

  • Tweaking Home Assistant cards

    WJCarpenter05/28/2023 at 03:14 0 comments

    I've been playing around a little bit with the UI for Ventbots in Home Assistant. My Ventbots are named after colors, so I use those colors on the dashboard.

  • Where, oh where, has my little fan gone?

    WJCarpenter05/27/2023 at 23:55 0 comments

    I've mentioned a couple of times that I am using Arctic fans, partly because there is a pretty good price for a 5 pack. For my house, I'm making 5 Ventbots with 3 fans each. That works out to 3 boxes of Arcitc 5 packs. That's how I know I have exactly 15 Arctic fans. Except, now that I am assembling fans into brackets, I can only only locate 14 of them. I can think of no explanation other than someone breaking into my house and taking it away from me (while ignoring all my other treasures) in an attempt to drive me crazy. In place of that 15th Arctic fan, I'm using a be quiet! fan that I bought for testing. It's actually just a tick quieter than the Arctic fans by my own measurement. They're also a bit more expensive than the Arctics.

    Incidentally, the exact model of Arctic fan, the Arctic F9 PWM PST, has been discontinued. The similar Arctic F9 PWM is still available. The difference, as far as I can see, is just the connecting cable. The PST model had a cable to chaining multiple fans together and controlling them all with a single PWM signal. I'm not using that feature, and I originally bought that model because it was the same price as the F9 PWM with a more typical cable. I was just keeping my options open.

  • First whispers

    WJCarpenter05/24/2023 at 01:54 0 comments

    After all this time, it finally happened. I observed my Ventbot going through its paces as a natural reaction to my HVAC. Everything before this was just manual testing.

    We've been having some crazy weather in the Seattle area. Last week, it was near 90F. This week, some days it is not getting up 60F. The smart thermostat controlling our heat pump keeps us in a comfort band of temperature. It's also integrated with Home Assistant so I can see when it's heating or cooling. This week, there is some heating.

    On this complicated chart, there are several things. The solid orange blocks on the top half are when the heat pump is producing heat. The orange line is the temperature sensed in the vent cavity by the Ventbot. The blue(-ish) lines in the bottom half are the tachometer readings from three fans of the ventbot. (The timescale is too coarse to see the ramp-up and ramp-down for the fans.) The important part is that all of those things nicely match each other.

    Yay! It works as designed.

    The other nice thing is that I only noticed the sound of the Ventbot after I was already awakened by my alarm clock. It was audible but not loud, and it didn't wake me up. While I was listening and patting myself on the back, the HVAC reached the end of a heat interval and I heard the Ventbot go through its ramp-down.

    "ventbot-red" is the only Ventbot I have installed. I have 4 more to go. They're all assembled and in their cases, and the fans are all arranged in their brackets. I just have to do the wiring for the BME280 temperature sensors and they'll be ready to place into vent cavities.

  • PCB 4th iteration

    WJCarpenter05/20/2023 at 21:02 0 comments

    It's been a while, but I realized recently that I didn't make a project log for the 4th revision of the PCB that I did in February. The main correction was that the silk screen label for one of the I2C connectors (the 4-pin Dupont connector) had the pin ordering reversed. That wasn't a huge deal since I could just make sure to point it out, but it seemed a little unprofessional. A run of PCBs is pretty cheap if you are not in a hurry to get them. I think it cost me US$12-13 and I got the boards in about 2 weeks.

    I'm sure I did some other little non-critical tweaks, like evening out the exact spacing between like components, but it's been so long that I've forgotten what those other tweaks are.

    For the record, here is the board I am currently using.

  • Options for smarter control

    WJCarpenter05/20/2023 at 20:45 0 comments

    In an earlier project log, I showed the bare bones of integrating a Ventbot with Home Assistant. It's very easy to wire up user interface buttons and other controls to call scripts in the Ventbot's ESPHome firmware. In the time since I started working on this project, I added a heat pump to the house. Along with that came a smart thermostat upgrade. It's an ecobee, but it was chosen by the HVAC contractor as part of a standard bundle. There are lots of smart thermostats on the market.

    The important part in the current context is that there is also an ecobee integration with Home Assistant. Besides telling me the current temperature at the thermostat and allowing me to fiddle with a few configuration settings, it also tells me when my HVAC is either cooling or heating. (The ecobee also has a configuration for how many minutes per hour you want the fan to run, regardless of whether it's heating or cooling. I haven't found that in the Home Assistant integration, but I also haven't pursued it.)

    To make the Ventbot design usable under various circumstances, it can operate completely standalone. An attached temperature sensor reliably detects when there is cooling or heating going on (though the "run the fan for N minutes per hour" can fool it for when heating or cooling turns off). 

    For someone who wants to go to the trouble of integrating with Home Assistant (or any other smart home system), it would be possible to use the smart thermostat's heating or cooling indications to turn the Ventbot on and off. That would be more precise at the cost of a more complex system with more moving parts. The idea is that Home Assistant would receive notifications from the smart thermostat that heating or cooling started or stopped. Home Assistant would then make calls to the appropriate services that communicate with scripts in the Ventbot.

    Once you go to the trouble of integrating with a smart home system, there are other possibilities. The temperature sensor in any single Ventbot could act as a master switch to tell the other Ventbots, via the smart home system, to take action. In fact, you could use a temperature sensor that was completely separate from any Ventbot. You could also use relative humidity readings to make some kind of "comfort" calculation in deciding about turning Ventbots on or off, along with time of day, people home or not, phase of the moon, and so on. (The Ventbot BME280 also has a relative humidity sensor, but it's not reliable for this purpose. The relative humidity inside your ductwork is likely quite different from the relative humidity inside the rooms in general.)

    I haven't done any of the things described in this project log, except for the basic Home Assistant integration I did for debugging purposes. But it's all pretty standard stuff in the home automation arena, so it shouldn't be too difficult. I might make some tweaks and finesses to the scripts on the Ventbots that are callable from Home Assistant, but OTA updates to the Ventbots make that straightforward at some later point.

View all 45 project logs

Enjoy this project?

Share

Discussions

Similar Projects

Does this project spark your interest?

Become a member to follow this project and never miss any updates