 Guido
GuidoThe EBAZ4205 board
The best resources I found to understand how to manage the board are:
STEPS TO CHECK IF THE BOARD IS OK
After 1 month my board arrived from China.
As expected there's no 25MHz crystal for Ethernet but the board is hardware configured not to use it (a Zynq-7000 pin is connected to the 25MHz clock Ethernet chip input).
The JTAG and UART connectors are present.
1. Supply with +12V. It should work as expected in the section "first booting" of https://theokelo.co.ke/getting-starting-with-ebaz4205-zynq-7000/
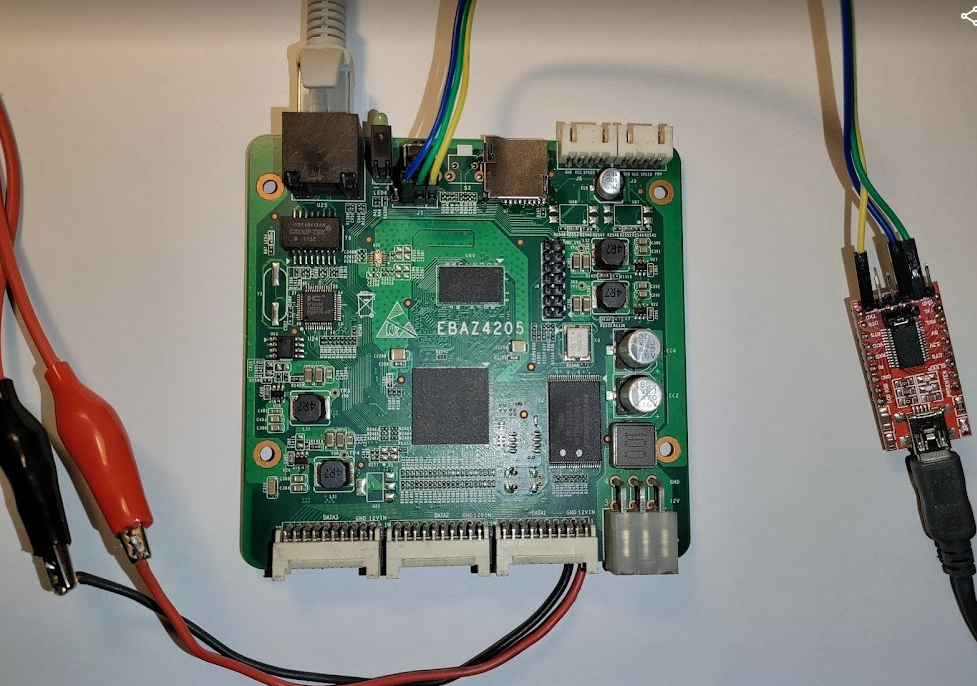
2. See the wirings.
- 3 wires RXD TXD and GND (blue, green and yellow in the picture) to a PC serial port configured at 115200bps, 8 bit, stop bit, no parity
- the 12V power supply directly soldered on the PCB (the 20 pin 2mm connectors will arrive from China at the end of August)
- the Ethernet cable to the home router
3. follow the instructions of xjtuecho/EBAZ4205 at paragraphs:
- "Reset the root password of built-in linux" and
- "Shut down the BTC miner program"
4. Edit /etc/network/interfaces and uncomment only:
auto eth0 iface eth0 inet dhcp
In this way you enable the ethernet port and a DHCP client on it to obtain an IP from your router (You do have a router with DHCP, don't you?)
5. Connect an ethernet cable to the ethernet port and then
reboot
6. I didn't want to buy an expensive JTAG programmer compatible with XILINK devices so I opted for this solution ft2232_to_digilent_jtag that transforms a FT2232 USB double UART into a double device:
- XILINX JTAG programmer
- UART
Now that you successfully checked your EBAZ420 board, you can go on!
PROGRAMMING THE EBAZ4205 WITH XILINX VIVADO
I found it more difficult than expected. VIVADO, VITIS IDE but especially PetaLinux are very powerful and complex instruments and their learning curve is very steep for me.
After many attempts, I managed to get working this Vivado block design, using the HW SW IDE described in the next section.
This block design configure the EBAZ4205 to create a clock generator (8-200 MHz) with a frequency programmable with a linux program. The HW logic, Linux and the programming software all run on the Zynq-7000 FPGA of the EBAZ4205. IMO this project lets me to setup and test all the different aspects (CPU/PS, PL, GPIO, Ethernet, Linux, boot from SD) for much more complex EBAZ4205 / Zynq-7000 projects.
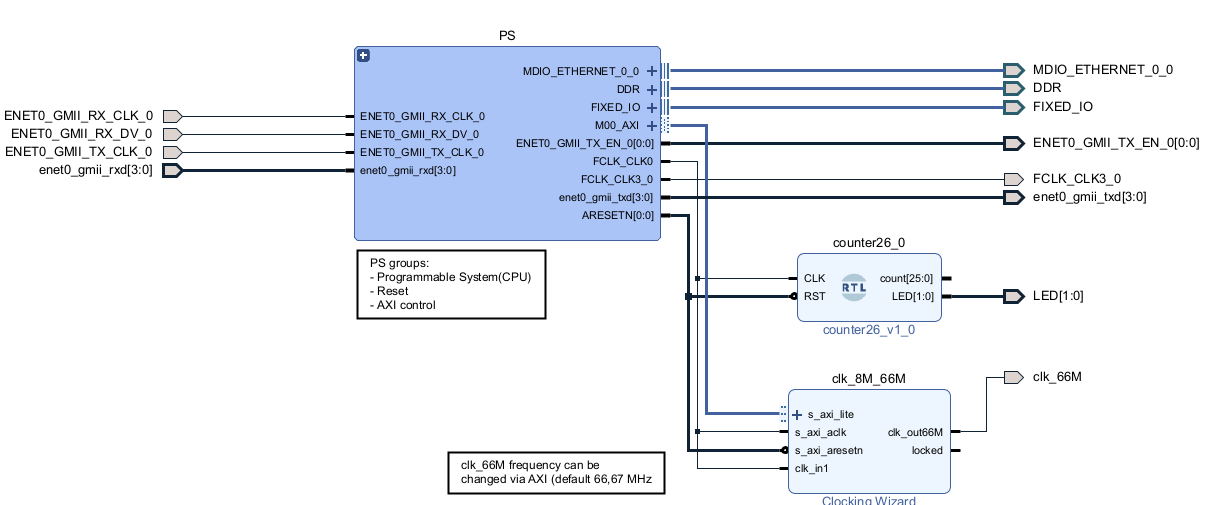
In this design please note that:
- the PS groups the IPs (Intellectual Properties) building the Programmable System logic, i.e. the CPU, the reset block, the AXI block and the Ethernet block
- the PS outputs the 25MHz FCLK_CLK3_0 to the pin U18 that in the EBAZ4205 is connected to the 25MHz Ethernet chip input. Without this clock the Ethernet port won't work!
- the PS outputs the 50MHz FCLK_CLK0 going to:
- a 26 bits counter to divide the 25MHz clock and flash slowly (~0,5 seconds) the two red and green LEDs
- a Clocking Wizard IP (clk_8M_66M) that outputs a programmable clock clk_66M (10 - 200 MHz) using a PLL
- the clk_8M_66M frequency is programmed by AXI. See the connection between the PS M00_AXI and the clk_8M_66M s_axi_lite
GLOSSARY
| NAME | DESCRIPTION | |
|---|---|---|
| PS (Processing System) | The CPUs (yes, they are 2) hosted inside the ZYNQ-7000 chip. In EBAZ4205 it can work alone, but without Ethernet. | |
| PL (Programmable Logic) | The digital logic programmed inside the ZYNQ-7000 FPGA. In EBAZ4205 it cannot work without PS, because the main clock is supplied by PS. | |
| "Standalone" (or "baremetal") app | Some software (written in C or C++) running on the Zynq PS without any Linux operating system. The peripheral drivers (Ethernet, UART, your PL block design, PS/PL interaction ...) are generated by Vitis | |
| Linux app | Some software (written in C or C++) running on the Linux operating system. The peripheral drivers (Ethernet, UART, your PL bloxk design, PS/PL interaction, ...) are standard Linux (user space or kernel space) drivers or can be written |
PROGRAMMING THE EBAZ4205 WITH STANDALONE OR LINUX APPS
The "standalone" mode is not enough for my needs. In fact I will need to run linux programs on a graphic screen (wsjt-x program to decode FT8 and similar). So I need to learn how to install and run the EBAZ4205 with Linux.
I found this useful resources Ebaz4205-petalinux-installation but I preferred to try EBAZ4205 how-to-build because it is newer. In fact it uses:
- Ubuntu 20.04.1
- 2021.2 Xilinx Petalinux to config and buld a custom linux image to be loaded on a SD card to push into the ebaz4205
- 2021.2 Xlilnx Vivado to create a custom hardware configuration, among other things to provide an internal clock to the Ethernet HW on the ebaz4205 when it has no crystal (like mine)
I updated the How to build instructions, inserting a better description of the MicroSD card preparation.
HW SW IDE SETUP
At last, after many attempts I setup this environment.
Please consider that essentially Zync7000 is a FPGA (PL) with a CPU (PS) in a single chip. The CPU can run a linux operating system (using petalinux tools) or run a single application (standalone mode). Anyway to get something useful from Zync7000, PS and PL must cooperate and to understand this cooperation I strongly suggest to view this ZYNQ for beginners: programming and connecting the PS and PL.
To reinforce the mandatory need to program and work with PS and PL together, you must know that in the EBAZ4205 board the unique 33,3 MHz crystal clock supply the PS only and to get a clock for the PL you must "turn on" the PS as well. Besides the EBAZ4205 Ethernet chip has no 25MHz crystal (but you can solder it if you prefer) and therefore the PL must provide a also this 25MHz clock reference for the Ethernet chip.
Hardware setup
Be sure that your EBAZ4205 works perfectly (see "STEPS TO GET THE BOARD UP AND RUNNING " above)
Modify the EBAZ4205 so that it can boot from SD (factory setting is to boot from NAND Flash). See "Booting from the SD Card" here https://theokelo.co.ke/getting-starting-with-ebaz4205-zynq-7000/
Prepare a JTAG / USB and UART / USB converters. The branded Xilinx JTAG programmer is more expensive than the EBAZ425 itself, so I opted for this solution ft2232_to_digilent_jtag that transforms a FT2232 USB double UART into a double device:
- XILINX JTAG programmer
- UART
Software installation
| THE MOST MPORTANT LESSON I LEARNED (UNTIL NOW): DON'T MIX VERSIONS |
| Xilinx Petalinux, Vivado and Vitis must be used all 3 togeher with the same version. Petalinux needs very specific Ubuntu versions, as it creates, configs and builds a linux package. E.g. Petalinux 2021.2 must be installed only on: Ubuntu 16.04.5, 16.04.6, 18.04.1, 18.04.2, 18.04.3, 18.04.4, 18.04.5, 20.04, 20.04.1 (64-bit). I chose 20.04.1 (64 bit). |
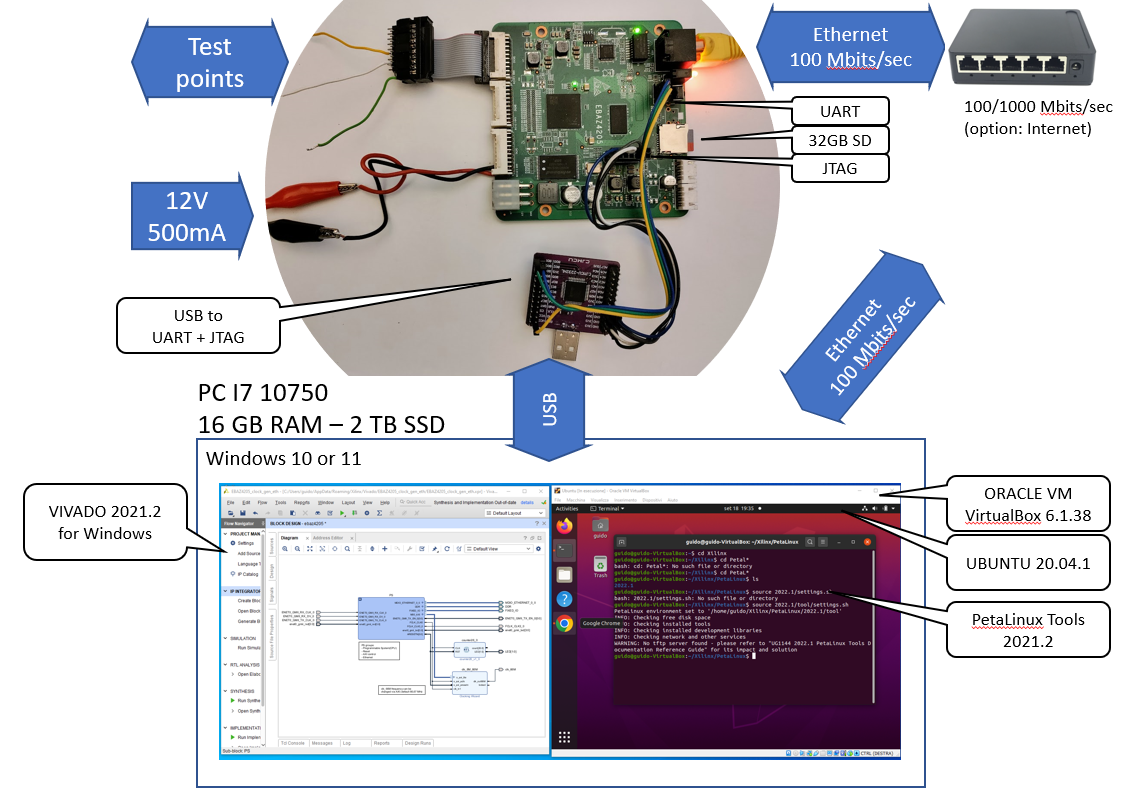
- On my Intel I7 - 16 GB RAM - 2 TB SSD I installed:
- Oracle VM Virtual Box 6.1.38 (set 2 CPUs, 6GB RAM, 100 GB hard disk, 64 MB video memory)
- Xilinx Vivado 2021.2 for WIndows
- PUTTY or a similar terminal console to connect to:
- the EBAZ4205 UART by the USB/UART adapter (115200 bits/sec - 8 bits - no parity - 1 stop bit)
- the EBAZ4205 SSH server by Ethernet
- WinSCP to easily copy files from/to the Windows PC and the Linux running on the EBAZ4205 by Ethernet
- BalenaEtcher or a similar Windows software to flaskìh the MicroSD with the image created by PetaLinux
- On the Oracle VM Virtual Box 6.1.38 I installed Ubuntu 20.04.1 (64 bit)
- On Ubuntu 20.04.1 I installed Petalinux 2021.2
Working Process
Essentially it is composed by the following steps.
- Design a first very basic Vivado block design (PS and Ethernet) and create with it:
- a "bistream"
- a "hardware export"
- Create a PetaLinux project:
- configure it with the "bitstream" and "hardware" export previousy created
- build the PetaLinux project creating the components to flash into the MicroSD card
- package the components (BOOT.BIN, roots and so on) into a single SD image (.wic format)
- Flash the .wic image to the MicroSD using BalenaEtcher
- connect a PC USB port to the USB/UART converter and check the COM port number (in Computer Management)
- connect PUTTY to that serial COM port
- cross your fingers and boot the EBAZ4205 from SD
- Create a VItis Software Platform by Vitis IDE using the previously created "hardware export"
- Create a Linux HelloWorld App, build it and remotely run it on the EBAZ4205 Linux.