 Jerry Isdale
There quite a few alternatives for creating the Pose2Art system. I will review the basic subsystems in this Details section, and go into the implementations of my setup in the Project Logs to follow. This is an ongoing project as we explore what is possible.
My GitHub for the project is https://github.com/MauiJerry/Pose2Art
And, yes, the overall idea of Pose2Art is something that has been done in the past using the Microsoft Kinect, which also includes a depth camera and other cool features. However, the discontinued Kinect and its replacement, the Azure are closed systems. The video and depth streaming (etc) features of these devices are quite powerful and desirable. Future updates of our Pose2Art might add some of these features, AND explore other smart camera functionality
Critique (Nov 2022)
(see Log 5 for planning next level)
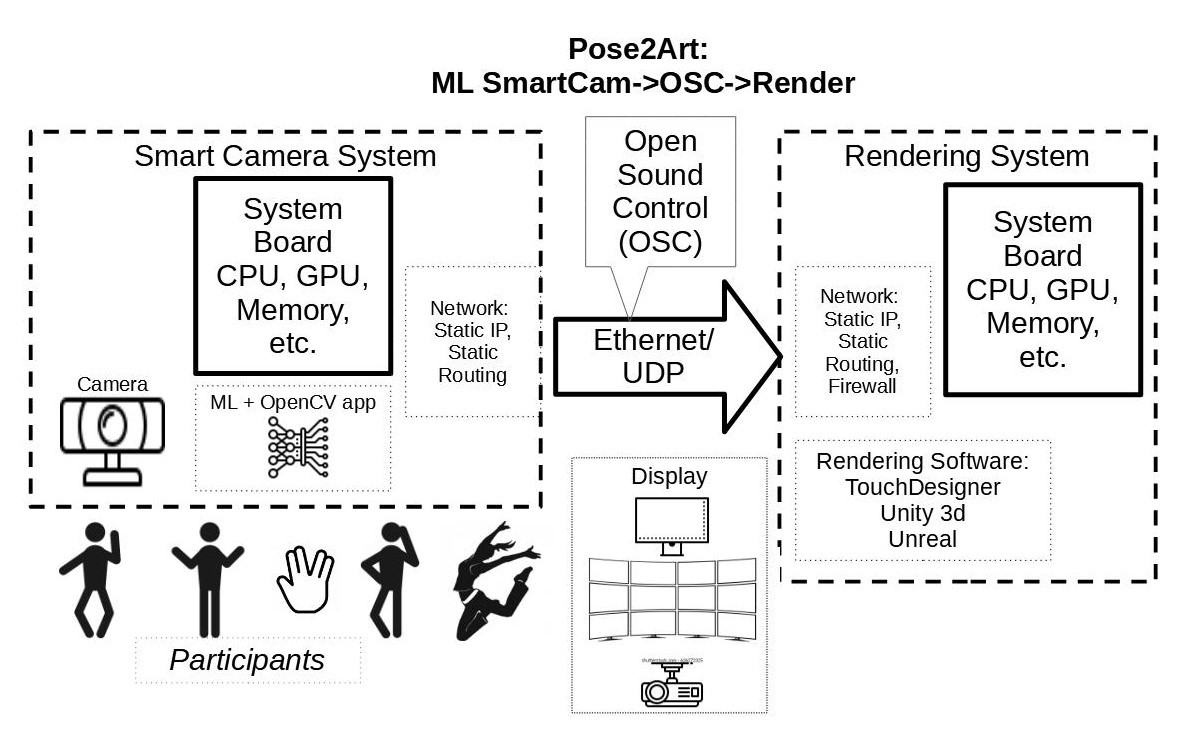
Initially there are 2 Smart Camera hardware for Pose2Art: a PC's webcam and Raspberry Pi 4 (rPi4).
A PC with decent graphics board can do a respectable ML frame rate, with power left over to render some things. I get about 28fps on the laptop/2070rtx i use for TouchDesigner. Alas, the rPi4 gets only about 8-9fps, which is not good enough for interactive work. Hopefully alternative Edge Computing devices such as the Jetson Nano or Coral dev boards will do better..
Meanwhile, we at least have a path for getting ML data into TouchDesigner via OSC. This method could be extended for multiple person tracking (on fast hardware), object detection or other ML processing. The OSC messages will need to change for those new applications, so when you fork this, document them ;-)
And yes, I REALLY need a couple videos here. One quick overview of idea w/demo, and perhaps a more in-depth walk through.
Table Of Contents:
- Example Installations of Related Projects
- Hardware Components
- Smart Camera (aka Edge Computer)
- Networking
- Rendering PC
- Software Components
- Machine Learning Pose Tools
- Edge Computing Software - Linux etc
- Networking - Open Sound Control (OSC)
- Rendering Computer - TouchDesigne
- Project Logs (Listing)
Example Installations of Related Projects
As yet I have not created a public installation using Pose2Art. Definitely need to get some stills and vids here of demos.
Meanwhile, here are some examples of similar system using Pose to drive interactive immersive installations...
Dance with Interactive PoseNet
Motion Tracking Measuring Tapes
Pose Tracking Fitness Applications (ok not an Art Installation, but alternative market for Pose2Art)
Character Tracking with Kinect and Unity3d
Character tracking with Kinect and Unreal
Hardware Components
There are 3 basic hardware components: The smart camera/edge system, the network and the rendering engine/PC.
Edge Computer aka Smart Camera
The Edge Computer part has roughly 3 main components: the system board, the camera, and the case.
I have two system board options in house that are capable of running Video Pose: a RaspberryPi 4 (rPi4) and an Nvidia Jetson Nano Development System. While capable and in hand, the downside of these machines is the cost and availability to replicate. While the rPi4 might list for under $100, they retail now for over $200USD, if you can get them. The Jetson Nano sells on Amazon for about $300US, and Nvidia is moving to new, more expensive Orin, targeting the robotics market. An alternative low cost base system might be the Google Coral Dev Board at about $130, but again supplies are limited. The Nano is the most powerful for DL followed by the Coral with rPi4 about 1/2-1/4 the power.
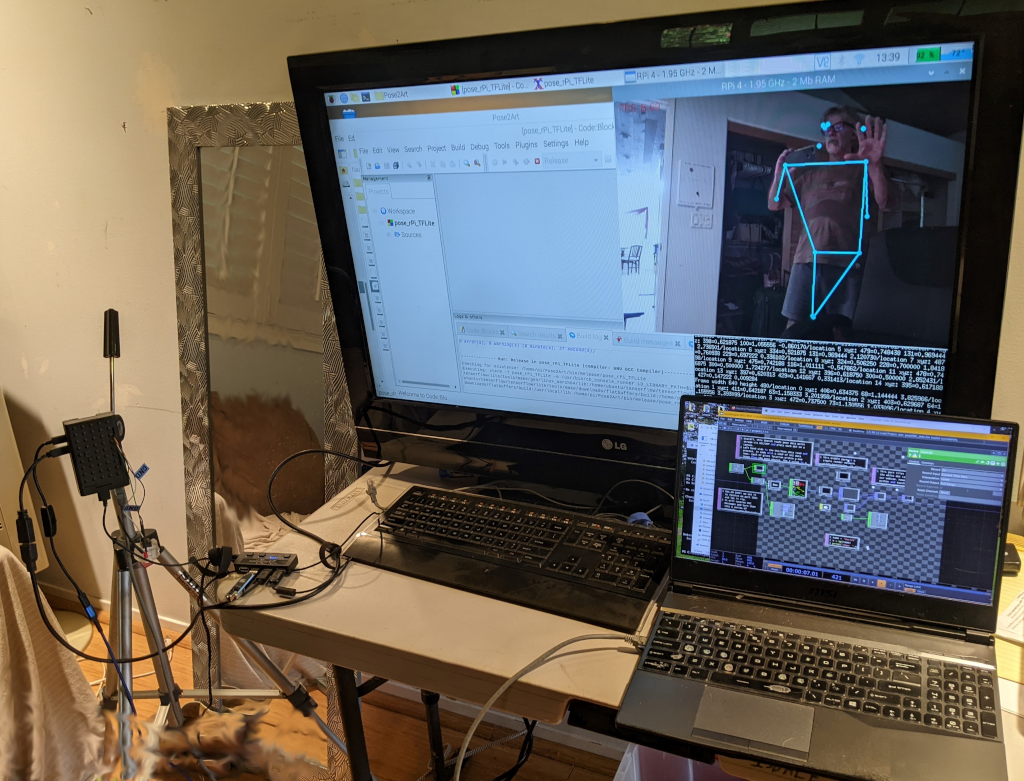
During development, the edge system will greatly benefit from (Need) a nice HDMI monitor, keyboard and mouse. A powered USB hub is recommended for the keyboard, mouse and (optional) usb camera. I recommend adding an in-line power switch for the raspberry Pi, as well as a dedicated power strip for the development setup. Some strips now come with USB-C power out - but be sure they are at least 3.1A 5V capable to supply the rPi+camera. A Pose2Art installation will likely run the rPi 'headless', without monitor etc. We can leave the remote login/desktop) ability available if desired.
All the edge systems can use either a standard USB WebCam or one of the CSI cameras such as the Raspberry Pi Camera or one of the ArduCam products. The vision processing software actually works just fine (better even) with lower resolution cameras. A 5 megapixel camera is quite adequate, and you can buy several for under $20. Be aware of the overhead going thru USB vs the direct CSI connection. Some edge systems (earlier rPi) went with software or low cost/function hardware for USB and this limits the speeds available.
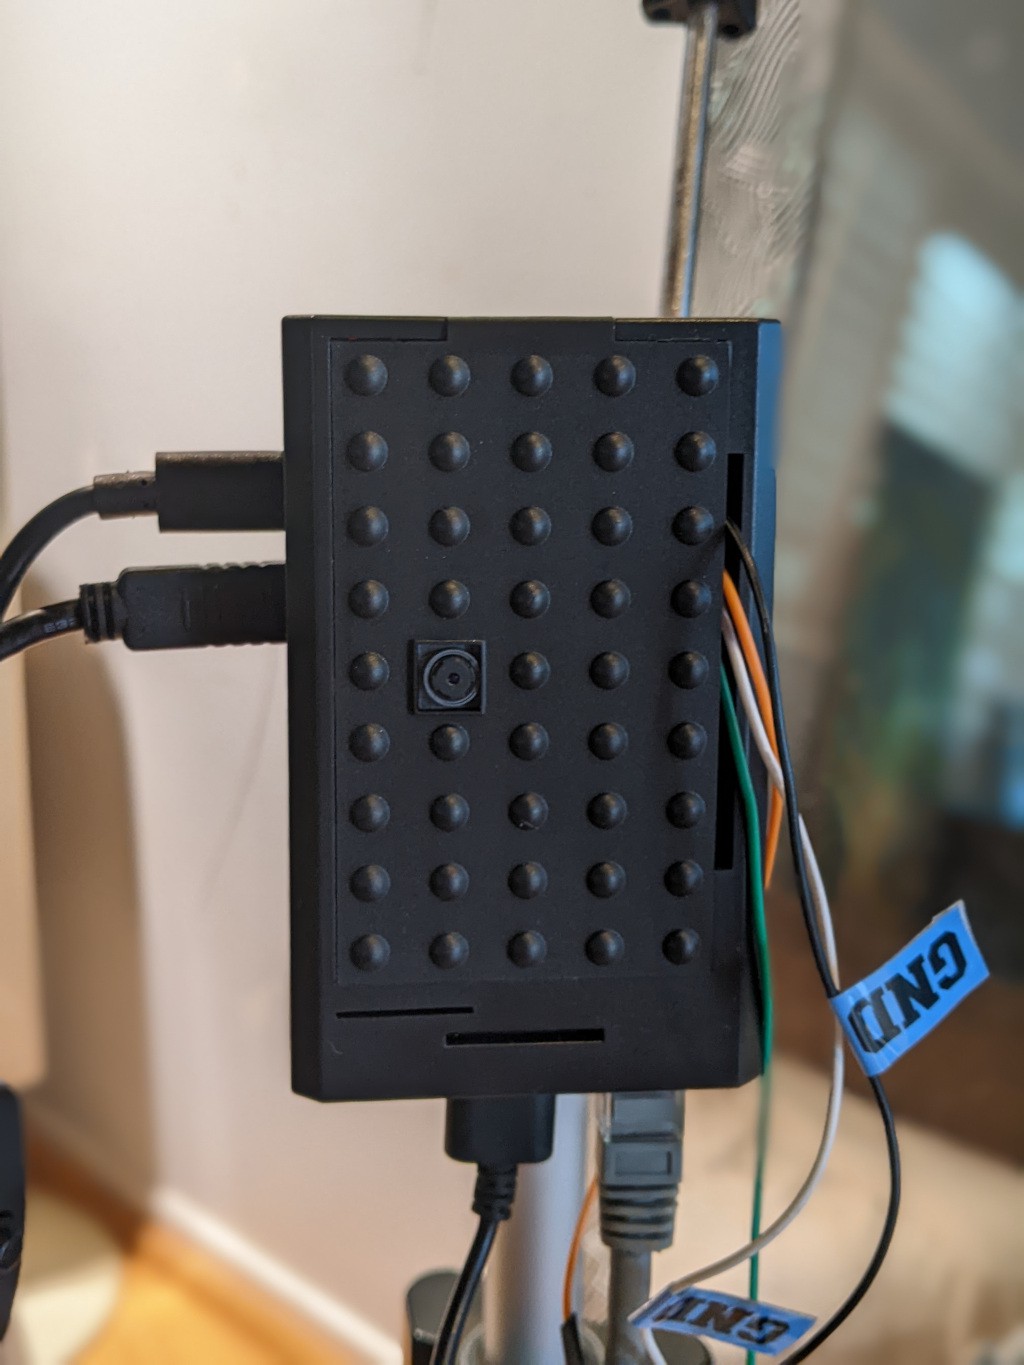
You will also need a housing for the board+camera, preferably one that has easy mounting options. I have several housings but selected this one which holds the camera in the lid and has a tripod screw mount on the bottom. I have am LED and Button attached to my rPi4 but they are not used for this project (yet).
Networking
Networking can be super easy or somewhat complex. I prefer to use hardwired ethernet for installations rather than wifi. Hardwired network eliminates interference from phones, and other systems, as well as providing a bit more security. Our setup only requires internet access for development. It is easy to setup both computers to use a development wifi and disable wifi for installations. A single ethernet CAT6 cable with RJ45 connectors can connect a single rPi4 with the host PC. It used to be necessary to use a 'cross over' cable for such direction connections, but modern Network Interface Controllers (NICs) do not require them. A more complex setup with multiple cameras, perhaps a lighting and sound control setup, would add a high speed network switch. Most of the networking complexity is in setting up the software side.
Rendering Engine (PC, Mac)
The final hardware component will be a relatively powerful PC (or Mac) with a good graphics card (GPU), monitor, keyboard, and 3 button mouse. It should have a wifi and/or second wired NIC for internet access as you will need to download a fair bit of software, as well as this and other tutorials. The system should be powerful enough to run the rendering software (TouchDesigner, Unity3d or UnReal Engine). A sufficiently powerful system can also host (likely has) a local webcam which could be used for Pose (and other ML) processing.
TouchDesigner wiki has a Recommended Systems page. Unity also has a System Requirements page as does Unreal. The 3button mouse (clickable scroll wheel) is essential for TouchDesigner (TD) and quite useful with other software. TD experts often recommend a trackball mouse such as the Logitech M570.
The final display hardware will be dependent on the installation piece requirements. A large HDMI monitor, video wall or are the likely audience facing devices. There are interactive installations that have used similar video input to drive motorized displays of various types. (eg. the measuring tape installation linked above).
Software
Smart Camera Software
The edge computers generally run some flavor of Linux. The rPi4 prototype uses a slightly older version of Linux - Raspberry Pi OS v10 aka Buster (64bit). Upgrading to the newer Bullseye is left for future as it uses a newer camera interface system. Linux software setup can be quite complex with lots of libraries and applications required, with a myriad of dependencies. It is easy to lose days (weeks) to getting the just the right combination running. I found the RPi-image from Qengineering to be the simplest solution. It comes with all the software required for this project (and more). It includes the Code:Blocks integrated development environment (IDE) for C++ but you could use a different one.
Machine Learning Pose Tools
The Pose Estimation software is the main specialty piece that makes the Smart Camera smart. This takes the image stream from OpenCV and runs its ML (aka Deep Learning) Model on it. The results for Pose are a set of points within the image and confidence weights for that landmark location. There are a number of alternatives available based on different Deep Learning engines, and training sets. The underlying engines use advanced 'neural networks' in various topologies, trained with wide range of data - images, text, audio, etc. for many purposes. Parallel floating point math on vectors aka 'tensors' are a key aspect of ML. Fortunately these computations are also key to 3D graphics and scientific computations so hardware has been developed and brought to consumer price levels to handle the work.
Most ML systems are available for Python developers, while some offer other language APIs (eg C++). Some of the tools run on large clusters of powerful servers that train for long periods before being available on similar network servers. Many of the tools support both training and runtime environments. Some can continue to learn and adapt while used in production. A few of these ML systems have been adapted to 'compile' their models down into less power models, often using smaller floating point representation, and even integer math. These models do not require extensive tensor computation units (aka GPU/TPU) and can run on very low power machines. This is often known as Edge or Fog Computing, as it puts the power at the edges of network, rather than requiring transmission of raw data to servers (aka Cloud Computing).
Deep Learning is a huge area of r&d. We wont go into it much for this project, except to note that separating the DL aspect into its own process and machine provides us with powerful modularity. We can change out the DL models without altering the rest of the system (the Art/rendering) as long as the communications remain the same. Some changes may require alterations/upgrades to the comm system to accommodate better features. We will see this in a few project logs.
Initially we are using two different Pose Estimation tools: MediaPipe Pose in Python on PC and TensorFlowLite Pose (TFL) in C++ on the Raspberry Pi 4. MediaPipe uses 33 landmarks while TFL uses on 17. There does not appear to be a compatible version of MediaPipe for the rPi4, perhaps due to the processing power of that device. TFL is intended for such low powered machines, especially using the C++ version. Both our tools use OpenCV to handle the camera capture, rescaling and generic image processing.
TensorFlow from Google is the one we selected mostly because its runtime TensorFlow Lite runs fairly well on the Raspberry Pi 4. The Lite version is runtime only. It does not support training. Instead a Model is trained on the full TensorFlow system using either a very powerful GPU PC or a cloud system. This trained model is 'compiled' and loaded into the Lite runtime to process images. TensorFlow provides examples of how to use the Pose Estimation
models - including source code for Android, IOS and javascript. There are store apps available for both Android and IOS phones that show off the basic power of the system. You can even try it out using a webcam/browser demo. Unfortunately the provided Python demo is too slow on the rPi4. Fortunately Q-engineering has included a C++ version that gives 7-10fps.
Networking Software - OSC Messaging
The networking software provides the data transport between the edge and rendering systems. There are lots of options and complex details involved in such software. I tried to keep it simple, but it is easy to get lost in details and options. The configuration underlying OS services for networking (addresses, routing, firewalls etc) require a few steps and is dealt with in a project log to follow this introduction.
For the pose data, I used Open Sound Control (OSC) messages. OSC is an open system designed for real time messaging. Libraries are available for C++ and Python (and other languages. OSC runs on the connection-less UDP internet protocol and is quite suitable for installations such as Pose2Art. A bit of searching turned up options of existing libraries that implement OSC: I chose Liboscpp for C++ and python-osc for python.
While Open Sound Control (OSC) is a very useful data protocol specification, it does not provide standards for particular data uses. It does define the basic format of a message but leaves the naming up to particular implementations. Applications need to decide (and document) the messages they use consistently on both ends of the conversation. Note the message is a combination of string and binary data. The Message Address is a string begining with '/' (slash).
For this round, there are 4 basic messages. Three special messages send the integer data for image_width, image_height and numLandmarks (different Pose systems use different landmarks). Each of the landmark gets 3 messages that begins with '/landmark-' followed by the landmark number and '-x', '-y', '-z' and ending with binary data. X and Y use floating point coordinates (0.0-1.0) within the image and Z is a floating point number indicating the 'confidence' the xy data is correct. For example:
/numLandmarks (binary integer)
/image_width (binary integer)
/image_height (binary integer)
/landmark-0-x (binary float)
/landmark-0-y (binary float)
/landmark-0-z (binary float)
/landmark-1-x (binary float)
/landmark-1-y (binary float)
/landmark-1-z (binary float)
MediaPipe defines 33 full body pose landmarks so each frame will have 69 /landmark messages. The C++ application uses TensorFlowLite's Pose with 17 landmarks. There are other systems that can track multiple people which would require including the target id in the address, or as part of a Bundle path (see the OSC specification). It isnt clear if TD can handle bundles, from my reading the documentation on OSCIn. I havent tested it, yet.
Rendering Computer Software
The prototype system uses a Windows 10 PC with Derivatives powerful TouchDesigner (TD) software. I also have Unity3d and Unreal which can be driven with OSC pose data. Hopefully, I will show Pose2Art setup for those in a project update log later.
TD is primarily a visual programming system for audio and visual applications. While Python and C++ are available for experts, most developers will use the visual programming interface connecting boxes with lines. The folks at Interactive Immersive HQ are the best 3rd party source for information on TD. I heartily recommend their site for both free and paid pages. While $140/mo (roughly) is expensive for dabbling, their videos and blogs are well worth the price for professionals. If you are just getting started with TD, watch their Crash Course videos, then browse their blogs and other free videos. Subscribe to their newsletter and get updates about 50%off deals occasionally.
For programming on Windows, I switch between Visual Studio Code and PyCharm. Both run on linux as well as Windows (and Mac), which makes life a bit simpler when doing multiple system development. VSCode supports a wide range of languages, while PyCharm is mostly for Python.
Next Steps - Setting up the Systems
The Log pages to follow will discuss how to setup the various systems and detail the software setup etc. It seems Hackaday displays logs most recently added first, which is opposite of how they need to be read. So i named them with Log #: so you can read them in proper order.
(note; initial log 3 may need to be split up. OSC messaging and Pose Estimation could be explained in more detail above, or in logs?)
- Log 1: Linux and Windows Software Setup
- Log 2: Networking Setup: Static IP, Routing and Firewall
- Log 3: PC Code - Python and TouchDesigner
- Log 4: Raspberry Pi C++ Pose to OSC
- Log 5: It Works! Sorta. Plan Phase2