 Jerry Isdale
Now that we have installed the software (Log 1) and setup the networking (Log2), lets try a PC-only pose-OSC-touchdesigner project. In the Pose2Art project (downloaded from GitHub) are two files I copied/renamed from my fork of Cronin4392's TouchDesigner-OpenCV-OSC project. The python tool pose_PC_MediaPipe.py uses OpenCV, MediaPipe and Python-OSC to capture the images, extract 33 pose landmarks and send them as OSC Messages to 10.10.10.10:5005. It also shows the landmarks and skeleton lines in an OpenCV window. The TouchDesigner poseOSC_dots.toe reads the OSC messages and displays them as dots.
Aside from name changes, I added the three frame message sending to the python tool and did some other changes to Cronin4392's original. The toe file got bunch of documentation in TextDATs, and a little bit of functional change.
Python Code:
The python tool (pose_PC_MediaPipe.py) captures the image, runs the pose extraction model and then sends the data via OSC. It uses MediaPipe to do the pose extraction. MediaPipe is a cross-platform, Machine Learning (ML) tool for live and streaming media, It identifies 33 landmarks including face, hands, torso arms and legs. These are sent as 69 OSC messages, with x, y and z (confidence) for each landmark. There are also three messages for image_width, image_height and numLandmarks sent each frame. The tool uses a MediaPipe function to draw the skeleton connections onto the original image, and OpenCV's circle to draw the dots before it uses OpenCV's imshow() to display the preview image. Note that the Y values need to be flipped and aspect ratio adjusted to match what TouchDesigner expects.
# modified from orig: new URL, added OSC msgs for image h,w, numchannels
# forked from https://github.com/cronin4392/TouchDesigner-OpenCV-OSC
import cv2
import mediapipe as mp
from pythonosc import udp_client

# Create our UDP client which we'll send OSC through
# Change the URL and port to whatever fits your needs
# mauiJerry: use our PC's static ip in prep for running on Raspberry Pi
UDP_URL = "10.10.10.10" #"127.0.0.1"
UDP_PORT = 5005
client = udp_client.SimpleUDPClient(UDP_URL, UDP_PORT)

# Initialize some mediapipe stuff
mpPose = mp.solutions.pose
pose = mpPose.Pose()
mpDraw = mp.solutions.drawing_utils

# Initialize our video source. It can be a file or a webcam.
cap = cv2.VideoCapture(0)
# cap = cv2.VideoCapture('dancing.mp4')

# Helper function to normalize direction and scale of y axis for TouchDesigner
def adjustY(y, w, h):
    return (1 - y) * (h / w)

num_landmarks =0
while True:
    success, img = cap.read()
    imgRGB = cv2.cvtColor(img, cv2.COLOR_BGR2RGB)
    image_height, image_width, _ = imgRGB.shape
    results = pose.process(imgRGB)

    if results.pose_landmarks:
        # first time, count number of landmarks pose model finds
        if num_landmarks < 1:
            # how do we get len/size of landmarks?
            for id, lm in enumerate(results.pose_landmarks.landmark):
                num_landmarks = num_landmarks+1
        # draw landmark connection lines (skeleton)
        mpDraw.draw_landmarks(img, results.pose_landmarks, mpPose.POSE_CONNECTIONS)

        client.send_message(f"/image-height", image_height)
        client.send_message(f"/image-width", image_width)
        client.send_message(f"/numLandmarks", num_landmarks)
        print("height, width, num marks", image_height, image_width,num_landmarks)

        for id, lm in enumerate(results.pose_landmarks.landmark):
            x = lm.x
            y = lm.y
            z = lm.z

            # Send our values over OSC
            client.send_message(f"/landmark-{id}-x", x)
            client.send_message(f"/landmark-{id}-y", adjustY(y, image_width, image_height))
            client.send_message(f"/landmark-{id}-z", z)

            # Draw circles on the pose areas. This is purely for debugging
            cx, cy = int(x * image_width), int(y * image_height)
            cv2.circle(img, (cx, cy), 5, (255,0,0), cv2.FILLED)

    cv2.imshow("Image", img)
    cv2.waitKey(1)
TouchDesigner Code
The TD project is distributed as a '.toe' file. When you open it you should see the default view is the network editor layout, showing the main level. The boxes are OPerators with lines connecting them to show data flow and dependencies. I heartily recommend watching the TouchDesigner Beginner Crash Course playlist from Interactive & Immersive on YouTube to get up to speed with TD. Their public youTube channel is full of amazingly helpful, well produced videos. When you want to go deeper into TouchDesigner (and related tools), consider their training and certification program HQ Pro.
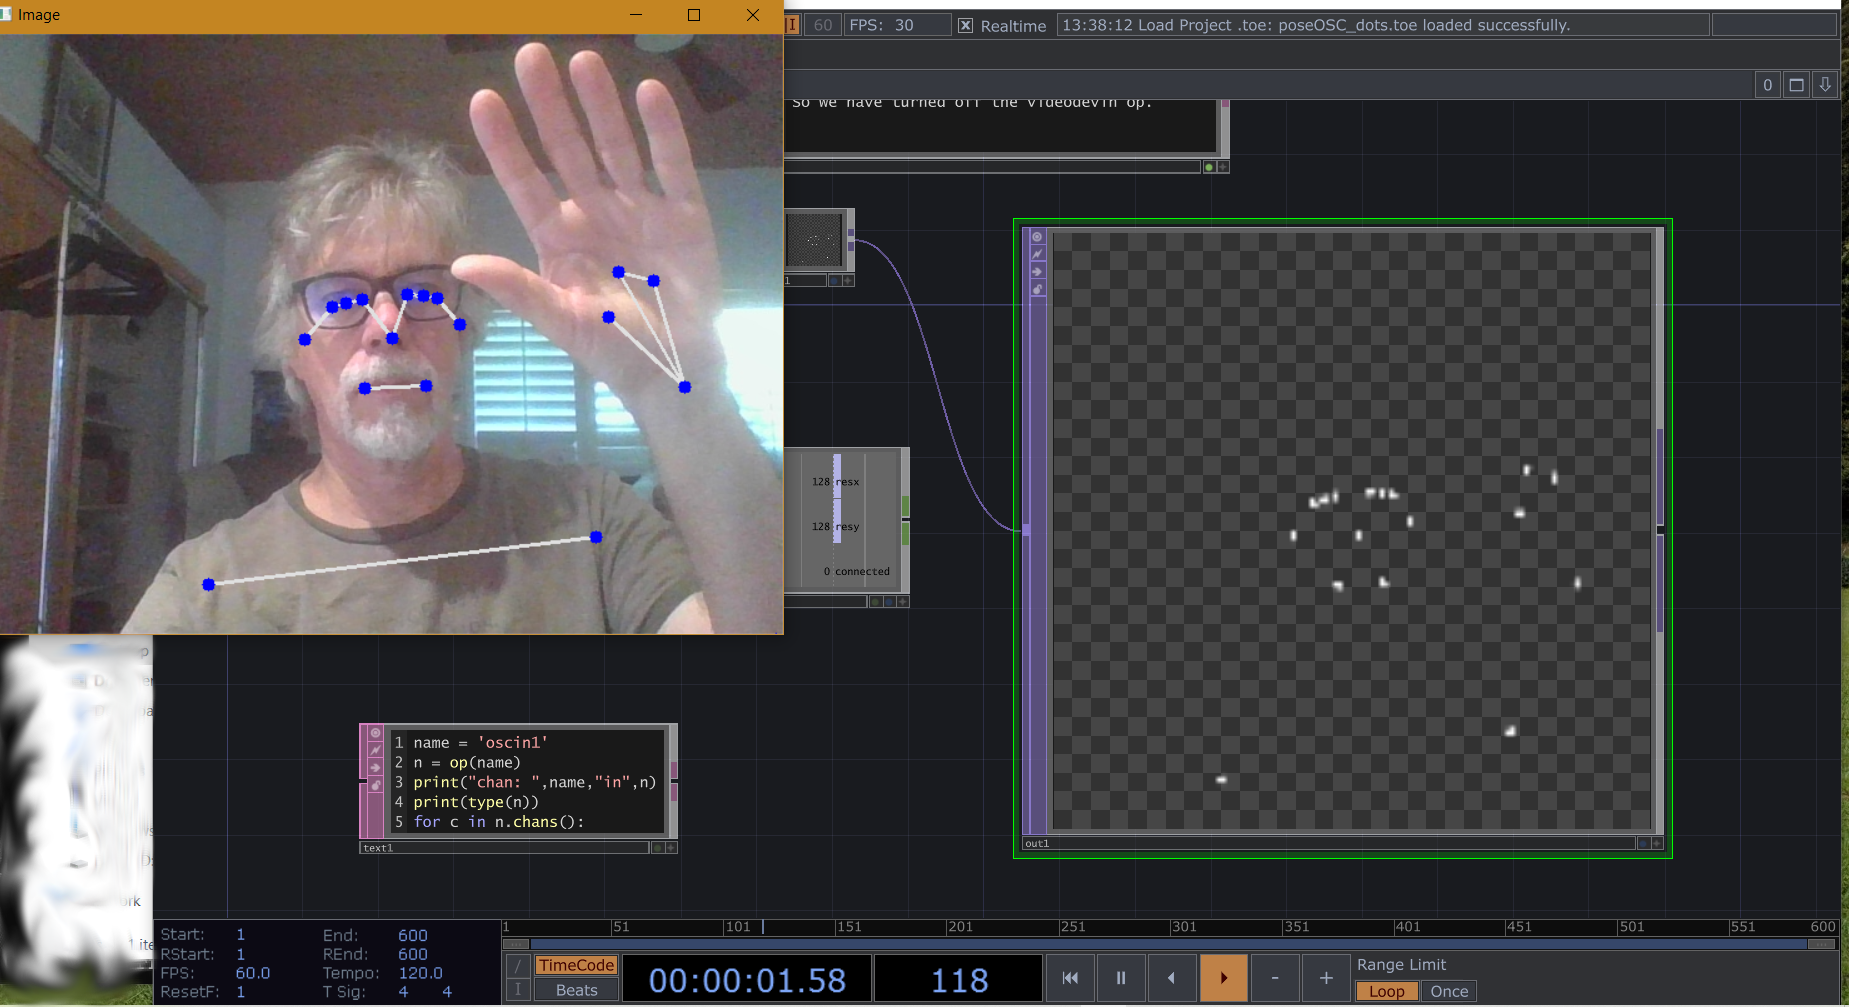
When you open 'poseOSC_dots.toe' with TD, it should look something like this:
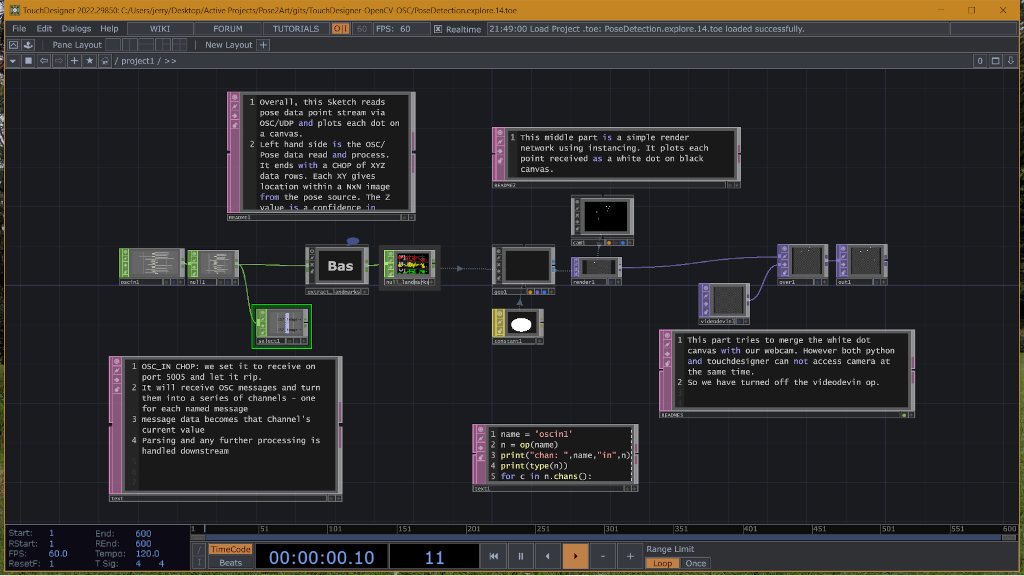
The main data flow is in the boxes across the middle. The magenta edged boxes are Text DATs that mostly contain comments about the application. The center bottom Text DAT holds a small bit of python code that will print out all the channels (osc message type tags) that are received by the OSCIn1 CHOP. Matthew Ragan has a good video on how to use the Textport to view python print statements
As the comment TEXTDats note, the OSCIn CHOP reads the incoming OSC messages. These flow into the 'Bas' (extract_landmarks) container, which massages the data into a stream of XYZ data. These 3 channels are used to render dots at the XY locations of landmarks on an image the size of the camera input. The right side of the network would show the webcam image overlaid by the dots, if there wasnt an access conflict. Double clicking on the Bas Container OP opens this layer to show the OSC data manipulation.
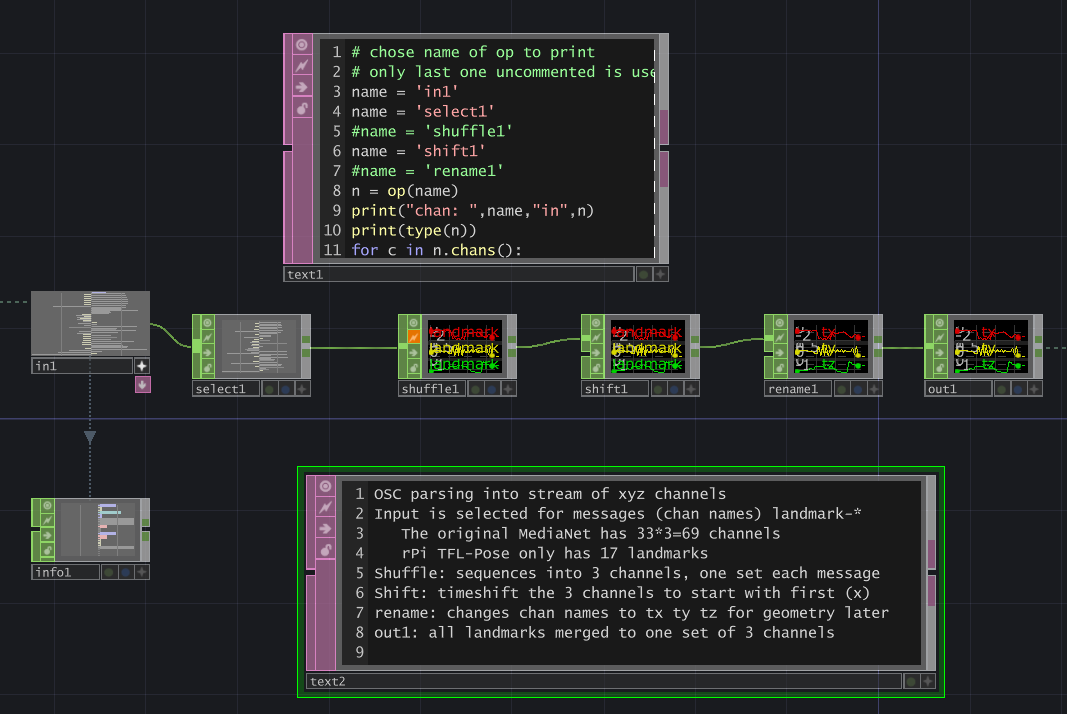
Again the Text DATs hold either python code or comments while the other OP boxes modify the data streams. Basically the container selects OSC messages with tags beginning '/landmark-' (the 69 landmark channels). These are reduced by the 'shuffle' chop into 3 channels, time shifted so each set of 3 happens at same step, and finally the channels are renamed to 'tx ty tz'. The out1 chop outputs the channels back to the parent flow. The python in text1 op can be used to inspect the channel names in each of the chops.
Discussions
Become a Hackaday.io Member
Create an account to leave a comment. Already have an account? Log In.