Close
0%
0%

Otto DIY+

"Otto DIY with steroids" Arduino powered bot - the ultimate tool for STEAM education

Similar projects worth following
Truly open source nature of Otto allows open STEAM education, we collect feedback from different workshops and schools around the world that are already using Otto DIY in their classroom and depending of the openness of this educational places we organize the lesson material and share as well, some people are teaching electronics explaining the connections with fritzing and the physics behind, other code with Arduino then github, other to create open source APPs in app inventor, other how to design 3d models with accessories for Otto with tinkerCAD or Fusion 360.

Otto DIY+ would be the advanced version of original #OttoDIY, the idea is to have the same base features + Bluetooth control and programming + metal gear servo motors MG90 + rechargeable battery + modes activation + sensors + RGB light moods + vibrators + facial recognition camera +...? This is a more advanced version requires some expertise and patience, if you want to start slow as a beginner please go to Otto DIY project

Even do all biped robots are very similar is of course because of their nature, i haven't seen any other bigger and broader family of opensource robots like in bipeds or in the "opensource hardware world". In Otto DIY we encourage people to copy us, remix and redesign like Chip-E did, even some people ask us if they can produce and sell Otto by themselves, for us the most important is to keep the creative commons license unfortunately we always find people that keep knowledge for themselves. 

How is Otto different/better?  "Through clever use of low price off-the-shelf hardware, and with a press-fit mechanical design". All electronics parts are out of the shelf and are very easy to buy basically everywhere; we don't try to create some sort of business strategy so people can buy from only one source. (that is not real opensource!)

For more info check this presentation made in Xi'an China Maker Faire the journey of Otto

Inline image 1

Nevertheless we love to add features! and this the Otto builders (as we call the community makers) already helped to develop:

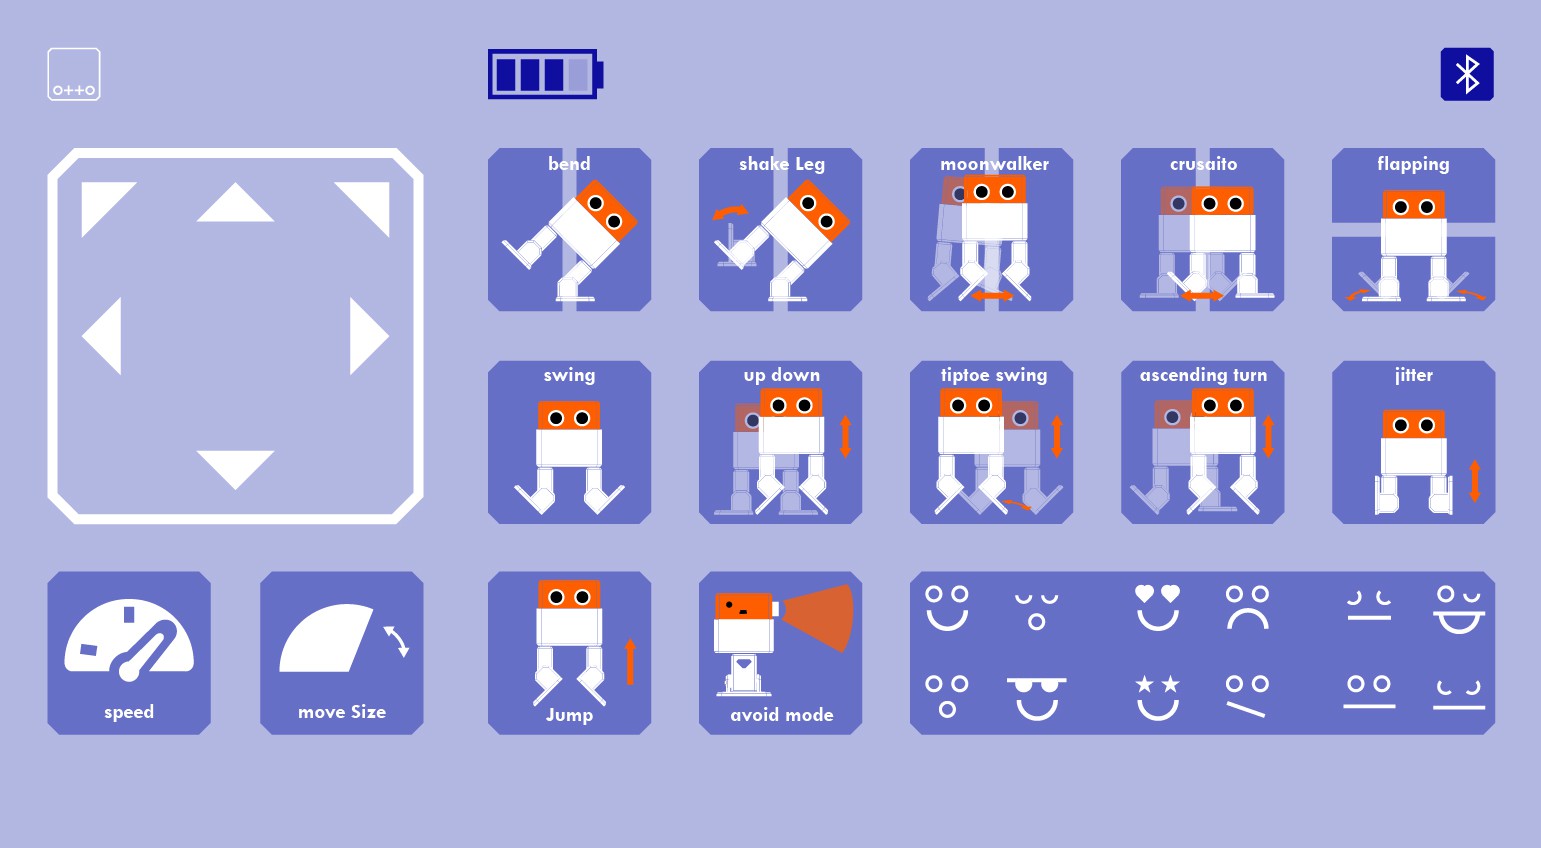
You can add very cheap Bluetooth module for few bucks and you will be able to use apps created by the community like this one or even the same Zowi app is compatible:

and the list will continue...

We are almost going to publish Otto DIY+(PLUS) which will have all Otto DIY features + some improvements for more advance coders + directly play with Bluetooth + more sensors.Please note the difference between Otto DIY (green) and Otto DIY+ (orange) we Fix this color only for brand reasons but actually Otto builders can decide which color use and even mix the features between them.

Otto DIY+ would be the improved and advanced version of original #OttoDIY, the idea is to have the same base features DIY robot + Bluetooth control and programming + metal gear servo motors + rechargeable + changing modes by touch sensor + sensors + light moves + other outputs +...?

Inline image 2The exciting part is that we are doing open development with makers and hackers around the world so we are open to ideas, not only from experts you can join us with , feedback, social share, testing or any other contribution that you might think of.

OTTO PCB ver1.zip

Custom PCB (optional)

x-zip-compressed - 120.52 kB - 07/24/2017 at 07:13

Download

Standard Tesselated Geometry - 243.05 kB - 06/22/2017 at 07:50

Download

Standard Tesselated Geometry - 249.11 kB - 06/22/2017 at 07:50

Download

Standard Tesselated Geometry - 287.39 kB - 06/22/2017 at 07:50

Download

Standard Tesselated Geometry - 351.25 kB - 06/22/2017 at 07:50

Download

View all 6 files

  • 1 × Arduino Nano
  • 1 × HC-06 or HC-05 Bluetooth module
  • 1 × Arduino Nano Shield I/O You can use a mini breadboard but much more cable work
  • 1 × USB-A to Mini-USB Cable
  • 4 × Micro servo

View all 12 components

View all 4 project logs

  • 1
    First gather all parts and tools

    1 × Arduino Nano 

    1 × HC-06 or HC-05 Bluetooth module 

    1 × Arduino Nano Shield I/O You can use a mini breadboard but much more cable work 

    1 × USB-A to Mini-USB Cable 

    4 × Micro servo 

    1 × Buzzer 

    10 × Female/Female Jumper Wires 

    1 × 3.7 V LiPo Battery 

    1 × Touch sensor 

    1 × RGB Led 

    1 × Dot matrix display MAX7219optional for the mouth 

    1 × 8x8mm Micro Switch Self lock On/Off

  • 2
    3D print settings
    1. Recommended to use a FDM 3D printer with PLA material. 
    2. No need supports or rafts at all. 
    3. Resolution: 0.15mm 
    4. Fill density 20%
  • 3
    Rechargeable Battery

    "lipo battery, 500 mAh, with step up converter it danced continuously for 40 minutes before battery run out"

    Arduino Nano with micro USB connector - i removed  diode from it and soldered a wire from it to lipo charger so it only charges from usb and can be programmed via usb but can't be powered from it. But programming is a problem since BT is connected so maybe i will remove connector, plug the hole and use the connector from lipo charger for charging and BT for programming

    • Metal gear servos
    • 2 switches - had to add 2 pull down resistors 10 kohm
    • Mic
    • 5V buzzer
    • MAX7219 Dot matrix display - having some memory problems when using it so arduino resets by itself
    • HC-05 bluetooth module - had to add 10 microF capacitor on reset line so i can program it over BT
    • 500 mAh lipo battery
    • Lipo charger board
    • Step up converter

    With 4x AA 1.5V Energizer can only run about 1 hour and then HC-06 not running

    Programming

    • An easier way for programming faster and less drivers or software trouble some like Arduino IDE
    • Still can be something like Scratch or Bitbloq graphical coding
    • Something tangible like Google bloks
    • App like cousin Zowi trough Bluetooth
    • Anything to control the robot in and more fund and friendly way, up to you.

    Electronic design

    • Custom made PCB for Otto, (now we use 2 boards that could be replaced by one with more functions like battery, integrated buzzer and microphone)
    • More sensors interactions like poking, tilting or clapping.
    • Emotional aspect how can be more than just a robot?

View all 7 instructions

Enjoy this project?

Share

Discussions

Camilo Parra Palacio wrote 12/14/2016 at 01:14 point

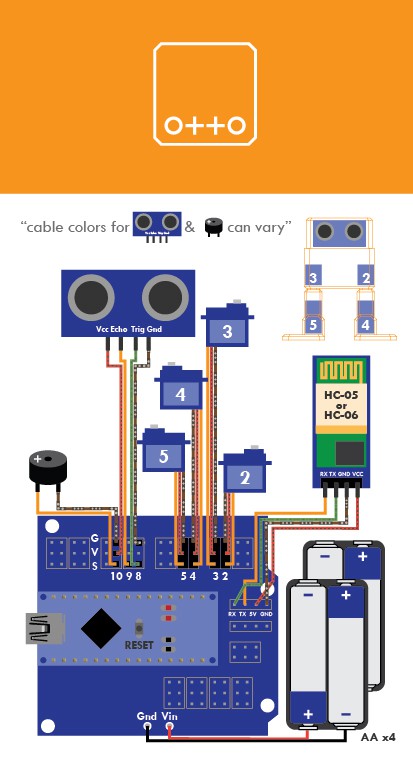
HC-06 or HC-05 module is cheap and easy to setup sometimes... Maybe can use the same modulo to receive voice commands form smartphone

  Are you sure? yes | no

jfmateos wrote 12/14/2016 at 06:30 point

That is a goog idea Camilo. I have a few hc-05, so will try to get sometihing ready with App Inventor this weekend. 

  Are you sure? yes | no

jfmateos wrote 12/12/2016 at 17:14 point

Features brainstorming:

- Bluetooth (phone/tablet control)

- WiFi (Internet of Things device)

- Infrared (Otto2Otto communication and TV remote control)

- Rfid (communication with other devices/cards)

- Push buttons (Beebot functionality)

- Microphone (envelope detector to get sound level, and band pass filter to get frequency equalizer)

- RTC (DS3231 or similar battery backed)

- Enviromental sensors (Light, Temperature, Humidity, Pressure... and CO2)

- Magnetometer (navigation)

- Mouth LED Dot Display (6x17 or 7x22)

- Tri-color LEDs (body lighting)

- Custom PCB

- Power requirements

- ...

  Are you sure? yes | no

Camilo Parra Palacio wrote 12/13/2016 at 01:07 point

I like all Juan!

Also we need to thing in easier ways of programming like:


-Already we can use Bitbloq.

-Look how to use Blockly-duino, Ardublocks or ScratchX (graphical programming) 

-Using same Infrared

-Use Bluetooth with APP inventor

  Are you sure? yes | no

jfmateos wrote 12/13/2016 at 10:45 point

plus SPI SD card for storage... and text to speech (S1v30120)
Have you already selected any bluetooth module? Or any other devices for Otto plus?

  Are you sure? yes | no

Similar Projects

Does this project spark your interest?

Become a member to follow this project and never miss any updates