The Raspberry Pi is a versatile and affordable single-board computer that can be used for a wide range of projects. However, one of its limitations is that it doesn't have a built-in real-time clock (RTC) to keep track of the time, even when the device is powered off. To overcome this issue, it is necessary to sync the time from the network, which ensures that the time is accurate and consistent across all devices connected to the same network.

There are several methods and devices available in the market like USB RTC from SB Components for syncing time on your Raspberry Pi, Rock SBC, etc, also can sync from the network on the Raspberry Pi, using NTP (Network Time Protocol), a protocol that is widely used for synchronizing the clocks of computers over a network. In this blog post, we'll look at how to set up NTP on the Raspberry Pi and how to keep the time accurate even when the device is offline.
Step 1: Install the NTP package
The first step in syncing the time from the network is to install the NTP package. This can be done using the apt-get command in the terminal. To install NTP, open the terminal and enter the following command:
sudo apt-get update
sudo apt-get install ntp
This will download and install the NTP package, which includes all the necessary software and utilities to sync the time from the network.
Step 2: Configure the NTP server
Once the NTP package is installed, you need to configure the NTP server. The NTP server is responsible for keeping the time accurate and up-to-date. To configure the NTP server, you need to edit the ntp.conf file, which is located in the /etc/ directory. To edit the file, enter the following command in the terminal:
sudo nano /etc/ntp.conf
In the ntp.conf file, you'll see a list of NTP servers that are used by the NTP client to sync the time. By default, the Raspberry Pi uses a pool of NTP servers, but you can also specify a specific NTP server if you prefer. To do this, simply uncomment (remove the # symbol) the server line and enter the IP address of the NTP server. For example:
server 192.168.0.1
Once you've made the necessary changes, save the file and exit the editor.
Step 3: Start the NTP service
Once the NTP server is configured, you need to start the NTP service so that the time can be synced from the network. To start the NTP service, enter the following command in the terminal:
sudo service ntp start
This will start the NTP service, which will run in the background and sync the time from the network. To check the status of the NTP service, you can use the following command:
sudo service ntp status
Step 4: Keep the time accurate when the Raspberry Pi is offline
Although the NTP service can keep the time accurate when the Raspberry Pi is connected to the network, it can't do so when the device is offline. To keep the time accurate when the device is offline, you need to use a USB RTC Dongle battery-backed RTC module.
An RTC module is a small device that contains a real-time clock and a battery, which ensures that the clock continues to keep time even when the Raspberry Pi is powered off. To use an RTC module with the Raspberry Pi.

 Ashwini kumar sinha
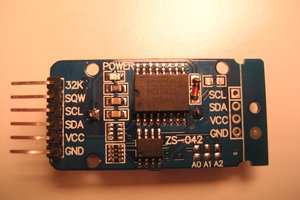
 AlfredC
 Frederick
 Ken Yap