Close
0%
0%

XL Robot trainer kit

Low cost, large format teaching platform for High School robotics teams

Similar projects worth following
Learning to build robots is best done through hands on learning, but large robots used in First robotics competition are very expensive ($2400 just for a functional drive base). A team might have 30+ students, but only have 1 robot to work on, causing most students to not actually spend much time building the robot. Additionally, it can be a challenge for adult mentors to implement effective lesson plans.

This goals of this project is the following

- design a robot chassis that is 10X cheaper than the current standard kit chassis
- provide build instructions for the chassis
- develop accompanying lesson plans to be used by mentors

Background

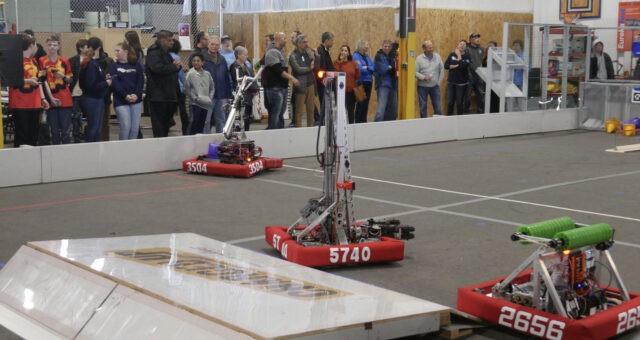
FRC (First robotics competition) is a High School program built to promote STEM education. The students build 120lb robots to compete in a new challenge every year. The robots themselves cost thousands of dollars so each team typically only builds one. I want to provide a cheaper alternative to allow for more hands on learning and development.

This project has two main objectives:

  • Create a large format, low cost kit
  • Teach students skills they need to build competitive FRC robots

Skills to be taught:

  • Safe use of power tools
  • Read and understand part drawings
  • Assembly practices and trouble shooting
  • Basic electricity concepts (Voltage, Current, etc…)
  • Wiring
  • Basic drive code using WPI library

See update log #1 for what the initial lesson plans would be.

Kit components

The following describes the target components to be used
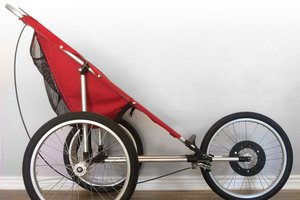
Frame

  • 24"x 27" frame built with 2x4s
  • Easy, cheap, sturdy. Components needing higher precision will be 3d printed
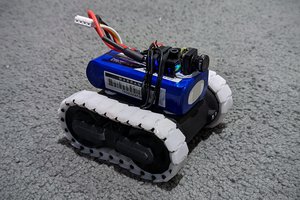
DriveTrain

  • 4 4" wheels on deadaxle
    • Dead axle referring to the wheel spins on the axle and not with
    • Axles are 8mm to make It easy to switch to using cheap 608z bearings later on
    • Axle supports are 3d printed brackets
    • Have not tested turning on carpet, may need to switch to 6 wheel drop
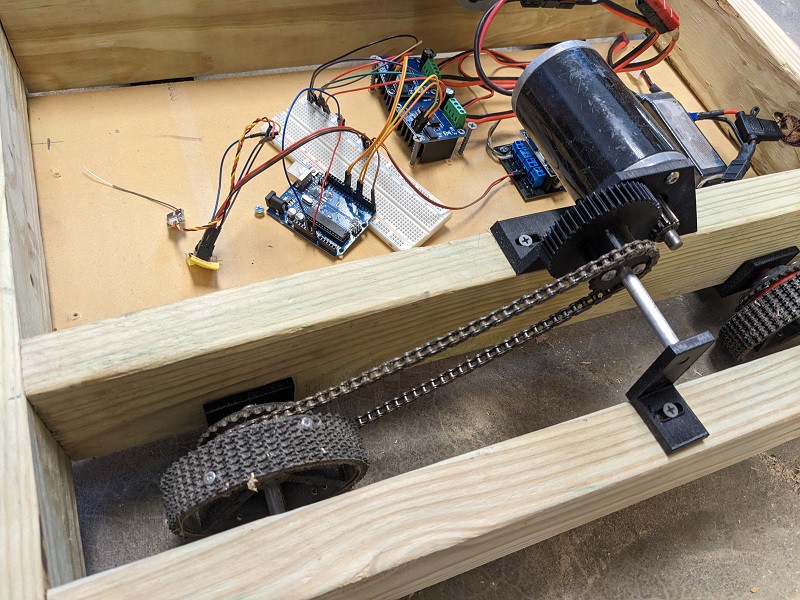
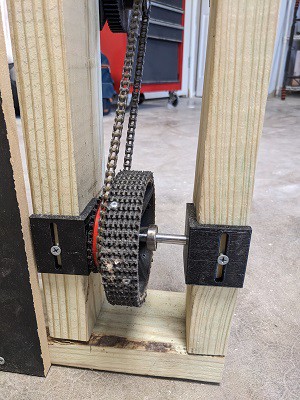
  • 2 12V Cim brushed motors, 7.7 gear reduction
    • First stage is aluminum pinion gear->3d printed PETG gear
    • Second stage is 3d printed sprockets
    • Cims are readily available to FRC teams but may switch to another motor for reduced cost

Power

  • 3s lipo
    • Readily available on amazon or other RC Hobby sports retailers
    • Could easily be switched with standard FRC lead acid battery
  • Power distribution
    • Custom power distribution board
      • Has mounting location for voltage regulator
    • Could easily be switched out with standard FRC distribution boards
  • Power switch
    • 120 amp breaker switch
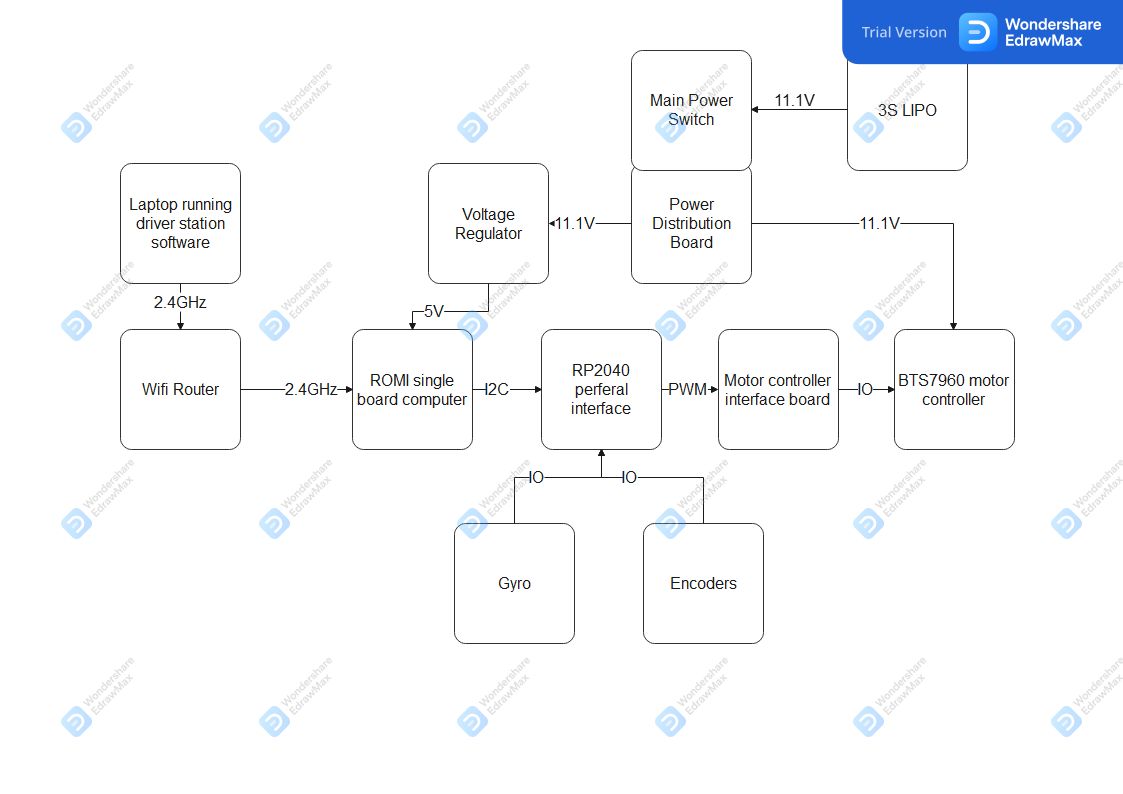
Control

  • Linux single board computer running "ROMI" software for main controller
    • Standard FRC control system uses a National Instrument's RoboRio, ROMI software simulates that device
  • RP2040 for real time peripheral interface
    • I2C slave device to single board computer
    • Handles communication to motor controllers and sensors
  • BTS7960 for DC motor controllers
    • High power controller with built in over current protection
    • Need a interface board to convert normal RC style PWM signal to BTS7960 control signals

prototypeSTLs.zip

STL files used for prototypeVersion

x-zip-compressed - 277.38 kB - 04/19/2023 at 15:55

Download

  • Prototype electronics

    David04/19/2023 at 15:20 0 comments

    The electronics for the prototype consist of a 3s lipo battery powering some BTS7960 motor controllers and an Arduino UNO. Communication is done through a T8S radio transmitter and receiver. The receiver outputs s.bus which needs to be inverted in order to connect to the Arduino's  uart.

    I plan on changing the communication method because the T8S and Arduino are so expensive. But If you'd like more information about how to use S.bus with Arduino, check out this git hub library https://github.com/bolderflight/sbus

    So far, I'm a big fan of the BTS790 motor controllers but they're wiring can be a bit of a mess and requiring two PWM signals for inputs is a bit of a mess. I plan on creating an interface board to simplify the wiring. But until then, checkout this tutorial for how to wire them to an Arduino https://electropeak.com/learn/interfacing-bts7960-43a-high-power-motor-driver-module-with-arduino/

    I used a power distribution board from a previous project, plan to redo to include some fuses for over current protection. https://hackaday.io/project/188503-fpv-robot/log/215442-a-sweet-new-power-distribution-boardthanks-pcbway

    Biggest problem with the prototype electronics: no main power switch :(

    Total Electronics BOM: $117.99

    Doesn't include wiring or shipping or connectors.

    Biggest cost sinks right now are the Arduino and transmitter/receiver. I plan to switch to using wifi+esp32 for communication which should significantly drop cost.

    Electrical BOM

    Qty

     Unit Cost

     total cost

    Arduino UNO

    1

     $   16.00

     $   16.00

    amazon

    Voltage Regulator

    1

     $     3.33

     $     3.33

    amazon

    BTS7960

    2

     $     6.33

     $   12.66

    amazon

    T18 transmitter & receiver

    1

     $   57.00

     $   57.00

    amazon

    Power Distribution board

    1

     $   10.00

     $   10.00

    custom

    3s battery

    1

     $   17.00

     $   17.00

    amazon

    custom inverter

    1

     $     2.00

     $     2.00

    custom

  • It DRIVES!!!! Progress update

    David04/19/2023 at 02:24 0 comments

    I know in the last log I said I was going to use 2020 extruded aluminum for the frame, but a thought struck me. You know what's really cheap and super easy to work with? 2x4s!!! 

    The basic idea of the frame is to take right angle brackets and on one side have a hole for the shaft and on the other have a slot. The slot will have a normal wood screw go through and allow for adjustment to tension the chain.

    The motor mounts are a similar idea, right angle bracket with mounting on one side and slots on the other.

    The shafts are all 8mm rods, chosen because 608z bearing can be absurdly cheap and have a 8mm inner diameter. Granted for this prototype I wanted to go without bearings to see how it went, and it works surprisingly well. Each wheel and motor mount needs two right angle brackets.

    The wheels are left over from an old design, they're 3d printed and have rough top conveyor material riveted on. Honestly they work fairly well but riveting the tread is an obnoxiously difficult process and I'd like to explore other options.

    The motors are cims with a 12 tooth 20dp aluminum pinion to 52 tooth PETG gear. A 18 tooth 3d printed sprocket is coupled on going to  32 tooth sprocket on the wheel. Uses size 25 chain.

    After driving for 5ish minutes, there was no noticeable wear on the gears or sprockets. Huge success there.

    The frame was made from some warped 2x4s. It's critical to try and make it as flat as possible and I didn't quite get there. But, the fact that it was still drivable is a great sign. The kit allowing for a lot of slop will make for a better first robot building experience.

    Mechanical BOM

    Item

    Qty

     Unit Cost

     Line Cost

    2x4

    2

     $     6.00

     $   12.00

    Belly plate (27"x11")

    1

     $   10.00

     $   10.00

    8mm shaft

    3

     $     2.06

     $     6.18

     PETG filiment

     1 kg

     $ 20.00

     $    20.00

    Cim motor

    2

     $   35.00

     $   70.00

    Pinions

    2

     $   10.00

     $   20.00

    Chain

    1

     $   13.00

     $   13.00

    Rough top tread

    1

     $     7.84

     $     7.84

    3 inch screws

    1 inch screws

    Shaft Brackets

    Wheel hub

    32 tooth sprocket

    18 tooth sprocket

    52 tooth gear

    18 Sprocket spacer

    32 tooth sprocket spacer

    Hardware cost total: $159.00

    (Minus motors) = $89.00 

    I'll go into detail about the electronics used in the next post.

    Good notes

    • Gear reduction and sprockets seemed to hold fine
    • Chain tensioning worked well
    • design allowed for slop

    Opportunities for improvement

    • Turning was bad until weight was added, try wider wheel base or 6 wheel drop
    • Bracket across from motor needs second screw hole
    • Frame rail spacing was wider than necessary
    • wheels were free floating on shaft
    • Did not power front wheels
    • Need to explore wheel options
    • Cheaper motor configuration

  • Lesson Plan Outline

    David04/04/2023 at 01:22 0 comments

    The following provides a rough outline of the lessons I want to accompany the kit. As I'm going through the process of prototyping this kit, I'm going to keep these lessons in mind to make sure it complements the skills the students should be learning. Unfortunately, I won't know if it will work out how I intend until I get it into my students hands but it should be a decent starting point.

    • Objective: provide a series of lesson plans to guide mentor through teaching brand new students.
    • Lessons will be 45-60 minutes, with 10-15 minutes of instruction followed by 30-45 minutes of students split into small groups (2-4 students) to complete tasks to assemble the kit.
    • No lesson is meant to go in depth on concepts, they are just meant to teach students just enough for a complete beginner to build their first robot.

    Lessons

    1. Frame assembly
      1. Lesson will cover the following while demonstrating how to make a simple 90 degree gusset for t-slot frame
        1. Importance of safety glasses
        2. How to safely hold your material
        3. How to use a drill
        4. How to use wrench and allen wrench
      2. Each group will make a set of gussets and assemble their frame
    2. Drive train assembly
      1. Lesson will demonstrate motor mounting and chain assembly
        1. Brief intro to motors (RPM/torque)
        2. Discus gears
        3. Discus chains and how to assemble
      2. Groups will follow instructions on how to assemble drive train
    3. Electronics board assembly
      1. Less will briefly cover each electronic component, it's purpose, how to wire
        1. Battery
        2. Power distribution board
        3. Roborio
        4. Radio
        5. Motor controller
        6. How to strip wires
      2. Students will follow instructions and mount/wire all electronics. MUST GET INSTRUCTOR TO CHECK WIRING BEFORE POWER ON
    4. Basic drive code
      1. Lesson will cover the following (may be better to do multiple parts here)
        1. Starting a new project
        2. Important sections of code
        3. Declaring motor controller
        4. Declaring joystick
        5. Controlling motors
        6. Deploying code
      2. Groups will write and test their own code
    5. Assemble and code a pivot arm
      1. Lesson will cover example of how to calculate the gear ratio needed for an arm
        1. Includes how to code buttons
      2. Groups will follow instructions to build pivot arms
    6. Prototype game piece pickup
      1. Lesson will cover prototyping using protopipe
        1. Include going over what objective a prototype is trying to achieve
    7. Make rev 2
      1. Lesson will cover the following:
        1. Use prototype to inform design
        2. Sketching a design
        3. Identifying key dimensions
      2. Groups will pick a prototype, and sketch out what a rev 2 will look like. After receiving feed back from the instructor, they will begin construction
    8. Rev 2 continued
      1. Lesson will start with progress updates from each group
      2. Groups will continue working on prototype

  • Problem definition & alternative research

    David04/03/2023 at 22:23 0 comments

    First robotics competition is a high school program where teams around the world are given a brand new game the first weekend in January. Teams must design, build, and program a robot to play that game. Starting in March, they begin to compete. (These robots weigh up to 125 lbs)

    As a mentor for a robotics team for the last 8 years, I've faced the same 2 challenges every year

    • How to teach robotics
    • How to keep students engaged when there's only one robot to work on

    I feel like I've done something different every year to address these problems, but it's always been last minute. (this is probably a similar story for the mentors on most of the other 3600 teams) This year is going to be different though!

    I'm going to write actual lesson plans, and have multiple robots for students to work on!

    The multiple robots part is a challenge though, the drive base kit that's widely used costs $750 without any motors or other electronics. With motors and electronics the cost totals $2400

    Item

    cost

    quantity

    url

    kitbot

    $739

    1

    andymark

    roborio

    $485

    1

    andymark

    Power distribution basics

    $395

    1

    andymark

    Radio bundle

    $179

    1

    andymark

    Cim motor

    $46

    4

    andymark

    Motor controller

    $90

    4

    rev-robotics

    Battery

    $55

    1

    Total

    $2397

    The meat of this project is going to be around identifying, implementing, and testing replacements for each of the previous line items. The potential impact this project can have can be looked at in different levels depending how which line item a replacement is found for.

    • Kit bot chassis
      • (70%) Impacts teams that already have multiple sets of the control system electronics
    • Lesson plan
      • Could impact 100% of teams by giving the mentors a starting point for how to teach their students in the off season
    • Roborio, power distribution, radio, cim motor, motor controller
      • Each replacement should be compatible with the rest of the system, which would allow teams to put together their own training kits based on what they already have.
      • In reality, many teams will hesitate to spend the money on electronic components that aren't competition legal. They would rather put that money towards back up parts due to thing frequently breaking.
    • The impact of this project could be far greater if I'm able to show that these replacements are just as capable as the current standards and get the FRC design committee to allow their use at competition. 

    For each line item, I'm going to outline requirements and list potential replacements

    Kitbot chassis requirments

    • 90-120 inch frame perimeter
    • Can support ~80 lbs
    • Can move at minimum of 5 ft/sec when at ~80 lbs
    • Electronics mounting
    • Battery holder
    • Bumper mounts
    • Can withstand side impacts from other robots
    • Assembled in less than 3 hours by someone with no experience

    The design of the chassis can be broken up into sections, I'm going to rate the options (1-3-5) with 5 being the best.

    Frame

    Option

    Cost

    robustness

    complexity

    Time for assembly

    Reusability

    Welded Steel tube

    5

    5

    1

    5

    1

    Steel tube gussets

    5

    3

    3

    3

    3

    Aluminum tube

    3

    3

    3

    3

    3

    T-slot aluminum extrusion

    1

    3

    5

    3

    5

    Wood

    5

    1

    3

    3

    1

    Gearbox

    Option

    Cost

    robustness

    complexity

    Time for assembly

    Reusability

    Prebuilt gear box

    1

    5

    5

    5

    5

    Custom metal gearbox

    1

    5

    1

    3

    1

    Metal gear, 3d printed plate

    3

    3?

    1

    3

    3

    Entirely 3d printed

    5

    1?

    1

    3

    1

    Drive train

    Option

    Cost

    complexity

    maneuverability

    4 wheel

    5

    5

    1

    6 wheel drop

    4

    4

    3

    Mecanum

    3

    5

    4

    Swerve

    1

    1

    5

    For the prototype I'm going to start with the following:

    • T-slot frame - most expensive option, but the cost will still be significantly less that the custom machined plates used by the current standard. Also won't require me to drill any...
    Read more »

View all 4 project logs

Enjoy this project?

Share

Discussions

Similar Projects

Does this project spark your interest?

Become a member to follow this project and never miss any updates