 Peter Sinclair
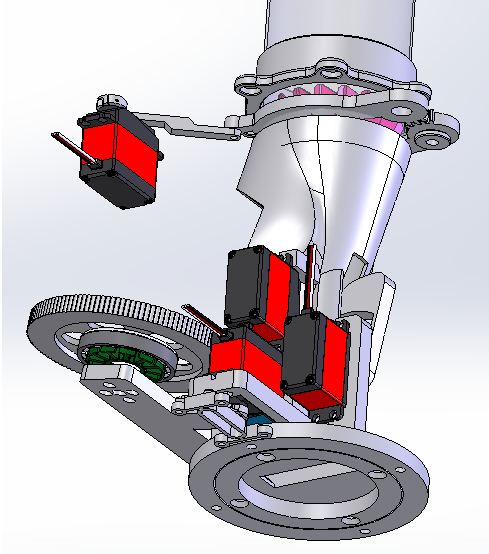
Now with CAD & CODE: https://github.com/TheSinc/BadmintonAce/
First few test feeds from the brand new hardware & software. Software is only roughed in enough to do some feeding so I could make a video but I like where things are headed. A long way to go to get the hardware and software completed and to place shots accurately & repeatable. See project log for more details.
Project Purpose & Social Impact
While this project started as a personal project to improve my own badminton skills it quickly became clear that it was much more. The excitement from children and adults alike testing early prototypes has been incredible. This project seeks to share that excitement with the world and to provide an engaging tool for physical activity, badminton skill building, and STEM education. As a complete mechatronics system it has something for everyone.
Teaching Badminton
One of the best ways for students to learn new skills is through shot repetition carried out using feeding exercises where the shuttle is 'fed' to the student in a specific pattern for them to return. While most coaches are excellent feeders, in larger classes students must often feed each other but they may not be able to do so consistently. This can impede their ability to learn the new skill. Lack of good feeding is particularly relevant for kids' classes where student feeding is not possible. An automated feeder solves these issues.
Learning Badminton
Learning badminton can be incredibly rewarding but it's not always possible to find a training facility that meets your schedule and budget. Coaching can be quite expensive and intimidating with many clubs geared to highly competitive players. With the Badminton Ace you can train at your own level and on your own schedule, using your personal badminton feeder along with the amazing content on YouTube and other online sources.
Learning STEM
While the concept of a launcher seems quite simple, the end product is a fully functioning robot. With many different sensors, motors, and techniques involved in the build it's a great opportunity to explore how it all works. In time, the detailed logs will highlight many of the design choices along with urethane molding, inverse kinematics, assembly, and programming. For those that just want to stick to badminton that deep dive is optional.
Improving Fitness
According to the World Health organization, worldwide obesity has tripled since 1975 and is growing at an alarming rate in children. Since regular physical activity can help prevent obesity and improve overall health it's important to find enjoyable activities. This launcher can help the user to improve their badminton skills to further their enjoyment on court while providing good exercise. Additionally, it can encourage a user, who might not be comfortable in public, to practice on their own to build confidence. More aggressive or random pattern options make for a great workout at any fitness level.
Theory of Operation
Badminton shuttles are placed in a long tube, acting as a supply magazine, which attaches to the top of ACE using magnets (making travel & refills more convenient). Once placed on the launcher, gravity pulls the shuttles down into the launcher where their movement is blocked using a servo controlled pincer gripper. The gripper opens which allows the shuttle stack to fall onto the catch/push arm. The gripper assembly then closes to hold the shuttle second from the bottom of the stack. The catch/push arm is then free to push the bottom shuttle into the firing wheels. Before this occurs, the rotation of the launcher and trajectory of the shot are set using two additional servos and the feed wheels ramp up to the desired speed based on the shot. The catch/push arm pushes the shuttle into the wheels where it is launched, then the feed motors shut off, and the catch/push arm returns to the catch position for the next shuttle priming sequence. The precise shot parameters & pattern are controlled using a microcontroller serving a html & javascript front-end.

Project Status
I first designed and built a very basic test platform to test the theory of operation, electronics, and code (V1). Upon successful testing of the basics, I used my findings to create a more complete functional prototype (V2). This variant had much of the functionality I was looking for but lacked some of the features I required: guarding for improved safety, shuttle run-out sensor, front-facing obstruction check. It was not sufficiently refined so a revised design was needed. It was at this time I also re-imagined the user interface going from a very basic interface to a full 3D interface. I'm currently working on bringing this next variant to life (V4). If you're wondering, V3 was an alternate design that never left the drafting board. The design, build, and wiring of V4 is mostly complete and I'm now working on the code rewrites to get it working. After that I'll need to start testing its accuracy, reliability, and user interface. The initial prototypes (V1/V2) only ever ran for a combined hour or two so I suspect there will be many reliability and performance issues that will need to be resolved before V5.
I already have a long list of things that need to be fixed or improved on for the next version before I can recommend others build it themselves. I'm also considering adding another motor and sensors to allow a revolver-style magazine system for longer play before running out of shuttles. I also want to re-design the wheels to make them easier to balance, and to create a custom control board for greater accessibility.
I have been testing the current version this summer. It's worked well mostly but I'm having issues with reliably calibrating it for the wide range of parameters that can be controlled. I've also had an issue where the outrunning motor shell has worn through the motor wires so the design needs to be adjusted to prevent this.
Inspiration, References, and Licenses
Baddy - Benoit Greslebin - CERN OHL v. 1.1
The open source Baddy shuttle launcher was the project that inspired me to get started. It demonstrated that an advanced launcher didn't have to cost a fortune. Since the project was defunct by the time I found it, I decided to make my own version with even more features. I'd add full court coverage, trajectory control, and design it from the ground up specifically for 3D printing. I used their wheel geometry and followed the same launch methodology but did not use their CAD or code beyond that. The wonderful documentation on their project was invaluable to point me down a good path.
Unfortunately, the Baddy apps are no longer on the app stores so their hardware will soon be bricked. It's my hope that one day the web interface I'm writing can be forked to run on the Baddy hardware and keep those devices alive to give back to that project.
https://github.com/baddy-lab/baddy-makers-edition
https://www.facebook.com/groups/519469218529907
https://www.youtube.com/@baddy7061
Baddy Research
It's my understanding that the original Baddy launcher was developed as part of a thesis project. There are also a number of papers related to its functionality and possible upgrades. The most influential was the work of Hugo Janton whose flight path algorithm was implemented in the upgraded UI. I believe it's based on flight analysis done by Caroline Cohen in "La Physique du Sport".
Badminton Training Robot - JONAS LINDSTRÖM & MÅNS NILSSON
Improvement of BADDY the shuttlecock launcher - Hugo Janton
Improvements of the shuttlecock launcher robot BADDY - Hege Rishovd & Ane Sofie Smith Kristiansen
3D Function Plotting Example - Frido Verweij - Creative Commons - Attribution-ShareAlike 3.0 Unported (CC BY-SA 3.0)
This code formed the bases for the 3D canvas experience. More details of what this was used for can be found in the related user interface logs.
https://library.fridoverweij.com/codelab/3d_function_plotter/3d_function_plotter_plainjs.html
Simple CSS - Kev Quirk - MIT license
A small css library to improve the look of the user interface.