 Subhajit
In this IoT Internet of Things project, I have shown how to make the IoT-based water pump controller using ESP32 Blynk and float sensor switches.
This water level monitoring system will also check the water level in both the overhead tank and underground water tank and accordingly control the water pump automatically in AUTO mode.
Tutorial Video on IoT Project using ESP32
This Water Level Controller has the following features:
- Monitor the Water Level in both the overhead tank and underground tank on the Blynk IoT app.
- Change Mode and control Pump from Blynk IoT App.
- If WiFi is not connected monitor the water level with indicator LEDs. The pump will automatically turn OFF, for the LOW water level in the underground tank.
- You can also turn on the buzzer alert.
- Used 30A relay, so you can control up to 2HP pump.
- In AUTO mode, it will automatically control the pump to maintain the water level. During the article, I have shown all the steps to make this IoT-based water pump controller.
Required Components for the ESP32 Project
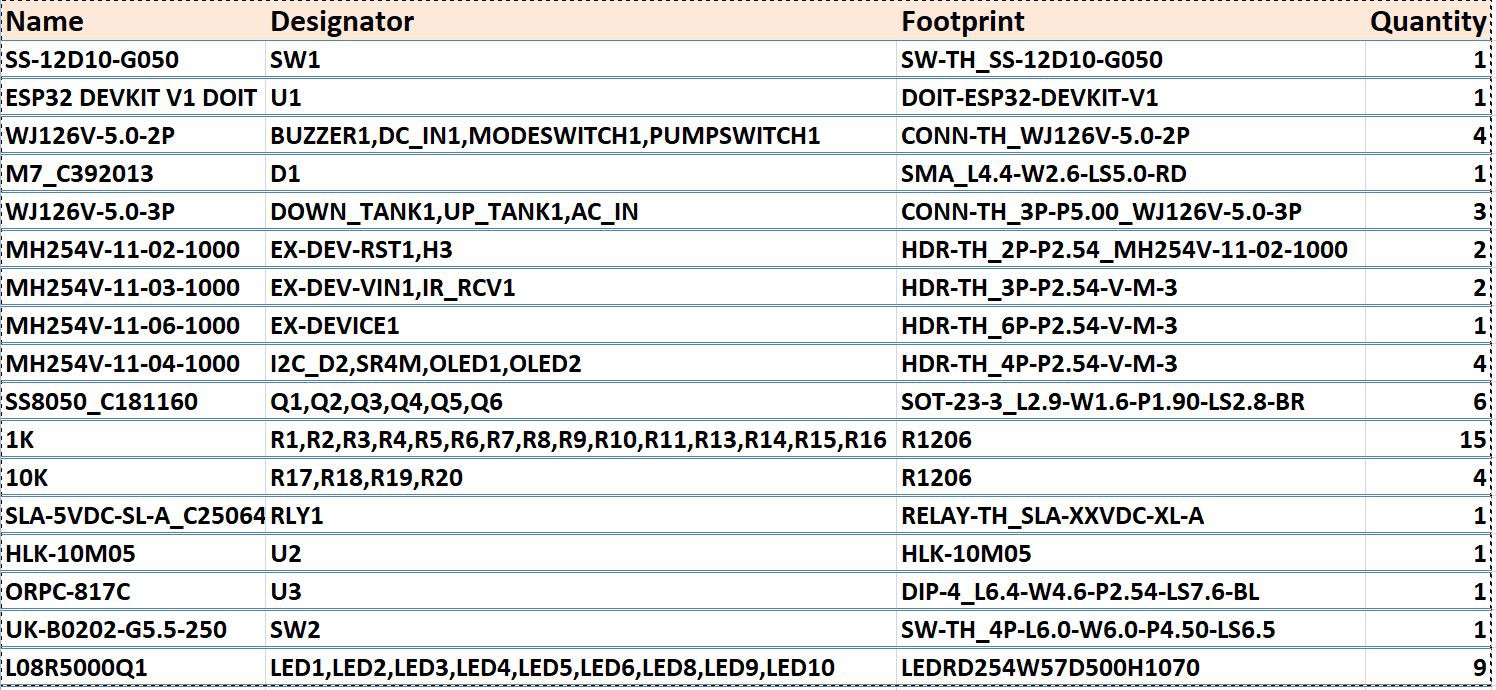
Download the BOM FIle (GitHub)
Please download the above BOM file from GitHub for the components list.
Circuit Diagram of the ESP32 Water Level Controller
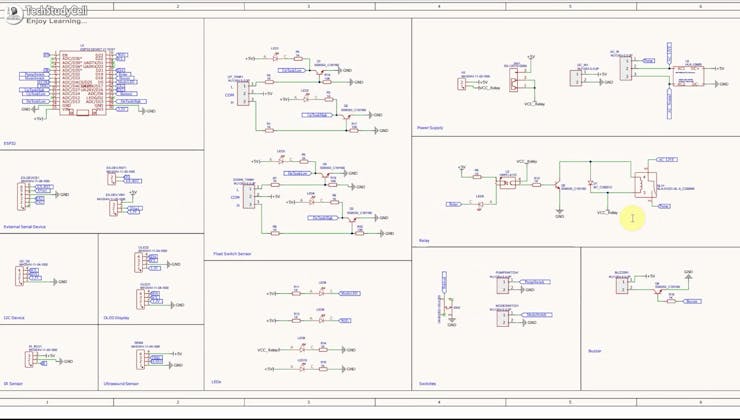
Download the Circuit from GitHub
In the tutorial video, I explained the circuit in detail. Please refer to the attached schematic.
Here I have used transistors in between the float switch and ESP32 GPIO. So if the distance between the float switch and ESP32 is too long, still the ESP32 will always get the correct readings.
To control the pump I have used a 30A relay, for the LOW signal the relay will turn ON and for the HIGH signal the relay will turn off.
With this circuit, you can connect multiple I2C devices, external BLE, LoRA devices, OLED displays, etc. But we will cover those features in upcoming projects.
Design the PCB for This ESP32 Project
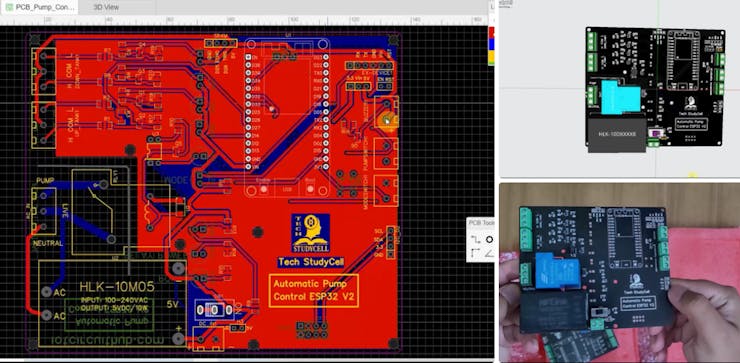
To make the circuit compact and give it a professional look, I designed the PCB after testing all the features of the smart water pump controller.
You can download the PCB Gerber, BOM, and "pick and place" files of this ESP32 project PCB from the following link:
GitHub link to Download PCB Gerber File
For this project, I have the JLC SMT Service while ordering the PCB.
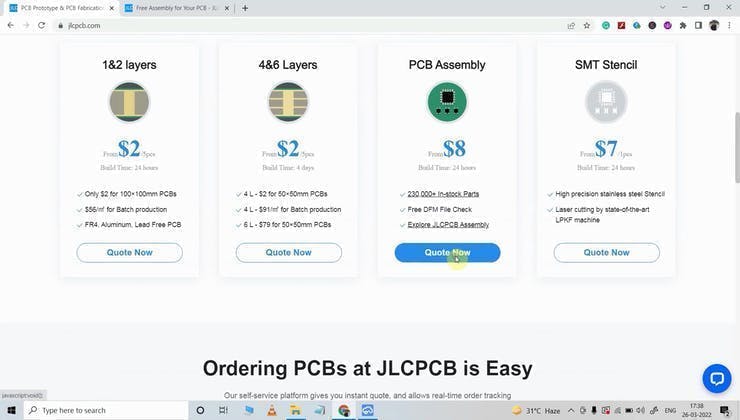
Why you should use JLC SMT Service?
On JLCPCB's one-stop online platform, customers enjoy low-cost & high-quality & fast SMT service at an $8.00 setup fee($0.0017 per joint).
$27 New User coupon & $24 SMT coupons every month.
Visit https://jlcpcb.com
JLCPCB SMT Parts Library 200k+ in-stock components (689 Basic components and 200k+ Extended components)
Parts Pre-Order service https://support.jlcpcb.com/article/164-what-is-jlcpcb-parts-pre-order-service
Build a Personal library Inventory, save parts for now or the future
Assembly will support 10M+ parts from Digikey, mouser.
Steps to Order the PCB Assembly from JLCPCB
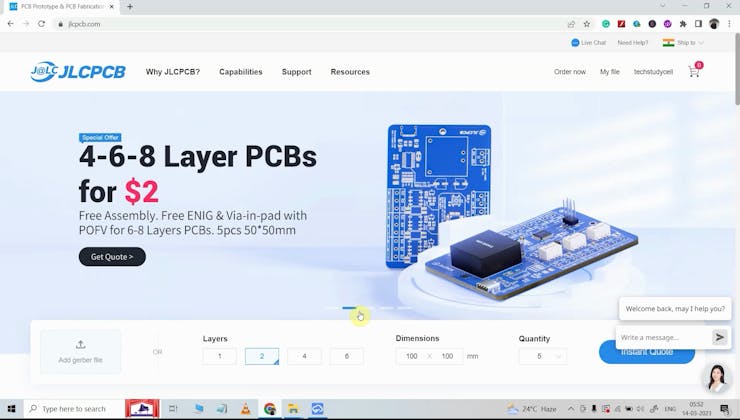
1. Visit https://jlcpcb.com and Sign in / Sign up.
2. Click on the QUOTE NOW button.

3. Click on the "Add your Gerber file" button. Then browse and select the Gerber file you have downloaded.
4. Set the required parameter like Quantity, PCB masking color, etc.
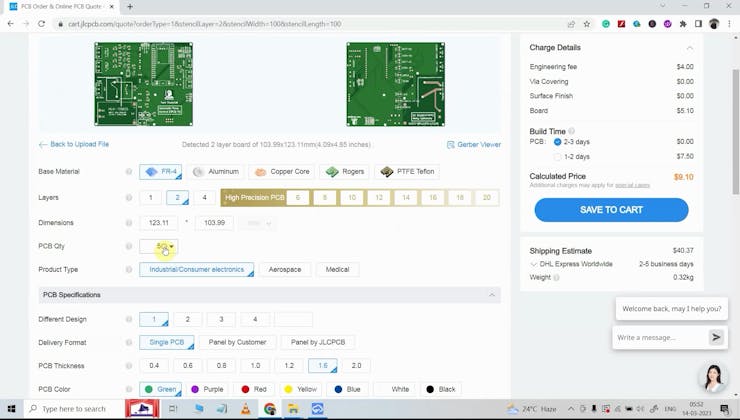
5. Select the Assemble side and SMT Quantity.
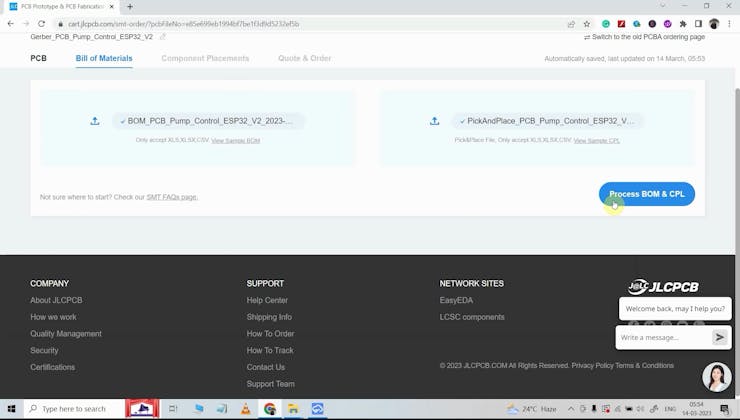
6. Now upload the BOM and PickAndPlace files.

7. Now confirm all the components which you want to be soldered by SMT services.
8. Click on the SAVE TO CART button.
Select Shipping Address and Payment Mode
6. Type the Shipping Address.
7. Select the Shipping Method suitable for you.
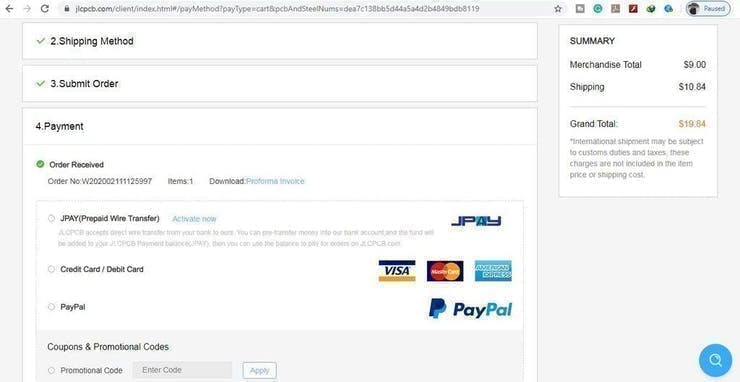
8. Submit the order and proceed with the payment.
You can also track your order from the JLCPCB

My PCBs took 3 days to get manufactured and arrived within a week using the DHL delivery option.
PCBs were well-packed and the quality was really good at this affordable price.
Create Blynk Cloud FREE Account & Blynk Template

For this smart house project, I have used the Blynk IoT Cloud Free plan.
Click on the following link to create a Blynk Cloud account.
https://blynk.cloud/dashboard/register
- Enter your email ID, then click on "Sign Up".
- You will receive a verification email.
- Click on Create Password in the email, Then set the password, and click on Next.
- Enter your first name, and click on Done.
After that Blynk cloud dashboard will open.
Create a New Template in Blynk Cloud
First, you have to create a template in the Blynk cloud.
- Click on New Template.
- Enter a template name, select the hardware as ESP32, and the connection type will be WiFi.
- Then click on DONE.
You will get the BLYNK_TEMPLATE_ID and BLYNK_DEVICE_NAME after creating the temple.
Create a Datastream in Blynk Cloud

After that, you have to create Datastreams. Here I have to create 4 Datastreams.
Steps to add Datastreams.
- Go to the Datastreams tab.
- Click on New Datastream and select Virtual Pin.
- Enter a name, select the virtual pin, and the Datatype.
- Then click on Create.
For the first 3 Datastreams, I used virtual pins V1, V2 V3, and Datatype String.
For the fourth Datastream, I used virtual pins V4 and Datatype Integer. (to control the relay).
Set Up Blynk Cloud Web Dashboard

Now go to the Web Dashboard tab.
Drag and drop 3 Level widgets and 1 Switch widget.
Go to the settings of each widget, and select related Datastream. (Please refer to the above picture.)
Then click on Save to save the template.
Add Device Using Template in Blynk IoT
Steps to add a device in the Blynk IoT cloud:

- First, go to Device, then click on "New Device".

- Click on "From template".

- Select the Template, and give the device name.
- Click on Create.

Then in the device info tab, you will get the Blynk Auth Token, Template ID, and Device Name. All these details will be required in the code.
Program the ESP32 for This Blynk Project

For programming the ESP32, I have used Arduino IDE.
GitHub link to Download Source Code
Download and install the following libraries in Arduino IDE
- Blynk Library (1.2.0): https://github.com/blynkkk/blynk-library
- AceButton Library (1.9.2): https://github.com/bxparks/AceButton

Now open the sketch (code).
- In the code, you have to update the BLYNK_TEMPLATE_ID, BLYNK_DEVICE_NAME, and Auth Token.
- Then update the WiFi Credentials.
- After that, select the DOIT ESP32 DEVKIT V1 board and proper PORT.
- Then upload the code to ESP32 Board.
While uploading the code to ESP32, if you see the "Connecting....___" text, then press and hold the BOOT button, after that release the button.
Install Blynk IoT App to Configure Mobile Dashboard

- Install the Blynk IoT app from Google Play Store or App Store. Then log in.
- Go to Developer Mode.
- Tap on the template that you have already made.
- Now go to the Widget box (on the right) to add widgets.
- Add 3 Level widgets and 1 Button widget from Widget Box.
- Go to the Level widget settings and select Datastreams (V1, V2, & V3).
- Go to the Button widget settings, select Datastream V4, Mode will be Switch. Then exit.
- After setting all the Widgets tap on exit.
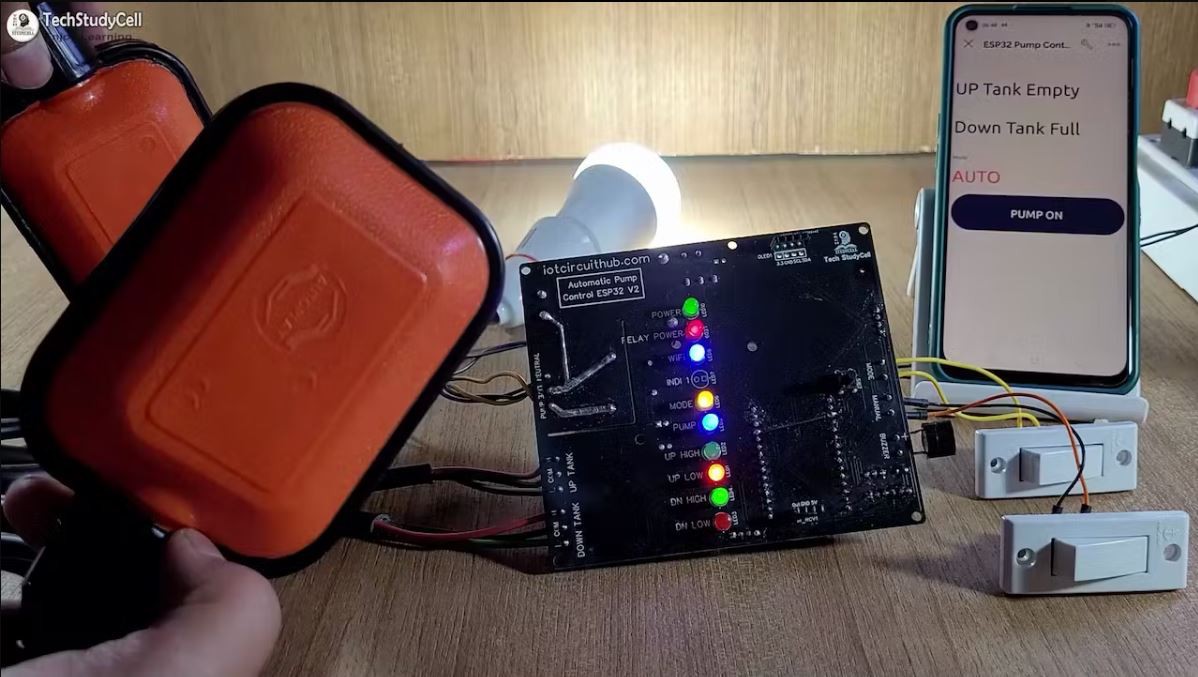
Connection Diagram for the Water Pump Controller PCB

Please refer to the above connection diagram, to connect the pump, float switches, Buzzer, and manual switches with the PCB.
Please take proper safety precautions while working with high voltages.
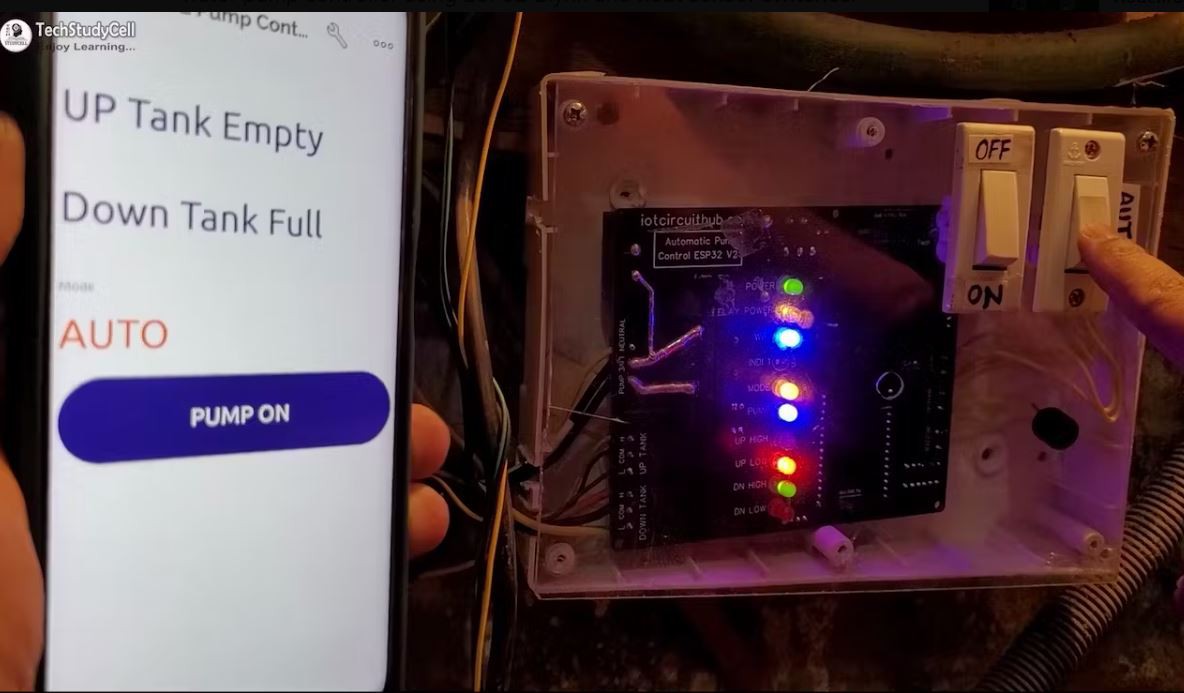
Testing the Water Pump Controller Circuit With Bulb

Before connecting the pump, it is better to test the circuit with a bulb.
Change the position of the float switches and check the relay status.
Also, change the mode, and control the relay from Blynk.
Float Sensor Error Protection

If there are any loose connections or somehow the float sensor wires are disconnected, the error flag will become active.
If the error flag is active, the buzzer will start after every 2 seconds. the pump will not start.
After checking and correcting the float sensor connection, first, you have to manually press the push button (as shown in the picture) to reset the error flag.
If the connection is proper, only then you can able to start the pump.
Finally!! the IoT Based Water Level Monitoring System Is Ready

After testing, install the float switches in the overhead and the underground tank.
Give the supply and check the indicator LEDs.
Now the pump will be automatically controlled by the ESP32 to maintain the water level.
I will really appreciate it if you share your valuable feedback. Also if you have any queries please write in the comment section.
Thank you & Happy Learning.