 donutsorelse
Supplies
Part of the fun of this one is that we can repurpose some old stuff you may already have on hand, but we do also need some electronics. And hey, even these may be part of an old project in need of repurposing as well! I've provided affiliate links to the exact parts that I used (I promise to use all 8 cents I get for future projects like this). Here are the electronics we're using:
- ESP8266 (microcontroller)
- L298N (for controlling the motor)
- 12V DC Motor
- Barrel plug adapter (for connecting the L298N to its power supply)
In terms of the items you may have lying around your garage that we're repurposing, here's what I used. A lot of it should be things that are pretty interchangeable with items most people will have, so this won't need to be overgeneralized. The fishing line can be any string that's strong enough and looks nice enough to be visible, the metal bracket could be anything similar or something like a shelf support, etc.
- Strong fishing line (it has to be extra strong line - normal fishing line will break)
- Wood pieces
- Screws
- Pulley
- Wheel (something for the string to rotate on)
- Binder clip
Step 1: The Plan

Especially considering that this is using old bits and pieces of things, it feels worthwhile to delve into the plan itself so you can make adjustments in advance before we get into all the specifics of how exactly to do each part of the project.
I am aiming for a more minimalistic approach to this. Instead of the more standard notion that you'll see with the ready-made solutions of having tracks, I'm going to just use a single string around a pulley that is controlled by a single motor. This requires that the string is completely taut or it won't work, but it has a few nice advantages. The only things in view are the pulley and the string, which will be strong fishing line in my case so it's not particularly noticeable. If it can't move the curtains any further in the direction it's meant to go, it will just rotate without moving it. The nice thing here is that this is a very simple workaround for power outages. If your blinds are open when the power goes out and the code defaults to assuming the blinds are closed, it could require additional logic with other setups. There's always a way to solve issues like these, but this way we don't even need to.
To keep the fishing line tight, I ended up with a small wooden enclosure. I was overthinking it a bit with a bracket or a shelf mount, but in the end the wooden enclosure was easier and still looked pretty nice because I could paint it to match the wall. At the end of the day, it just needs to be a way to mount the motor that will either be concealable, have decent aesthetics, or both.
On the opposite side of the curtain from the motor is the pulley. You could use a wheel or something, but this will probably be in view so it's worth it to have a nice looking part here.
The binder clip attaches the fishing line to the curtain. I realize binder clips aren't exactly items people use for home décor and aren't something you'd want front and center on a home improvement project, but this is easily concealed so no one should even see it.
As far as the electronics go, we're using the ESP8266 NodeMCU microcontroller because it's small, cheap, does everything we need, and has built in Wi-Fi that we can leverage for all the "smart" features. This does mean we need the L298N to control the motor, though, so it's worth a callout that you could make adjustments to the plan if having multiple components like that doesn't suit you or some such.
Step 2: Electronic Assembly
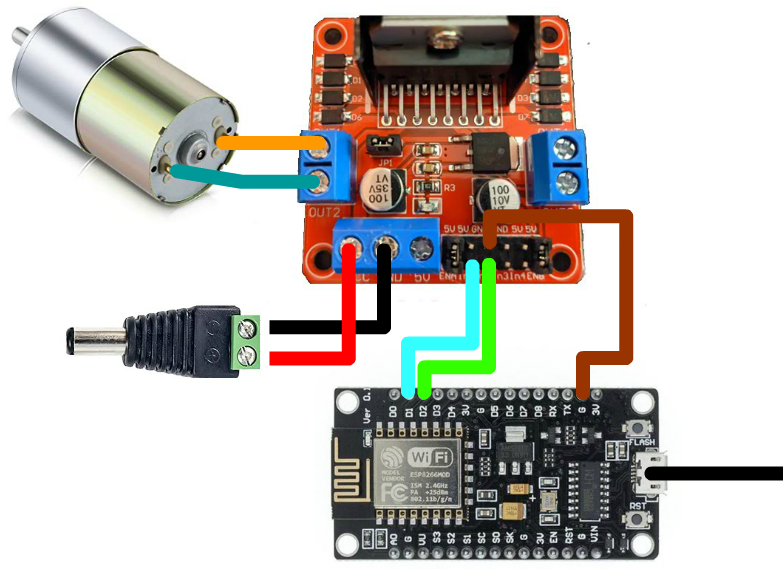

For anyone used to dabbling in Arduino projects, you may be all set with just the included schematic, but I want to break this down a bit more for anyone newer to this type of tech. Another perk of the minimalistic setup is that it's simpler in terms of the electronics as well, so this may be a more doable smart home project for people to tackle in general....
Read more »
 Electroniclovers123
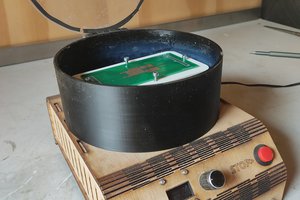
 Jeroen Delcour
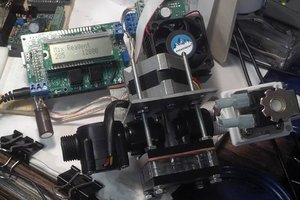
 James Newton
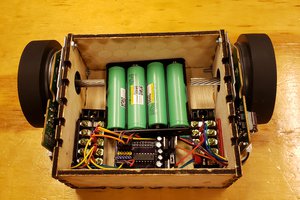
 shane.snipe