 Matt Perkins
Overview
The 2FA Sidecar is a small external keyboard-like device with five keys specifically designed for generating and sending time-based two-factor authentication (2FA) codes with a single key press. It is primarily designed to be compatible with Google's 2FA implementation known as Time-Based One-Time Password (TOTP), which is specified in RFC 6238.
The purpose of the 2FA Sidecar is to simplify the process of using 2FA codes when switching between different security levels in various parts of a network. Instead of having to manually open your phone, retrieve the code, and type it in, the sidecar device allows you to generate and send the code with just a single key press.
The device supports up to five different TOTP codes for different systems, allowing you to manage multiple 2FA-enabled accounts or services. Additionally, it features a TFT screen on the front where you can read the generated code if you prefer to type it manually.
The 2FA Sidecar is compatible with any platform that supports USB HID (Human Interface Device) protocols, making it versatile and usable across a wide range of devices and operating systems.
Security
When the sidecar is running in normal mode it is not accessible by any network services and maintains a network connection to update accurate time from a time server only. So it should not be easy for a malicious actor to connect to the sidecar and access the TOTP salt. It would be however possible to download new code to the ESP32 and then retrieve the salts from the parameters memory. So if you want to keep it as secure as possible. You may burn the protective Efuses on the ESP32 to protect flash memory. Even with this done it may be possible to retrieve the salts by much smarter people then i. So i warrant nothing. Use it at your own risk. It goes without question to say also that if someone is in possession of the device they can use your TOTP so you need to keep the device secure. In the same way you would with any key fob.
Hardware Required
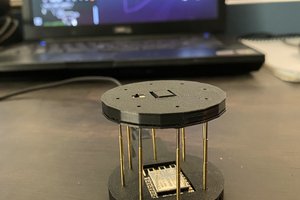
Adafruit ESP32-S3 Reverse TFT Feather - 4MB Flash, 2MB PSRAM, STEMMA QT https://www.adafruit.com/product/5691
Case can be printed from PLA/ABS or whatever really
5 X Cherry MX switches https://core-electronics.com.au/cherry-mx-switch.html click=good
5 X Cherry MX key caps you can source your own or print them many people sell them There's all sorts. Hookup wire soldering iron and hand tools, super glue
Core electronics stock all of the above.
3D Printing
The 3d model is based on cherry mx macro pad by LeoAnth found on thingiverse. I remixed that design to fit the Reverse TFT Feather it also has a pin hole so you can access the reset button externally so once complete the boot loader can be accessed. It prints fine without supports on my snapmaker in both ABS and PLA. Print it upside down with no special options. The Lid can then be glued in place once the project is complete and tested. There are also two small plastic squares that can be used to hold the feather in position. Use a drop of glue to hold them in position. I then just used 6 drops of super glue to afix the bottom.
base.stl - Bottom plate.
main_body.stl - Main unit print upside down keys pop in.
shroud.stl - Optional but to put around keys.
standoffs.stl - Plastic bits to hold the ESP32 in place
Hookup
To Wire the Cherry MX keys is very simple. Wire one leg of each key to ground and then run a wire from the other leg of each key to the following pins. You might want to solder the switches before you pop them into the case. They can be held with a drop of glue but will fit snugly without as well.
Key 1 = Pin (5)
Key 2 = Pin (6)
Key 3 = Pin (9)
Key 4 = Pin (10)
That's it. Once you flash the esp32 and power up press key 1 within the first 3 second of booting and you will enter a self test and config mode. In the self test mode you can push each key one by one and it will verify your soldering and operation of the keys. Once all 5 keys have...
Read more »


 deʃhipu
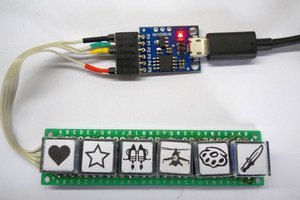
 danjovic
 Mauro Riva
Protectimus works with many different Two-Factor Authentication Provider (2FA) systems. The safety of a user's account and the information stored within it is increased whenever that user makes use of any of their many services.