 JP Gleyzes
This weather station was part of the Rezodo project. It has been moved to its own project as the Rezodo project was becoming too big to be easily readable !
This weather station is intended to be easily "tunable" to your own needs :
- transmission to the base can be done
- directly by the station itself if Wifi is available
- via Lora point to point to get a much greater range (currently working with more than 2.5 km between base and station)
- sensors can be choosen among the list and two major versions do exist
- wind only (+ sensors) for less than 50€
- wind + rain (+sensors) for less than 65€
The design of the two main versions is basically the same but the "mechanical" parts, of course, differ. We will cover the two versions.
As key specifications we propose these two long range wireless systems, with real time operation 24/24 7/7 and energy efficient solution, "off grid" and solar panel powered.
"Wind only" weather station
As I do belong to a RC flying club, we need to know the wind conditions at the airfield. These conditions are locally changing quite fast and weather forecast is not accurate enough for our hobby !
So I decided to design a "Wind only" version of the weather station.
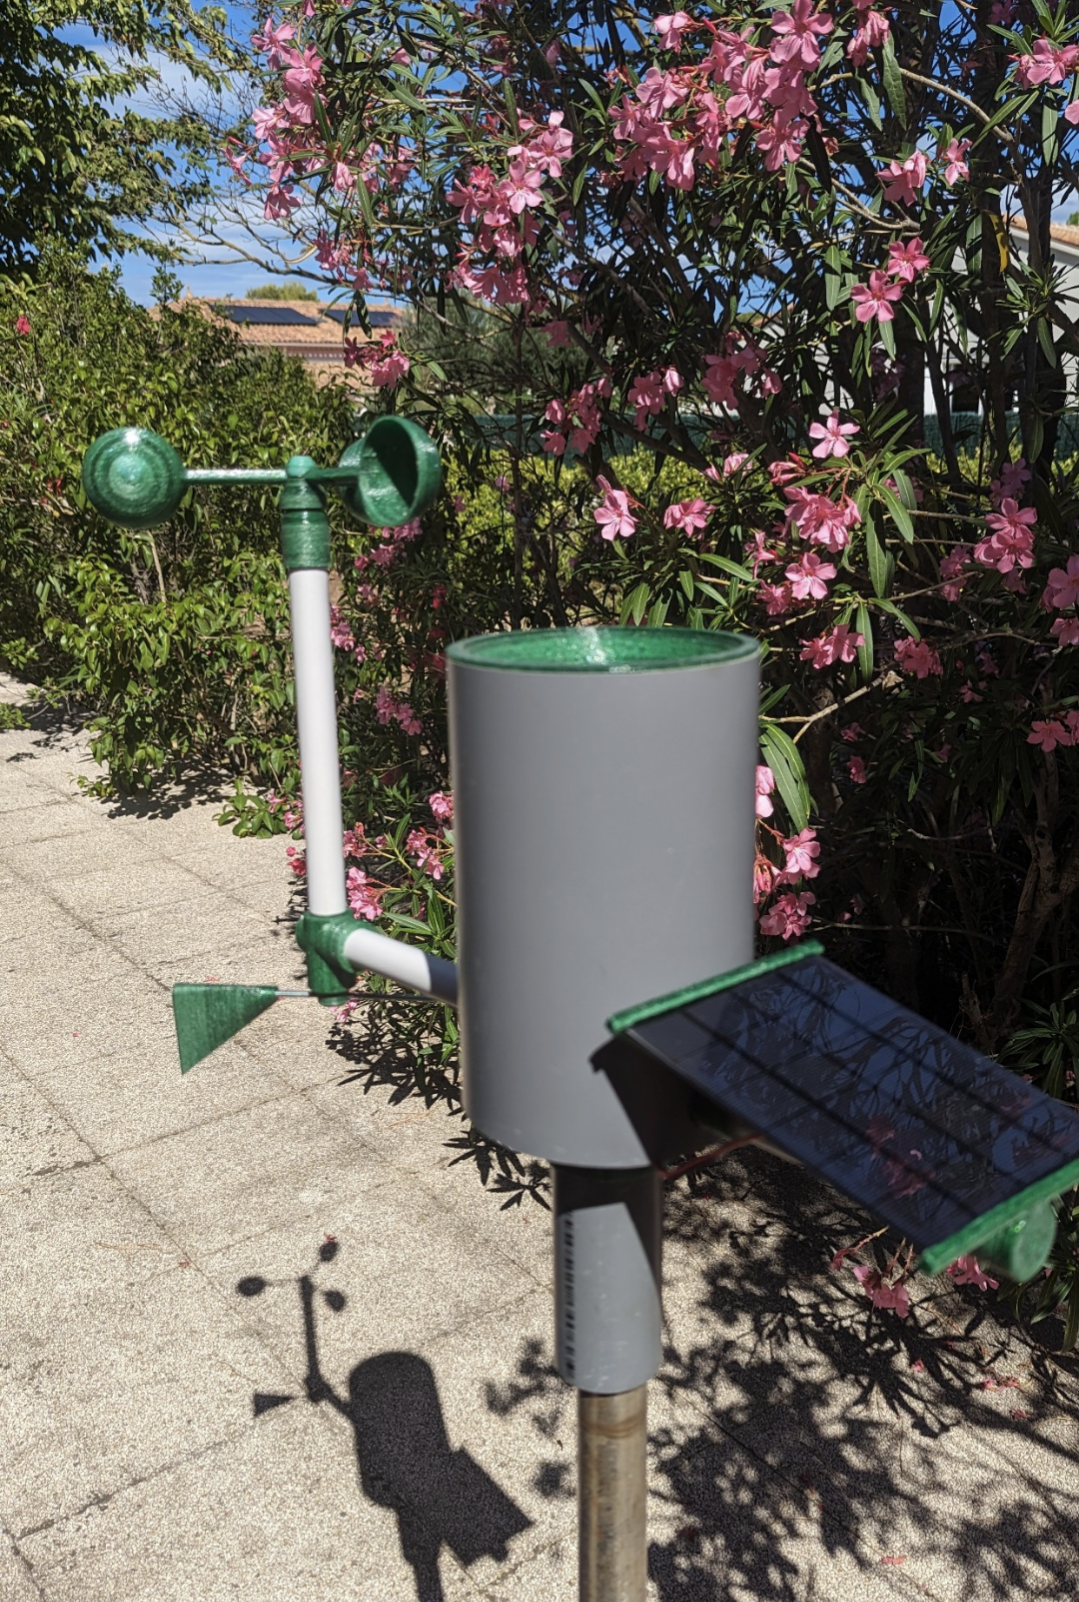
Here it is, installed at our airfield
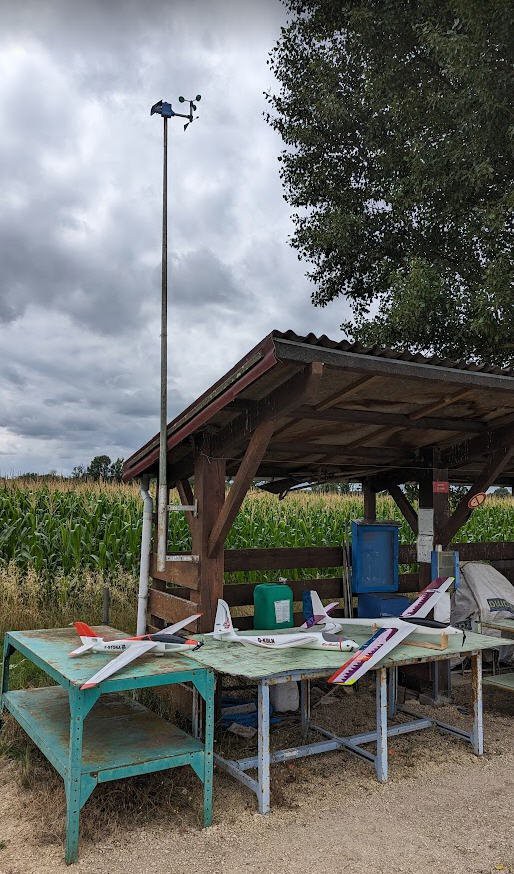
The airfield is far away from electricity network and at 2.5km from the first building where we have installed the Lora receiver.
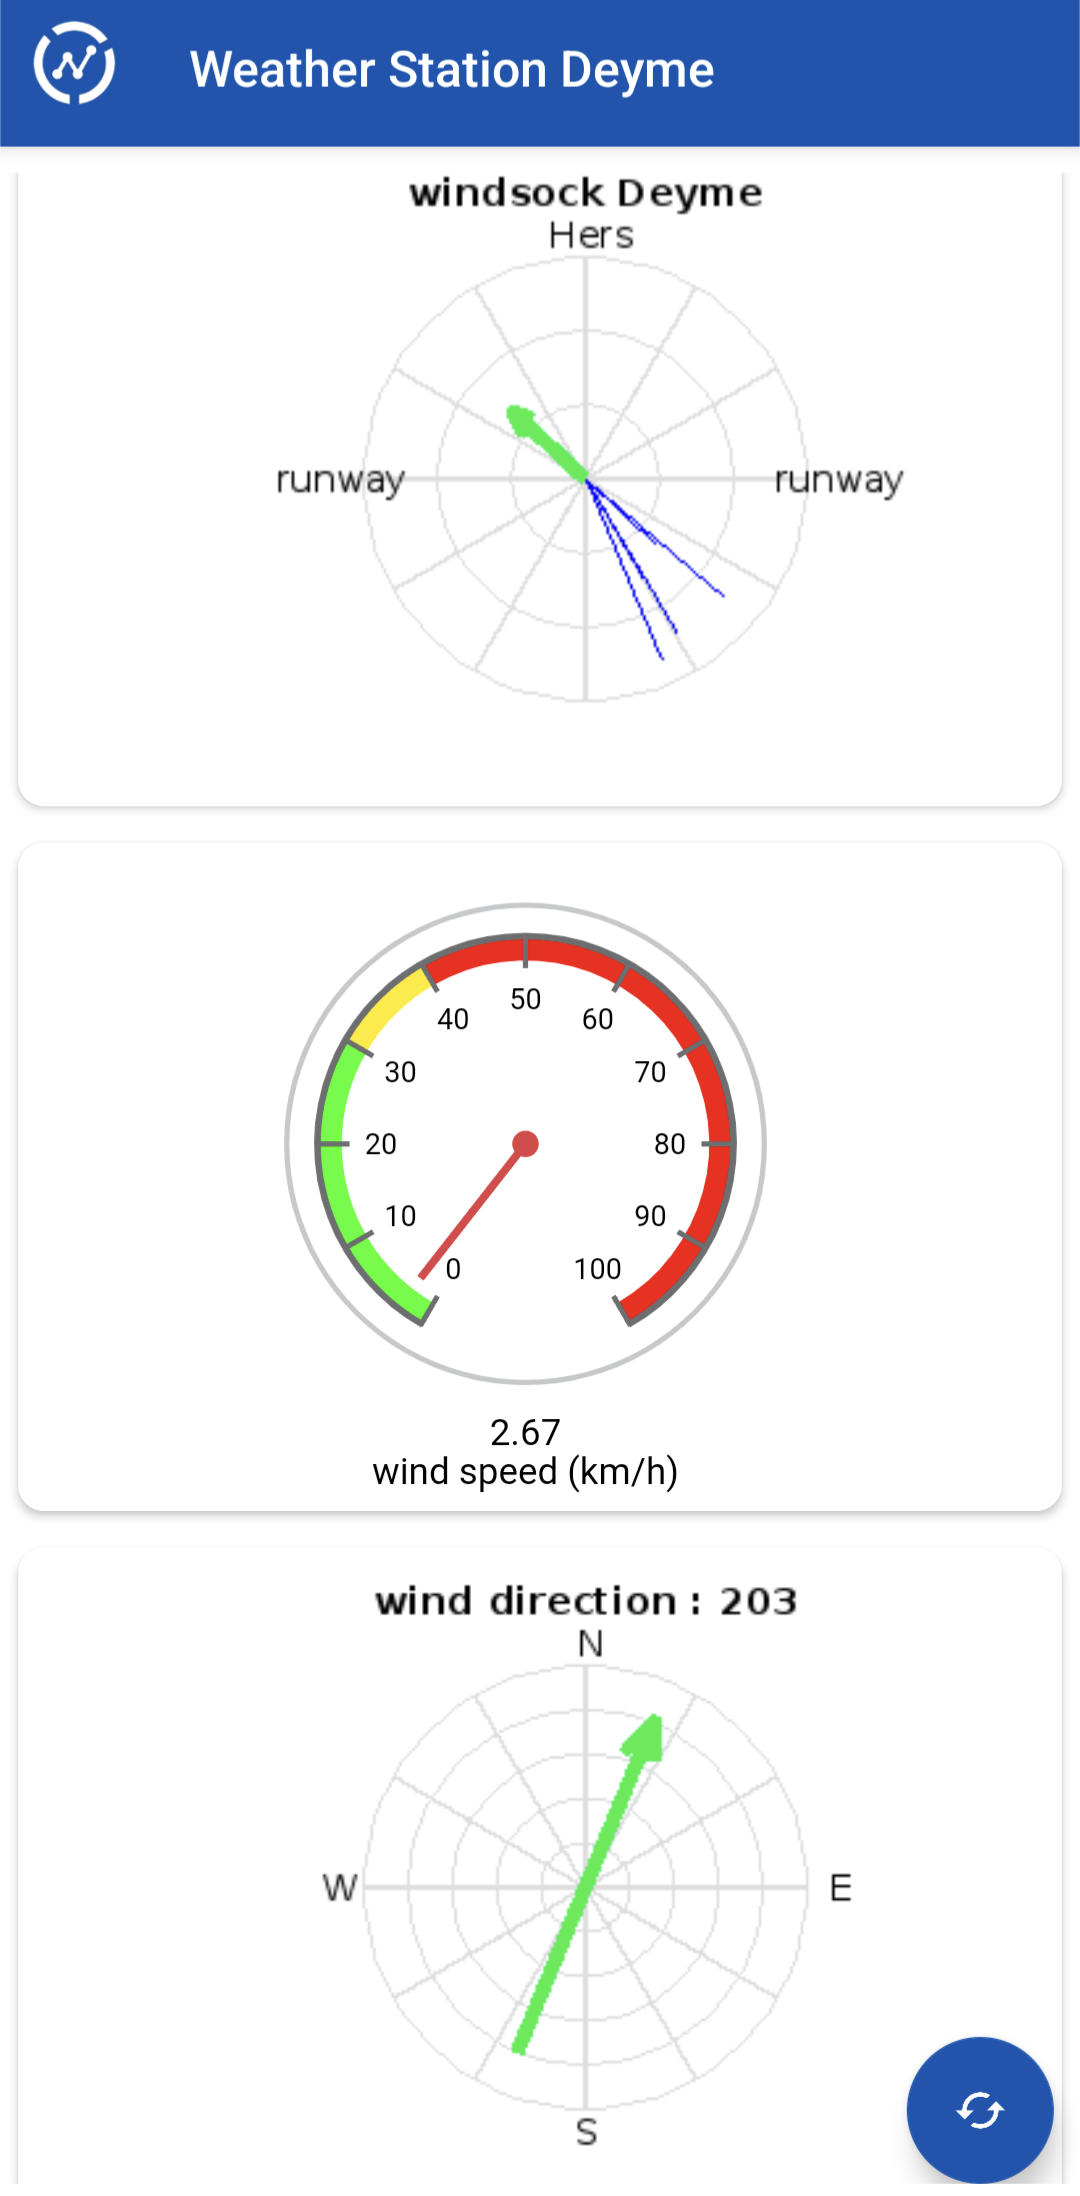
Everything is working now and we have a public access to these nice gauges!

Last minute upgrade : The weather Station is now also fully integrated into windyApp weather forecast application.
The result is a very professionnal User Interface, merging weather forecast (top of screen) with local measurements in real time. That's really cool!
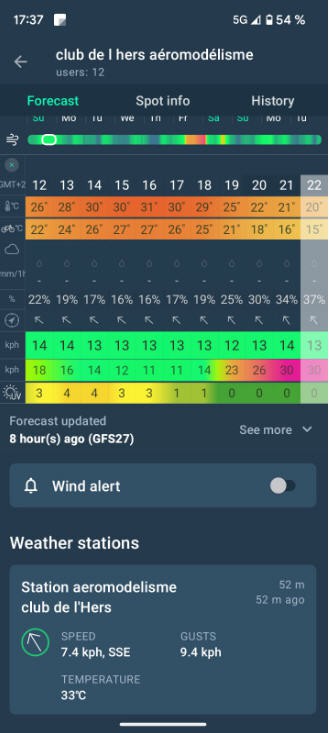
And you can even change the color code :
- green = good to fly
- yellow = warning
- red = too much wind you'd better don't fly
Wonder how to do this ? It's simple, follow this log : integrating your Weather Station with windyApp
Building this station is not complex. Read all this description and the logs and you will be able to build yours !
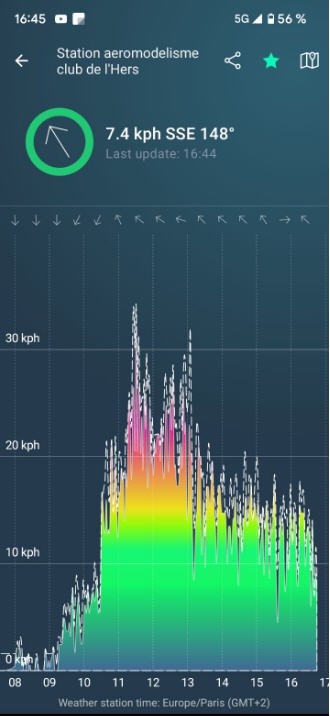
As you can see the wind sensors do work in very low wind conditions.
Price for this "Wind Only" weather Station including both emitter and receiver boards (GTW0 + GTW1) is less than 50€. Bill of Material is accessible here
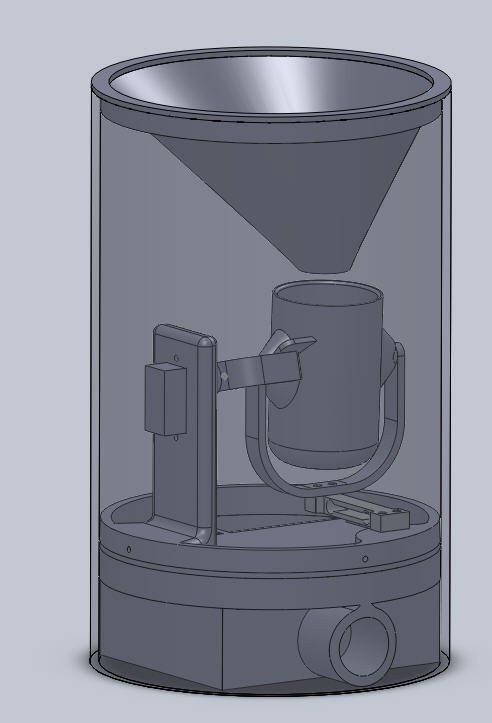
Full weather station
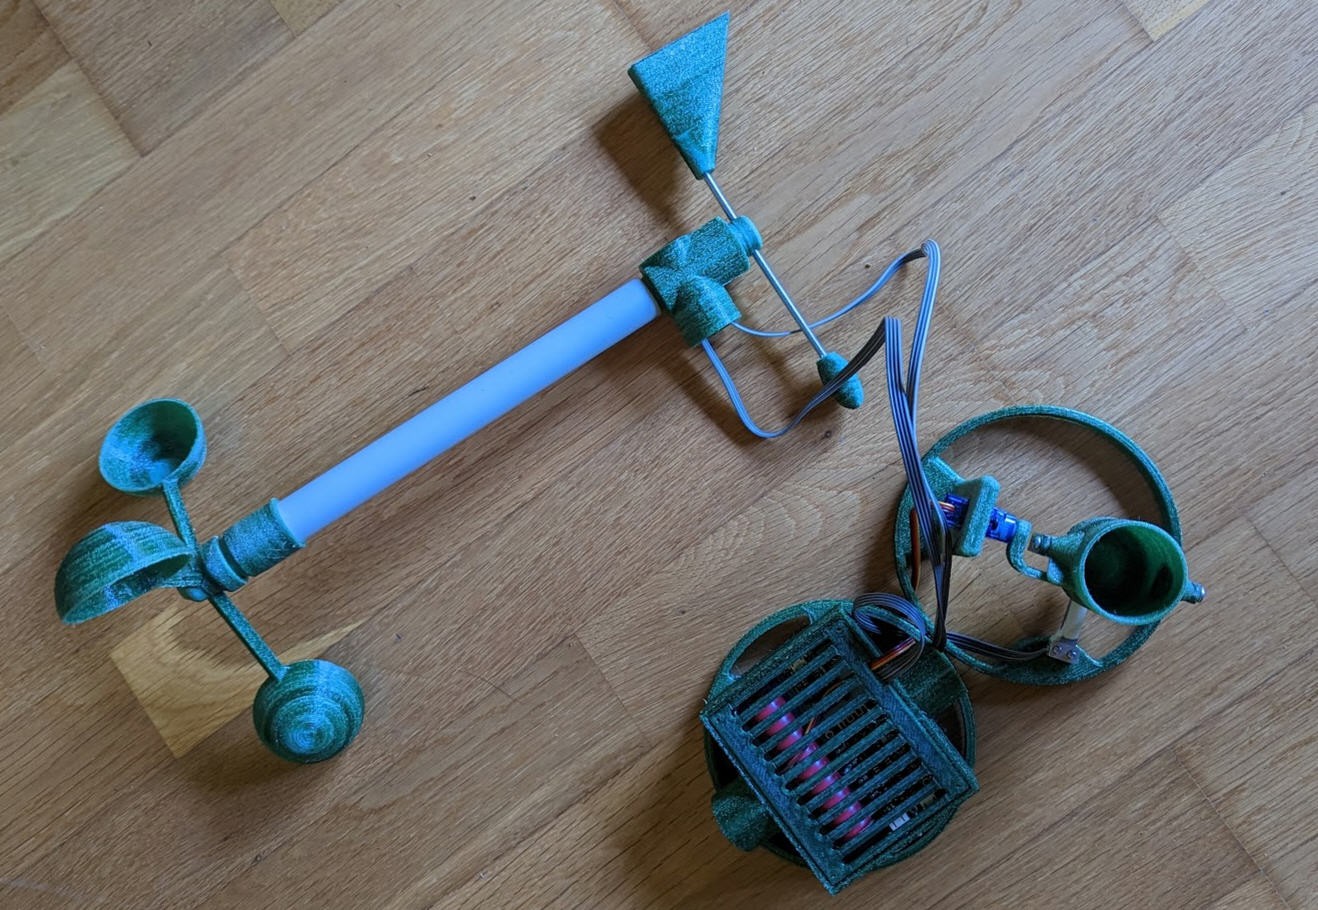
This one is the most complete version, including all the sensors. It mainly differs from the previous one by the addition of a rain gauge.
The electronics goes inside the bottom box, wires go to the sensors into the pipes. PCB is protected against rain.
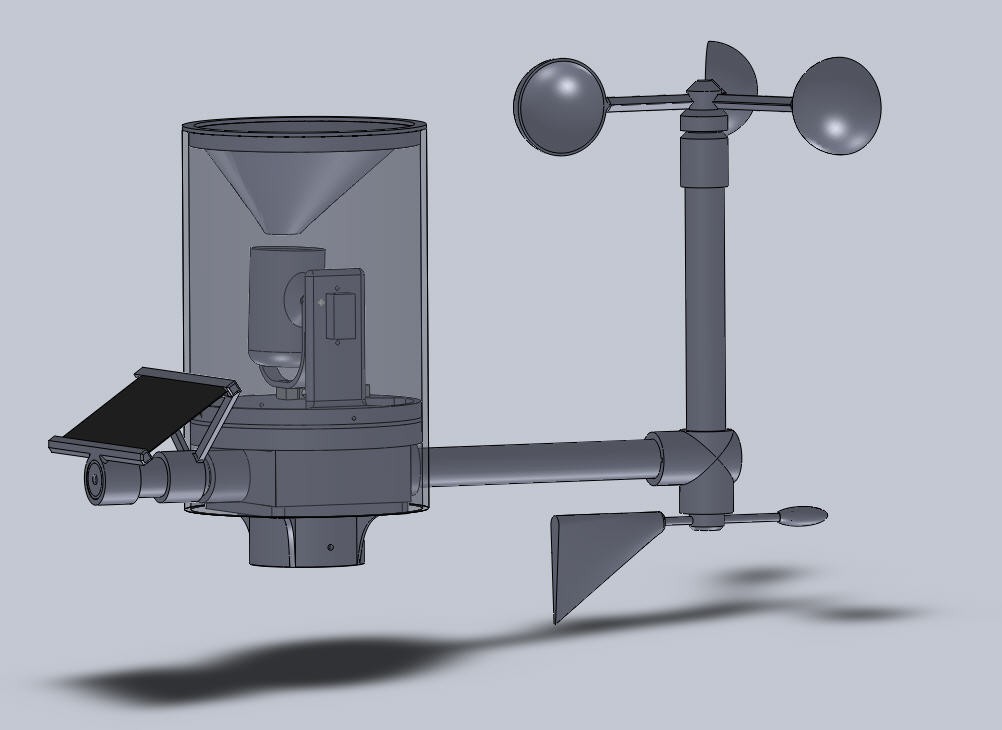
Here is a picture showing "exploded" view of the weather station:
And here it is during tests:
Weather station electronics
This schematics summarizes the electronics embedded into the weather station. The same PCB is used for the various versions of the weather station, and even for the Lora gateway 0 (the one simply equiped with Lora + wifi access + mains power supply).
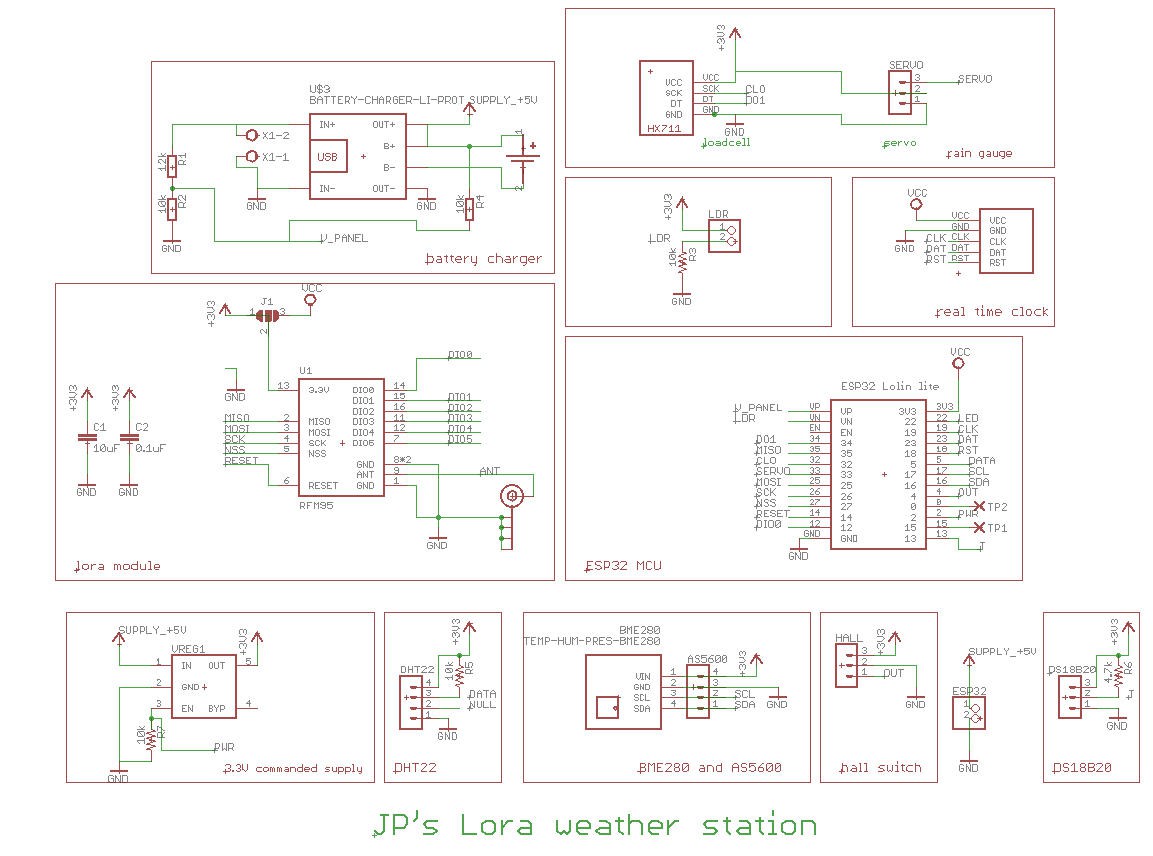
In a few words, it has the following components:
- a lora module for long range communication between Gateway 0 and Gateway 1
- an ESP32 MCU + ESPNow (to be connected to Rezodo FDRS network if needed)
- a rain gauge equiped with weighing sensor for accurate measurement
- a wind direction sensor with a Hall encoder delivering 4096 angular postions (contactless... no wear)
- a wind anemometer with hall effect sensor (contactless... no wear)
- temperature, humidity, pressure, light sensors
More details into this log please read it as it contains important informations.
Components + mechanical parts for this schematics should cost around 65€. This price is for the "full" Lora weather station and does include the Lora GTW0 and GTW1...
To build the weather station you will have to add a few 3d printed mechanical components.
All the 3d printed parts are available on thingiverse (links on the left of the main page of this project).
I printed them with plastic bottle PET filament. See here : Pullstruder project on hackaday.
Never print these parts with PLA... They will melt under the sun. Choose PETG or ABS or PET.
PCB
The PCB have been sponsored by PCBWay. You can order them here : Weather Station PCB @PCBWay
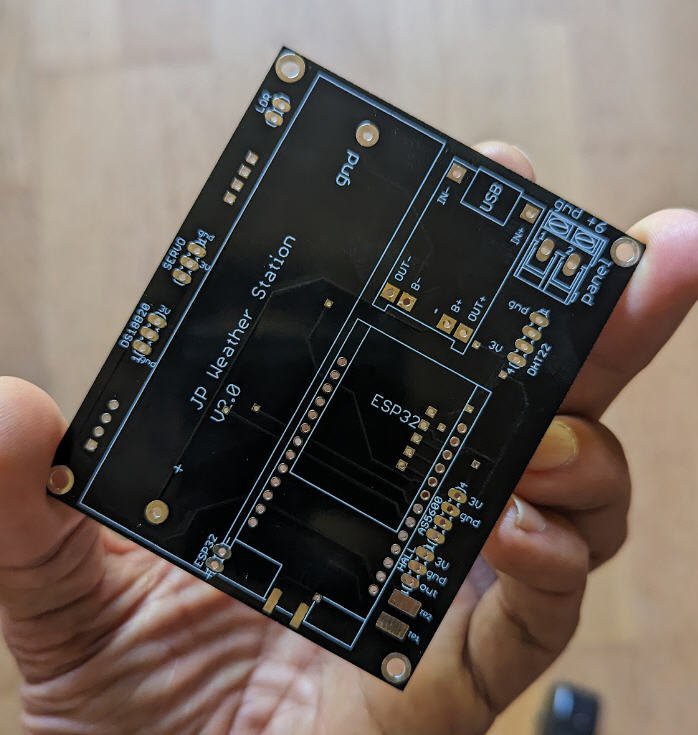
As you can see, this is the V2 version of this board (the latest one).
Gerber files for this PCB are available here : Weather Station PCB V2
Eagles files are also available here : Weather Station Eagle files
The rain gauge
There are a few ways to measure rain. The most commun design is "tipping bucket"
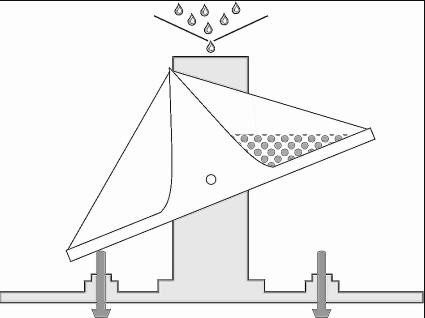
These rain gauges if not "dynamically corrected" may suffer from poor performances. They under estimate high rains and have a poor precision for "small rains". The bucket has to "tip" before counting the water inside...
Please refer to this excellent article for comparison between tipping bucket and weighing gauge.
I have thus chosen the "difficult approach" to design a weighing rain gauge.
The principle is however simple:
- weight the bucket
- empty it from time to time
And here is my prototype starting to work
You can see the bucket, under which is a strain gauge. And the servo is emptying the bucket when needed. Simple!
A detailed description of this rain gauge is available into this log .
The anemometer
Nothing complex, simply a rotary head and a hall sensor
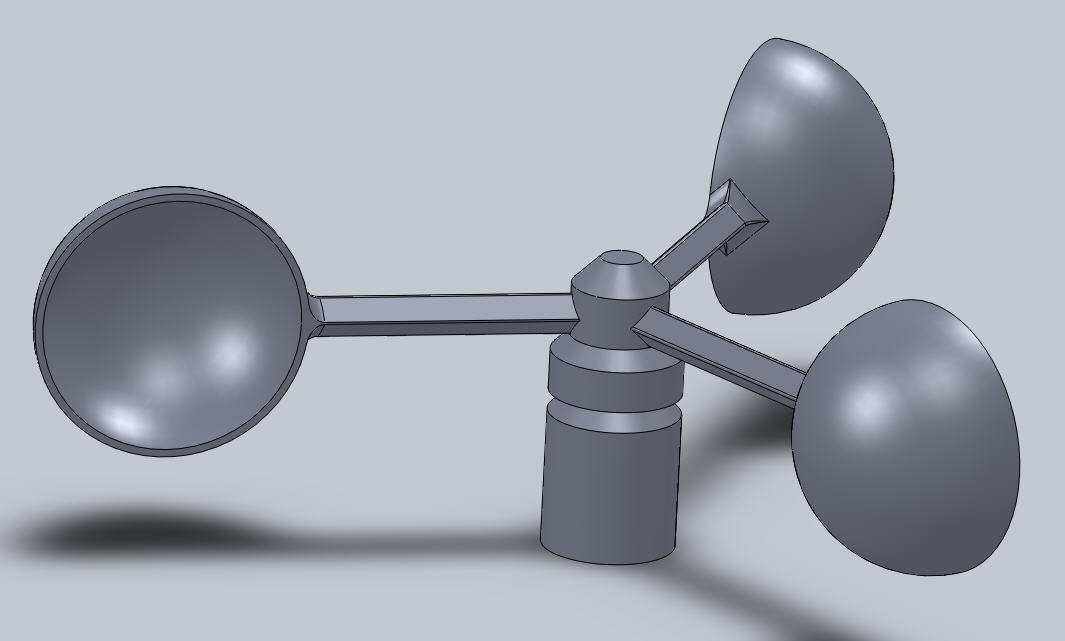
More details into this log.
The wind direction sensor
A hall encoder is used to determine the wind direction
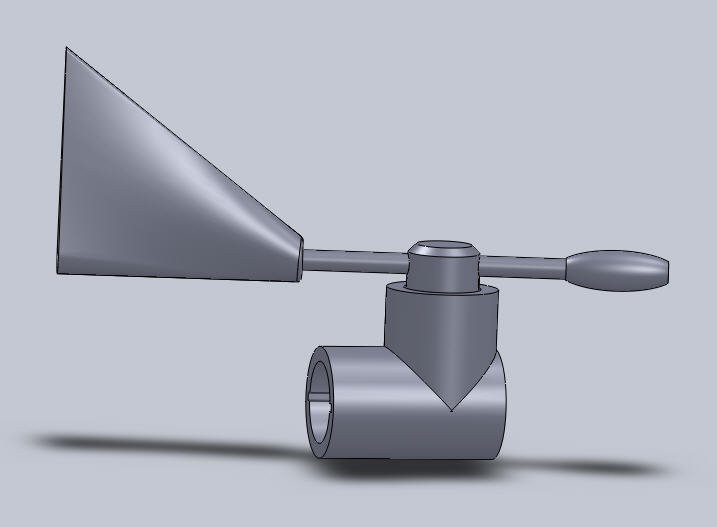
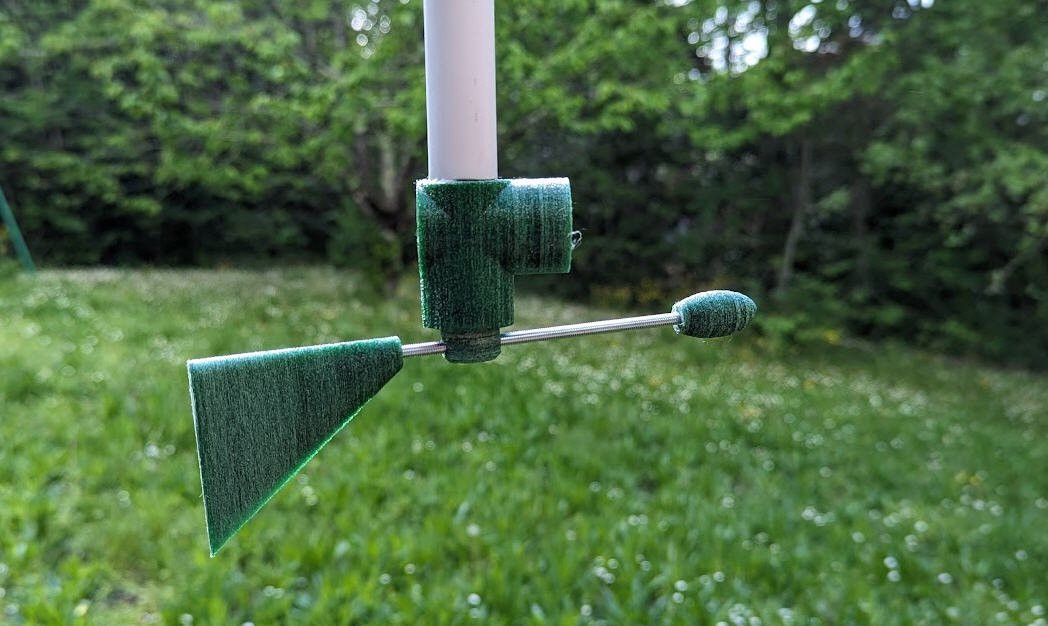
Details are available into this log
Software
Most of the software is embedded into the ESP32 firmware. This little board is programmed with Arduino IDE.
All the code is available on my github pages : Weather Station source code on Github
- Refer to this log to see how to compile the code
- Refer to this log to see how to configure your weather station
And to get these nice gauges on ThingSpeak you will need to add a few lines of Matlab code.
- Refer to this log to see how to do it .
This is the Matlab code used for the "Wind Only" weather Station. You can adapt it to your needs !
Calibration of your weather station
Most of the sensors of this weather station are factory calibrated but a few are not and we need to take care of them !
They are :
- weighing gauge and wind direction sensor: both are covered into this log
- wind speed anemometer : calibration explained into this log
Carefully read these logs to understand how to calibrate your weather station.
Calibration should be done only once and can be done on a bench.
Beware that weighing gauge calibration and wind direction sensor calibration are triggered by the same touchpad.
Be sure you are into the calibration conditions of these two sensors before launching calibration...
Increasing Lora range with a biquad antenna
My "Wind Only" weather station is located 2.5km away from the GTW0.
We made tests with simple antenna (8.6 cm piece of wire) and it proved to work even in cloudy conditions.
However we wanted something with more gain and more directionnality.
Thus we built a biquad antenna

Details to build this biquad antenna are provided into this log
Configuring the GTW0
It can be done with your smartphone:
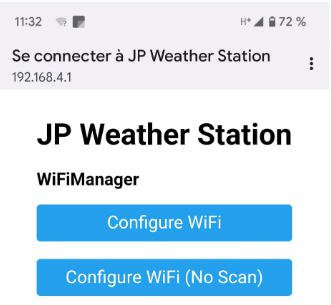
This is an easy part, follow this log !
Wider integration into Rezodo network
As said into the introduction this project was initially part of the Rezodo project.
It is now a "stand alone" project but it can easily be integrated into a Rezodo network.
Here is an example of what can be done :

- Gateway 0 is connected to internet both on Thingspeak and on home assistant
- GTW1 is our weather station and is a bridge for next GTW2
- GTW2 is an irrigation board and is controled by GTW0 via MQTT and home assistant
The code for this configuration already exists and is under tests. Send me a message if you are interrested
Conclusion
October 2023, this project is almost finished, intensively tested for its most important functionalities, its usefulness is clear in this period of climate change and we use it every day at our RC Airfield !
Winter season has still to be passed successfully before declaring the project finished and fully operationnal.
But, even today, you can build your own weather station and you won't be disapointed !
I am proud to be one of the 2023 hackaday Prize "save the world challenge" and would like to thank Hackaday and the Sponsors for this cool adventure.
Licenses
Unless otherwise stated, all works presented here that are not based on software/code are subject to the Creative Common Attribution license .
The complete legal text can be found here
Unless otherwise stated, all software/code-based works presented here are subject to the GNU General Public License v3.0
The complete legal text can be found here