Close
0%
0%

Boom!

Classic artillery game for Arduino

Similar projects worth following
Boom! is a classic-style artillery game, in the tradition of Scorched
Earth and Worms. The objective is simple: fire projectiles and blast
the other guy out of existence! This version features color graphics, a
touch screen interface, and randomly generated terrain. It's as
interesting to play as most modern mobile games and requires no in-app
purchases!

Video available at https://www.youtube.com/watch?v=7L3iLPP8Tdk
Source code available at https://github.com/jimshortz/boom

Code Size

"ATmega328P" memory use summary [bytes]:

Segment   Begin    End      Code   Data   Used    Size   Use%
---------------------------------------------------------------
[.cseg] 0x000000 0x0003fe    960     62   1022   32768   3.1%
[.dseg] 0x000100 0x000600      0    459    459    2048  22.4%
[.eseg] 0x000000 0x000000      0      0      0    1024   0.0%

Assembly complete, 0 errors. 0 warnings

Playing The Game

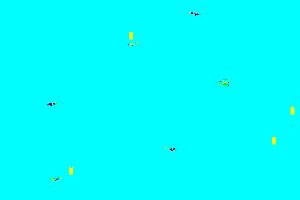
Each player is represented by a red or blue tank positioned on a randomly generated terrain background. When it is your turn to fire, a white button will appear behind your tank. In addition, the aiming cursor (white cross hair) is displayed in the sky region. The relative position of the aiming cursor and firing point of your tank (top-center of the turret) is used to describe a vector of your projectile's initial velocity (remember this from physics class?)

The relative angle between the aiming cursor and turret describes the angle of fire. The distance between the two describes the amount of powder used to fire the shot. The further away from the turret, the larger the powder charge and the longer the projectile will fly. Touch the "sky" region of the screen to move the aiming cursor.

Once you are happy with where it is placed, press the white button (or your tank) to fire. The path of the projectile will be plotted in real time until it hits something or goes out of bounds. If you miss, the other player will be given a turn to fire on you. If you hit the other player, you are awarded a point and the terrain is regenerated. If you hit yourself, the other player is awarded your point.

Each player's score is displayed at the top of the screen as tally marks. Play continues until a player has scored 3 points, in which case he or she is the winner. A new game is immediately started.

Design Details

The code is broken into several modules located in the real/ subdirectory of the github repo:

main.asmMain flow of the game
util.asm Math routines, copy routines, random number generator.
tft.asmLCD interface routines, graphics primitives.
touch.asmTouch screen interface routines.
vector.asmVector and rectangle manipulation routines.

At the top of main.asm, there are a number of constants defined. The most interesting are the SMOOTH_TERRAIN and FLASH_TANK constants. When both are enabled, the size of the code exceeds the 1024 byte limit. For the purpose of submission to the contest, I have chosen to enable SMOOTH_TERRAIN and disable FLASH_TANK. If you don't mind blocky terrain and want a cool flashing effect when a tank gets blown up, then you can change these constants to enable that. Also, you can turn them both on, but the game will no longer fit in 1KB!

The main game loop (in main.asm) is broken up into the ready, aim, and fire sections. Ready draws the board, aim handles manipulating the aiming cursor, and fire plots the projectile path. There is also a new_game section and labels for handling hits an misses. Several subroutines are also defined for generating the terrain.

The game is based on "real physics equations". Each pixel on the screen represents one meter of space. Obviously the tanks are oversized, to make the game possible to play. Position is computed using three vectors - acceleration, velocity, and position. Each vector consits of an X and Y coordinate, stored as 16-bit signed integers. Fixed-point math is used such that 1 meter = 64 units. A frame rate of 16 fps is used to plot the motion of the projectile. Every 16th of a second, the acceleration vector is added to the velocity and the velocity is added to the position. This is, in effect, a numerical integration of the 1/2at^2 equations we all learned in physics class.

The position vector is immediately scaled down into screen coordinates (1 meter = 1 pixel = 1 unit). The remainder of the calculations, such as hit tests and bounds checks are performed in this coordinate system.

The proto/ subdirectory contains an Arduino sketch that was used as a prototype for this game. This allowed me to try out new ideas and figure out how the...

Read more »

  • 1 × Arduino Uno You know what this is!
  • 1 × Seeed Studio 2.8" TFT Shield The newer versions should work as well, but this has not been tested.

  • What a blast!

    Jim Shortz12/30/2016 at 01:39 0 comments

    Since I don't believe in publishing half-baked ideas, I did not create the Hackaday.io site until the project was completed. So, this will be a bit of a retrospective.

    The Arduino and Touch Shield were gifts from the estate of a recently deceased close friend. It seemed like the perfect platform for a video game project and I wanted to honor Don's memory by carrying on the kind of tinkering he liked to do with these.

    Since I was not at all familiar with the touch shield, I decided it best to write a prototype of the game in C using the Arduino software. This let me quickly iterate on the project and find out what kinds of graphics and game flows could be done simply, but still be interesting to play. I tried several different aiming interfaces before deciding on the crosshair. It also let me prove out the fixed point motion algorithms.

    As the prototype progressed, I started replacing pieces of the Arduino libraries with my own code to further prove it out. I have included the prototype code in the repo, so you can play that version too!

    My first task in the assembler version was to write the motion equations. Those were pretty straightforward and I was happy to see they only used 96 bytes. The next task was far trickier - getting the video routines and touch input working. I used the Arduino libraries as a starting point, but those were written in C, so I had to convert them. That conversion was basically an "all or nothing" operation - it either worked or it didn't. After a few failed attempts, I resorted to using GCC to produce an assembly output and then reformatting that to work in AVRASM. That netted me a working (albeit bloated) driver layer.

    Next was the touch screen interface, which went a bit smoother. Last was the game flow, point scoring, etc. By this point it was clear that this wasn't going to begin to fit. Rather than pile up too much "debt", I went through a number of iterations of shrinking things.

    Probably the biggest gains were had in the video routines. Since I had a working baseline, I would make very small changes (often a single line at a time) and test as I went. Ultimately I wound up significantly shrinking the send_command, send_data, and send_byte routines which would up being several times faster in the process. The initialization code was also huge. To shrink it, I simply deleted each line of code and re-tested. I deleted most of the lines in that process.

    The touch screen interface was my next target at 192 bytes. I was able to hack that down quite a bit by working out an offset, numerator, and denominator that would allow the pressure threshold to be tested using the exact same code as computes the X and Y coordinates. Pretty nifty, heh?

    Once I had a working game, I went through several more iterations, which included going back to the prototype. I really wanted to add randomly generated terrain. In order to have a place for the tanks to "rest", I decided to generate the terrain as 5 plateaus and only position tanks on the plateaus. This prevents the "dig into the side of a hill" problem. It was pretty straight forward to generate these, but without interpolation it looked like a Road Runner cartoon. By doing two passes with a 16-element averaging window I was able to produce beautiful curves, but the 16-bit math involved was well over 50 bytes. Turns out that by using a 2-element window I could do it all in 8-bit (terrain is always < 128) and simply ran the algorithm more times.

    Anyway, this project was a lot of fun, but it was far more challenging and time consuming than I had originally expected!

View project log

  • 1
    Step 1

    Install avrdude. The simplest way to do this is to install the Arduino software and execute it out of the c:\Program Files (x86)\Arduino\hardware\tools\avr\bin\ directory (or the equivalent is on your platform).

  • 2
    Step 2

    Install Atmel Studio 7 (optional). avra should also work. These tools are only needed if you want do change the code. Both products are free downloads.

  • 3
    Step 3

    Open the real\boom.atsln solution in Atmel Studio and build it or assemble main.asm if using avra.

View all 4 instructions

Enjoy this project?

Share

Discussions

Similar Projects

Does this project spark your interest?

Become a member to follow this project and never miss any updates