 Alan
AlanIntro
Hello! I made a fun project this time as well!
This project is very similar to the last one, but it's been upgraded a lot!
Check out the previous project for more information!
Hardware
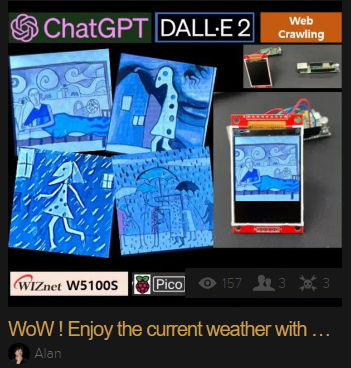
The configuration is very simple! All you need is a W5100S capable of Ethernet communication with Raspberry pico. I used the W5100S-PoE board that I developed. And just configure the switch circuit to press the SPI-enabled LCD and switch like last time, and that's it!

The pin setting is the same as the image above.

Ethernet Connectivity
The first thing to do is to do is to connect Ethernet. You can easily connect the Pico board to Ethernet by entering the Git below.

You can configure the computer to be a server and the Pico to be a client.
Image transfer / Display

while True:
    with open("back1234.bmp", "rb") as f:
        image_data = f.read()
    print(image_data)

    len_sent = f"LEN:{len(image_data)}".encode()
    print(f"length of sent data = {len_sent}")
    connectionSock.send(len_sent)
    time.sleep(1)
    connectionSock.send(image_data)
    time.sleep(1)
Pass the BMP image that has already been created over Ethernet. (Server)

while True:
    data = s.recv(MAXBUF)
    if not data:
        continue

    if len(data):
        print(len(data))
        if not len_buf:
            if b"LEN" in data:
                len_buf = int(data.decode().split(":")[1])
                print(f"length of buf = {len_buf}")
        else:
            buf += data
            if len(buf) >= len_buf:
                break

bmp_data = bytearray(buf)
with open("test.bmp", "wb") as f:
    f.write(bmp_data)
f.close()

group = displayio.Group()
display.show(group)

bitmap = displayio.OnDiskBitmap("/test.bmp")
tile_grid = displayio.TileGrid(bitmap, pixel_shader=bitmap.pixel_shader)
group.append(tile_grid)

os.remove("/test.bmp")
The client connects to the server and receives the image and displays it. (Client)
Select a card
You can choose the card you want with four buttons.
while True:
    pressed = button1.value + button2.value * 2 + button3.value * 2 ** 2 + button4.value * 2 ** 3

    if pressed != 15:
        break

s.send(f"{15 - pressed}".encode())
In the Client, click the button for the desired card number. It calculates bits by bits and sends data to the server. When you click button 1, number 1 and 2 send 2, number 3 send 4, number 4 send 8.(Client)
while True:
    data = connectionSock.recv(2)
    if not data:
        continue
    data = data.decode()
    card_num: str = ''
    print(f"received={data}")
    if data == '1':
        card_num = 'first'
    elif data == '2':
        card_num = 'second'
    elif data == '4':
        card_num = 'third'
    elif data == '8':
        card_num = 'fourth'

    query = "4 random cards flipped on pamela colman smith rws tarot deck." \
            "I picked the {} card. Please explain what this card is like. Please explain within 3 sentences".format(card_num)
    print(query)
When the server receives the data, it converts the data into the desired characters. And make a string to deliver to GPT.(Server)
Chat GPT
You can easily get a Chat GPT API Key from the site below.

def Chat_GPT(api_key, query):
    global answer

    openai.api_key = api_key

    model = "gpt-3.5-turbo"

    messages = [
        {
            "role": "system",
            "content": "You are the best tarotist."
        },
        {
            "role": "user",
            "content": query
        }
    ]

    response = openai.ChatCompletion.create(
        model=model,
        messages=messages
    )
    answer = response['choices'][0]['message']['content']
    print(answer)
I assigned the following role to Chat GPT and wrote a prompt accordingly.(Server)
query = "4 random cards flipped on pamela colman smith rws tarot deck." \
        "I picked the {} card. Please explain what this card is like. Please explain within 3 sentences".format(card_num)
print(query)
Chat_GPT(api_key, query)
The main code then combines the information about the click of a button received from the device into the prompt and forwards it to the GPT.(Server)
Dall-E-2
DALL-E 2 is an image generation tool created by OpenAI.
def dall_e2(answer):
    global image_url
    global image_data
    response = openai.Image.create(
        prompt=answer,
        n=1,
        size="256x256",
    )
    image_url = response['data'][0]['url']
    urllib.request.urlretrieve(image_url, "test.bmp")

    im = Image.open("test.bmp")
    im_resized = im.resize((220, 220))

    im_resized = im_resized.convert('P', palette=Image.ADAPTIVE, colors=16)

    im_resized.save("test_resized.bmp", format="BMP")
    with open("test_resized.bmp", "rb") as f:
        image_data = f.read()
    print(image_data)
The code for DALL-E 2 is structured as follows. One thing to note here is the Image size section. Since I don't have separate memory, I will save the image in BMP format to the Pico board's Flash and display it later.
Anyway, when sending and receiving data, the image size cannot be larger than the size of SRAM because the data is stored in SRAM.
In my experience, the program did not work properly when the image size exceeded 53k. I will upgrade this part in the future so that we can display even cooler images.
Chat_GPT(api_key, query)
dall_e2(answer)
In the main code, we send the data received from GPT back to DALL-E 2 as follows.

The Dall-E2 creates an image from the prompt sent by the GPT.
Display

Send the data to the Client as you did in the process above to display the image created by the Dall-E2!
Card Description
# Card Description
s.send(f"Card Description".encode())
After displaying the image, send the string Card Description to the server. (Client)
done = False
sent = False
while True:
    data = connectionSock.recv(100)
    if not data:
        continue
    print(f"received={data}")
    # if client sent OK all is done
    if data == b"OK":
        done = True
    if not sent:
        ret = connectionSock.send(answer.encode())
        sent = True
    # quit when client received my response
    if done:
        connectionSock.close()
        break
while True:
    data = connectionSock.recv(100)
    if not data:
        continue
    print(f"received={data}")
    # if client sent OK all is done
    if data == b"Reset":
        done = True
    break
When the server receives the "Card Description" message, it sends the description of the card it received through the Chat GPT to the client again

The Client will display a description of the card.
Complete
It's a motion video! Every morning, I use this tarot card to predict my luck.It's amazing that AI can do these things now!