Close
0%
0%

1 KB 6 legged crawling bot

the robot is controlled with an arduino nano and only uses 2 motors and 2 sensors. The program to control the robot is only 843 bytes big.

Similar projects worth following
I designed the robot completly from scratch. The robot only uses 2 small coreless motors and 2 photosensors. The robot walks towards lights as it compares the values between the front photosensor and the rear photosensor. If the rear sensor detects more light than the front sensor the robot will turn until the front sensor detects more light than the rear sensor and the robot will then walk towards it. I used 8 transistors to make the 2 motors run left and right and at different speeds using PWM (see wiring diagram). The program is only 843 bytes big as it only needs to read and compare the value's of the photosensors and only needs to tell the motors to go on or off, left or right. The robot is powered by a 2 cell 200 mah lipo. You can find the part files, code, wiring diagram and video in the dropbox link.

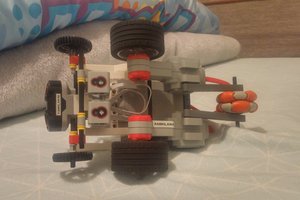
the controller is an arduino nano.

the coreless motors used in this project are from a small toy rc helikopter.

the bearings for the gears are just tubes from an antenna and this works very good.

the parts are printed in PLA plastic.

I used superglue to glue al the pieces together.

The transistors used are some I had lying around.

Standard Tesselated Geometry - 130.94 kB - 12/30/2016 at 17:04

Download

123dx - 100.76 kB - 12/30/2016 at 17:04

Download

Portable Network Graphics (PNG) - 53.50 kB - 12/30/2016 at 17:04

Preview
Download

123dx - 145.38 kB - 12/30/2016 at 17:04

Download

Portable Network Graphics (PNG) - 35.38 kB - 12/30/2016 at 17:04

Preview
Download

View all 69 files

View all 11 components

  • posted video of the robot walking

    Brian Brocken01/03/2017 at 22:51 0 comments

    I added a video in the dropbox link where you can see the robot walking. I did this after I got the question if the robot could walk because at some point the 2 middle legs would touch the ground at the same time and the question was if it would tip over. No it doesn't the robot its legs are moving to fast for it to tip over. So I posted a video with a slowmotion video where you can see the 2 middle legs touching the ground at the same time and the robot keeps walking/crawling.

  • I added a video in the dropbox link

    Brian Brocken01/03/2017 at 19:56 0 comments

    I added a video in the dropbox link. You can see the robot working and I show you how I made the robot.

  • removed the emergency pushbutton

    Brian Brocken01/02/2017 at 23:20 0 comments

    I removed the emergency pushbutton. This button was to prevent the robot from demaging itself during testing. You can see the two red wires that go to the pushbutton in the pictures.

View all 3 project logs

  • 1
    Step 1

    included in the files is a file called "anatomy spider bot" here you can see how to assemble the robot and wich are the left and right sides of the frame and the limbs.

  • 2
    Step 2

    Included in the files is a diagram to see how the connections to the arduino are.

  • 3
    Step 3

    included in the files is the code for the robot

View all 3 instructions

Enjoy this project?

Share

Discussions

ActualDragon wrote 01/07/2017 at 00:39 point

have you considered using some sort of distance sensor or dropping the tether (not for the 1KB challenge, but for the sake of hacking) with like a infrared module?

  Are you sure? yes | no

Brian Brocken wrote 01/07/2017 at 00:48 point

Yes i do have considered this but i wanted to do something different. I wanted to make a robot that walks towards light because all other robots have distance sensors and infrared sensors. But this setup works good to if you have dark walls so it will walk away from it. This doesn't work with lighter walls where it will walk towards it. I'll add aditional sensors in the future

  Are you sure? yes | no

ActualDragon wrote 01/08/2017 at 22:05 point

in that case, you could ditch the nano for as long as you want to keep the photoresistors or as long as you are still using it for the 1KB challenge. With as simple of a design as two photoresistors and two motors, you could follow the same basic design as https://www.radioshack.com/collections/maker-kits-parts/products/radioshack-running-microbug-kit, and just use the photoresitors as, well, you know, potentiometers. I could be wrong, just set me straight if i am.

  Are you sure? yes | no

Brian Brocken wrote 01/09/2017 at 16:37 point

yes i could do this but then I could have also just bought a hexapod kit online and put it together. Then you don't have as much fun as when you make it completely from scratch and write your own code and you can say to people look what I've build completely from scratch. And now with the nano on it I can edit its behavior. For example now it just turns around when its to dark and then walk straight again but i could also make it walk backwards first then let it turn and then let it walk straight again. And this is also an ongoing project so when i would add a new sensor I could just edit the code and then it works with the new sensor. It is much easier to edit a code than to make a complete new pcb board. And you can buy an arduino nano for only 3 euro's instead of the 14 euro's shipping not included. I just use arduino for all my projects because it's cheap and it's something I have lying around.

  Are you sure? yes | no

ActualDragon wrote 01/06/2017 at 16:11 point

the main reason i love this project is that its (for the most part) mechanical. try a google search for "hexapod". we all love electronics, but there is a huge margin for error, then give or take a week or two to figure out what the problem is, then anywhere from 20 to 100 dollars to fix it. this is one hundred times more reliable to work, and you probably don't even need brushless motors, but that makes it even more efficient. i love it, amazing project, may be the base design for my next one 

  Are you sure? yes | no

Brian Brocken wrote 01/06/2017 at 16:32 point

thank you very much. I really appreciate you like my design. And yes feel free to make one your own I've dropped all the files in the dropbox link.

  Are you sure? yes | no

ActualDragon wrote 01/06/2017 at 17:59 point

which link is the completed video? 69 files is a little tricky when you don't know what its called...

  Are you sure? yes | no

Brian Brocken wrote 01/06/2017 at 18:16 point

I only have 1 link. In this link you can find 2 video's. 1 video about how i made it and 1 video about the robot walking on a surface. You can also find al the part files under the tab "3D part files" here you can find stl-files and autodesk files. These files are ordened.

  Are you sure? yes | no

deʃhipu wrote 01/03/2017 at 21:00 point

Nice design. I can't help but wonder how you are making sure that there are always at least 3 legs on the ground? As far as I can tell, the two sides are powered independently, so they rotate with different speeds and are not synchronized in any way. That means that once in a while only the left and right middle legs will be down, while all four corner legs will be up, and the robot will be unstable and tip one way or the other. Is there something I'm not seeing there? I noticed that you only have videos of the robot in the air, and are never showing it actually crawling on the ground. Is that why?

  Are you sure? yes | no

Brian Brocken wrote 01/03/2017 at 21:30 point

You're right that at some point the 2 middle legs touch the ground at the same time but the robot his legs are moving fast enough to not tip over. The time he's on the 2 middle legs is just to short for the robot to tip over. And the reason i don't put it on the ground is that I just want to minimize the wear and tear on the robot because everything is mechanical and i also had a loose contact on my battery so I had to hold the battery in a certain positionin order for it to work. But I'll fix the losse contact and post a video of it walking on the ground.

  Are you sure? yes | no

deʃhipu wrote 01/03/2017 at 21:52 point

Thanks for the explanation, can't wait to see the video of it actually walking!

  Are you sure? yes | no

Similar Projects

Does this project spark your interest?

Become a member to follow this project and never miss any updates