I was tired with awful lifespan of these Electrolux cordless vacuums and wasn't ready to buy my 3rd unit and ignoring the fact that after 2 years I'd be in the same spot again. What pisses me even more is that the electronics in these things are precisely designed to last a few months more than the original battery, so don't mind trying replacing the batteries and expecting extended lifetime. Anyway, I took action.
Since I already have two working batteries from my beloved Dewalt Cordless Drill and knew how good and reliable those Li Ion packs are, I decided to use them. They were doing and excellent job powering my USB-C electronic soldering iron, are widely available in different capacities and probably won't go obsolete any time soon.
For this project, I'm using the Electrolux ErgoFast ERG14, but the concept goes the same for any other unit. Here is the component list:
- 3D Printed Battery Slot (see attached files)
- 20A Step down buck converter (DC/DC) with enable switch
- Power wire, 2mm at least
- On/off switch
- 4x M5 20mm allen bolts w/ nuts
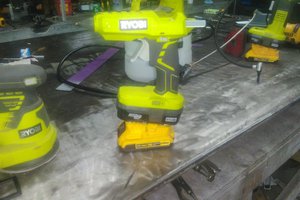
The battery slot included here was designed for the ERG14 handle, so you might want to edit it to match your model. You should fix it in the back of the hadle, like you see in the pictures, using the 4 bolts and nuts. You might need to clip some internal plastic parts to fit things in there. For the battery clips I'm using two small knife connectors, but any metal thing that fits in the slot goes. Fix them in position with Epoxi glue. I printed mine with black PETG filament and it works fine. I have attached the STL file in this project.
You don't really need a 20A buck converter, but one should be wise when using Aliexpress dirty cheap electronics. Derating is always good. These things work with ~85-95% efficiency, so I installed it inside the vacuum unit, right above the motor, like in the picture. There's lot of forced air there, so it will run cool and I hope it'll have better reliability, because the Electrolux one didn't. If you're trying to buy one of these, just search for "aliexpress 20a buck converter", they go for around USD 5.
The rest is making lots of holes in the plastic case and wiring things like shown in the diagram, and also finding space for the new added parts. You should have plenty of room, since you'll remove the original electronic boards and the battery cells. It is important to notice that you won't have the portable vacuum mode anymore, since the battery will be attached to the handle, and hardwired in place. You may use the original contact connection in the bottom of the portable unit for connecting the on/off switch and 12VDC source to the brush DC motor.
 Neal D Corbett
 leadacid44