For months I have been working on a project called "Electronics Online Platform" which allows us to work with electronic components such as Arduino and modules like LCDs, Sensors, Input Output and etc and programing them and see the result of the program remotely.
the idea is to make an electronics hardware with a microcontroller (in this case Arduino) and some useful modules such as LCDs, Sensors, Keypad, Rotary Encoder, temperature Humidity Sensor, EEPROM, RTC, UART and etc which could be access through a browser.
with this platform everybody could make their electronics project and learn how to work with electronics part and the see the result of their work. so everybody could work with electronics and make their own project and learn with our electronics components for free.
Why just dont using the simulation software? well we all worked with simulation software or simulation platform witch is great and useful but after all in reality testing result might be diffrent sometimes. so basicly the answer is. because its REAL and reliable.
the idea started with a question? Can we work with real electronics components but through a software or browser instead of virtual simulation? can we make learning Electronics a lot easier than it was for the begginers? Can we make the problems less and the results more?
And the answer for months was NO. Well you know there are many questions in it.
Like how are you going to make a physical connection online? How do people would see the results of their program? How to upload their program to Microcontroller? How to trigger the mechanical parts like keypads and rotary encoders? And the list of questions is many.
After months of finding a way to solve every problem, I decided that this project might be doable and got started.
now I have made the result of my work available to everyone in the world and I want to share with you how you can use this platform for free and start learning arduino with nothing.
َLets see a simple example of how its work
How To Use
For using this platform you should first make a reservation for the device.
1: make an account in ElectronicsCatalyst.com and verify your email (To avoid spam reservation)
2: goto page dawn.ElectronicsCatalyst.com in reservation section enter your email and choose a password and select your desire time.
3: login to the platform and use it
for more detail goto Electronics online platform documention
Start coding
for example we want to show the DHT11 and DS3231 data (temprature, humidity, time) on the SSD1306 OLED 0.95".
here is the example code wrote in arduino also you can download it form attachments
#include <Wire.h>
#include <Adafruit_GFX.h>
#include <Adafruit_SSD1306.h>
#include "DHT.h"
#include <DS3231.h>

RTClib myRTC;
DateTime now;

#define DHTPIN 2
#define DHTTYPE DHT11   // DHT 11
DHT dht(DHTPIN, DHTTYPE);

int humidity;
int temprature;

#define SCREEN_WIDTH 128 // OLED display width, in pixels
#define SCREEN_HEIGHT 64 // OLED display height, in pixels

// Declaration for an SSD1306 display connected to I2C (SDA, SCL pins)
Adafruit_SSD1306 display(SCREEN_WIDTH, SCREEN_HEIGHT, &Wire);
String DateTime;

void setup() {
  Serial.begin(115200);
  dht.begin();

  // SSD1306_SWITCHCAPVCC = generate display voltage from 3.3V internally
  if (!display.begin(SSD1306_SWITCHCAPVCC, 0x3D)) { // Address 0x3D for 128x64
    Serial.println(F("SSD1306 allocation failed"));
    for (;;); // Don't proceed, loop forever
  }
  // Clear the buffer
  display.clearDisplay();
  delay(500);
}

void loop() {
  // put your main code here, to run repeatedly:
  humidity = dht.readHumidity();
  temprature = dht.readTemperature();
  if (isnan(humidity) || isnan(temprature)) {
    Serial.println("Failed to read from DHT sensor!");
    return;
  }

  now = myRTC.now();
  DateTime=String(now.hour())+":"+String(now.minute())+":"+String(now.second());

  ShowOnLCD();
  PrintDataOnSerial();
  delay(1000);
}
void PrintDataOnSerial(){
  Serial.println(DateTime);

  Serial.print("Humidity: ");
  Serial.print(humidity);
  Serial.print(" %  Temprature: ");
  Serial.print(temprature);
  Serial.println(" C ");
}
void ShowOnLCD() {
  display.clearDisplay();
  //display.setFont(&FreeMonoBold18pt7b);
  display.setTextSize(2);
  display.setTextColor(WHITE);
  display.setCursor(15, 0);
  display.print(DateTime);
  display.setTextSize(3);
  display.setCursor(2, 28);
  display.print(temprature);
  display.print("C ");
  display.print(humidity);
  display.print("%");
  display.display();
}
after that we need to export the hex file from our code. in Arduino you can goto sketch > export compiled binary.
Now login to the Electronics online platform using your user name and password after reservation.
after login you will see the main page witch contain all the things you need.
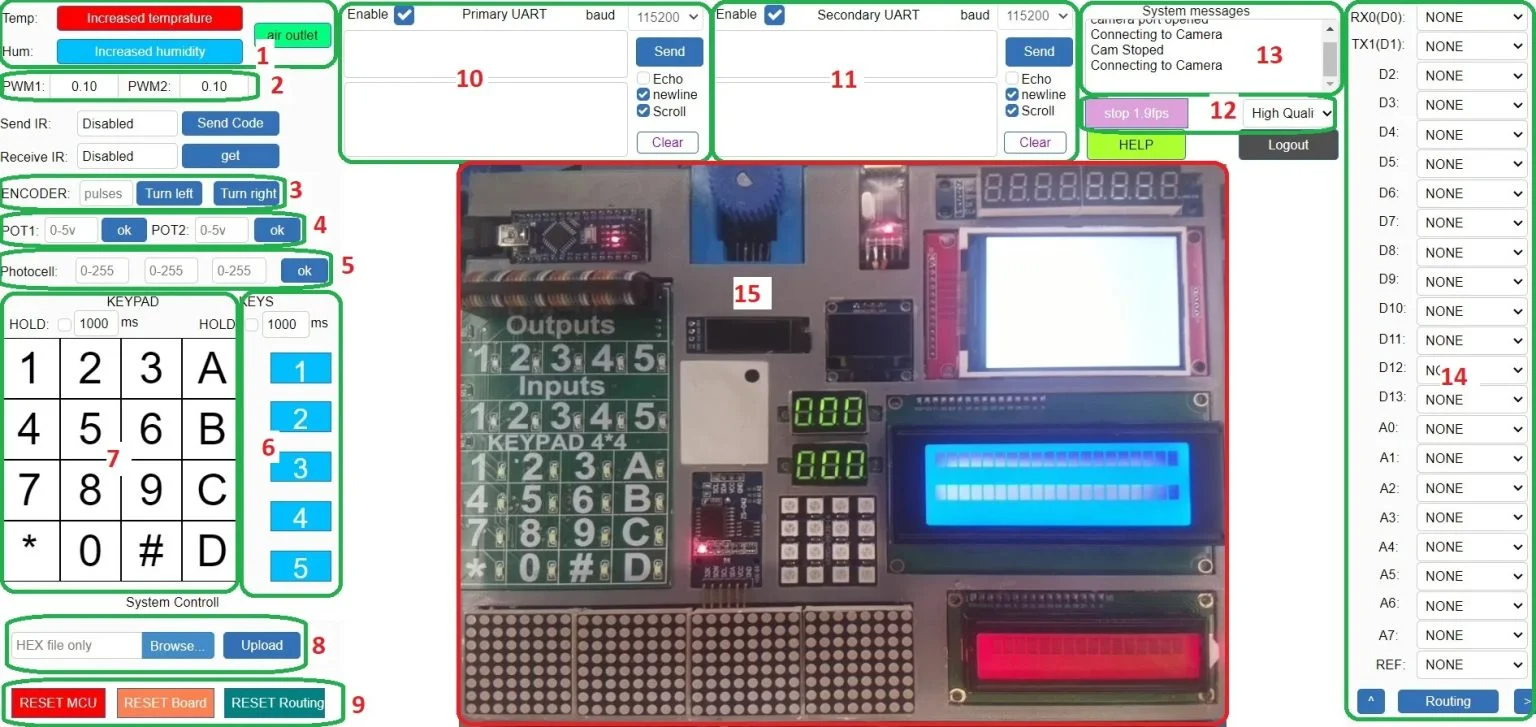
after login you should do 3 things to run your program.
First. upload your HEX file by select the file and click upload (section 8 in the picture)
Second. make the connection based on your program (section 14): D2 -> DHT11 (for sensor), A4 -> I2C-SDA & A5 -> I2C-SCL (for oled display and ds3231 rtc)
after selecting this connection by pressing the Routing button it will make your connections automaticly
Third. open camera and reset the MCU. by clicking open cam button (section 12) you will see the hardware throght the camera and then by Clicking on the Reset MCU (section 9) your program will be restart and you can see the result of you program.
Note: this was a simple example for this Device. for more detail about this device and other example you can see the Documention here
If you have any questions or suggestions, please let me know in the comments or directly.