 Miguel Tomas
Join the WhatsApp group here.

The problem
Nowadays, installing solar photovoltaic panels on big city buildings is limited to the roof area of the building. This means little power generation capabilities for energy savings when considering each individual apartment.
The idea
The idea of this "Smart Home Solar Power Management" Project is to develop simple components and accessories that enable easy, "for dummies" kind of installation of solar photovoltaic cells. For that to happen is required installation of additional wiring in the apartment electrical network. Staring with a 5V DC wire, suitable for most small home appliances such as vacuum cleaners, smartphones, tablets, and any other smart device or technology. And another with 12V DC suited for computers, gaming consoles, and OLED TV displays.
Energy storage methodology follows a decentralized architecture of installation, where each individual room or compartment has its own "independent" battery storage up to 40.000mAh. All connected to any Smart Home device I made available on my Github.
The solar panels can be assembled in a Lego-style kind of way. Due to the reduced photovoltaic solar cells, can be assembled into any shape or area. For instance glass door windows and doors. For instance in a terrasse or a terrasse exterior wall regardless of floor area shape..
Assembly and Installation of two solar panels in a window
On the previous iteration i began assembling the solar cells and soldering them into the support hardware. This make the solar cell much more resistant to handing when moving them and installing on a window.
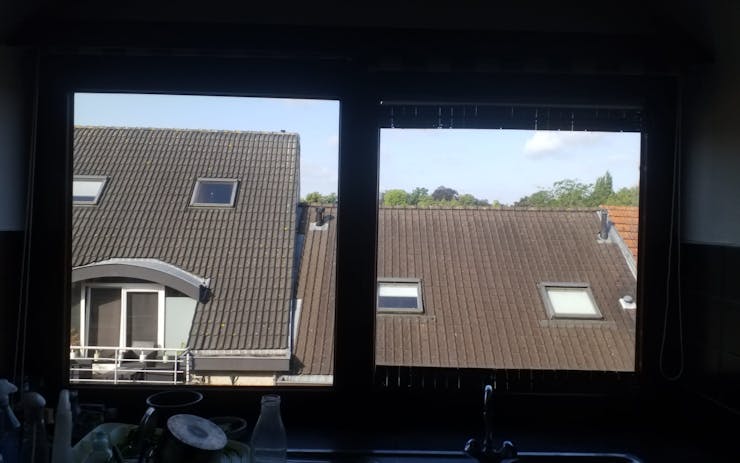
Comparison of window area occupied by the solar cell installation. To the left without solar cells
I installed a total of 40 solar cells connected together in series of 10. The total output for this window alone is 6.2V and 5,200mA. This is still a provisory installation before the final. Is now only missing a piece of wood, equal to the existing on the window frame and cut to size and match the solar panel dimensions.

Close up detail of the solar cell installation at the bottom of the window
To connect the solar panels to the "power bank" I used a transparent copper wire found on most stereo and audio systems and with enough gauge to handle peak electricity production and output,
Solar Power Management
On every row of solar panels on the window above is installed at hinge side a solar panel power management PCB with the main and only functionality of stabilizing power output o a constant 5V DC . This hardware electronics is connected directly to the solar panel assembly. The electrical wiring connects to it for distribution and energy storage at a nearby "power wall". This is the 1st revision of the hardware and can be found on this Github repository.

Solar Power Management hardware Module
This PCB is for assembly with 79x38mm solar cells. It features up to 6x independent solar cell power lines, with a minimum efficiency of 92>#/b### and up to 97.1 >#/b###, that can be configured on a dip switch for 3 different DC outputs:
- 5V
- 9V
- and 12V
for a maximum of 9A. On the photo below one can see a close up of the Solar Power Management hardware Module already connected to the solar cells on a window.
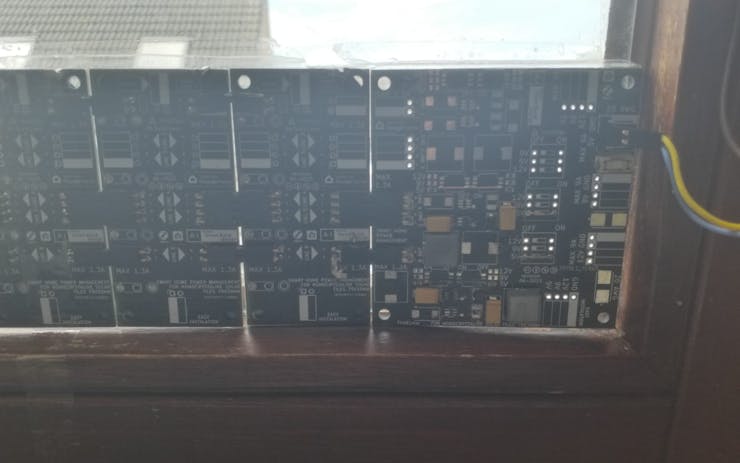
Close up of the Solar Power Management hardware Module
Previous "power wall" installation
The 1st iteration of a "power wall" was the simplest installation requiring only a TP4056 BMS module. This installation had a total storage capacity 16,000mA and the electrical network was operating at a maximum of 4.2V and without any power conversation or stabilization. This meant all indoor illumination connected started to dim and fade as soon as the power was turned on. Spite this immediate disadvantage it has another as great advantage. Since the room illumination it powers is only for ambient lighting purposes, as the night advances, the LED dim and fade "automatically" adjusting the light intensity "lumens" just before bed time. The second biggest advantage of a setup like this, is on prolonged power and usage at night lasting until the next morning,

1st iteration of a "power wall" installation
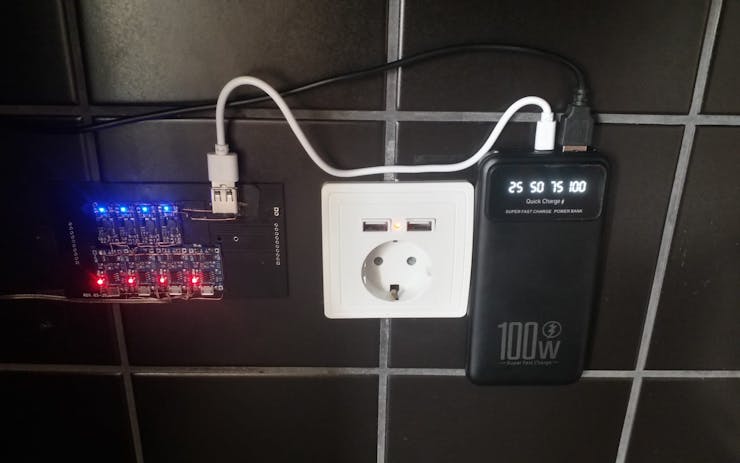
2nd Iteration of the "power wall" installation
The 2nd iteration of the "power wall" was intended to replace all the 18650 LiPo batteries with a regular 20,000mA fast charge power bank. I assembled in parallel 4 step up converters to boost DC power from the solar panels to a stable 5V DC. and connected it directly to the power bank using a USB A to micro USB cable (see photo below)

2nd iteration of the "power wall"
However to my surprise the power bank was not charging , or charging so slowly it was impossible to notice it. The other challenge was when powering the illumination LED light at night., as I come to understand, the power bank was not "detecting" the LED lights and thus not providing any power output,
C,ose up of the 2nd iteration of the "power wall"
While I was searching and reading on the internet about this, i decided to add the LiPo batteries I had from the previous setup

2nd iteration of the "power wall" with a total of 44,000mA of storage
Current Status of Development
2nd iteration
The current status of development of this project has now the following preliminary conclusions:
To optimize power storage , is necessary to have individual "power walls" according to output voltage and power requirements than to have a single bigger battery pack.
Initially I was aiming at an additional 10 euro a month savings on the utilities bill , however, recent prototypes show that is possible to repurpose any apartment on any big city to become independent of the main power grid for the following home appliances :
- indoor illumination
- small home appliances such as a battery powered vacuum cleaner , manual operated or a robot
- Smart devices such as smartphones, tablets or any other smart appliance
- OLED TV screens, and laptop computers
Additional energy savings can be achieved, if installed with a "home occupancy management system" to monitor occupants habits:
- to provide an optimized electricity usage schedule to each of the occupants
- to detect empty an room/ compartment
- to regulate light intensity during evenings and at night before going to bed. Synchronizing with the human biological clock cycles.
Conclusions
Power adjustments on the solar panel it self are necessary if one is looking to deploy a solar system with the highest efficiently possible. On this 2nd iteration, power produced by the solar cells array is converted to a stable 5.0V DC output and the maximum difference of power when converting at maximum solar light is only of 1.2V (the solar cell array outputs a maximum of 6.2V DC) . This design consideration alone, enables raising the efficiency of the system to almost its maximum theoretical efficiency . On this particular case, I'm using the MT3680 IC with a maximum efficiency of approx.. 97%.
Next:
The 4th prototype iteration of this same project, advances into the next milestone. Enable AC to DC scheduled power charging to allow charging of a power wall during the periods when electricity is cheaper, usually during the nigh. In the meantime check my Tweets about his and other projects.