 ElectroBoy
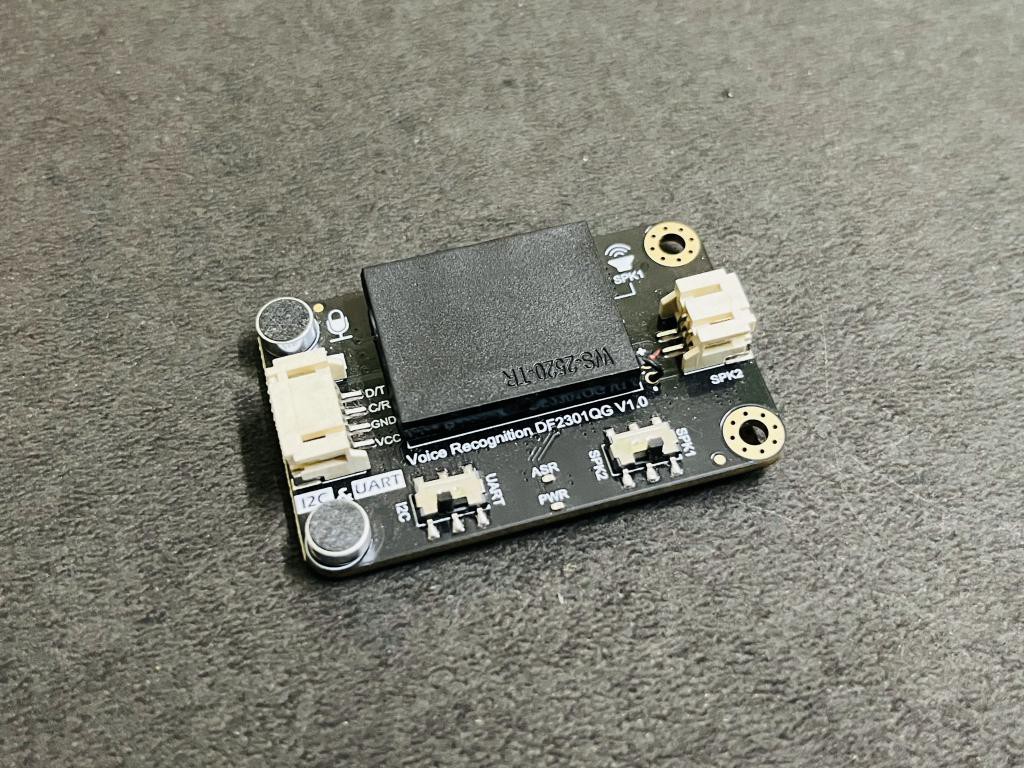
I will say this DF2301 is a smart sensor, not because it has some AI or Internet models working inside. Because this sensor is capable of giving you the essence of new generation Machine learning models. Running on a small microcontroller it is able to convert the speech signals into text by recognizing them. This module can be trained to do different tasks, as the tutorial will proceed I will tell how to train the module. I think this is the best piece of electronics and computer engineering, having a lot of features. This offline speech recognition sensor is built around an offline voice recognition chip, which can be directly used without an internet connection. It comes with 121 built-in fixed command words and supports the addition of 17 custom command words.
This small sensor can be interfaced with any microcontroller board and then different actions can be performed over voice. It will be the same as Alexa but with much more restricted commands and answers. Because overall it is a small ML model working on a little microcontroller. Some popular applications are such as various smart home appliances, toys, lighting fixtures, and robotics projects, among others.
Being a huge fan of Marvel and Iron Man it is very interesting to rename the voice assistant model as “JARVIS”. Now the Jarvis has power to ON/OFF the home appliances without any connection to the internet.
Features:
- Self-learning function: Learn command words by the voice
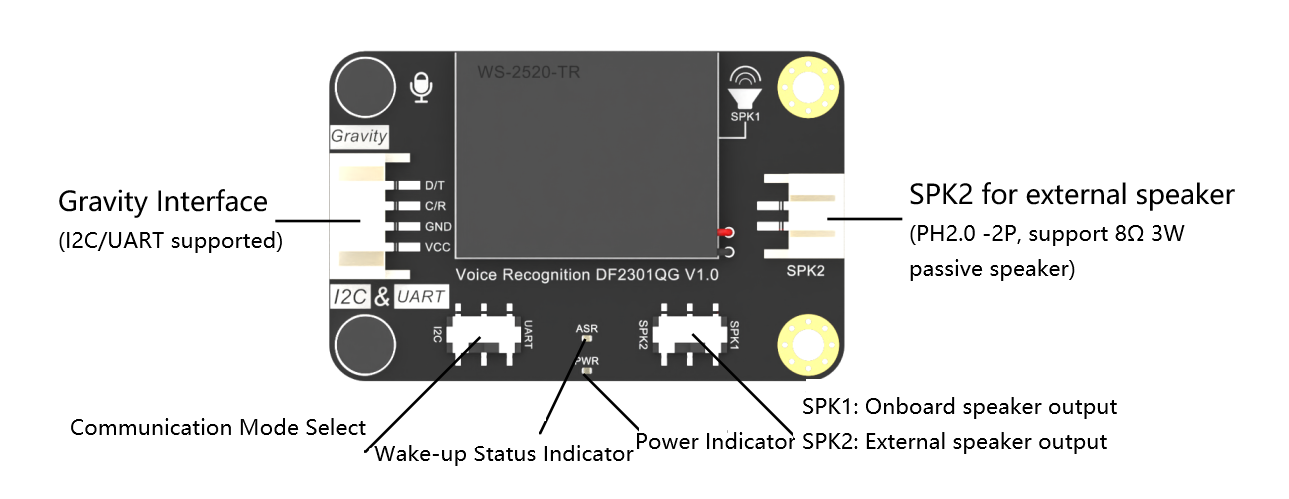
- Support I2C and UART
- Compatible with 3.3V/5V
- Built-in with 121 commonly-used fixed command words
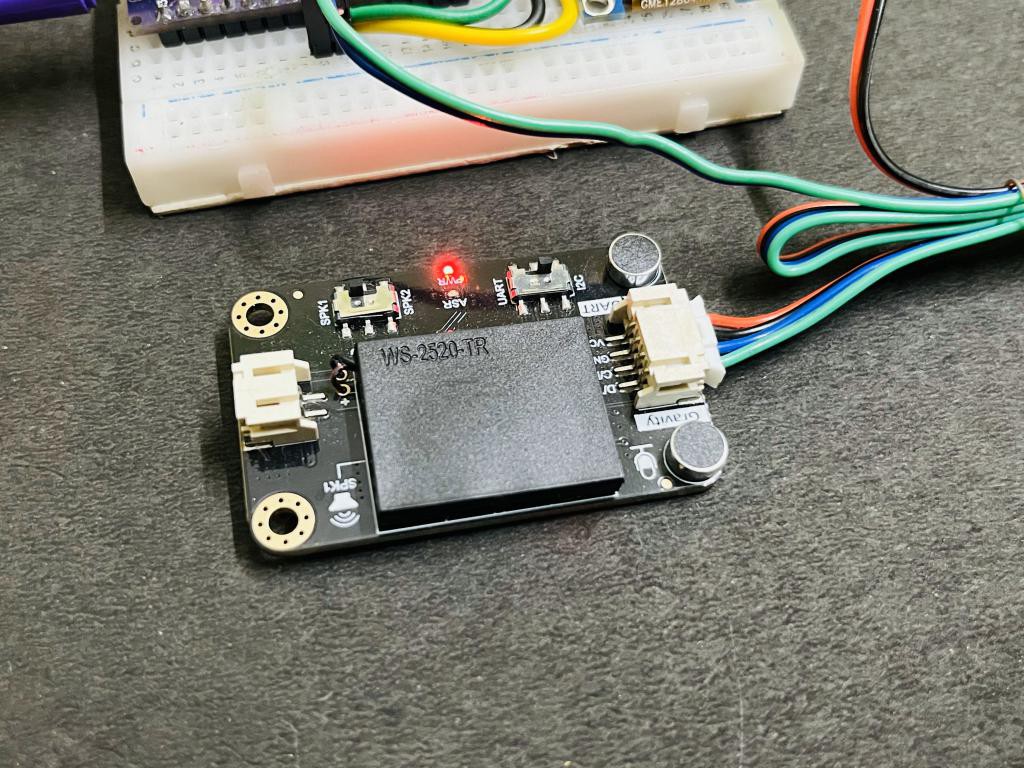
- The module has a built-in speaker and an interface for an external speaker,
- Equipped with power indicator (red) and recognition status indicator (blue)
- Dual microphones provide better noise resistance
- Compatible with Arduino, Raspberry Pi and ESP32
Specifications:
- Operating Voltage: 3.3 - 5V
- Maximum Operating Current: ≤370 mA (5V)
- Communication: I2C/UART
- I2C Address: 0x64
- Fixed Command: 121
- Fixed Wake-up Command: 2
- Custom Command: 17
The same module can be used for smart home configuration, making a solid state relay interface with module and microcontroller on a single PCB. This tutorial is sponsored by NextPCB, China Best PCB manufacturer providing PCB, PCBA, Stencil, SMT and BOM services. Try free PCB assembly prototyping on first 5 pieces of PCB.
Check the requirements of PCB, Free shipping of electronics components, And it is always fun to use free DFM Gerber Viewer to inspect the PCB details.
How the algorithm works:
Voice recognition is a computer technology that recognizes and converts speech signals into editable text or operational commands through analysis. It allows people to interact with computers by speaking without using a mouse, keyboard, or other input devices. Voice recognition technology has been widely used in applications such as voice assistants, smart homes, voice search, and voice recognition notebooks.
What are Fixed/learned Command words and wake-up words:
I will try to keep it as simple as possible, I will divide all the words in 3 sections as per action. See the block diagram given below.
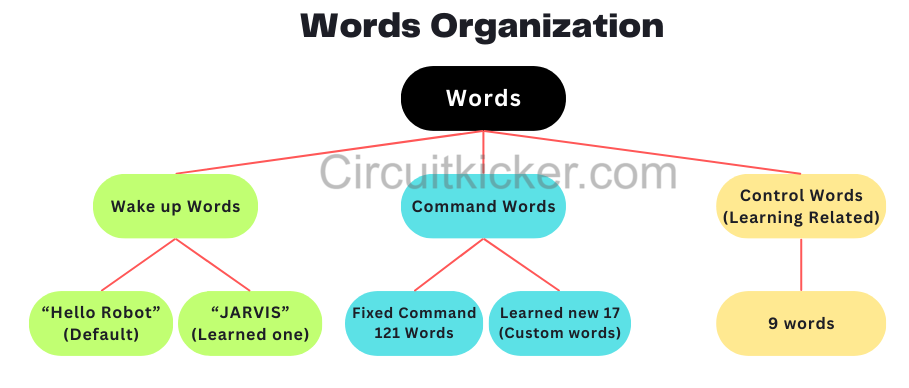
1) Wake-Up words: The wake-up word refers to the word that switches a product from standby mode to operational mode. It is the first command which is given to wake the module. It is similar to saying “Alexa” ,“Hey Siri” ,“OK Google”. Same as that here the default wake up word is “Hello Robot” and it is the default one. We can also add one more wake work which is demonstrated below as “JARVIS”
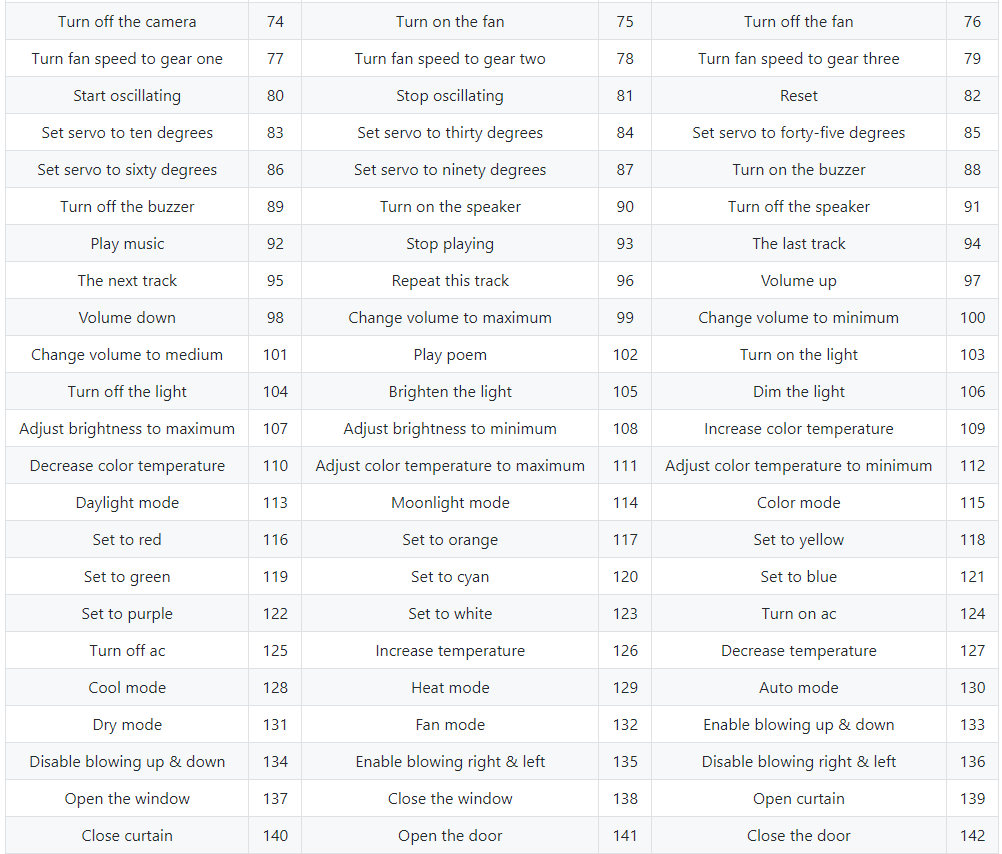
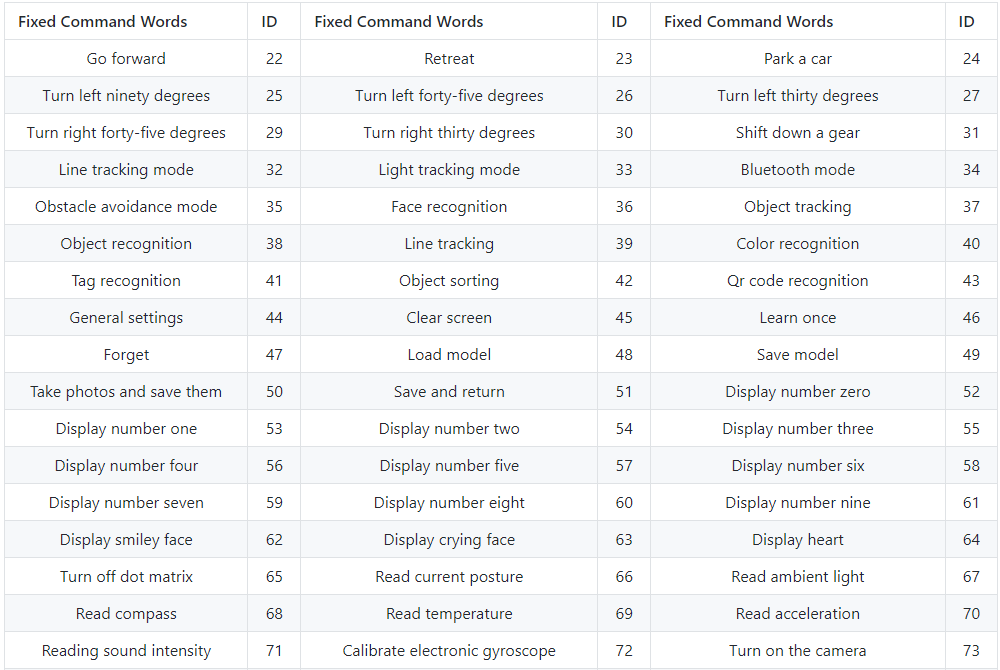
2) Command words: Fixed command words refers to the designated vocabulary used by users to issue specific instructions. Here these words are essential because, after all, this is an offline module and does not have external data/server from the internet to process. So these are the already processed, trained words which are stored in the memory of the module and whenever triggered produce the corresponding ID, which can be used to specify the different actions later on. There are a total of 121 words which are already defined for specific functions over different ID’s.
Now whenever working on a project it is not always good luck that these commands work for you. Means sometimes we need some other commands. Which is possible to do here, known as a custom command word. And there are a total of 17 Custom command words you can train the model on.
3) Learning Related Commands (Control Commands): These are the command words which are used to interact with the Machine learning model. These are the Controlling commands which initiates the learning and deleting of Wake-up words and command words.

Process to Train the model on new command words:
Use the wake-up word “Hello Robot” to wake up the voice assistant. Let the learning command be “Turn on red light” just for example.
User will say: "Learning command word" Module reply: Learning now, be quiet, please learn the command word according to the prompt! Please say the first command to be learned!
User will say: “Turn on red light"
Module reply: Learning successful, please say it again!
User will say : "Turn on red light"
Module reply: Learning successful, please say it again!
User will say : "Turn on red light"
Module reply: OK, learned the first command successfully! Please say the second command to be learned!
This process takes a few iterations because the module is in learning mode and training itself on new words. Now if you don’t want to set any second command word then ends up the learning by:
User will say: "Exit learning"
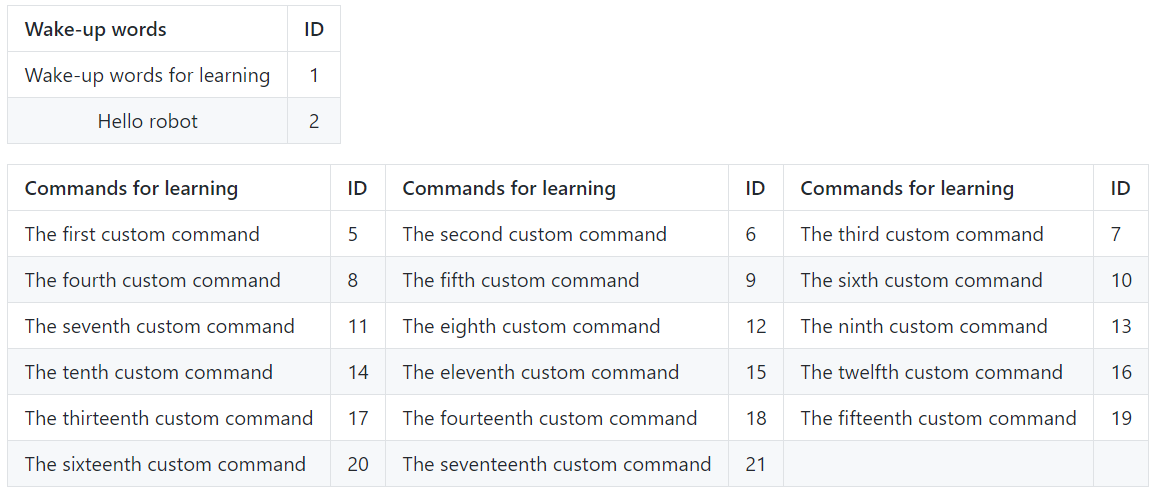
After the completion of the learning process, an ID will be automatically generated. Please see the table given above for the wake up/ Custom and Fixed command words. Before each session of learning command phrases, it is necessary to delete the previously learned command phrases.
Adding another wake-up word:
Say I want to name my module “JARVIS” which I want to set as a wake up word. Only one extra new wake word is possible to add. You can also use “Hello Robot” because it always remains the default keyword.
Initiate the voice assistant by employing the default wake-up word “Hello Robot”.
User will say: "Learning wake word".
Module reply: Learning now, be quiet, please say the wake word to be learned!
User will say: “JARVIS”
Module reply: Learning successful, please say it again!
User will say: "hello, there"
Module reply: Learning successful, please say it again!
User will say: "hello, there"
Module reply: Ok, learning completed!
Once the learning process is accomplished, you will be able to utilize the phrase "JARVIS" to awaken the voice assistant!. See the short video on how to add another wake word.
Delete Wake Words and Command words:
For example I want to delete all the learned words. Initiate the voice assistant by employing the default wake-up word “Hello Robot”.
User will say: "I want to delete"
Module reply: Do you want to delete the learned wake word or command word?
User will say: Delete command word
Module reply: Successful
User will say: Delete wake word
Module reply: Successful User will say: Delete all Module reply: Successful
User will say: Exit deleting
First Time power on:
While turning on for the first time, Some hardware settings could be done. The module has an integrated interface of I2C and UART. Usually I2C is used because of having good speed. So choose the I2C by sliding the switch to that position. This board has the option to use an onboard or external speaker, which can be configured by the user. A small onboard amplifier is then used to power the external speaker. The blue light on the module indicates the active mode and the red light indicates standby mode. Whenever the wake word is spoken the module pushes itself in active mode from standby mode and then we can perform further actions.
Arduino Sketch:
This is the sketch for configuring the module in I2C mode, Learning, custom and fixed commands can be performed by uploading the sketch to Arduino and making connections with I2C. Download the Library from here.
#include "DFRobot_DF2301Q.h"
//I2C communication
DFRobot_DF2301Q_I2C DF2301Q;

void setup()
{
  Serial.begin(115200);
  // Init the sensor
  while( !( DF2301Q.begin() ) ) {
    Serial.println("Communication with device failed, please check connection");
    delay(3000);
  }
  Serial.println("Begin ok!");

  /**
   * @brief Set voice volume
   * @param voc - Volume value(1~7)
   */
  DF2301Q.setVolume(7);

  /**
   * @brief Set mute mode
   * @param mode - Mute mode; set value 1: mute, 0: unmute
   */
  DF2301Q.setMuteMode(0);

  /**
   * @brief Set wake-up duration
   * @param wakeTime - Wake-up duration (0-255)
   */
  DF2301Q.setWakeTime(15);

  /**
   * @brief Get wake-up duration
   * @return The currently-set wake-up period
   */
  uint8_t wakeTime = 0;
  wakeTime = DF2301Q.getWakeTime();
  Serial.print("wakeTime = ");
  Serial.println(wakeTime);

  /**
   * @brief Play the corresponding reply audio according to the command word ID
   * @param CMDID - Command word ID
   * @note Can enter wake-up state through ID-1 in I2C mode
   */
  // DF2301Q.playByCMDID(1);   // Wake-up command
  DF2301Q.playByCMDID(23);   // Common word ID

}

void loop()
{
  /**
   * @brief Get the ID corresponding to the command word
   * @return Return the obtained command word ID, returning 0 means no valid ID is obtained
   */
  uint8_t CMDID = 0;
  CMDID = DF2301Q.getCMDID();
  if(0 != CMDID) {
    Serial.print("CMDID = ");
    Serial.println(CMDID);
  }
  delay(3000);
}
Configuration required:
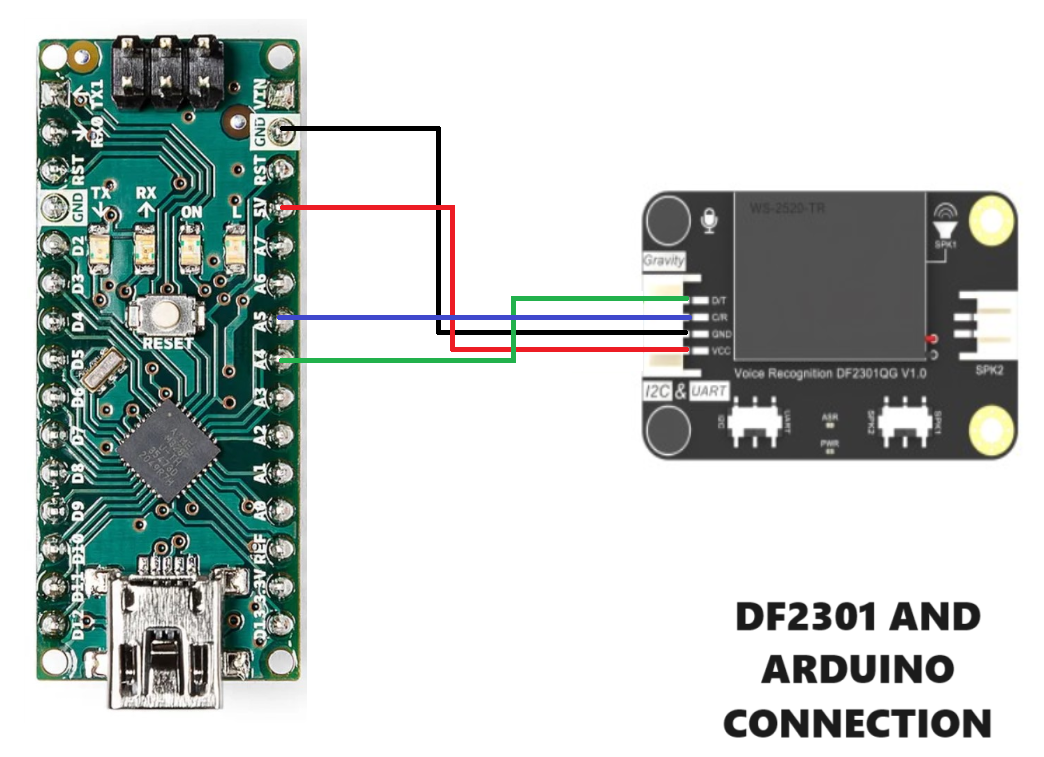
To configure the Module and to initialize the learning mode upload the above given sketch in Arduino and connect the module according to the diagram given above. Connect the power supply and we are ready to go. All the custom commands need to be recorded in one go so write the required custom command on paper and then record them in once. In the sketch some controlling functions are given to set up the volume, mute settings and commands settings which can be changed by the user as per application. Any digital or analog action can be performed by changing the logic in code, which gives all the access to GPIOs. In this way this module can be used as Small home assistance, Because here every command ID works as a signal to Arduino and code logic turns On/OFF the respective port or pin.
Troubleshooting:
While turning the first time module may remain in standby mode for a long time this is because after the 1st time power on the module will automatically turn on and then off, which may take 30-45 seconds. So do not disturb until Module replies “I am off now”. Try NextPCB PCB assembly services now and turn your ideas into real world projects.