 wismna
Update 01/19/2017
Simpler installation!
Creating the ethernet gadget
The really simple way create a gadget on the Pi is to follow this guide and use g_ether kernel module. However, g_ether is a legacy module that definitely does not work on Windows. During all my tests, the gadget was systematically recognized as a COM3 device. I couldn't even force newer versions of Windows (10) to use an Ethernet driver. Also, it's impossible to emulate more than one device at the same time.
I then found with this great guide, which uses the libcomposite kernel module. This is far more advanced as it allows precise configuration of the gadget, as well as giving the ability to emulate more than one device at the same time.
I created an Ethernet gadget adapter as well as the serial adapter in a single configuration. The serial adapter is very very useful, especially while testing the Ethernet configuration, as if you make a breaking change and can't ssh back to your Raspberry Pi Zero, you still can use the console: sudo screen /dev/ttyACM0 115200
To make the Ethernet gadget work on Windows, I used a little trick. When Windows is communicating with the adapter, it will look in its .inf files for a matching driver based on idVendor and idProduct (as well as bcdDevice for revision). Knowing this, I used
echo 0x04b3 > idVendor
echo 0x4010 > idProduct
so that Windows would load its generic RNDIS driver netimm.inf. However, this still wouldn't work for me, even though it appeared to be working for other people. Windows would load the driver but fail to start the adapter with a code 10 error.
Browsing a bit (a lot...) I determined that Windows would only reliably work with a RNDIS configuration. So I added a new configuration designed to emulate the RNDIS function. This configuration had to be defined first for Windows to work. Linux and Mac (supposedly) are smart enough to ignore it and load the second one, the CDC ECM configuration. And lo and behold, it worked! Windows correctly loaded the driver and the adapter, with no manual intervention. Unfortunately it didn't work on Linux anymore... great.
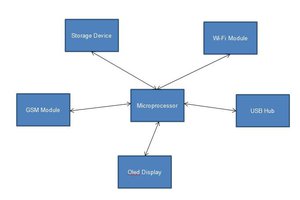
Bridge interface
I realized (thanks to the serial console) that each configfs configuration creates a new network interface (usb0, usb1 and so on). However, all the servers were listening exclusively on usb0, which was assigned to the RNDIS configuration. Linux ignored this configuration to load the CDC ECM one, where no servers (especially ISC-DHCP) were listening and no routes nor iptables rules were added.
The easy solution would have been to duplicate everything, but I decided instead to create a bridge interface, br0, which would be the master of all usbX interfaces. Then, I would make the servers listen on that interface, as well as add the routes and iptable rules. After a bit of fiddling around, it worked!
My gadget was now automatically recognized by Windows and Linux, without having to change anything to the configuration files. Unfortunately (bis...) the gadget stopped working on MacOs, and this is because since version 10.11, it's no longer smart enough to load the CDC ECM configuration if it isn't the first one! I now needed a way to make the gadget recognize the host it was connected to via USB fingerprinting, so that I could better configure libcomposite.
OS fingerprinting
This is where the fun began. I had two big issues to overcome:
- Find a way to dump, trace or sniff USB traffic on a USB controller set up as a device
- The chicken and the egg problem: to trace USB traffic, the gadget needed to be set up, but to be set up correctly, I needed to trace USB traffic...
The first thing to do was to find a way to dump incoming USB traffic. The obvious answer was to use the usbmon kernel module which allows tracing of USB data. Unfortunately, this doesn't work at all (no data is captured) when the USB controller is in device mode. But to create a USB gadget of any kind, the controller has to be set in device (or peripheral) mode. So no usbmon, and by way of consequence,...
 fadilluquman
 CarbonCycle
 helge
helge
 ACROBOTIC Industries