Close
0%
0%

Temperature Card

The Temperature Card is a wearable XIAO and SSD1306-based device that displays the current temperature using an SHT40 sensor.

Public Chat
Similar projects worth following
68 views
0 followers
Here's something cool: The TEMPERATURE CARD The project is a wearable ID card-like device that has an OLED screen that displays live temperature readings taken from the SHT40 temperature sensor module.

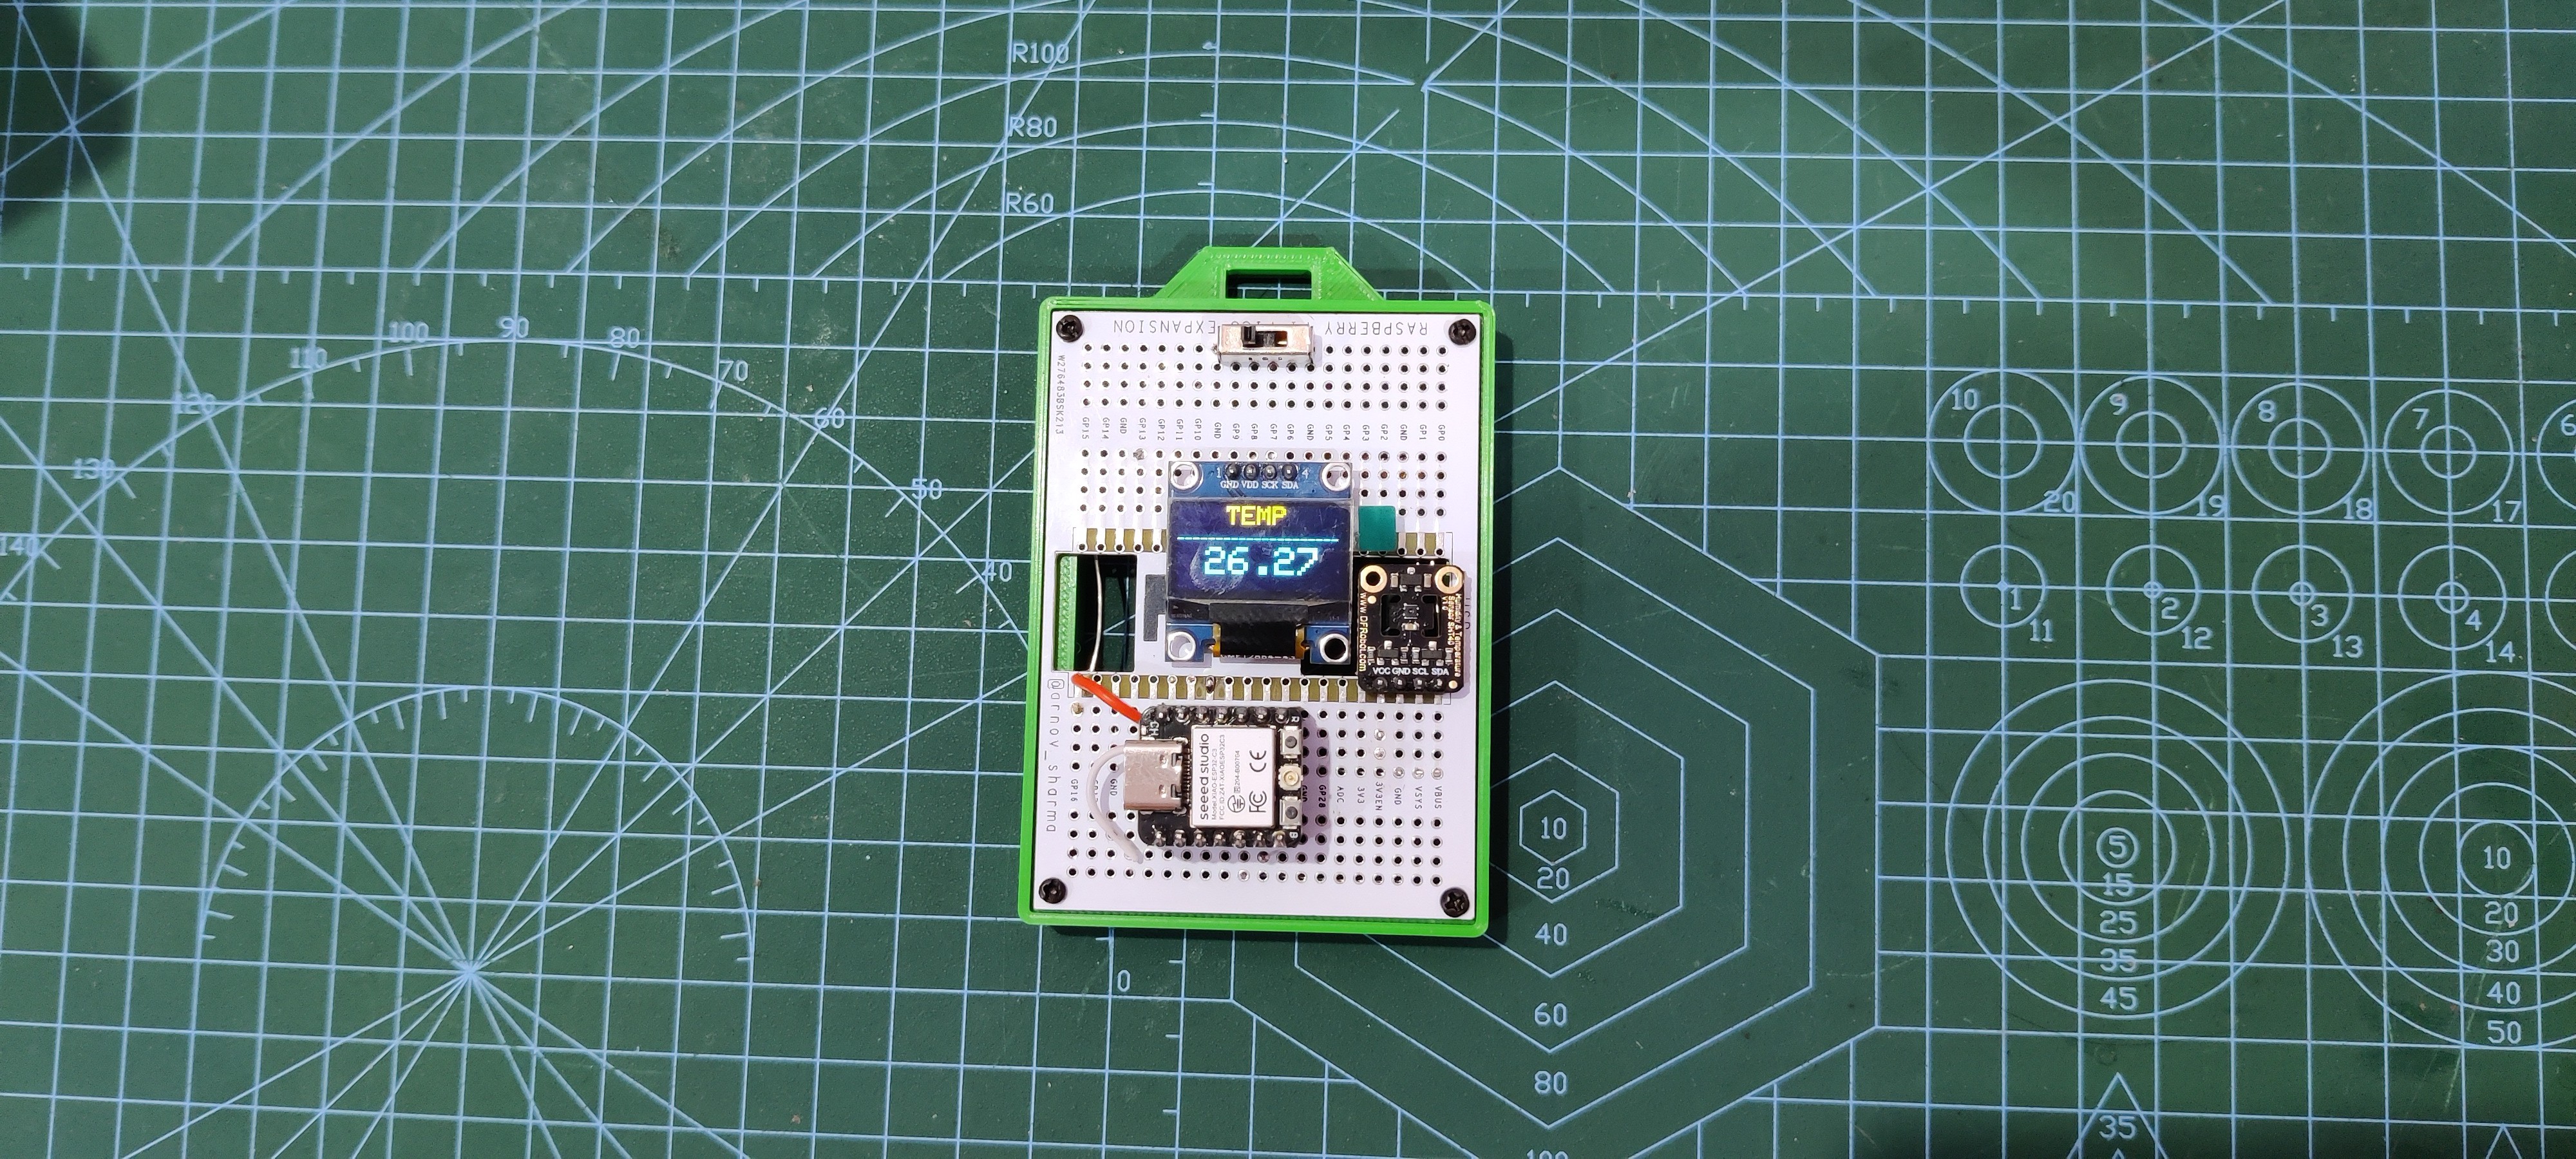
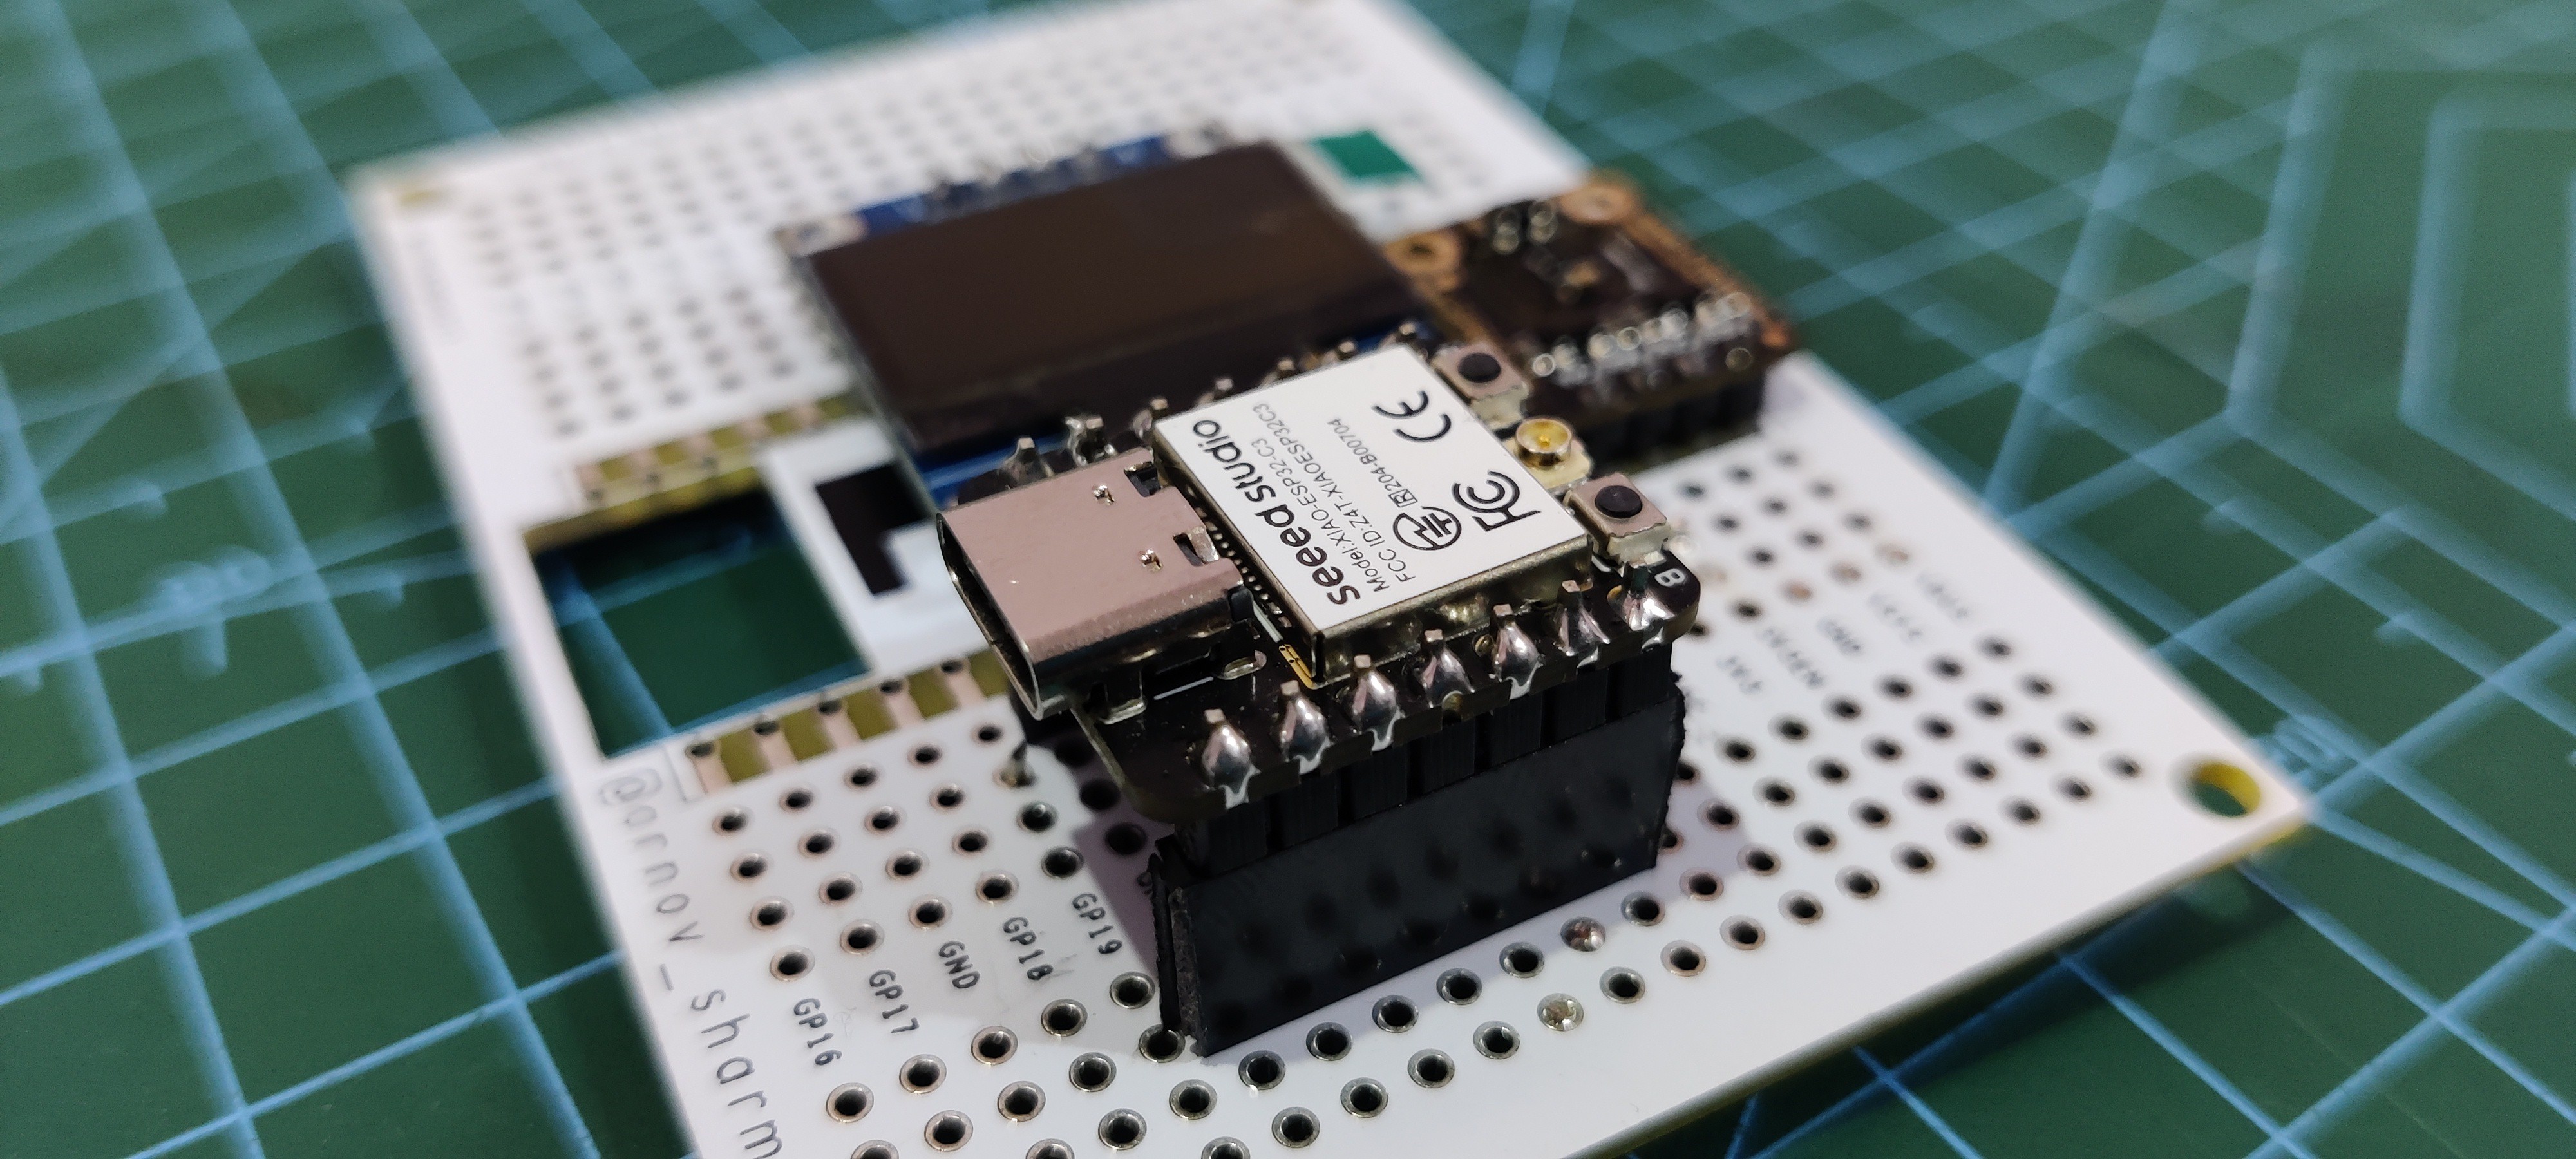
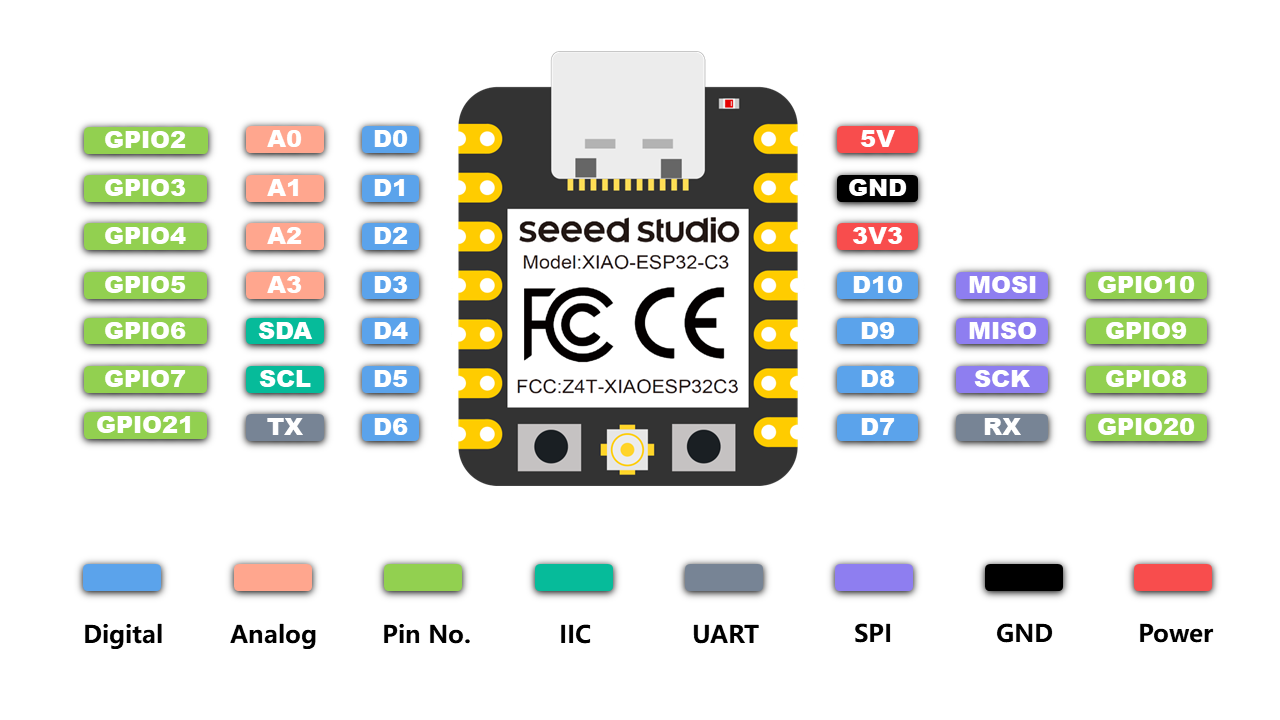
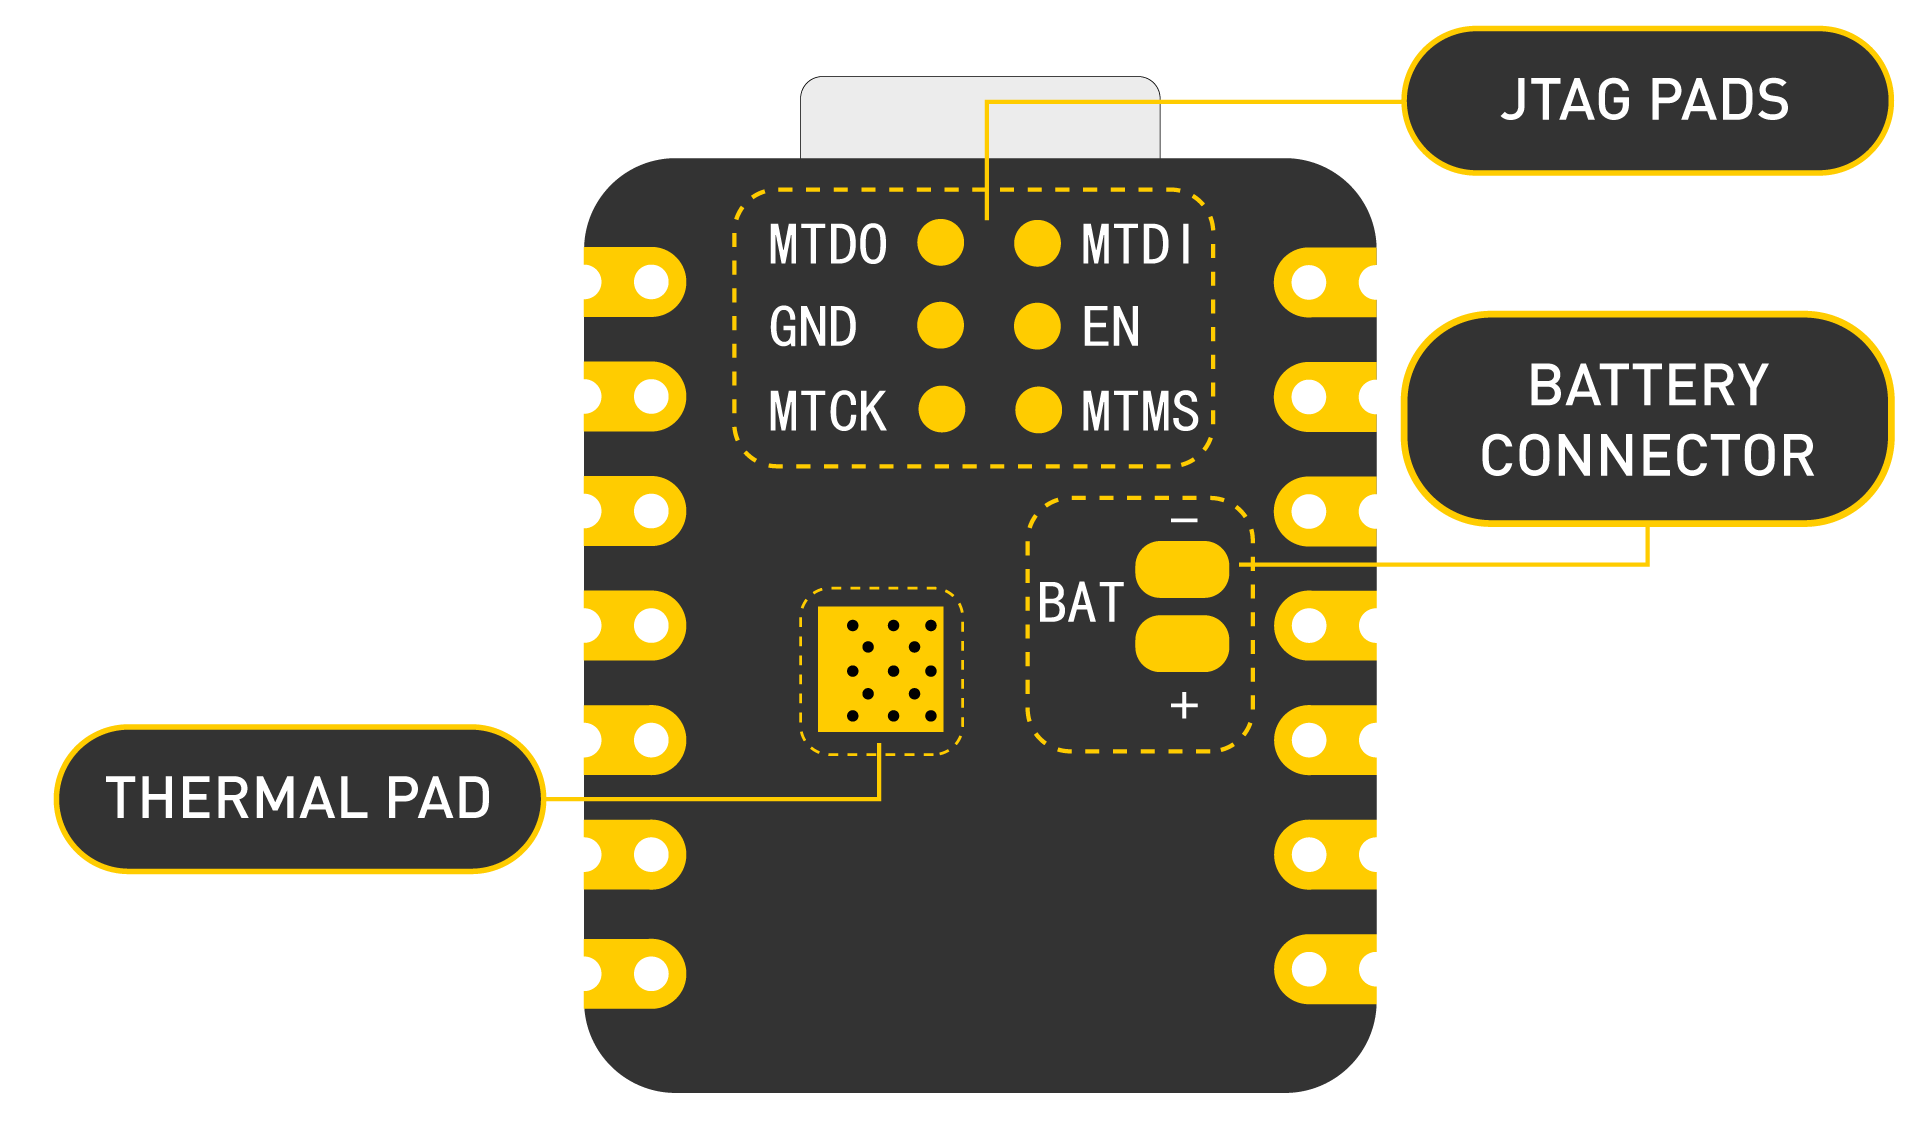
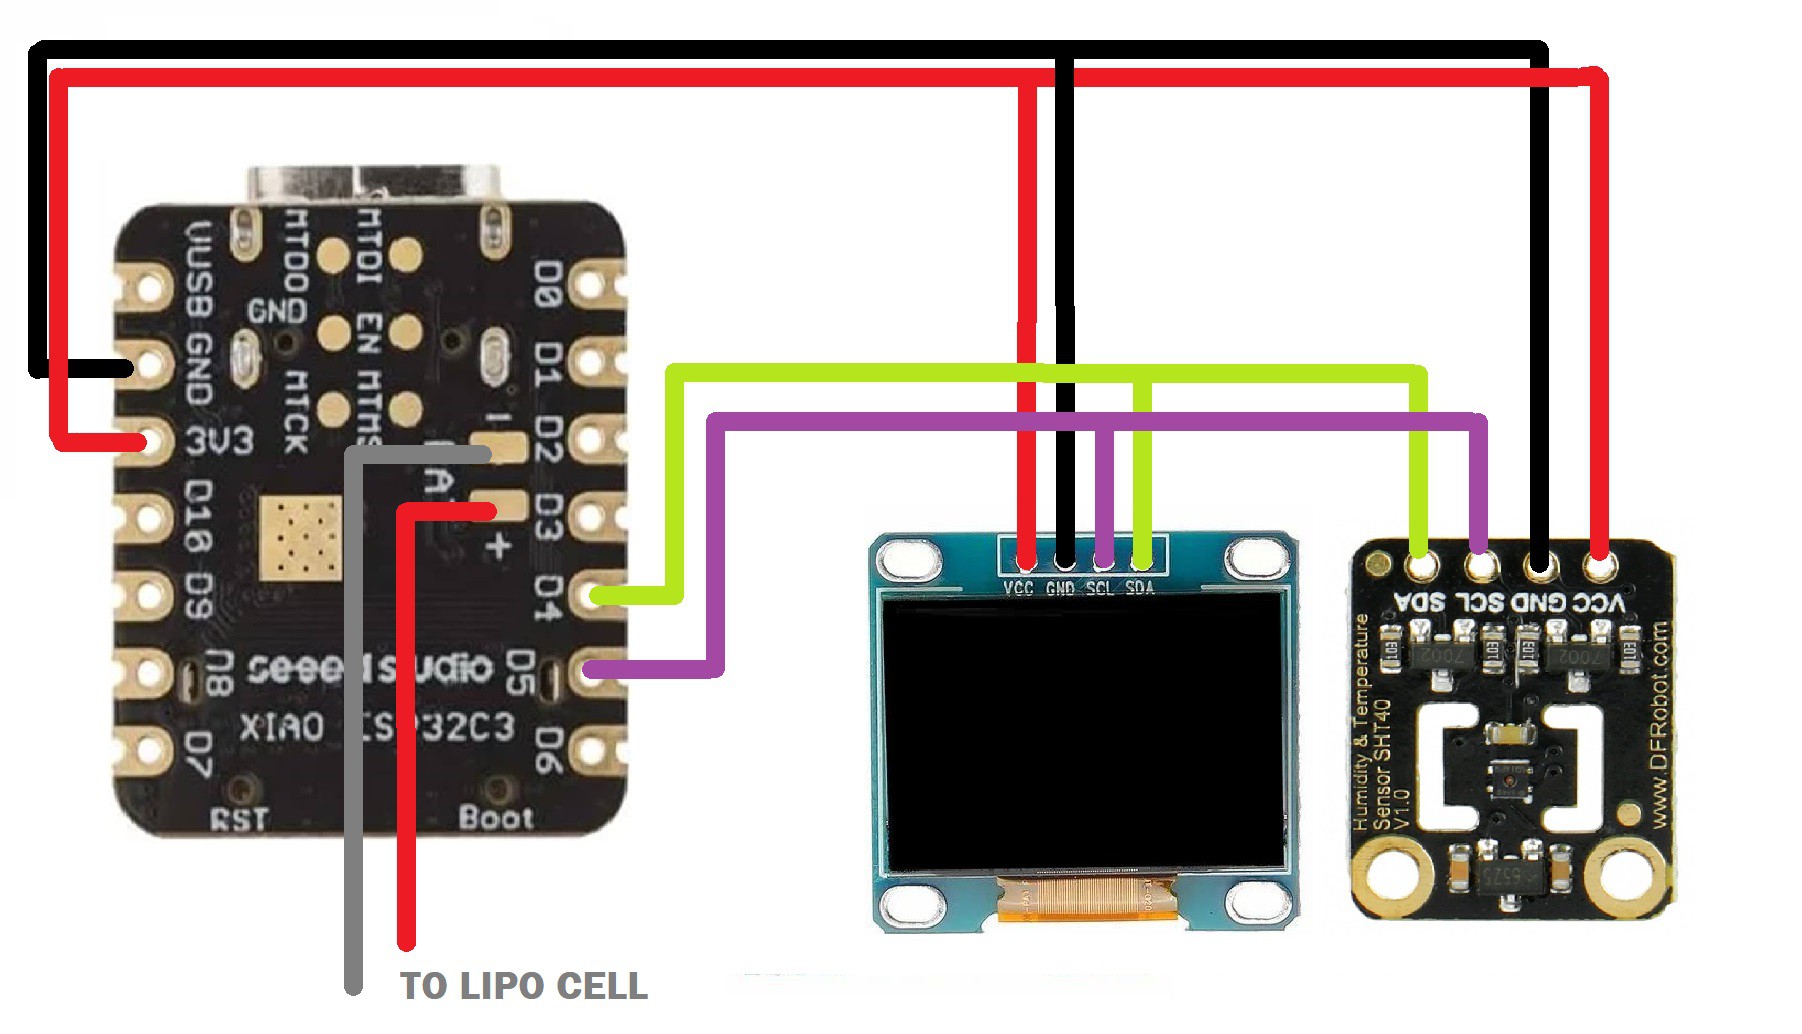
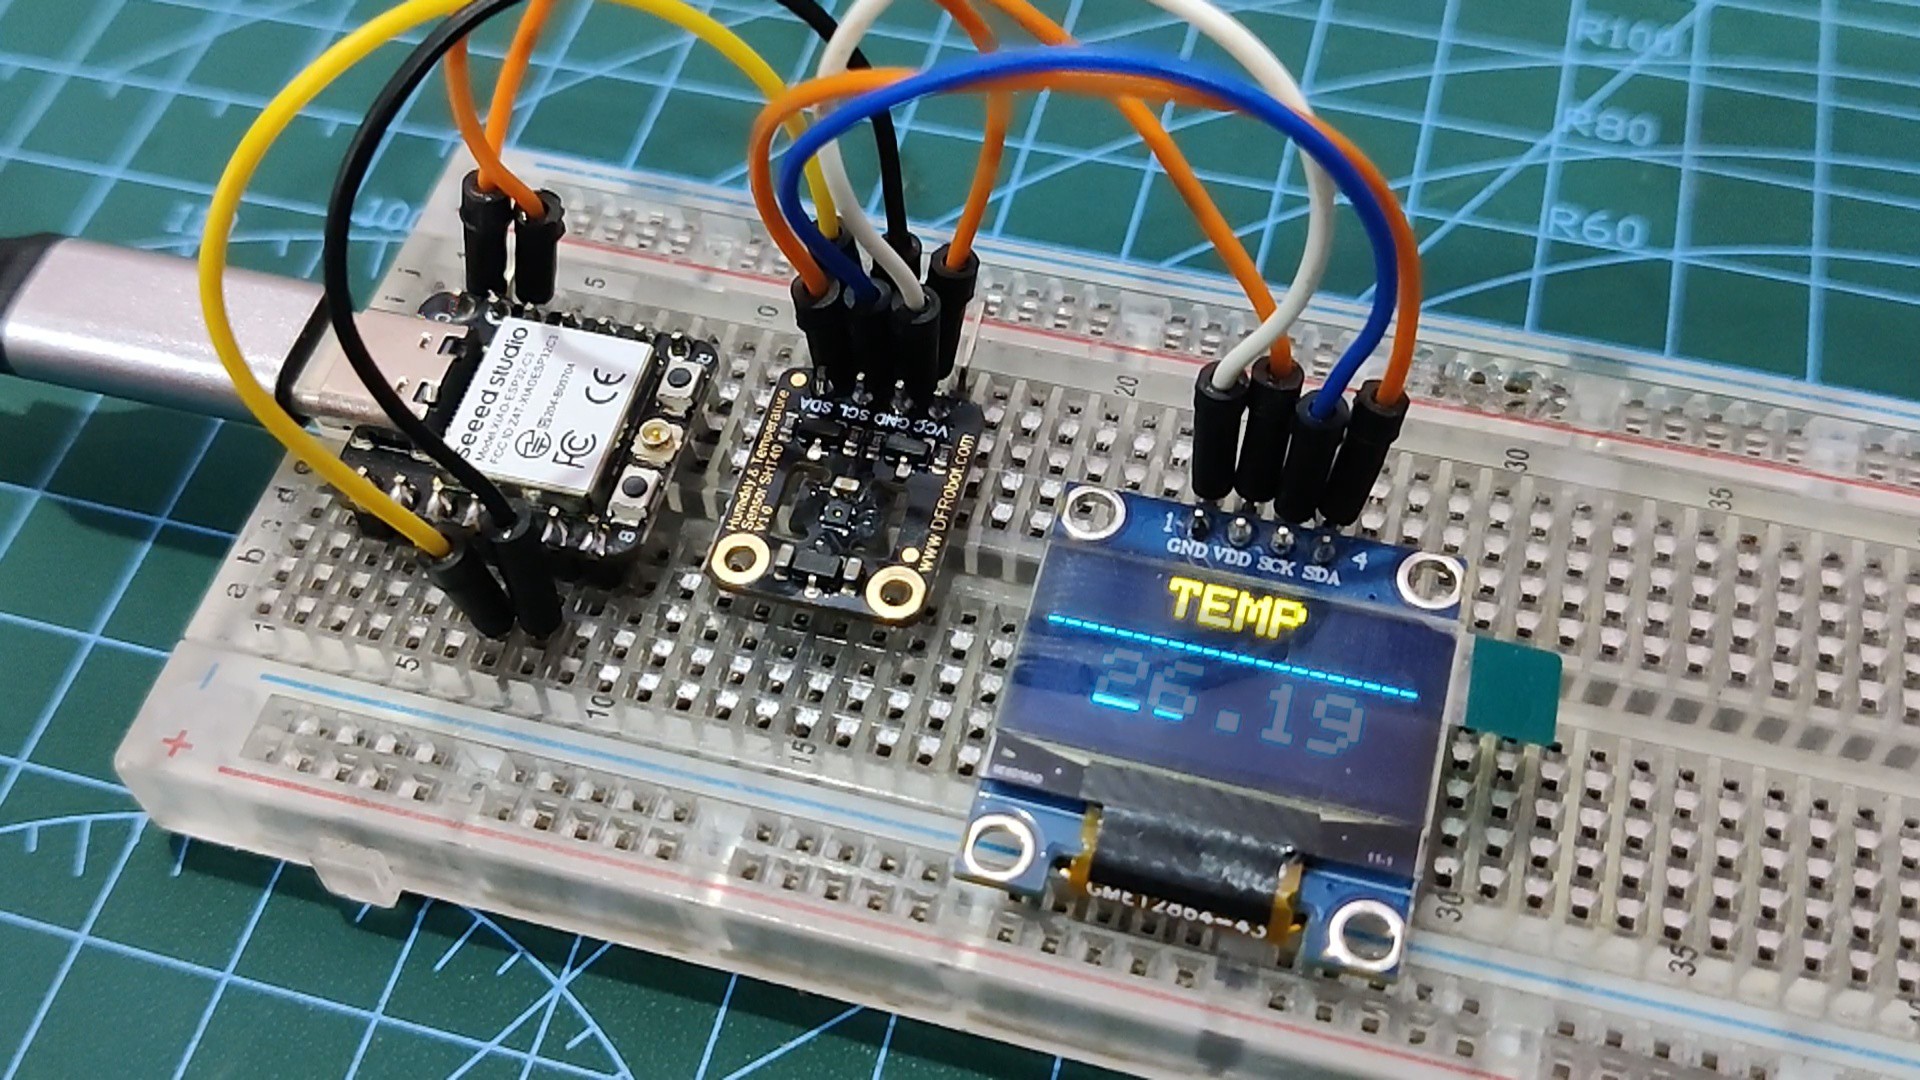
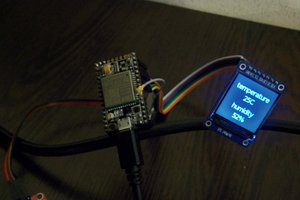
The heart of this project was an XIAO ESP32C3 development board, which is paired with an SSD1306 display. An SHT40 TEMP sensor is being used for temperature data, and the whole setup is powered by a small 3.7V LiPo cell that is connected directly to the XIAO ESP32C3 board's battery terminals.

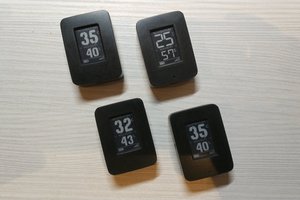
The whole device was made in two stages: the first was the breadboard version, and the second was on a prototyping board, which was then encased in a 3D-printed body.

fusion - 1.58 MB - 03/17/2024 at 12:59

Download

JPEG Image - 280.54 kB - 03/17/2024 at 12:59

Preview
Download

Portable Network Graphics (PNG) - 127.16 kB - 03/17/2024 at 12:59

Preview
Download

3mf - 31.84 kB - 03/17/2024 at 12:59

Download

  • 1
    Seeed Studio's XIAO ESP32C3 DEV Board

    In this project, we are using the XIAO ESP32C3, which is a IoT mini-development board based on the Espressif ESP32C3 WiFi/Bluetooth dual-mode chip. ESP32-C3 is a 32-bit RISC-V CPU, which includes an FPU (Floating Point Unit) for 32-bit single-precision arithmetic with powerful computing power.

    This board comes with an external antenna to increase the signal strength for wireless applications. It also has a small and exquisite form-factor combined with a single-sided surface-mountable design.

    It is equipped with rich interfaces and has 11 digital I/O that can be used as PWM pins and 4 analog I/O that can be used as ADC pins. It supports four serial interfaces, such as UART, I2C and SPI. There is also a small reset button and a bootloader mode button on the board.

    The battery connector on the backside of the DEV board will be used in this project to add a LiPo cell to power the XIAO as well as the display and SHT40 sensor.

    You can check out Seeed Studio's brief product introduction for the XIAO ESP32C3, which includes a ton of information, by clicking the link below.

    https://wiki.seeedstudio.com/XIAO_ESP32C3_Getting_Started/

    Visit Seeed Studio Fusion to get a wide range of services, including 3D printing, PCB/PCBA, and microcontroller/module services.

    https://www.seeedstudio.com/fusion_pcb.html

  • 2
    Breadboard Version

    We first started with a simple breadboard version that included the three main components used, which are the XIAO ESP32C3 board, the SSD1306 screen, and the SHT40 temperature sensor.

    • We added them to a breadboard and first connected the 3V3 pin of XIAO with SHT40's VCC and SSD1306 Screen's VCC port.
    • Next, we connect the GND of XIAO with SHT40 and SSD1306's GND Port.
    • We then add the A4 Pin of XIAO to the SDA pins of SHT40 and SSD1306.
    • At last, we add the A5 Pin of XIAO to the SCK pins of SHT40 and SSD1306.
  • 3
    CODE

    Here's the code that was used in this build, and its a simple one.

    #include "Adafruit_SHT4x.h"
    #include <Wire.h>
    #include <Adafruit_SSD1306.h>
    #include <Adafruit_GFX.h>
    
    #define OLED_WIDTH 128
    #define OLED_HEIGHT 64
    
    #define OLED_ADDR   0x3C
    
    Adafruit_SHT4x sht4 = Adafruit_SHT4x();
    
    Adafruit_SSD1306 display(OLED_WIDTH, OLED_HEIGHT);
    
    void setup(){
    Serial.begin(115200);
    
    display.begin(SSD1306_SWITCHCAPVCC, OLED_ADDR);
    display.clearDisplay();
    
    Serial.println("Adafruit SHT4x test");
      if (! sht4.begin()) {
        Serial.println("Couldn't find SHT4x");
        while (1) delay(1);
      }
      Serial.println("Found SHT4x sensor");
      Serial.print("Serial number 0x");
      Serial.println(sht4.readSerial(), HEX);
    
      sht4.setPrecision(SHT4X_HIGH_PRECISION);
      switch (sht4.getPrecision()) {
         case SHT4X_HIGH_PRECISION: 
           Serial.println("High precision");
           break;
         case SHT4X_MED_PRECISION: 
           Serial.println("Med precision");
           break;
         case SHT4X_LOW_PRECISION: 
           Serial.println("Low precision");
           break;
      }
    
      // You can have 6 different heater settings
      // higher heat and longer times uses more power
      // and reads will take longer too!
      sht4.setHeater(SHT4X_NO_HEATER);
      switch (sht4.getHeater()) {
         case SHT4X_NO_HEATER: 
           Serial.println("No heater");
           break;
         case SHT4X_HIGH_HEATER_1S: 
           Serial.println("High heat for 1 second");
           break;
         case SHT4X_HIGH_HEATER_100MS: 
           Serial.println("High heat for 0.1 second");
           break;
         case SHT4X_MED_HEATER_1S: 
           Serial.println("Medium heat for 1 second");
           break;
         case SHT4X_MED_HEATER_100MS: 
           Serial.println("Medium heat for 0.1 second");
           break;
         case SHT4X_LOW_HEATER_1S: 
           Serial.println("Low heat for 1 second");
           break;
         case SHT4X_LOW_HEATER_100MS: 
           Serial.println("Low heat for 0.1 second");
           break;
      }
    
    }
    
    void loop() {
    
     sensors_event_t humidity, temp;
      
      uint32_t timestamp = millis();
      sht4.getEvent(&humidity, &temp);// populate temp and humidity objects with fresh data
      timestamp = millis() - timestamp;
    
      display.clearDisplay();          //TEMP
      display.setTextSize(2);
      display.setTextColor(WHITE);
      display.setCursor(38, 0);
      display.println("TEMP");
    
    //  display.display();
    
     
      display.setTextSize(1);                 //TEMP VALUE
      display.setTextColor(WHITE);
      display.setCursor(0, 20);
      display.println("---------------------");
    
      display.display();


      display.setTextSize(3);                 //TEMP VALUE
      display.setTextColor(WHITE);
      display.setCursor(22, 30);
      display.println(temp.temperature);
      display.display();
      delay(10);
    
    }

     This sketch interacts with two sensors: the SHT4x temperature and humidity sensor and the SSD1306 OLED display, and the code essentially reads the temperature from the sensor and displays it on the OLED screen. It could be further extended to include humidity readings or additional functionalities

    Make sure to download and install SHT40's Library and SSD1306 Library before uploading this sketch.

    https://github.com/adafruit/Adafruit_SHT4X

    https://github.com/adafruit/Adafruit_SSD1306

View all 8 instructions

Enjoy this project?

Share

Discussions

Similar Projects

Does this project spark your interest?

Become a member to follow this project and never miss any updates