 Carsten Rhod Gregersen
Here's what to expect
Plus, a quick video demo
Let's start with an introduction to the ESP32 camera boards
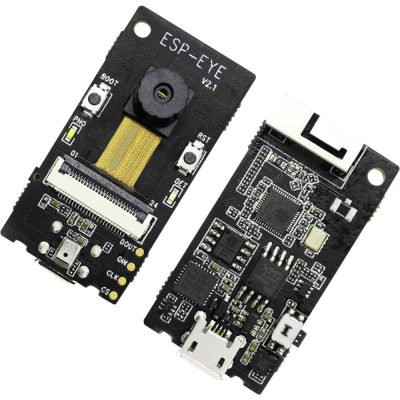
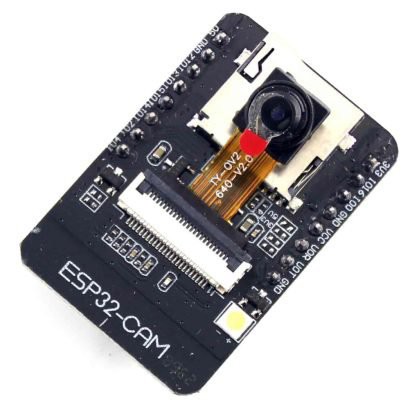
The ESP-EYE and ESP32-CAM are from the Espressif ESP-32 MCU series.
The ESP-EYE and ESP32-CAM modules represents a cost-effective solution to achieve Wi-Fi connectivity and GPIO functionality. The ESP32 chip, integral to both the ESP-EYE and ESP32-CAM, offers 520KB of RAM, making it a powerful component for a range of applications. The ESP-EYE enhances this with an additional 8 Mbytes of external PSRAM and 4 Mbytes of flash memory, providing a robust platform for complex tasks and data storage. It needs to be said that we have chosen the ESP-EYE board for this demo even though it is one of the more expensive ESP32-based camera boards.
The reason is that the ESP-EYE has USB access built-in as opposed to the ESP32-CAM. The ESP32-CAM is very similar to the ESP-EYE but lacks built in USB support. Instead, it has a UART interface exposed on the PINs, so you need to strap it to a USB-to-UART cable yourself.
Video and imaging capabilities of the ESP32 camera
The ESP32 chip is equipped with a built-in JPEG encoder and boasts a dual-core processor, facilitating efficient image processing and multitasking. Looking ahead, the ESP32-P4 is expected to feature H264 video encoding, further expanding the possibilities for video applications. Using the hardware accelerated JPEG encoder a RTSP server can be created that streams JPEG-compress video feeds. See here for further information on RTP JPEG streams.
Practical applications
This ESP-32 camera demo is ideally suited for low-cost consumer products where video or imaging functions are secondary yet critical features. Examples include pet feeders, bird cages, household appliances like ovens and refrigerators, and even 3D printers equipped with surveillance capabilities.
The architecture of the demo
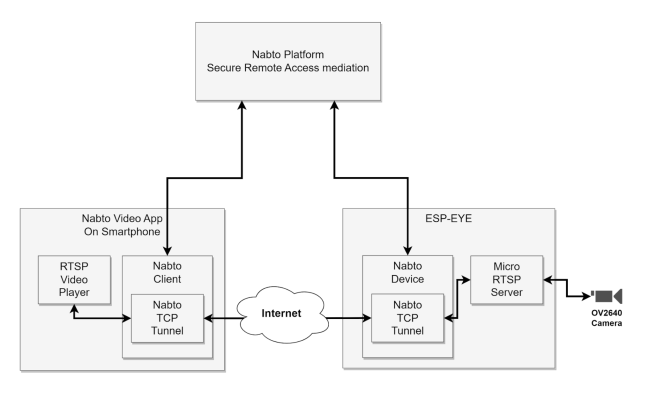
Main components:
- ESP-32 camera device
- Nabto video app running on a smartphone iOS or Android
- Nabto Platform for remote access mediation (using techniques like P2P / Real Time Communication)
Before starting the demo
The way this demo works is by pairing an IoT device (in this case the ESP-32 camera) with a mobile device or other device via the Nabto platform and creating a connection between the two. Specifically, this happens via the exchange of a device ID and product ID in the Nabto platform and the exchange of public keys, similar to Secure Socket Shell (SSH) applications. You can read our guides to security in the Nabto platform for more information.
Nabto allows you to remotely acess a Real Time Streaming Protocol video stream using an existing video player component or application, in this case, the Nabto video application, using Transmission Control Protocol (TCP) tunneling. The TCP tunnel ensures a secure connection even through firewalls without any added hassle.
TCP is the main transmission protocol for a lot of network-based applciations, and it’s commonly used for IoT video cameras as well. Tunneling allows you to securely transmit sensitive data with minimal latency. For more information on TCP tunneling, read the accompanying doc or our recent blog post.
Architecture of the video streaming software components
This demo uses an RTSP stream, which means that it requires the following video streaming software components:
- ESP-EYE consisting of:
- A small RTSP server that creates a RTSP feed from camera sensor data.
- A Nabto TCP tunnel server end-point that connects to the RTSP server internally
- The Nabto video app consisting of:
- Nabto connection client libraries
- Nabto client tunnel end-point
- Video player that connects to the tunnel end-point
- Local connections between app and ESP-32 camera using mDNS discovery
- The Nabto platform that enables remote access from the Video app to the ESP-EYE
Requirements for the demo
To complete this ESP-32 camera demo, some hardware and software requirements must be in place. First of all, you’ll need an ESP-EYE or an ESP32-CAM module. A link to the vendors’ site can be found here and here.
The Github repository is PIN strapped to an ESP-EYE board.
If you have an ESP32-CAM, what is required is to alter the camera’s IO-PIN specification, which is done by changing the struct camera_config_t structure in the esp32-rtsp.cpp file.
| 1
2 3 4 | // Camera board configuration
camera_config_t config = espeye_config;
//camera_config_t config = esp32cam_config; // NOT TESTED
//
camera_config_t
config = esp32cam_aithinker_config;
|
Also, you will need to install the ESP-IDF environment. The ESP-IDF version used for this demo was “ESP-IDF v5.1.2”.
Read more on how to install ESP-IDF on Windows, MacOS or Linux here.
Finally, you will need an iOS or Android-based phone or tablet that can run the Nabto Video app.
Step-by-step instructions
First, we need to do some initial steps to create a device on the Nabto platform. This involves creating a private key for the device and create a new device in the Nabto platform and registering this new created key for this device. This will be done manually here, but in a production environment this would be done via APIs.
Step 1: Generate a key and matching key finger-print
First, we create the key using the keytool, by cloning the key-tool github repository. Type the following into the console of your device:
| 1
2 3 4 5 6 7 | git clone https://github.com/nabto/edge-key-tool
cd edge-key-tool/
mkdir build
cd build
cmake ../
make -j
./edge_key_tool
|
You will see something like this:
| 1
2 3 4 5 6 7 8 9 10 11 12 13 | Generating new key
PEM Private Key:
-----BEGIN EC PRIVATE KEY-----
MHcCAQEEINhemsBoXqsvukujEQkN9K0xXz7eCq7p7AgKKT32Rmq4oAoGCCqGSM49
AwEHoUQDQgAE0BrGav7rpF9NNyPueQcKUoyQNjBPW0VysU0Yrap7G5GQx6namfjd
Dna1uBvWoXGj7oUeXGbEnD05TXBN8uaBdA==
-----END EC PRIVATE KEY-----
Raw Private Key:
d85e9ac0685eab2fba4ba311090df4ad315f3ede0aaee9ec080a293df6466ab8
Fingerprint:
ee4137f5a4933ee939ffaea45b1f676c7700bcc18d8e66ee90b74a967299e0f3
|
Ignore the above keys and fingerprint for now. Using them would enable other persons to access your video feed (if they guess your device and product ID, which is generated later on). Do not close the window; you will use the fingerprint soon.
Step 2: Signup to the Nabto Console, create a device and register the fingerprint
In this step, we continue with creating a Nabto Edge device. Go here to register and log in to the Nabto Cloud Console. Once you have registered and logged in, you will be greeted with the home page. From here click on the Products link in the sidebar.

Now press New Trial Product to create a trial product. Creating a product will send you to the settings page for your new product.
Return to the products page by clicking Products in the sidebar again. Now you should see that a product has been added to the list. Take note of the Product ID column.
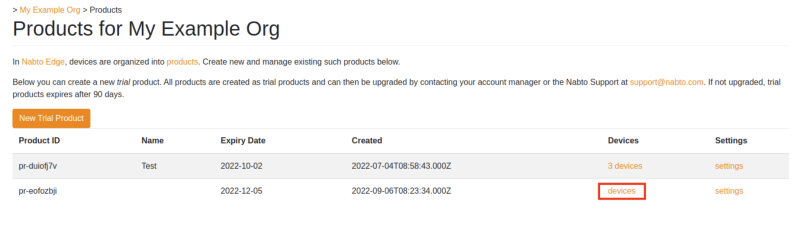
Now we need to create a device. Click on devices on your new product.
At the moment there are no devices registered for this new product.
Press Create Single Device to create a device that we can use. You will notice a new device is immediately added to the list of devices below, and the device has a Device ID column. Click on the device to open its settings.
Take note of the Device Configuration section. Do not leave this page yet, we will need to use the Fingerprint section in the next part.
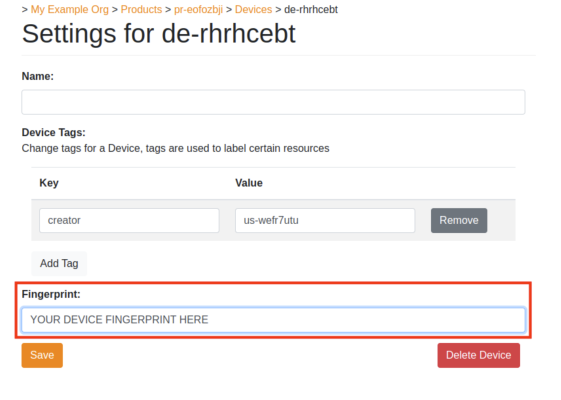
Copy the fingerprint string from step 1 and paste the fingerprint into the Fingerprint input in the settings page in the Nabto Cloud Console. Without this fingerprint, the cloud console will not allow the device to connect, prohibiting remote connections.
Now the device has been created and the fingerprint of the generated key has been registered in the Nabto platform. So now we are ready to download and configure the ESP-EYE code.
Step 3: Clone the edge-esp32 repository, configure, build, flash and monitor
We start by creating a new catalog for the code, which is just good practice.
Something like:
| 1
2 | mkdir my-esp-eye-demo
cd my-esp-eye-demo
|
The git edge-esp repository will need to clone several other repositories so make sure you have enough space.
Important: Remember to clone with the recursive flag!
This will go something like this:
| 1 2 3 4 5 6 7 8 9 10 11 12 | git clone --recursive https://github.com/nabto/edge-esp32/
Cloning into 'edge-esp32'...
remote: Enumerating objects: 857, done.
remote: Counting objects: 100% (143/143), done.
remote: Compressing objects: 100% (105/105), done.
remote: Total 857 (delta 61), reused 99 (delta 36), pack-reused 714
Receiving objects: 100% (857/857), 193.47 KiB | 2.72 MiB/s, done.
Resolving deltas: 100% (435/435), done.
Submodule 'examples/components/esp32-camera' (https://github.com/espressif/esp32-camera) registered for path 'examples/components/esp32-camera'
Submodule 'nabto-embedded-sdk' (https://github.com/nabto/nabto-embedded-sdk) registered for path 'nabto-embedded-sdk'
...
[SNIP]
|
Next step is to go to the ESP-EYE camera demo directory and configure the setup.
You will need the following information ready :
- Device ID -> from the Nabto console in Step 2
- Product ID -> from the console in Step 2
- Nabto Raw Private key -> from step 1
- Your WIFI SSID -> the name of your WIFI
- Your WIFI Password -> the password of your WIFI
Enter the following in your device’s console:
| 1
2 | cd edge-esp32/examples/esp-eye-camera/
idf.py menuconfig
|
You should see this menu:
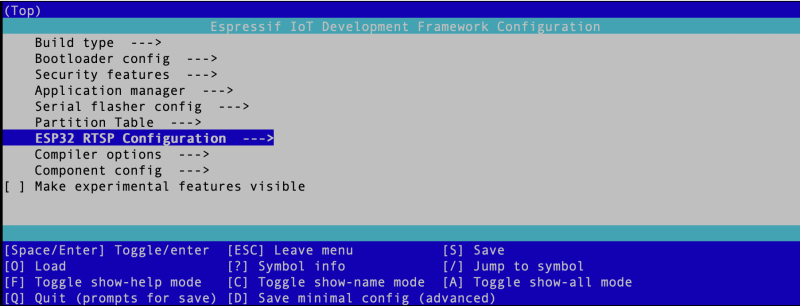
Use your keyboard arrows to go to the “ESP32 RTSP Configuration” and you should be presented with the following menu:
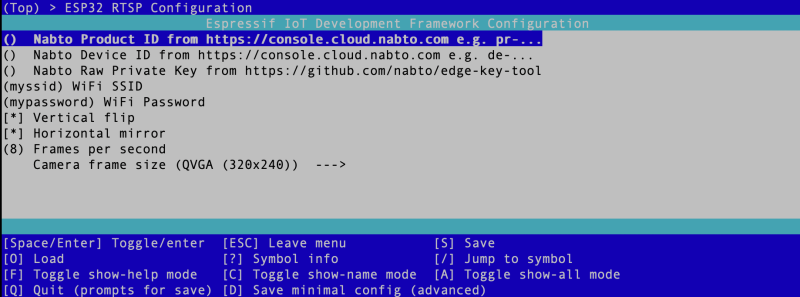
Please enter the Product Id, Device Id, Raw Key, WIFI SSID and WIFI Password as described earlier.
After this you need to run the commands build, flash and lastly monitor using the idf.py tool.
| 1
2 3 | Idf.py build
Idf.py flash
Idf.py monitor
|
Some important debug info to look out for is:
| 1
2 3 4 | I (2962) wifi station: got ip: [ERASED]
I (2962) wifi station: connected to ap SSID:[ERASED] password:[ERASED]
I (2972) wifi station: Main task: waiting for connection to the wifi network...
I (2982) wifi station: connected!
|
This information indicates the ESP-EYE device has setup WIFI correctly to your WIFI access point.
And you should also see information indicating that the device has recognized the camera:
| 1
2 3 4 5 6 | I (3501) camera: Detected camera at address=0x30
I (3601) camera: Detected OV2640 camera
I (3601) camera: Camera PID=0x26 VER=0x42 MIDL=0x7f MIDH=0xa2
I (5901) cam_hal: buffer_size: 32768, half_buffer_size: 4096, node_buffer_size: 2048, node_cnt: 16, total_cnt: 3
I (5901) cam_hal: Allocating 15360 Byte frame buffer in PSRAM
I (5911) cam_hal: cam config ok
|
And, of course, that the ESP-EYE device has connected to the Nabto platform:
| 1
2 3 4 | I (3352) nabto: Starting Nabto Device
[ERASED]
I (7291) nabto: Device attached to basestation
I (7291) device_event_handler: Attached to the basestation
|
If you have a standalone RTSP video player you can actually connect to the video feed by entering the address rtsp://<IP_Address_of_the_ESP_EYE>:8554/mjpeg/1 in your browser.
<IP_Address_of_the_ESP_EYE> should of course be replaced by the IP address that you can find in the monitor logs in your console. Look for something like:
| 1 | I (2941) wifi station: got ip:192.168.10.8
|
All in all the ESP-32 camera should be ready now.
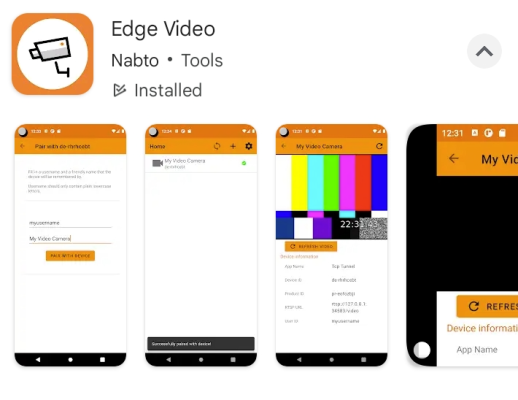
Step 4: Install Edge Video App onto your Android or iOS phone
Install the Nabto Edge Video App onto your Android or iOS phone from one of the following links.
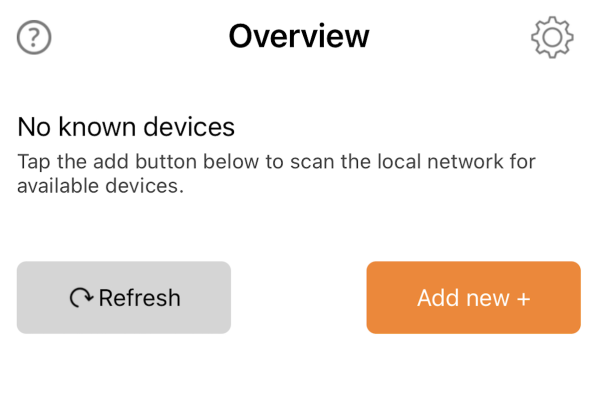
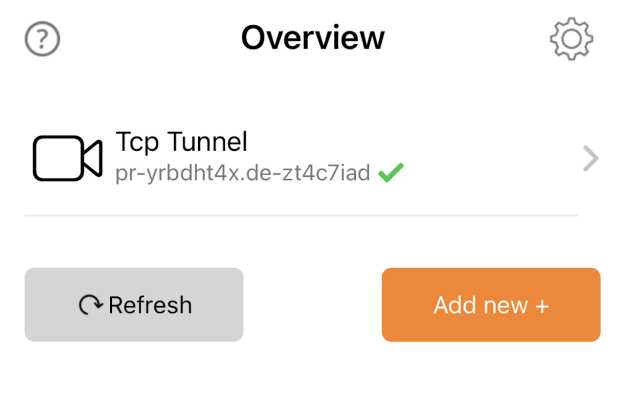
Open the Nabto Edge Video App and press Add new.
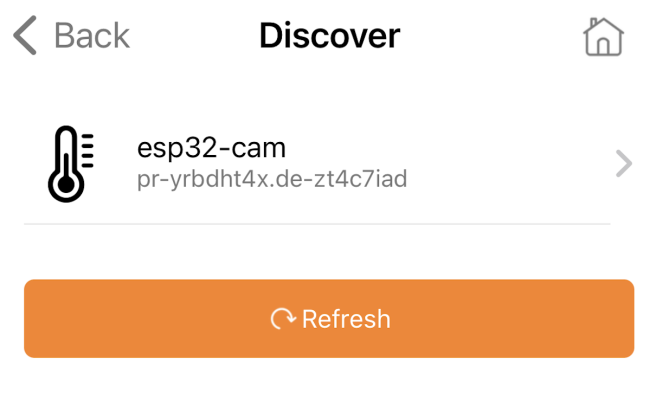
Be sure to be connected on the same WIFI network as the ESP-EYE device. Tap the Discover local devices button.

If everything works the ESP-EYE device should show up with the correct product ID (pr-XXXXXXXX) and device ID (de-XXXXXXXX). Tap on the device line.
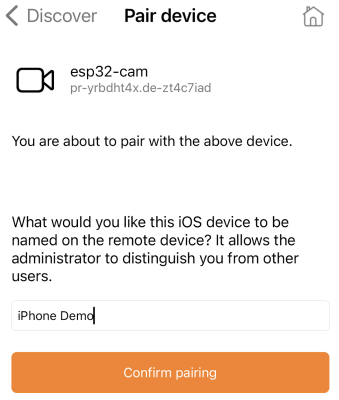
You are now about to initiate the exchange of public keys between the ESP-EYE camera device and the client. The client actually created a new public-private keyset the first time it was started. The app is also asking for a name that the client app should be referred to on the device (important when multiple client apps connects to the video device and the administrator has to modify who, i.e. which keys can connect or not).
Type in a name for the app/client and tap Confirm pairing.
The key exchange will begin and a success message will appear.
Tap Save and continue.

The ESP-EYE video device and the app has now been paired and you should be able to connect to the ESP-EYE video device both on the WIFI network, but also remotely; i.e., outside your own network, both on cellular data or another WIFI network.
This is done by tapping the device line with the right product ID and device ID.
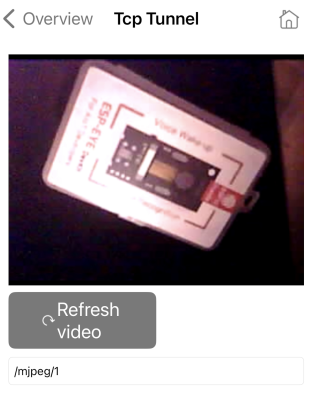
What you will see is a small video player screen playing the RTSP video feed from the camera.
Here is a screenshot from the app:
Here are some videos of the demo:
Final thoughts
Video surveillance is one of the top IoT applications today with the global smart home security camera market size expected to grow at a compound annual growth rate of 19.2 percent from 2023 to 2030.
The ESP-32 camera using the ESP-EYE single board module or the ESP32-CAM is undoubtedly an excellent option. Performance is great and you can typically purchase one for $20-$25 (or a ESP32-CAM for $1 or even less on sites like Aliexpress or Alibaba) and have a fully functional surveillance camera in an hour. Low cost, low time investment, high functionality.