I had considered buying an old truck camper, but that would set me back a few thousand dollars to get one that isn't falling apart. Plus, the weight of those things would require me to do significant work to my 34 year old pickup truck. Work that I could do myself, but cannot afford to do. This led me to the thought of buying a truck bed cap and converting it into sleeping quarters. I decided I wanted more space and a bit of comfort. I settled on building a truck camper after saying to myself "How hard can it be?"
I am finding that it really isn't that hard. I understand the logistics of it, and am putting in a solid process to get it going as quickly as possible.
I will be sharing ALL knowledge gained, either in logs, or by request, as I understand the value of it. I support open source, and will be uploading my final design plans for anyone to use. All trucks are different, so my plans will be for Chevy trucks with beds measuring 69 by 100 inches. Basically older, 8 foot beds, maybe some newer ones.
I am designing this to be a slide out camper. I could pull it out the back and onto a custom built stand if needed. In order to have it slide out, I will need to sacrifice some space between the wheel well arches and the front of the bed, nearest the cab. These will basically be channels that will allow it to slide in and out. I am considering putting hinged panels on the inside that will allow me to access this space for tool storage.
I am framing the walls out of 3/8 inch plywood, with a 1/2 inch plywood roof. The walls will be framed similar to a house for strength and simplicity. The front of the cab overhang is going to be made angular to help with the aerodynamics and looks.
The cab overhang will become a bedroom, with LED lights, roof vent, and front and side windows.
The roof may be used for strapping things on, as well as a deck, hence the 1/2 inch plywood roof, and extra reinforcement.
I have yet to decide on the interior, but I think I want a wrap around sofa, a small TV, a small computer workstation, propane heater, vents, cabinets, counters, propane stove, and MAYBE a sink with small water supply.
All feedback is appreciated, and I will be glad to share any thoughts or knowledge. My goal is to create an open source process for creating truck campers, refine it, and watch everyone go.
 Jorj Bauer
 matthewkleinmann
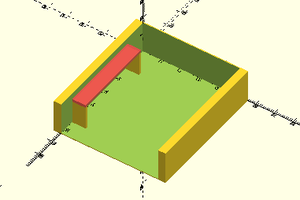
 the.fedora
not a problem.something to think about for skinning your build when you get to it you could do redneck fiberglass or poor mans fiberflass. You glue the fabric to the outside of your build then soak paint into the fabric. Its been used to create some resilient trailers and other toys. Depending on the type of paint used you could have a long lasting truck bed camper.