Close
0%
0%

TeensyBoy

The goal of this project is to advance my understanding of emulation whilst seeing how far I can push the new Teensy 3.6 and the Arduino IDE

Similar projects worth following
This project is purely an experiment to see if near full speed or for that matter even remotely playable gameboy advance emulation is possible on the Teensy 3.6.

This project is currently under heavy development so a lot of the limited documentation us likely to be out of date regularly.

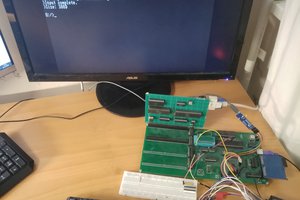
Small change of plans with the external SRAM (as7c34096a-10tin) although the initial result are very encouraging I have now removed the shift registers from the design and am now directly addressing the memory from the Teensy, This change although not terribly elegant does solve some headaches that would otherwise be preventing me from moving the project forward at the speed I would like. To help solidify these changes and allow to to have a reliable hardware platform with which to continue the firmware development I have now laid out the first full hardware revision which not only includes the changes to the SRAM addressing but also adds sound, user buttons, and screen brightness control. As usual the Eagle files for the first revision PCB can be found along with the most up-to-date version of the firmware at the GitHub repository linked below.

Current Emulation Speed: 1 - 5.5 frame per second

Do To's:

  1. Finish sound implementation.
  2. Serious optimization and code cleanup.
  3. Gameboy colour compatibility.
  4. Cartridge connector to play real games?
  5. Functionality to rip ROM's to SD card?
  6. Proper hardware explanation and documentation.

GitHub Repository:

https://github.com/ChrisM90/TeensyBoy

For the extremely patient among you here is a video.


  • 1 × Teensy 3.6
  • 1 × Adafruit ILI9340C
  • 1 × Micro SDCard (for ROM's)
  • 1 × as7c34096a-10tin SRAM

  • Current Progress & Future PLans

    ChaosChris03/28/2017 at 12:48 0 comments

    So whilst I am awaiting the first real PCB revision from OSH Park I thought I would take the time to elaborate a little on how the project is going & speculate on what features the end result might have...

    How's it going?

    Not to bad really, emulation speed now peaks at about 5.5 FPS this was achieved by switching out the digitalWriteFast calls with direct port manipulation this has allowed ~1us random read and write SRAM operations and ~800ns sequential reads and writes. The SRAM is capable of much fast though at ~20ns for both reads and writes. The limiting factor seems to be the number of port operations that need to be done to to achieve either a read or a write. I'm hoping to reduce this number by shuffling the pins around to allow more of the address and data lines to share common ports.

    ROM's now start and play correctly, well that's a bit of an exaggeration I've only actually testing Mario Kart successfully I have also tried Pokemon emerald but that ROM gets the emulated CPU stuck in a loop for some reason? Randomly reading bytes from a file on an SD card is proving painfully slow and is crippling emulation speed so some sort of flash buffer seems to be in order something along the lines of:

    1) Select the game.

    2) Copy game to flash

    3) Start emulation from the flash not the SD Card.

    User buttons are now implemented and working correctly I was able to navigate the menus in Mario Kart without issue. Unfortunately I cant continue the sound implementation until the new PCB's turn up.

    Future features:

    I would really like add gameboy colour compatibility as in my mind part for what makes a gameboy advance a gameboy advance is the backward compatibility with the gameboy color games.

    I suspect I will run out of IO before hand but I would like add a cartridge connector so the emulator can play games directly from original cartridges this also has the nice benefit of allowing the emulator to copy original cartridges to the SD Cart to play later.

    Cheat menu in the on screen display maybe?

    If anyone has any suggestions on features please feel free to leave a comment.

  • Shift Register Failure

    ChaosChris03/17/2017 at 22:49 0 comments

    The Problems:

    So after assembling the SRAM PCB I was greeted with a multitude of problems ranging from bad jumper wire connections to shift register voltage sag. Once I had shortened all the wires and replaced the pin headers with soldered joints I did manage to get a single run through of the bios but my relief was short lived.. I'm not sure exactly what the issue with the shift registers is but after the first run the memory checks failed every time at semi-random locations in memory, after some poking around with the oscilloscope I found that one or two of the address lines that where supposed to be logic high (roughly VCC) where in fact struggling to manages 1/3 of VCC roughly 1V out of 3V3 this seems to be related to higher than expected current draw on certain address lines at any given address.... weird as this information appears to be non existent in the data sheet and I apparently wrongly assumed the address lines would be of a constant high impedance, sort of like an op-amp but no such luck.

    The Solution (kinda)

    Shift registers desoldered and slung back in the parts draw with a reluctant shrug I decided to try connecting the address lines directly to the Teensy, not ideal as this uses up a lot of the IO but I needed a sanity check. Result!! worked a charm first time and every time after, I have now tweaked the code a little to gain a little extra speed and the result of my labours is a peak FPS of 4.5 as apposed the 0.01 of the SD card page file. There is still some gains to be had by using direct port manipulation and combining multiple digitalWriteFast calls on a port into a single port update but that is for another day.

View all 2 project logs

Enjoy this project?

Share

Discussions

Reyven Perez wrote 06/18/2017 at 18:57 point

Sir does your LCD support 8-bit or 16-bit parallel interface? If so what about using the parallel interface of the LCD to speed things up a bit and adding a Teensy 3.2 or Teensy 3.6 as a coprocessor or some sort of "graphics processor" to free up some resources at the main Teensy 3.6? Thanks for this project anyway I will try this after my finals in college as to see if it works well.

  Are you sure? yes | no

ChaosChris wrote 09/19/2017 at 10:10 point

The LCD is connected via SPI and is using DMA for transfers, meaning only a memory address has to be written for a pixel to change the rest happens like magic :-) The biggest bottle neck at the moment is ROM read speed and external memory access and write speed. I plan to do a revision soon to move all the address and data lines to whole ports so I can write an address and read or write data to memory by writing to whole ports rather than odd pins hear and there. Once memory speeds match or exceed the original hardware I can look at optimisation of the emulation code. And hopefully finish the GBC emulation code...

  Are you sure? yes | no

Similar Projects

Does this project spark your interest?

Become a member to follow this project and never miss any updates