Mrinnovative
Step 1: First of all See this videos
As per Human Psychology Videos or visual content is the best and power full way to learn
So before proceed further first of all take a look to this videos so you will clear in your mind about what you going to learn in this instructables,
Information in following all videos is must to have to build a perfectly fine CNC Machine so watch then carefully.
Step 2: Bill of Material ( Hardware + Software )


Following are the Hardware & Software list you want
Hardware
Arduino UNO/MEGA———————————————Qty—1
L293D Motor shield———————————————–Qty—1
Mini Servo Motor————————————————–Qty—1
OLd scrap DVD Drives—————————————–Qty—2
50MM long bolts with nut and washer————————Qty—8
A pen—————————————————————-Qty—1
Some hardwares & tools—————————————-Qty—1lot
Software
- Arduino IDE (Version 1.6.3) (https://www.arduino.cc/en/Main/Software)
- Processing IDE (Version 3.0.2) (https://processing.org/download/?processing)
- Inkscape (version 0.48.5) (https://inkscape.org/en/download/)
Go to link to download the particular software select software pack according to you system
**NOTE:- Inkscape version must be 0.48.5 only other wise gcode extension will not work.
Step 3: Role of Hardware & Software in this Machine

![]()

It is good to know role of each component and software in CNC machine
1) ARDUINO
Arduino is basically work as a brain of CNC Machine a CNC code uploded to arduino so that when Gcode stream to arduino Arduino commands motor shield to run stepper motors.
2) L293D Motor shield
This is dedicated shield to control verities of motor with arduino here this shield control two stepper motor(x-axis & y-axis) and one servo motor,
https://cdn-learn.adafruit.com/downloads/pdf/adafruit-motor-shield.pdf read this for detail technical knowledge.
3) Servo motor
Basically this motor is used here just to UP/DOWN pen servo is connected with motor shield
4) Arduino IDE
This is used to upload code to arduino
5) Processing IDE
This is used to stram G-CODE to arduino
6) Inkscape
This is used to make G-CODE file of any image
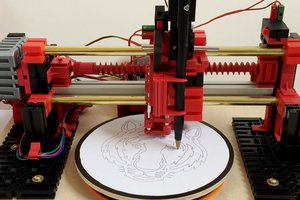
Step 4: Assembling the machine


How to assemble machine ?
I hope you have seen videos and pic uploaded here so you have idea about how to assemble machine so I am not going in depth of it
Just want to highlight some key point
Make sure your machine became vibration free like tightly mount axis on each other
Here I used DVD drive shutter opening mechanism to do pen up/down with the help of servo motor, if you don’t want to do much complication simple tie the pen with servo motor shaft and your purpose get solved
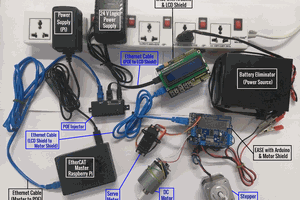
Step 5: Wiring drawing


Do component
wiring accordingly shown in images,
Do cross check power polarity once before powering the components
Step 6: Programming Arduino
Now your machine is ready its time to give life to you machine
So we need to program arduino
Here we are using L293D Motor shield, so it need to add some library (AFMOTOR LIBRARY) to arduino IDE Software
so first download & upload this library to Arduino IDE to know how to add library watch video
Download Adafruit motor shield Library
Then upload this CNC Code to arduino
Click to download arduino code
After successfully compiling and uploading your arduino programming part is over now move towards G-CODE
Step 7: Preparing G-CODE
G-code is the format of file which your machine can understand and work acordingly
Suppose you have to draw some text with machine so you need its Gcode so what you do
Inkscape software provides you a facility to convert image or text into G-code
how to convert file in G-code watch video n
How to add G-Code extension in Inkscape for MINI DIY CNC Machine
But when you download Inkscape software from net there is not a G-CODE save as option so you need to add a library Extension in inkscape for this download the following Makerboat g-code unicorn extension
Click to download Makerbot unicorn G-code extension
How to add this extension to Inkscape
1) Unzip the file
2) Open the folder by double click
3) Copy all the sub folders...
Read more »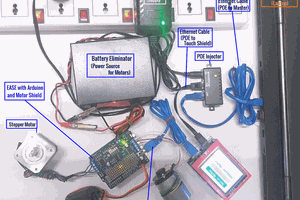
 Esmacat
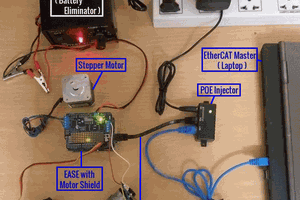
 davidatfsg