Close
0%
0%

Wood Works

Tales from my woodworking shed

Similar projects worth following
I've recently started yet another hobby. Cleared the shed to make room for a workbench and some woodworking tools. I've bought a small saw table, drill press. plunge router, mitre saw and a handheld circular saw. Most of it second-hand as I can't afford to pay full price.

All the wood I use is salvaged from dumpsters. It's amazing what you can find if you know where to look. There's so much free wood out there that I'm considering a wood burning stove for my home.

Essential woodworking tools:

Hand Tools

  • awl
  • clawhammer, rubber hammer and wooden mallet
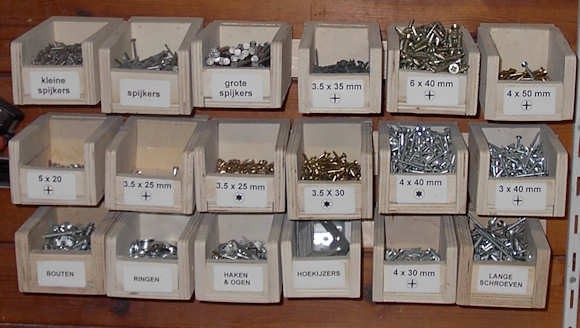
  • small, medium, large Philips screwdrivers
  • set of chisels
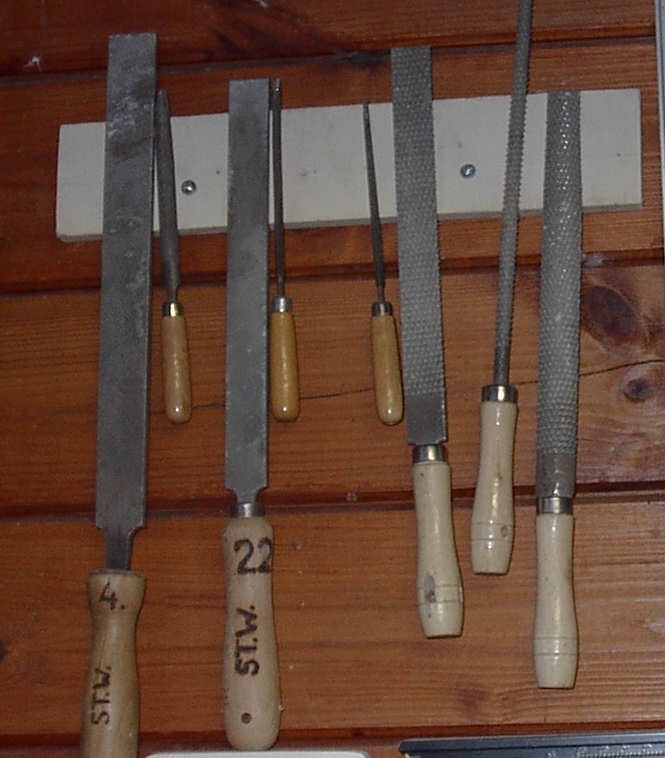
  • flat, round and curved file
  • angle square, T square, L square, spirit level, ruler and a pencil
  • clamps (lots of clamps)
  • stanley knife

Power Tools:

  • table or circular saw
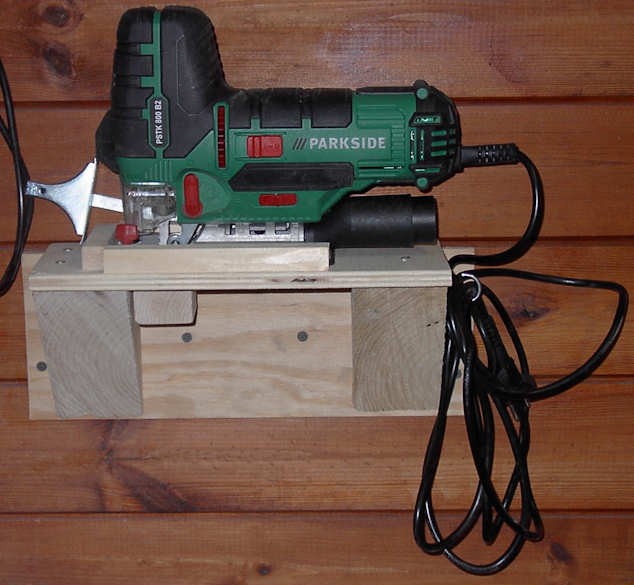
  • jigsaw
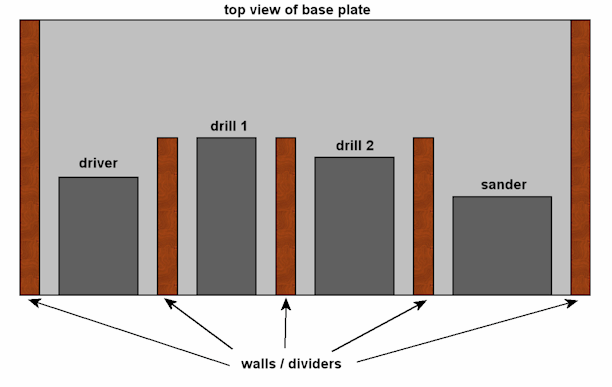
  • hand drill(s) - the more the merrier
  • impact driver with Torx, Posidrive and Philips bitsets
  • sander
  • router
  • drill press

And don't forget a first aid kit !

  • 1 × scrap wood All the wood was sourced through dumpster diving

  • Dumpster Diving Bycatch

    Mark07/04/2017 at 20:29 0 comments

    As one dives for wood in dumpsters, one comes across all the flotsam and jetsam of today's throwaway society. But for poor, no-budget me that's a very good thing! The stuff I keep finding is simply amazing. Weirdest thing of all is that I often find what I need. One day I ordered a cheap LED strip from China and that very week I found a matching DC adapter and remote controller. Coincidence or serendipity?

    Anyway, in this log I will keep track of the most wonderful and weird bycatch...

    • heavy-duty Hitachi hammer drill with 20+ BIG drill bits
    • Black & Decker Workmate 747 in nice condition complete with benchdogs
    • Philips CD/twin cassette/radio boombox (works great after a good clean)
    • one Mordaunt Short HiFi speaker (just the one, alas!)
    • Canon Pixma 7250 photo printer (trashed it for parts)
    • bag with 40+ music CD's (mostly good!)
    • box with 750+ screws
    • roll with almost 100 meter copper cable
    • chandelier complete with lightbulbs
    • hall lamp with big glass domec
    • clawhammer
    • heavy 3.3A transformer for halogen or LED lights
    • electric citrus press
    • toy dinosaur

  • Workbench / Sanding Station

    Mark06/08/2017 at 23:39 0 comments

    When you work with wood, you're almost inevitably going to spend a lot of time sanding. Whether you use a disc, belt, palm or delta sander it's going to produce a lot of fine dust. Dust that will clog up your power tools and your lungs unless you take precautions.

    So I built a sanding station with a perforated downdraft top surrounded by three knockdown panels. A simple but effective design that was easy to build. But it was a hassle to setup for every little sanding job so it did not see a lot of use in practice.

    I cleared up some more junk and clutter from my shed and this created enough room to add another workbench. And this bench will feature an integrated sanding station. I've salvaged enough "construction grade" wood from dumpsters so it will only cost me a couple of dimes for the screws & glue. UPDATE: I've purchased (!) a 90 degree corner for 32mm PVC pipe to neatly fit a vacuum hose to the dust chamber. That added a whopping 45 cents to the BOM. Still well below 1 (one) euro though...

    The basic design of the bench is simple: a 120 by 60 cm frame supported by four 95 cm legs. A secondary frame is mounted about halfway up the legs to add extra support and create some shelving space. The worktop is made of 16 mm plywood. I've drilled a lot of holes in the central section between the two crossbeams so any sanding dust will be sucked up by the vacuum chamber underneath.

    This chamber was created by screwing & glueing a piece of OSB to the underside of the crossbeams. I drilled a 32 mm hole in the OSB for the PVC pipe corner and fastened it with a small screw and lots of silicone kit. On the other side I glued a short piece of hose that will connect with my vacuum cleaner.

    I also put a thin sheet of MDF at an angle inside the chamber and kitted it in place. This baffle will reduce the amount of air that needs to be displaced to create suction.

  • Jigsaw Rack

    Mark05/25/2017 at 22:42 0 comments

    My ancient Black & Decker jigsaw is starting to fall apart so today I've replaced it with a cheap model from Lidl. And to be honest I'm quite impressed by the power, quality and features. Anyway, a new tool requires storage and a test project. So i got busy...

    (layout and build log to follow)

  • Power Tool Rack

    Mark05/25/2017 at 19:12 0 comments

    Mission: store the most commonly used power tools (screwdriver, drills, sander) in a safe and accessible way. I like to have these tools plugged in, ready to fire and within arm's reach. My first attempt with the tools stored in pieces of slotted PVC pipe did work but was not very pleasing to the eye nor entirely safe. One of the drills narrowly missed my head when it fell out.

    So I decided to build a similar construction out of multiplex scraps. First step was selecting a suitable base and spacing out the power tools. I settled on this layout:

    First I sawed out the gray areas with my new jigsaw. Used the table saw to make two planks of plywood and then I cut those to length with the mitre saw. Glued and screwed the walls and dividers in place after pre-drilling and counter-sinking the screwholes.

    The top sheet is screwed and glued to the walls and dividers. It is about 3 cm wider to accommodate three screws on each side. These screws will fasten the entire cubby hole structure to the shelf above.

    And here's the finished project. Sturdy, safe and cheap!

  • Tape Rack

    Mark05/20/2017 at 23:04 0 comments

    Sticky tape, double-sided tape, painter's tape, duct tape... there are a lot of rolls rolling around the average workshop so we need a storage solution. Like this tape rack.

    Components:

    1. piece of scrap wood (length TBD)
    2. broken broomstick (any sort of more or less round stick will do)
    3. six screws

    Cut four or more pieces of identical length from the broomstick. Pre-drill and countersink four evenly spaced holes in the back of the strip of wood. I spaced them approx. 10 centimeters apart to suit the size of the tape rolls.

    Use an awl to puncture a guiding hole in the centre of each piece of broomstick (the pegs). Glue the peg to the front of the woodstrip and drive a screw in from behind. TIP: use a thin sharp (drywall) screw here. Remove any excess glue from the front. Repeat this procedure for all the pegs.

    Now pre-drill and countersink two mounting holes in the front of the strip. Drive one screw into the rack and screw it loosely to the wall. Make sure the rack is level, drive in the second screw and tighten up the first one.

    And this is the finished article:

  • Storage Bin Rack

    Mark05/16/2017 at 21:54 0 comments

    I recently bought some cheap plastic storage bins for my screws, nails and such. As soon as I had them mounted on the wall of my shed I realized I could just as easily have manufactured something similar from my stack of salvaged scraps. I picked some irregular shaped pieces of 1 cm plywood that were pretty much useless for anything else and worked out how to saw it all up.

    I managed to get enough pieces out of the material at hand to make seven small bins.

    TIP : when making several identical pieces, it saves a lot of time and energy if you repeat each step for all pieces before moving on to the next step. So saw all panels, then drill all the holes and so forth.

    So, after cutting all the panels according to plan I glued the edges, clamped them together and pre-drilled all the screw holes with a counter sink bit. Then I drove in all the screws.

    Next I took a strip of 2 by 5 cm pine and cut it in half with a 45 degree angle. I chopped up one half of the strip into six pieces of approx. 7 cm. These pieces were glued & screwed to the back panel of all the bins. The other half was screwed to the wall.

    The angled edges will grip each other and hold the bins in place. Thanks to gravity, this so-called French cleat system works really well. It also allows you to take out or re-arrange the bins with ease.

    As you can see, these bins ain't perfect but they're perfectly functional and that's what I was aiming for. You could paint or varnish them but I'll probably won't bother. Now I just need to build at least 9 more...

    Done!

  • Magnetic Tool Rack

    Mark05/15/2017 at 16:39 0 comments

    This simple but effective tool rack can be made from a piece of wood and some of those neodynium magnets you have been salvaging from hard drives.

    Take a strip of wood about 1 cm thick and use a router or chisels to create a cavity where the magnets can be hidden. Use epoxy to glue the magnets in place. Note that the magnets shown here are the wrong way up; they should be mounted with the magnetic strip facing down.

    Pre-drill two screw holes (shown here in red) so you can mount the strip to the wall. Sand it down and chamfer the edges to make it look nice. Now screw it to the wall and hang up your files and chisels.

    TIP: removing the back plate from the magnets seems to reduce the magnetic field so you better leave them as is.

    Look Ma, no hands!

  • Workbench

    Mark04/30/2017 at 21:04 0 comments

    My cramped workshop / garden shed is in desperate need of an extra worktop and more shelving space. So I decided to combine the two in a compact and simple workbench design. A simple frame of 50x75 mm beams supports the legs. Everything except the worktop is glued and screwed into place to ensure stability. The surface is made of laminated chipboard from an old IKEA table. I will add a sheet of plywood on top of that as soon as I can find some decent pieces in a dumpster. I've added a 5cm high wooden fence around the back, left and right edges of the worktop so stuff won't roll off and disappear. The shelf is made out of some melamine boards I salvaged last week. It offers enough space to store my mitre saw and router and my box of offcuts snugly fits below it.

    Because I mostly used a mish-mash of recycled wood, the bench does not look pretty. But it is very sturdy, stands stable on the rough floor and is pretty much level thanks to some subtle shimming of the worktop. I've just finished building this bench and really like it a lot. It's the first piece of furniture I've ever made and it is quite practical as it exactly fits the available space, doubles the available surface to work on and also increases and upgrades the storage space. And the entire build only cost me 10 euro for the support frame wood plus a bunch of screws and some glue.

    I call that a winner.

  • Star Knobs

    Mark04/23/2017 at 16:56 0 comments

    Typical star knobs

    I needed some star knobs for upcoming projects. You can buy a large variety at almost any hardware store but they're not cheap. A bit of Googling and Youtubing (?) showed that it was possible to make your own using only a drill press and the power of geometry! I apologise to my high school math teacher for not paying more attention because "I will never need that boring stuff".

    Tools & materials needed:

    • a drill press. Using a hand drill would be very challenging!
    • 2mm drill bit, 16mm spade bit and 50 to 60 mm hole saw bit
    • an awl (a nail will do as well)
    • Dremel sander or sandpaper
    • MS Paint or pen and paper
    • one M6 tee nut
    • a bit of scrap wood. Anything except MDF and particle board will do.

    You start by drawing a circle. Divide it up in 5 equal parts (draw a baseline, draw a second line at a 72 degree angle, add a third line at 144 degrees etc) and draw a crosshair on the intersections of the circle and lines. Add a crosshair in the center and we're done.

    Star know template

    I set the diameter of the circle at 56 mm. If you set it too small, the knob will become quite small and fiddly and it will be more difficult to avoid "chip out" or splitting of the wood. I printed this pattern on paper and glued this to a thin strip of parquet. After drying, I used the drill press to carefully drill 2mm holes at all six crosshairs. Now the template is ready for use!

    Spade bit

    Place a piece of scrap wood (10 mm thick) under the template and use an awl to mark the crosshair points on the wood. Drill a 2mm guide hole at each of the marked locations. Put a 16mm spade bit in the drill and drill out the grey areas from top to bottom. Turn over the workpiece and make a 2mm deep counter-sink in the center. Flip the workpiece back up again.

    Switch to a 56mm hole saw bit. They're a bit scary to work with but as long as you keep the RPM's in check and don't rush the job it should be fine. The hole saw will saw out the knob and it's guide bit will put a 6mm hole at the center. Put the guide bit dead center of the work piece and slowly drill all the way through from the top to bottom. Now pry the knob from the (sharp object! look out!!!) hole saw. Turn it over and insert the tee nut. Take a wooden mallet and subtly whack the tee nut pins down into the central hole and counter-sink.

    Use a Dremel or a stick with sandpaper to take off the rough edges and sand the top till it's nice and smooth to your touch. Unless you want to paint or varnish your knob - this is best done BEFORE you insert the impact nut BTW - we're done. Total cost: two dimes for the tee nut.

    Not bad for the first attempt.

    VARIATIONS: you can also embed a bolt or screwnut depending on the task the knob has to perform. Bolts and washers can be expoxied to the wood and you can saw out a small circle of wood and glue it on the top to hide a bolt. Add a 6mm hole and you can glue it to the bottom as a spacer.

View all 9 project logs

Enjoy this project?

Share

Discussions

Similar Projects

Does this project spark your interest?

Become a member to follow this project and never miss any updates