History and Background
During my studies in medical informatics i got fascinated in everything that involves hardware and software. The first project that i wanted to tackle was a RGB Led Cube. This was around the year 2006. At that time was around but not very well known and Microcontroller programming was not as accessible as today. Especially 32Bit Microcontroller were hardly accessible in case you were not a professional.
Anyway i decided to built one of these cubes and wanted an RGB Led Cube of Size 5x5x5 with a spacing of 5cm in between the LEDs to get quite a visual effect and a Cube that was not too small.
Software
Although is was already programming since multiple years i never did a project like this. I was especially inexperienced in Hardware so i decided to develop a Client application for the Cube first.
That client Software is QT-based (i can't say anymore why i choose QT, but it was a wise decision), and has an OpenGL Renderer that shows the Cube in 3D. The Size of the Cube can be changed using Configuration, so it can also be used for bigger or smaller Cubes.
The idea is that you can create 3D movies or 3D Pictures by editing the cube in the 3D viewer. You can safe and load these 3D Pictures and Videos from File. The Software also includes algorithms that can be played in the viewer.
Hardware design
When i was started to work on the Cube i was a student and wanted it to be cheap. I wanted to use components that i could get everywhere and that are cheap. Also i wanted to learn hardware design and soldering so i decided to go for a solution with an easy to use AVR and discrete Hardware. I already owned a Pollin AVR Net IO Board (AVR NetIO) , which i decided to use. The board is basically a large AVR with an Enc28j60 for Ethernet and some connectors to access the GPIO.
So i decided to use the Ethernetport of the AVR NetIO to receive the commands from the Client Software so i could not only simulate the Cube in the Software but also play whatever the Software shown (Pictures, Videos, Algorithms) on the Cube in realtime.
Going further with the Design i found out that Common cathode LEDs were cheap at that time so i bought a bunch of them (i needed 125) and started my design around the Atmega644P that i put onto the NetIO and the Common cathode LEDs.
As usual the LEDs are controlled using multiplexing. So i needed 5 Pins for the Cathodes and 75 Pins (25 for each color) for the Anodes. I needed to use any kind of port expansion and again i wanted easy to get hardware and broaden my software development skills. So i used Atmega48P AVRs as port expanders that are connected to the NetIO via I2C. Per Layer of Cube i used an AVR so that the idea of the modularity was born. I could simply add new AVRs to the I2C Bus if i ever decided to build a bigger cube.
More design considerations
I wanted the Cube to be really bright and multiplexing takes away brightness so i am driving the LEDs with 60mA at 5V which can result in a consumption of 5V*75*60mA = 22.5W (as in multiplexing only 25*3 LEDs can be switched on at a time). In order to be safe i decided to use FETs for controlling the Cathodes. The Anodes are controller by discrete transistors that are connected to the micro controller via a resistor and to the LED via dropping resistor.
For the Full Cube this sums up to more than 150 resistors and more than 80 transistors. (i would never do this again and use a darlington instead. However you can go out to every electronics store and buy the BC327 that i used.....)
Arduino and Raspberry age
I was working on the initial design of the cube for multiple years. It was a big project. (Especially the software was big). At some time i realized that the Code for generating 15 channels of Soft-PWM did not fit into the ROM of the Atmega48P so i dropped that idea and simply used the Atmega48P as port expanders as stated above and reduced the number of colors to 7. Additionally at that time i decided to use Arduino for convenience. (Unfortunately...
Read more »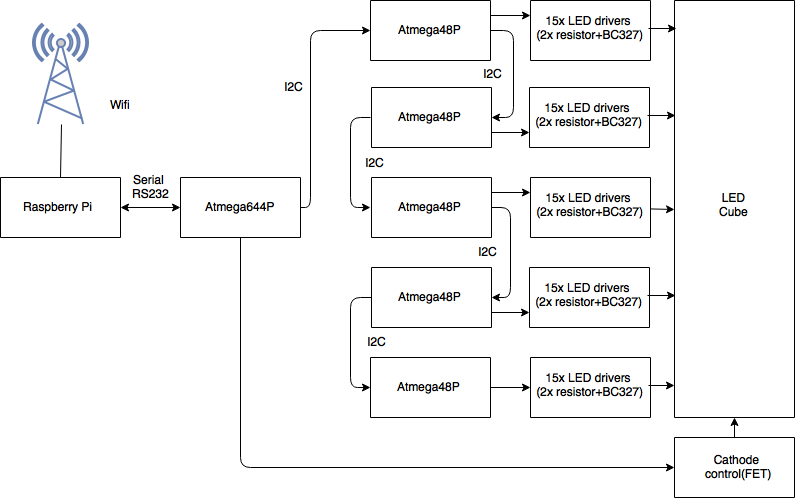
 Jon durrant
 Mehrdad Majzoobi
 andriy.malyshenko
 Reagen Ward