• Evaluation

    Mark05/01/2017 at 21:50 0 comments

    I've been testing my dust collector for about a week now. It really works well in static situations like hooked up to my table saw or other tools. There's plenty of power and pretty much all the debris gets trapped in the collector.

    If you use it as a regular vacuum cleaner (sweeping the floor) you have to take care not to block the hose. If that happens, the dust already gathered in the bucket gets sucked up by the primary system.

    All in all I will continue to use it in my workshop. And I'll probably build another one when I come across a transparent bucket :)

  • How To Build

    Mark04/29/2017 at 23:29 0 comments

    As luck would have it I found a suitably sturdy bucket & lid in a dumpster outside a Chinese restaurant and two 1 meter pieces of PVC pipe of exactly the right diameter in another dumpster. The MDF was sourced some time ago from the waste bin of a local flooring shop. So all the parts needed were free; I only paid 2 euro for a tube of silicone kit.

    I studied how my Dyson vacuum cleaner worked and just tried to mimick that design with the parts at hand. Please note that all dimensions mentioned here are based on those particular parts.

    I started off by sawing a 28 cm disc from 8mm thick MDF. Used a 32mm hole saw bit to drill a hole in the center. Sanded down the disc until it fit about a centimeter below the lid. This disc not only holds the outlet pipe firmly in place but supports the lid and wall of the bucket and prevents a collapse if the airflow gets blocked. To add more structural support, I made a slightly smaller MDF disc and turned it into a circle of about 1 cm wide. This wooden ring fits tightly about halfway down the bucket. You could add some screws from the outside to hold it in place but it isn't really necessary in my experience.

    Next I beefed up the lid itself by adding two pieces of MDF (I used a square piece I had lying around on top but in hindsight another disc would have been nicer). Pre-drilled some guide holes and screwed everyting tight. Because the PVC pipe is also 32mm in diameter, the holes i drilled were a very tight fit so I did not add any sealant at this stage.

    My Dyson uses a downward pointing conical shape to force the incoming dirty air stream into a vortex or cyclone. As the air swirls around inside the bucket, the heavier dust particles will eventually succumb to gravity and end up at the bottom of the pit. I happened to have a broken plant spray in my "you never know" pile that seemed to fit the bill perfectly (after a bit of Dremel work). I unscrewed the top and fastened the plastic cone upside down to the MDF disc with a couple of screws.

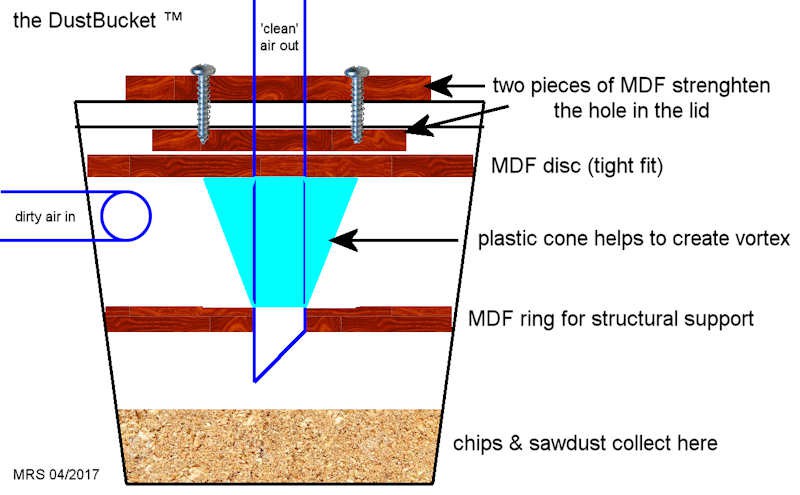
    I took the 32mm hole saw and made a hole for the dirty air inlet pipe just below the MDF disc. The pipe was sawn off at an angle that more or less fits the curve of the bucket. I held a small piece of plywood on the outside and drilled a screw thru the pipe and bucket wall. Then I applied silicone kit all along the pipe and bucket, inside and outside and let it harden for 24 hours.

    Next day, I hooked up the Dyson and with an old vacuum hose (also from the "you never know" pile!) I started sucking up sawdust and wood chips. There was no visible debris present in the Dyson, everything was trapped in my dust collector. I also tested the structural strength by closing off the hose with my hand. The lid buckled just a tiny bit but the wall of the bucket remained rigid so no worries there.

    Now I just have to hook up my power tools to the dust collector. More projects!