Enrico
The DS1307 Emulator is, as stated by its name, a mere emulation of the omonym chip. It is a firmware, that can be put in any microcontroller based systems – like in many Arduinos – and let the board behave like such a chip, without actually having a DS1307 lying around.
Since it is really keeping the time, this library is pre-tuned (you can adjust it in the code) to work with a quartz crystal of the system clock, running at 16MHz. Like the one on the Arduino Duemilanove or Uno.
You might be interested directly on the "Practical setup" section of this description, you can skim the content to it.
A general overview
This library is now part of the contributed Arduino libraries. For the repository, it is well supported the Github page, since it is also the destination link from the Arduino library repository.
The mechanics of this software can hopefully be understood at very high level from the following picture, where the Arduino Uno is the board running the sketch (represented as a blue circle), which has loaded the DS1307 Emulator library (orange circle), of course all running at the same time.
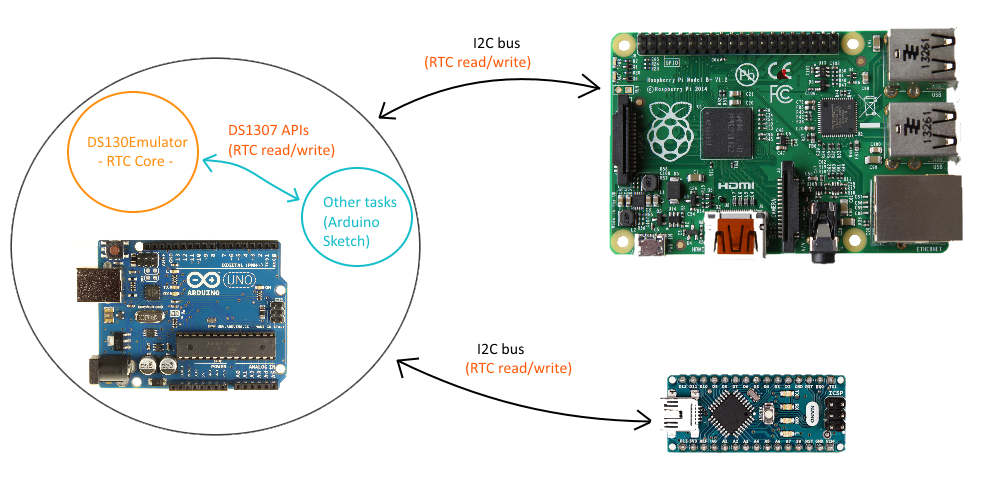
The Sketch can actually communicate with the emulator by means of provided API. The self-styled “not-so-fake” RTC can also be configured and read back from an external real master through the I2C bus, like a real DS1307 (Raspberry Pi, or other boards in the picture). So the emulator can be used, by definition, with all the already available DS1307 master libraries that you can find.
How it works
This library provides some API to handle the initialization, the I2C bus handling and the RTC data communication.
Init and I2C bus handling API
- DS1307Emulator.init(pin number) -> initialize the whole emulator, wiping all the non-volatile data and the timekeeping registers. Initialize also the I2C bus.
- DS1307Emulator.softInit(pin number) -> the same as the init, but will keep the data in the time registers.
- DS1307Emulator.busDisconnect() -> detach the RTC from the I2C bus without alterating the current RTC functionality. Useful if the the bus shall be used/shared with other tasks on the same sketch. After this call, the emulator will work only inside the sketch.
- DS1307Emulator.busConnect() -> attach the RTC to the I2C bus without alterating the RTC functionality.
In other words, the real DS1307 has an output pin, called pin number in the emulator's APIs. Let's say we have an Arduino Uno and we want to use the default LED in the port 13. The sketcher shall import the library and call the init in the setup(), with the pin number 13. Then, if the emulator is connected to the I2C bus, any master can interact with the Arduino. The only thing required is to call the init(pin number) first.
Few additional features
Preparing the emulator to communicate with an external master (default operating mode)
- Reading/Writing sequence from/to the sketch through the I2C bus:
- Be sure that the emulator software is connected to the bus. If not, issue the DS1307Emulator.busConnect().
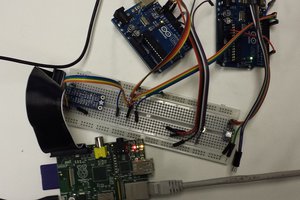
- Use a master (very nice would be a second Arduino running an RTC library, or a Raspberry Pi) to talk with the Arduino running the DS1307 emulator, AKA the slave. If the master have the right RTC software, it will issue the commands for which the emulator (slave) will answer accordingly.
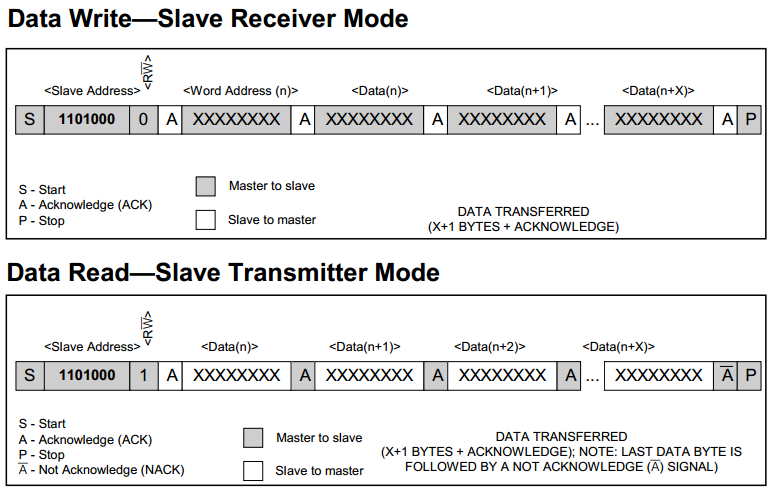
That's it! If you are curious, the emulator will follow the response described in the DS1307 datasheet, where an extracted picture is shown here:
Using the emulator to communicate within the sketch running on the same Atmega
- Writing sequence to the emulator from the sketch:
- DS1307Emulator.bufferUserData() -> save the current time to a temporary buffer to avoid time wrapping issues (as the DS1307 chip does).
- DS1307Emulator.writeToRTC(address) -> write the current address byte. In this step, is the RTC internal address set to address value.
- Issuing again the step 2 will write now RTC data from the previously set address - it will auto-increment the internal...
 Simon Merrett
 Hulk
Hulk