Close
0%
0%

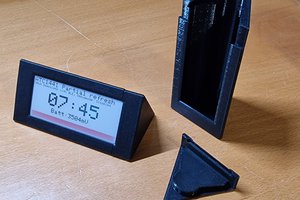
TrafficIndicator between work&home (or vice versa)

Display the estimated time of arrival between two fix destinations. Based on Particle MCU and Paperino ePaper.

Similar projects worth following
This project checks the actual traffic between two locations (e.g. work+home) and displays the estimated time needed for arrival (eta) on a ePaper screen. The data is provided by the Google Maps API, the related Arduino sketch is just 59 lines long ;-). It triggers regularely a Webhook and displays the received response on the screen, then goes to sleep for most of the time. The code runs with controllers from the Particle family (Photon, Electron, Bluz).

This project is strongly inspired by Eslam's nice Traffic Clock https://hackaday.io/project/16096-display-traffic-status-using-arduino-1sheeld and the Neopixel Traffic Map http://makezine.com/projects/arduino-neopixel-traffic-map/

trafficIndicator.zip

Demo sketch and Paperino Epaper library PL_microEPD

Zip Archive - 9.02 kB - 07/25/2017 at 17:00

Download

  • 1
    Get a free Google Maps API key

    To get the live traffic data you need to use an individual API key from Google Maps. This is free and easy to get: Go to this page and klick the button "Get a Key": https://developers.google.com/maps/documentation/distance-matrix .

  • 2
    Generate a HTTP request

    The HTTP request should contain the individual start address, destination address and your private API key. As a starting point you can try this example in combination with your key:

    https://maps.googleapis.com/maps/api/distancematrix/json?units=imperial&origins=Washington,DC&destinations=New+York+City,NY&departure_time=now&traffic_model=best_guess&key=YOUR_API_KEY

    By inserting this line in the browser URL field you should get the estimated time of arrival and the distance for the requested route in the JSON format. If this works fine just replace the origins and destination address with your own examples. Great!

  • 3
    Generate a Particle Webhook

    At Particle's Console in the Web IDE, following the section "Integration" and "New Integration" we can generate a new Webhook via Browser IDE by selecting "Webhook".

    Event Name = TrafficIndicator (or anything else you'd like to use in the sketch lateron)

    URL = (the above generated & tested HTTP request string)

    Request Type = GET

    Device = (Your device name)

    Response Template = {{origin_addresses}}~{{destination_addresses}}~{{#rows}}{{#elements}}{{distance.text}}~{{duration_in_traffic.text}}{{/elements}}{{/rows}}

    Include Default Data = Yes

    Enforce SSL = Yes

    (Remaining fields can be left blank)

View all 4 instructions

Enjoy this project?

Share

Discussions

Similar Projects

Does this project spark your interest?

Become a member to follow this project and never miss any updates